Today I am gonna tell you how to restore you iOS device (iPad, iPhone,iPod) back to the factory default settings if you have forgotten the password. So be it any reason like incorrect password for Apple ID or iPhone Locked due to any xyz reason, you can get your device back to the factory default settings but be cautious that you may loose your contacts and messages if you haven’t had backup of them.
So let me start with the buttons that we will be using to do this all troubleshooting.We will only be using two buttons which are sleep/Wake or On/Off button and Home button. Look at the picture 7(a) below for the reference.
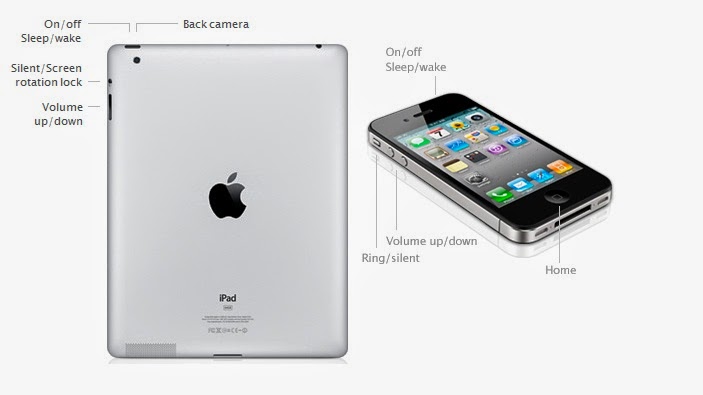
Now the next thing required is an iTune software on your PC. If you already have iTunes installed make sure its an updated version or update it to the latest version. And if you don’t have iTunes you can download it from Download center of my blog and install it on your PC or just click here to download iTunes.
Now after you have installed the iTunes and open it first time it will show you the welcome screen as shown in the picture below.
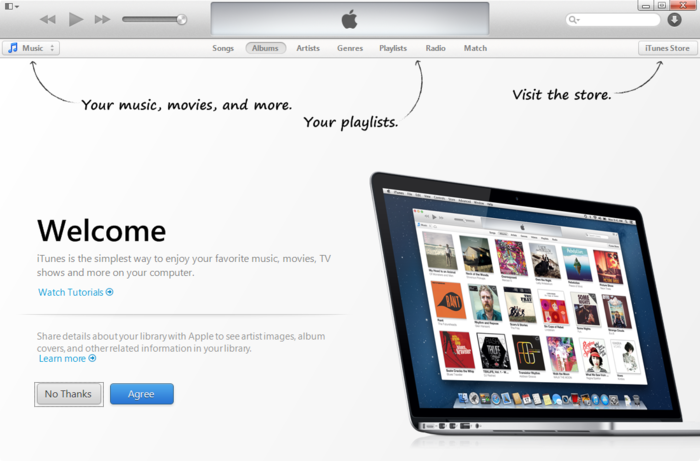
iTunes is a media management software created by Apple, Inc., for both the Macintosh and Windows operating systems. You can use it to manage and play both audio and video files on your computer. You can take it anywhere which means all the contents like songs, your playlists, purchase and other stored items are available to you everywhere whenever and wherever you login onto iTunes using your Apple Id.
Someone else can log onto his iTunes account on your iPad if he signs out of your ID in the settings app first. The option can be found by selecting iTunes and App Store, then tapping on your ID. Any purchases downloaded on the device stay until they are deleted, but apps must be updated using the ID that originally downloaded them. And You can share purchases from both accounts on the same iPad with very little difficulty.
iTunes can also be used to restore and back up your settings, Messages, Camera Roll, documents, saved games, and other data like Histories, cookies, bookmarks and much more. Backups don’t contain content synced to the device, such as movies, music, podcasts, and apps.If you choose to backup your iOS device on your PC it is saves the back up files at the following location, otherwise you can choose to save the back up at iCloud.
Mac: ~/Library/Application Support/MobileSync/Backup/
The “~” represents your Home folder. If you don’t see Library in your home folder, hold Option and click the Go menu.
Windows XP: \Documents and Settings\(username)\Application Data\Apple Computer\MobileSync\Backup\
To quickly access the Application Data folder, click Start, and choose Run. Type %appdata% and click OK.
Windows Vista, Windows 7, and Windows 8: \Users\(username)\AppData\Roaming\Apple Computer\MobileSync\Backup\
To quickly access the AppData folder, click Start. In the search bar, type %appdata% and press Return.
Restoring your iPhone, iPad or iPod
Now depending on the condition of your phone you can go about this a number of ways. If your phone is functioning you can simply click “Settings” then go to “About” and click “Restore to Factory Defaults”. If however the phone is not working it can be a little trickier. If you have forgotten the password and can not access the settings menu.Then you have to connect your iOS device to iTunes on your PC and restore it under recovery mode.
Now I am gonna show you the steps to restore your iOS device to factory default settings using iTunes in Recovery Mode.The steps are as mentioned below which I got from Apple Support website KB article #HT1808.
Method -1. Reset and Restore iPhone to Original Default Factory Settings with Recovery Mode
iPhone display freezing? iPhone doesn’t detect by or appear in iTunes? iPhone cannot sync with iTunes on PC or Mac? Cannot make or receive calls, send or receive text messages, or access email or the web? Or worse, iPhone simply won’t turn on and does not respond to tap or button press? If the problem still persists after you have reseted the iPhone, or tried various iPhone troubleshooting, it may be worthwhile to invoke recovery mode to restore iPhone to default factory settings, the original state as when you first received and unwrapped the phone.
Restoration of iPhone to original factory defaults will likely to fix all problem, with the downside that all data and information stored on your phone will be lost. Normally iTunes will make a backup automatically when you connect and sync the iPhone with the program, however, it’s still a good recommendation to copy out and backup everything that you may need on the phone before proceed to restore the iPhone.
To restore iPhone and reset the phone to default factory settings, follow these steps:

1. Turn off iPhone – Hold down the Sleep/Wake button for a few seconds until the red slider appears, then slide the red slider. Ignore this step if your iPhone is already off.
2. Press and hold down the Home button for about 10 seconds until a yellow triangle with a text which says Please Connect to iTunes appears.
Method -1. Reset and Restore iPhone to Original Default Factory Settings with Recovery Mode
- You can’t update or restore because iTunes doesn’t recognize your device or says it’s “in recovery mode”.
- The Apple logo remains onscreen for several minutes with no progress bar.
- The Connect to iTunes screen appears.
Use recovery mode
- Turn off your device. If you can’t turn it off, press and hold the Sleep/Wake and Home buttons at the same time and wait a few seconds for it to turn off.
- Plug the device’s USB cable into your computer only.
- Hold down the device’s Home button as you connect the USB cable to it.
- When you see the Connect to iTunes screen, release the Home button. If you don’t see this screen, try steps 1 through 3 one more time.
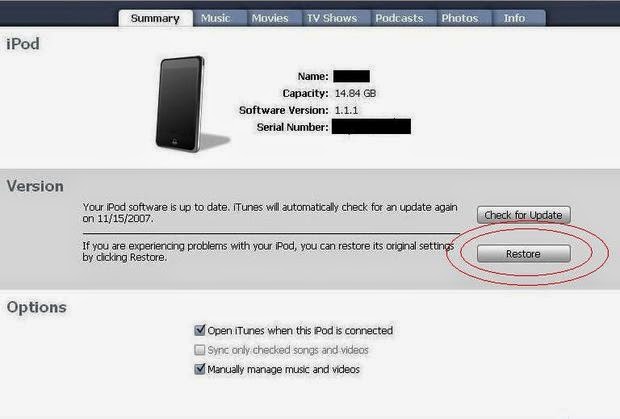
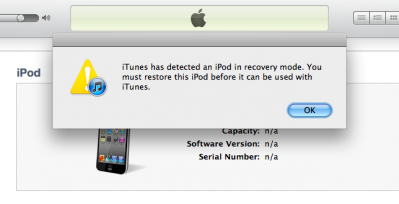
iTunes should open and display a message such as: “iTunes has detected an iPhone in recovery mode. You must restore this iPhone before it can be used with iTunes. “Look at the pictures below you might see the screen like one of these pictures shown below just click on Restore option.
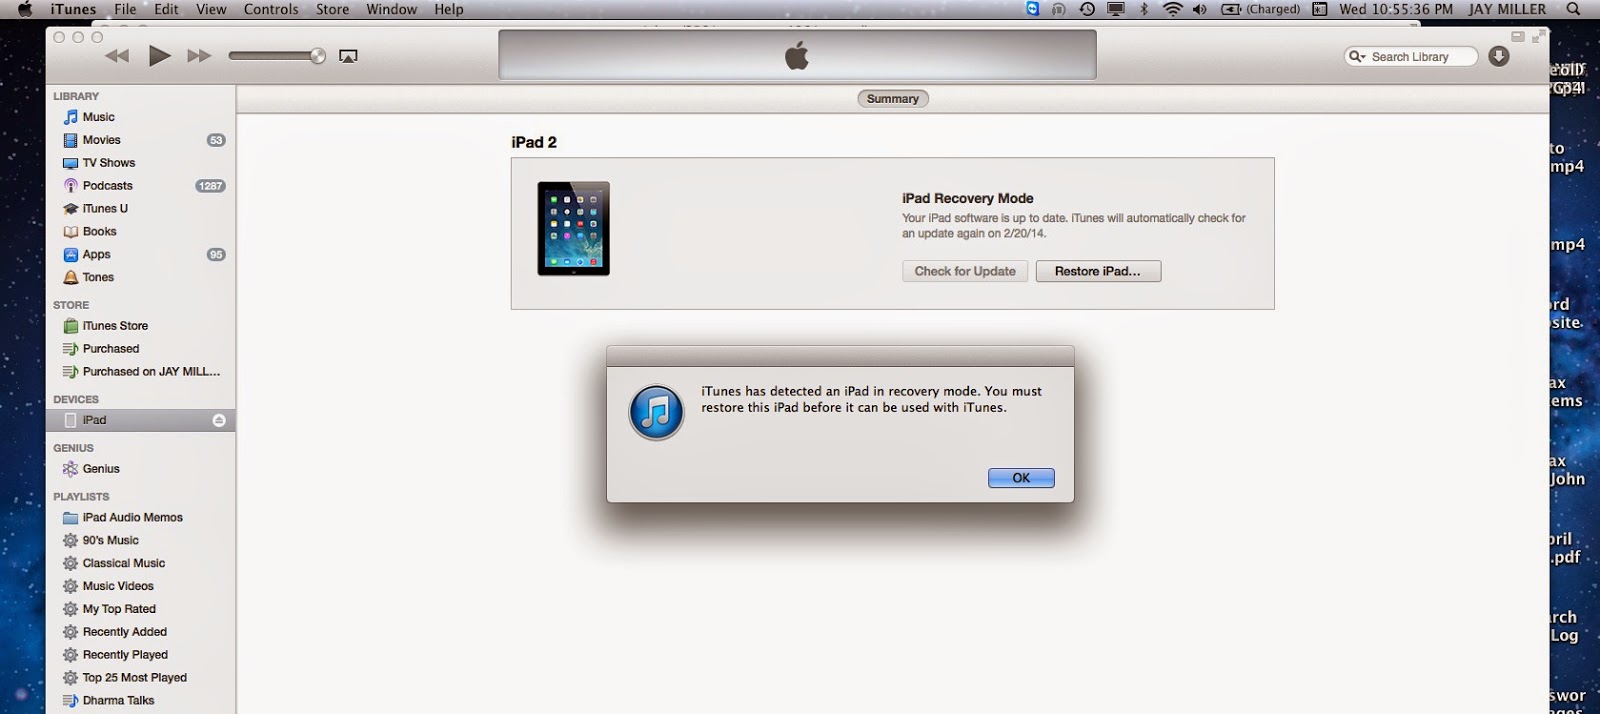
5. Now as in the picture 7(e) above click OK and then Click Restore.Its now gonna ask you are sure you want to restore this iPhone to its factory default settings as shown in the pic-7(f) below, Click Restore and update. It will then start restoring the device which may take several minutes so make sure your computer has a power source connected to avoid unwanted power outage.
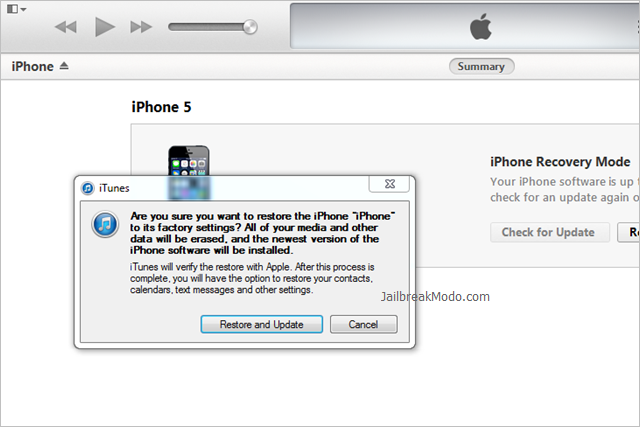
Additional Information : If you started your device in recovery mode by mistake, restart it to exit recovery mode. Or you can just wait-after 15 minutes the device will exit recovery mode by itself.
Method-3. Using DFU Mode in iPhone, iPad and iPod touch (Recovery)
In addition to recovery mode on iPhone, iPad and iPod touch, the iOS-based iDevices also has another mode which calls DFU. The main difference between the recovery mode and DFU mode is whether iBoot bootloader is loaded or bypassed during boot, with iBoot agent, when available, ensures that user cannot flash a firmware OS software which is lower or older version than the current one, effectively disable downgrade.
In recovery mode, which is the standard default way to upgrade or restore iDevices, iBoot is used when restoring or upgrade iPhone to make sure that the a iOS .ipsw which has the version number greater than or equal to current one is flashed or written to the device, or otherwise does not allow restoration process to proceed. In addition, unless the iPhone, iPad and iPod touch has been jailbroken or pwned”, custom-built firmware OS cannot be flashed. If the device is not connected to computer in recovery mode, the screen will display “Please connect to iTunes” logo.
DFU mode bypasses the loading of iBoot while still maintain the interfacing with iTunes, allow a older or lower version of iOS .ipsw to be flashed and restored to the device, including flashing a custom-build or home-made firmware iOS software. DFU mode is mostly used by hackers to downgrade or upgrade with a pre-jailbroken firmware created by PwnageTool. In DFU mode, the screen is totally black with no text display, just like when the phone is in power down state.
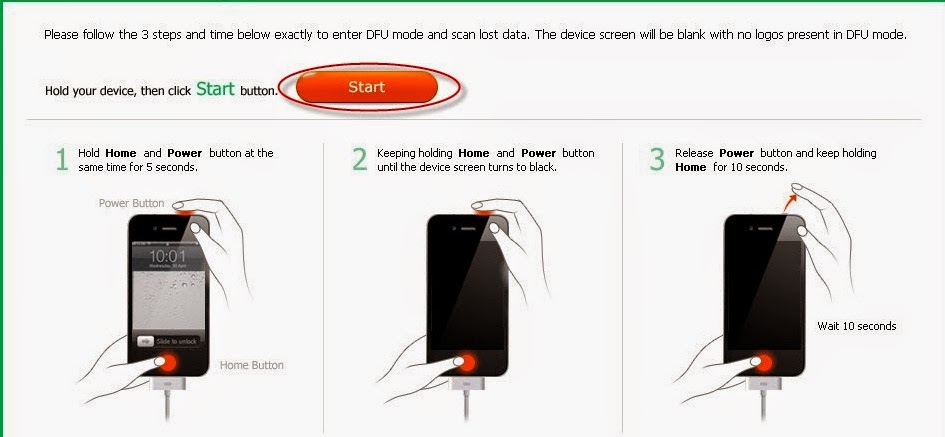
Here’s how to enter DFU Mode in iPhone, iPad and iPod touch:
1. Power off the iPhone, iPad or iPod touch if it’s in on state.
2. Connect the device to computer via USB cable or dock.
3. Run and open the iTunes program so that user will be notified when device enters DFU mode.
4: Now you will need to press and hold the Home button for 3 seconds.
5: Then you need to press the Power button and Home button and hold them for 10 seconds.
6: You can now release the Power button when Apple logo disappears.
7: Release the Home button when iTunes detects the iPhone in Recovery mode.
Now you will see the message as shown below.


![The Apex Legends Digital Issue Is Now Live! Apex Legends - Change Audio Language Without Changing Text [Guide]](https://www.hawkdive.com/media/5-Basic-Tips-To-Get-Better-On-Apex-Legends-1-218x150.jpg)






You can also read my post http://bookingtohosting.blogspot.com/2014/06/how-to-speed-up-your-mac.html on Mac optimization and make your mac at least 10 times faster.