This article is specially written for those who are unable to boot their Mac in normal mode or Mac boot process stuck at grey screen with Apple logo and a loading bar. In such situations, your important data is at stake. You can’t boot your Mac and can’t copy the data over to an external hard drive or USB disk. But there is still a way to boot your Mac and recover data from there. The only way your Mac can boot for sure is “Single User Mode”. In Single User Mode(SUM) you need to first mount USB or external drive to copy data over to it. This post will show you simple steps to mount USB or external drive in Single User Mode on Mac.
Warning: In SU Mode, your Mac boots in root user environment. Root user can make any changes and delete any files on your Mac. So if you have never used this command line environment or UNIX and Linux OS, make sure you type every command very carefully. Also make sure the USB disk or external drive that you are going to mount in SUM on mac, is formatted on Mac. If not formatted on Mac, You can format it under FAT32 filesystem on windows. Only the FAT32 file system of Windows platform is what I have found working flawlessly. exFat is another file system type that is supported by both Mac and Windows but it is formatted differently on both the platform. The cluster size is different in both the systems and that results in producing “Unsupported sector Size (0)” error during mounting any USB or external disk on Mac.
 |
| Unsupported Sector Size Error While Mounting USB – Single User Mode |
The another problem that may come into your way to mount USB or external drive in SU mode is SIP (System Integrity Protection). In some Macs, you may not be able to mount USB external drive under single user mode due to SIP. You may encounter errors saying Invalid Signature; Trust Cache is disabled or Untrusted kext are not allowed, which appears after executing the mount command. So you need to disable the SIP on your Mac first.
This post can be very helpful for those trying to recover some important data from Mac which is almost died or can not boot. Here are the steps that you need to follow in SUM if your Mac can boot to SUM; If you don’t want to read all these steps, you can also watch this YouTube video for a complete steps on how to mount a USB drive and copy data from internal hard drive to USB disk in SU mode on Mac.
How to mount USB or external drive in Single User Mode on Mac?
#1. Boot your Mac in SU mode by holding “Command+S” keys combination during startup.
#2. Let go off the keys when you see a black screen with white text scrolling.
#3. Wait for a few seconds until you see the last line written as “Localhost: root#”.
#4. Type the following command.
fsck command will run a series of check on root drive and will make sure all the error are fixed. If it finds any issue, the command will try to repair it. Once the command has executed successfully, it will show a message “File system was modified” or “The volume (name) appears to be OK”. When you see the second message move on to the next step otherwise run the fsck command again until you get the second message.
#5. Type the following command to remount the root partition in read and write mode. By default, it’s mounted read only.
/sbin/mount -uw /
#6. Now type the following command to get an idea of what all disk devices are currently listed by your system.
ls /dev/disk*
When I typed the above command on my Mac, I got the following disk devices with their name.
 |
| Listing All the Disk Drive Names SUM |
#7. Now connect the external USB disk or external hard drive to one of the USB ports on your Mac. And type the same command “ls /dev/disk*” again and note down the name of the external hard drive or USB disk that you just connected. This would be the new name added to previous list and most often it is always the last disk name in the list. In my case the last one was disk4s1 and that is my Kingston USB stick.
 |
| Finding the Disk Drive Name for USB disk in SU Mode |
My MacBook Pro has got multiple disk drives because I have got three different partitions of the internal hard drive. Each of them has Yosemite, macOS Sierra and macOS High Sierra respectively. #8. Now that you have got the name of the external USB drive. Your next step is to mount it, so that you can copy the data over to the USB device in SU Mode. Type the following command to create a mount point ( Just a folder or directory where the external disk will be mounted ).
mkdir /Volumes/usb
#9. Enter the following command to check the Filesystem of external USB drive.
fstyp /dev/disk1s2
msdos
 |
| Find the FileSystem type of a USB Disk or External Drive |
My USB stick was formatted in FAT32 on windows and that’s why it clearly showed msdos. Note down the Filesystem type listed here.
#10. Finally type the command to mount USB or external drive in single user mode on Mac.
mount -t msdos /dev/disk4s1 /Volumes/usb
Replace disk4s1 to whatever name your USB stick or external hard drive has got on your Mac. And replace /Volumes/usb to any mount point you created for your USB drive.
Note:- In case the USB disk or external hard drive is formatted in Mac OS Extended Format or you see the Filesystem type as HFS then type mount -t hfs instead.
mount -t hfs /dev/disk4s1 /volumes/usb
 |
| Mount USB or external drive in Single User Mode on Mac |
When I ran this command I got some error despite turning the SIP off. I just ignored the error message and tried to create a test folder on the newly mounted USB disk. And much to my delight, It did work. I even disconnected the USB disk and connected it to a Windows PC to confirm that the test folder I created on Mac shows up on Windows.
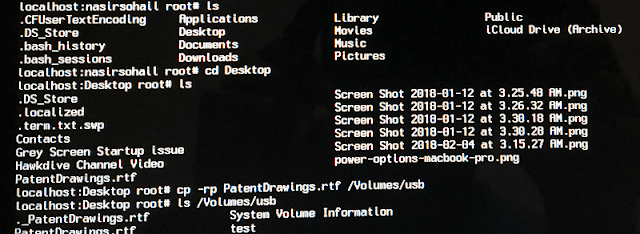
Now you can use the CP command to copy the files and folders from the internal disk to a USB disk or external hard drive. Use the following command:
cp -pr /Users/username/Desktop /Volumes/usb
 |
| Copying Files from Internal HD to External Disk in SU Mode |
The -r flag is used for copying all the files recursively. So if you are trying to copy the whole folder including all the files inside it, you must use -r flag. The -p flag is used to preserve following attributes of each files being copied over.
“file mode, group ID, user ID, modification time, access time, file flags, Access Control Lists (ACLs) and Extended Attributes (EAs)”
How to unmount the USB disk before unplugging it from Mac?
After you have copied all the important files, you would want to take out the USB disk from Mac. Use “umount” command to do that, then type the command “exit” to restart or “shutdown -h now” to shut down your Mac.
umount /dev/disk4s1
shutdown -h now
That was all about how to mount USB or external drive in Single User Mode on Mac. And how to copy data from Mac when it is unable to boot normally. I hope the above information would fulfill your need and save your time and money. In case you have any question or unable to do it yourself feel free to contact me through comment section below or Skype me.


Nice