


 Header Through Cloudflare")


Efficient system monitoring is crucial for maintaining optimal performance and diagnosing issues in Unix-like operating systems. Among the various tools available, the top command stands out as a powerful utility for real-time monitoring of system processes and resource usage. This tutorial provides a comprehensive guide to using the top command to monitor CPU usage, ensuring you can effectively manage and troubleshoot your system.
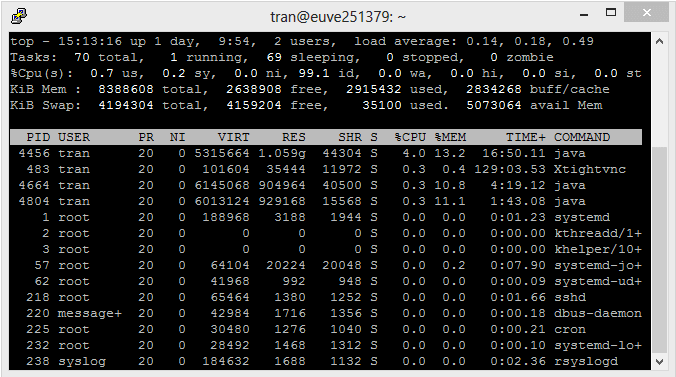
Introduction to the top Command
The top command is a versatile utility found in Unix and Unix-like operating systems, including Linux and macOS. It provides a dynamic, real-time view of system processes, displaying essential information such as CPU and memory usage, process IDs, and user details. Unlike static commands like ps, top continuously updates its output, allowing users to observe system behavior as it happens.
Also Read- How to Upgrade phpMyAdmin on a Linux Web Hosting Server
Prerequisites
Before diving into the tutorial, ensure you have:
- Access to a Unix-like operating system (Linux, macOS, etc.).
- Basic familiarity with the command line interface (CLI).
- Sufficient permissions to execute system monitoring commands.

Step 1: Launching the top Command
To start monitoring CPU usage with top, open your terminal and simply type:
top
Press Enter to execute the command. You will immediately see a dynamic display updating every few seconds, presenting various system metrics.
Step 2: Understanding the top Interface
Upon launching top, the interface is divided into two main sections:
- Header Section: Displays summary information about the system.
- Process List: Shows detailed information about each running process.
Header Section Breakdown
The header typically includes:
- Current Time: The system’s current time.
- Uptime: How long the system has been running.
- Load Averages: Average system load over the last 1, 5, and 15 minutes.
- Tasks: Total number of processes, including running, sleeping, stopped, and zombie processes.
- CPU Usage: Breakdown of CPU utilization across different categories.
- Memory Usage: Information about used and available physical memory and swap space.
Process List Breakdown
The process list contains columns such as:
- PID: Process ID.
- USER: Owner of the process.
- PR: Priority of the process.
- NI: Nice value, indicating the process’s scheduling priority.
- VIRT: Virtual memory used by the process.
- RES: Resident memory used.
- SHR: Shared memory.
- S: Process status (e.g., running, sleeping).
- %CPU: Percentage of CPU usage.
- %MEM: Percentage of memory usage.
- TIME+: Total CPU time consumed.
- COMMAND: Name of the command or process.
Also Read- Monitoring Server Load in Linux: A Comprehensive Guide
Step 3: Customizing the top Display
The top command offers various interactive shortcuts to customize the displayed information. Familiarizing yourself with these options enhances the utility of top.
Sorting Processes by CPU Usage
By default, top sorts processes by CPU usage. To ensure this, press:
P
This key capital ‘P’ ensures that processes are sorted in descending order based on their CPU consumption.
Changing the Refresh Interval
The refresh interval determines how often top updates its display. To adjust this:
- Press
d. - Enter the desired number of seconds for the delay.
- Press
Enter.
For example, entering 5 sets the refresh rate to every 5 seconds.
Filtering Processes
To filter processes based on specific criteria:
- Press
oto open the sort order prompt. - Enter the filter condition, such as
%CPU>10to display processes using more than 10% CPU. - Press
Enterto apply the filter.
Displaying Threads Instead of Processes
To view individual threads:
- Press
H.
Press H again to toggle back to viewing processes.
Also Read- How to locate the Process ID files in Linux Top Command?
Step 4: Interpreting CPU Usage Metrics
Understanding the CPU usage metrics in the header is essential for accurate system monitoring.
CPU Usage Breakdown
The CPU usage section typically includes:
- us (User): Percentage of CPU time spent on user-level processes.
- sy (System): Percentage of CPU time spent on kernel-level processes.
- ni (Nice): Percentage of CPU time spent on user processes with a positive nice value.
- id (Idle): Percentage of CPU time the system is idle.
- wa (I/O Wait): Percentage of CPU time waiting for I/O operations to complete.
- hi (Hardware Interrupts): Percentage of CPU time handling hardware interrupts.
- si (Software Interrupts): Percentage of CPU time handling software interrupts.
- st (Steal Time): Percentage of CPU time stolen by the hypervisor in virtualized environments.
Analyzing CPU Metrics
- High
usandsyvalues indicate significant CPU usage by user and system processes, respectively. - High
idvalue suggests the CPU is largely idle, implying low system load. - Elevated
wavalue may indicate I/O bottlenecks. - Non-zero
hiandsivalues can point to interrupt handling overhead.
Also Read- Creating A Linux Virtual Machine [VMware Guide]
Step 5: Managing Processes with top
The top command allows you to manage processes directly from its interface. This includes killing or renicing processes.
Killing a Process
To terminate a process:
- Press
k. - Enter the PID of the process you wish to kill.
- Enter the signal to send (default is
15for graceful termination). - Press
Enter.
If the process does not terminate, you can send a stronger signal like 9 for forceful termination.
Renicing a Process
Renicing adjusts the priority of a process, affecting its CPU scheduling.
- Press
r. - Enter the PID of the process.
- Enter the new nice value (typically between
-20for highest priority and19for lowest). - Press
Enter.
Lowering the nice value increases the process’s priority, while increasing it lowers the priority.
Also Read- How To Install Anbox App Manager And Google Play Store On Linux?
Step 6: Utilizing Advanced Features
The top command includes advanced features that provide deeper insights into system performance.
Displaying Process Trees
To visualize the hierarchical relationship between processes:
- Press
V(uppercase ‘V’).
This mode displays processes in a tree-like structure, showing parent and child processes.
Highlighting High CPU Usage Processes
To highlight processes consuming significant CPU resources:
- Press
Shift + >to sort processes in descending order. - Observe the
%CPUcolumn to identify top consumers.
Saving and Loading Configurations
To save your current top configuration:
- Press
W(uppercase ‘W’).
This saves the configuration to ~/.toprc, allowing top to remember your settings in future sessions.
To load a saved configuration, simply start top, and it will automatically apply the saved settings.
Also Read- Exploring The Benefits Of Running Ubuntu On Your Mac Device
Step 7: Exiting the top Command
To exit the top interface, press:
q
This key quits the top session and returns you to the command prompt.
Step 8: Automating top for Logging
While top is primarily an interactive tool, it can be used in batch mode for logging purposes.
Running top in Batch Mode
To capture top output for a specified number of iterations:
top -b -n 5 > top_log.txt
-b: Batch mode operation.-n 5: Number of iterations to capture.
This command runs top in batch mode, capturing five snapshots of the system’s state and saving them to top_log.txt.
Analyzing Logged Data
You can review the logged data using text editors or command-line tools like grep, awk, or sed to extract relevant information.
Step 9: Exploring Alternatives to top
While top is a powerful tool, exploring alternatives can provide additional features and ease of use.
htop
htop is an enhanced version of top with a more user-friendly interface, color-coding, and mouse support. It allows easier navigation and process management.
Installation:
sudo apt-get install htop   # Debian/Ubuntu
sudo yum install htop       # CentOS/RHEL
brew install htop           # macOS with Homebrew
Usage:
htop
atop
atop provides detailed logging and analysis of system resources over time, making it suitable for performance monitoring and troubleshooting.
Installation:
sudo apt-get install atop
Usage:
sudo atop
Best Practices for Monitoring CPU Usage
To maximize the effectiveness of CPU monitoring with top, consider the following best practices:
- Regular Monitoring: Frequently check CPU usage to identify trends and potential issues early.
- Understand Baselines: Establish baseline CPU usage patterns to recognize anomalies.
- Focus on High-Usage Processes: Pay attention to processes consuming excessive CPU resources, as they can impact system performance.
- Combine Tools: Use
topalongside other monitoring tools likehtop,vmstat, orsarfor comprehensive insights. - Automate Alerts: Implement automated monitoring and alerting systems to notify you of critical CPU usage thresholds.
Conclusion
The top command is an indispensable tool for system administrators, developers, and power users seeking to monitor and manage CPU usage effectively. Its real-time insights, coupled with interactive features for process management, make it a versatile utility in any Unix-like environment. By mastering top, you can ensure your system runs efficiently, promptly address performance bottlenecks, and maintain overall system health.
For those seeking enhanced functionalities, exploring alternatives like htop and atop can further augment your monitoring capabilities. Regardless of the tools you choose, consistent and informed monitoring is key to maintaining robust and responsive systems.
Q-1 How often should I monitor CPU usage with the top command?
A: It is recommended to monitor CPU usage regularly, especially during peak usage times or when troubleshooting performance issues. By keeping an eye on CPU utilization, you can proactively address any potential bottlenecks before they impact system performance.
Q-2 Can I use the top command in a remote SSH session?
A: Yes, you can use the top command in a remote SSH session to monitor CPU usage on a remote server. Simply SSH into the server and run the top command as you would on a local system.
Q-3 Is there a way to save the output of the top command to a file?
A: Yes, you can save the output of the top command to a file by running `top -b -n 1 > output.txt`. This will save a snapshot of system metrics to a text file named output.txt.


