


 Header Through Cloudflare")


Annoyed by fix low Microphone volume issues in Windows 11? Let’s see what can be done to fix the issue.
The microphone is arguably one of the most important hardware components of any PC, especially in a scenario when more than half of the world is working from their homes. Be it attending a business meeting or discussing some work with your colleagues, a mic is required in all these situations. Besides, it also comes in handy when you are trying to record sounds through your Windows 11 PC.
However, several users who’ve recently upgraded to Windows 11 are facing issues with the microphone of their PC. Either the microphone is very quiet or isn’t at all audible. While the annoying microphone issues are mostly related to hardware but sometimes, the issue can also be software-based and can initiate due to outdated drivers or incorrect settings.
 Also Read: How To Stop Automatic Updates In Windows 11
Whatever be the culprit for low microphone volume on your Windows 11 PC, we will help you troubleshoot it. In this troubleshooting guide, we have put down the most tried and tested methods to fix the low microphone volume issues in Windows 11. So, let’s get started.
Adjust the Microphone Volume from Windows 11 Sound Settings
Before we move further in the troubleshooting guide, it is recommended to adjust the volume settings of your PC’s microphone directly from the settings app of your Windows 11 PC. Let’s see how to go about it:
- First of all launch the Start Menu on your Windows 11 PC.
- Now click on the tile of the Settings App located in the Start menu.
- Now click on the ‘System’ option in the left pane of the Settings App.
- Next, move towards the right side of the Settings Windows and click the ‘Sound’ tab.
- When the new window opens, keep scrolling until you reach the ‘Input’ settings.

- Now look for Volume in the Input settings and ensure that its slider is towards the extreme right.
- ‘100’ value will also be mentioned next to the ‘Microphone’ icon here. This means your microphone has the permission to capture 100% of the surrounding sounds.
- Now look for the Microphone settings in the same Input Settings.
- Here, press the ‘Start test’ button provided next to the ‘Test your microphone’ option. This is important to know the sensitivity of your microphone.
- After you press the button, you should play some music at normal volume near your Windows 11 PC.
- Do it for at least 30 seconds and then press the Stop button.
Now Windows will analyze the microphone sensitivity and display its value. Generally, a 90% sensitivity level is good to go. If you get a quite low value, move on to the next step.
Make sure Microphone is enabled
There is a good chance that you might have disabled your microphone subconsciously and then you started experiencing such issues. There are many ways to disable the mic on a Windows 11 PC. You can do it from BIOS settings, privacy settings, and device manager settings.
While not all manufacturers allow you to disable your microphone right from the BIOS settings, it is possible to disable the microphone from the Device Manager. So let’s head to the Device Manager to see if the Microphone is enabled or not. For this,
- Use the Windows+R keys to bring up the Run dialog box
- Now type ‘devmgmt.msc’ in the text box and hit the enter key.
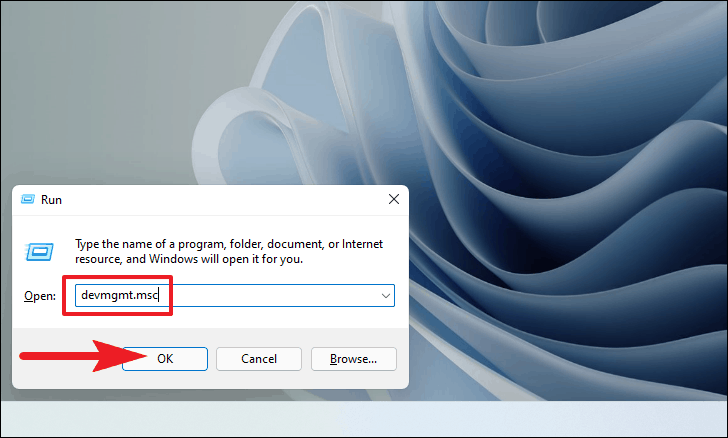
- Doing so will take you to the Device Manager of Windows 11.
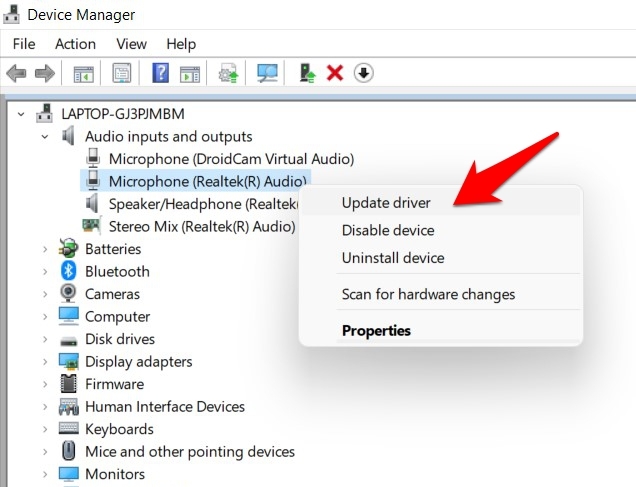
- Keep scrolling to find the ‘Audio inputs and outputs’ category.
- Expand the category to view all the devices.
- Look for the Microphone device and right-click to bring up the context menu.
- Click on the Enable Device option here.
Note – If you see the Disable Device option in place of Enable Device, it means your microphone is already enabled.
Ensure Microphone has Permissions
If you feel that your microphone works properly in general but is running into issues only in a particular app, a good chance that it has been denied permission to work. But don’t worry; the issue can be fixed very easily. Let’s see how:
- First of all, you need to access the Settings App of your Windows 11 PC. For this, you can easily type Settings in the search bar and choose the relevant option from the search results.
- When you reach the settings app, look for the ‘Privacy & Security tab in the left panel of Windows settings and click it.
- Now move to the right panel and look for the ‘App Permissions’ tab. Here you will find the ‘Microphone’ option.
- Click to expand the microphone permission. Here you need to ensure that the ‘Microphone access’ switch is toggled in the ‘ON’ position.
- Now look for that app in which you are experiencing microphone-related issues. Make sure that the switch for it is turned on.
Take help from a Microphone troubleshooter
If none of the methods worked till now, and you are still struggling with the low volume in the microphone, you should take help from Windows. Windows provides several troubleshooters to look for the issue in a specific component and tries to fix it from its end. Here’s how to use the microphone troubleshooter on your Windows 11 PC.
- For this, you need to go to the Settings App of your Windows 11 PC using the same method as explained previously.
- Now click the System tab present on the left pane of the Settings app and choose the troubleshoot option from the right side of the window.
- Next, choose the ‘Other Troubleshooters’ option present under ‘Troubleshooting’.

- Now keep scrolling and look for the ‘Recording audio’ section.
- Click on the Run button for it located on the right end of the tile. This will launch the Windows troubleshooter on your Windows 11 PC.
- Now look for the Microphone option on the troubleshooter screen. Enable the radio button next to it and press the next button present on the bottom right.
Now the troubleshooting process will begin on your Windows 11 PC. Windows will deeply scan your PC and look for possible fixes. Wait for some time until Windows finishes troubleshooting your PC. Hopefully, Windows will succeed in troubleshooting the issue but if it cannot, let’s move on to the next fixes.
Update your outdated Drivers
If the issue is not yet solved, the best thing you can do is to try updating the drivers. Most of the time these outdated drivers create such weird issues on your PC. Even though updating the drives does not seem to work, it can work wonders. Let’s see how to update the drivers.
- First of all, head to the Start menu of your Windows PC and search for Device Manager in the search bar. Click the ‘Device Manager’ option from the search results.
- In the Device Manager window click on the ‘Audio inputs and outputs’ tab to expand it.
- Look for the Microphone option and right-click it to access its context menu. Now choose the Update Driver option here.
- Now you will be taken to the Update driver window.
- Here you need to choose the ‘Search automatically for drivers’ option. This will prompt Windows to automatically look for the latest update for your driver.
- On the other hand, you can choose the ‘Browse my computer for drivers’ option if you’ve already downloaded the driver package on your PC. You can browse the downloaded package using the Windows 11 File Explorer.
- If you’ve asked Windows to look for the driver update, it will search on the internet for the latest available driver for your Microphone. If the update is found, Windows will download and install it without your intervention.
- After the driver is downloaded, you may be prompted to restart the browser for the installation to be successful.
Adjust your Microphone’s Boost
If you haven’t had any luck until now, you need to tweak the settings to enhance the microphone boost of your Windows 11 PC. Let’s see how to do it:
- First of all, right-click the ‘Speaker’ icon located on the right side of the Windows 11 Taskbar to open the context menu.
- Now choose the ‘Sound settings’ option here. You will go to the ‘Sound settings’ window of the Settings app.
- Keep scrolling until you reach the ‘Advanced settings section.
- Now click on the ‘More sound settings’ option given here. A new window will open up on the screen.
- In the new Window, look for the ‘Recording’ tab and right-click the ‘Microphone’ option present under it.
- Look for the properties option in the context menu and click it.
- Now you can access the ‘Microphone Properties’ on your Windows 11 PC.
- Here you need to go to the Levels tab and look for the ‘Microphone Boost’ option.
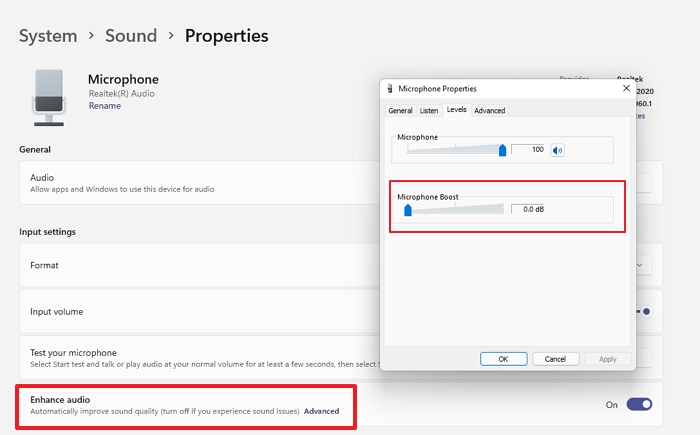
- Now you need to move the boost slider to the extreme right. This will improve the microphone’s sensitivity to the sound.
- Finally, click on the ‘Apply’ button to apply the changes followed by the ‘OK’ button.
Conclusion
That’s pretty much it! Use the above methods to fix low Microphone volume issues in Windows 11. One or a combination of two or more settings will surely do the trick. Which of the above trick worked for you? Let us know in the comments below.
Also Read: How To Fix ‘0x80888002’ Update Error In Windows 11?


Volume at 100%, RealTek drivers updated and mic boost at +30dB and it is barelly usable. Discord is at 100% on the mic too.
SteelSerie Arctis3 headset/mic with onboard audio from an MSI Z590 Gaming Plus motherboard.
Weirdest thing ever.
Did you ever fix this Frank? Thanks
any update on this ?
Here is how I fixed it on my laptop.
1 Open Device Manager
2 Under ‘Sound, video and game controllers’, select the Realtek driver or whatever is there
3 Go to ‘driver’ then ‘update driver’
4 Select ‘Browse my computer for drivers’ then ‘Let me pick from a list of available drivers on my computer’
5 If only the Realtek driver is listed, uncheck ‘Show compatible hardware
6 Under Manufacturer, scroll down to Microsoft
7 Under ‘Model’, select ‘High DefinitionAudio Device Version *************, if there is more than one, pick the latest
8 Click ‘Next’ then ‘Yes’.
9 Reboot
To test, press the Win key and type ‘Sound Recorder’. Record a short speech and then play it back.
Ive completed these steps numerous times with no resolution. Under Device properties, Levels, I cant even slide it over from zero. And I have no Boost option.
I am experiencing the same issues. Everything looks fine until I get to the levels tab and there is no Boost option