


 Header Through Cloudflare")


Refer to this guide to know to stop automatic updates on Windows 11 both for time being or permanently.
Microsoft keeps rolling out new software updates to fix any potential vulnerability, improve the overall performance of the system as well as make other enhancements. These features loaded and security updates are automatically installed on your Windows 11 PC since your PC is programmed to do so by default.
Although these updates are essential to patch to bugs and rule out the performance issues, most of the time the updates themselves cause weird problems in your PC, making it unstable. This issue of random bugs is more common in Windows 11 since has been released recently. Hence, it is advisable to keep using a stable release until another stable one rolls out.
While random bugs are one big problem, another problem that may irritate you is that when Windows 11 installed any new software update, it asks you to restart your PC. If you are doing something important, this prompt is really very annoying as it hampers your work.

Also Read: How To Enable God Mode In Windows 11
These reasons are sufficient in themselves why you should stop the automatic updates feature in Windows 11 so that you can only download the updates manually.
To help you out, in this guide, we have put down different methods that can help you to stop automatic updates on your Windows 11 PC. Let’s take a look at them one by one.
Block Windows 11 Updates using Windows Update Settings
This is an easy way to stop automatic Windows 11 updates. Let’s see how you can do that:
First of all, you need to open the Start menu and click on the Settings App to open it. Alternatively, you can also use the Windows+I shortcut to launch the Settings App on Windows 11 PC.
- When in the Settings, head to the left panel and choose the ‘Windows Update’ option.
- In the ‘Windows Update’ window, look for the ‘Pause Updates’ option present under ‘More options.
- Here you need to click the ‘Pause for 1-week’ option. This will stop your PC from automatically downloading the Windows update for up to a week.
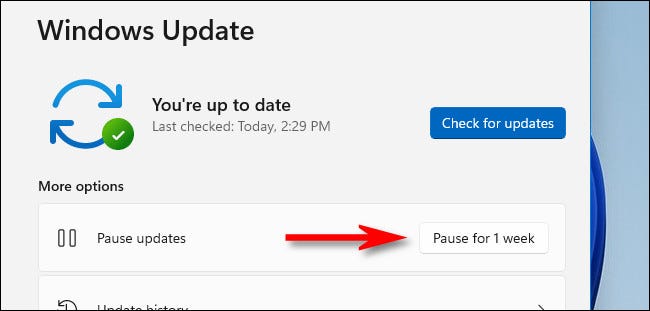
- But if you need to extend this period, you can press the ‘Extent for 1-week’ button. Keep pressing this button to extend the update paused period for up to 35 days minimum.
- When you reach the 35th day, you need to update your PC before you can begin the cycle for net 35 days.
- If you need to resume the automatic update before you hit the deadline, you can simply press the ‘Resume updates’ button given at the top of the window.
This is how you can temporarily stop the latest upgrade from downloading on your Windows 11 PC for up to 35 days. If you are looking for a permanent solution, keep scrolling below.
Enable a Metered Connection to Stop Windows Updates from downloading automatically
This is more of a permanent solution to prevent Windows from getting updated automatically. A metered connection feature enables you to set a limit on the Wi-Fi data usage that you consume via your Windows 11 PC.
While the primary motive of the feature is to prevent you from running out of data, when enabled it will prevent the download of automatic updates since they consume a huge amount of data. Let’s see how to enable metered connection on your Windows 11 PC.
- Use the Windows+I shortcut to bring up the Settings App on your Windows 11 PC.
- Now from the left pane, choose to open the ‘‘Network & internet’ category.
- Choose the ‘Wi-Fi’ feature from the right side of the Settings App.
- Now click on the ‘Properties’ option in the Wi-Fi connection.
- Here you need to turn on the toggle for ‘Metered Connection’. This will turn on the metered connection feature for the current network.
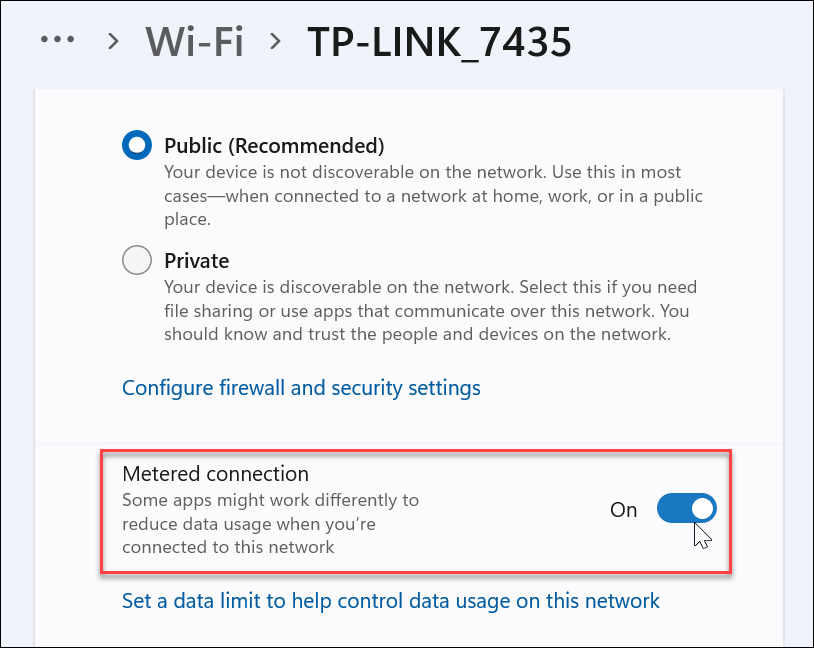
- Next, head to the Windows Update window in the Settings App.
- Once there, choose the Advanced Option.
- Here you need to disable the option that allows ‘Download over metered Connections’.
Once you’re done with this, it will prevent the automatic updates from downloading on your PC. Whenever an update will be available for your PC, it will be shown as ‘pending download’. To manually begin the download and installation procedure, just hit the ‘Download’ button present near the ‘pending download’ status.
Even though the automatic download is blocked, Microsoft can still download and install the security patches that are essential for your PC.
Block the Software Updates via Windows 11 Update Service
While the previous method is a permanent solution to block Windows updates, it is more of a network-based solution. If you are looking for another potential way to stop automatic Windows update, completely disabling the Windows update service option is the option you should go with. Let’s see how to do it step by step:
- First of all, press the Start button and type Services in the Search bar of the Start menu.
- Now choose the ‘Services’ app from the relevant search result.
- To achieve the same result, use the Windows+R to fire up the ‘Run dialog box.
- Now press the Windows key to directly reach the Services window.
- Keep scrolling until you reach the ‘Windows Update’ service amongst the list.
- Now double click on it to open the properties window.
- Here you will find a ‘Stop’ button under the Status tab.
- Click this button to stop this ‘Windows Update’ service permanently.
- Next, modify the status for the Startup type drop-down and set the Disabled option.
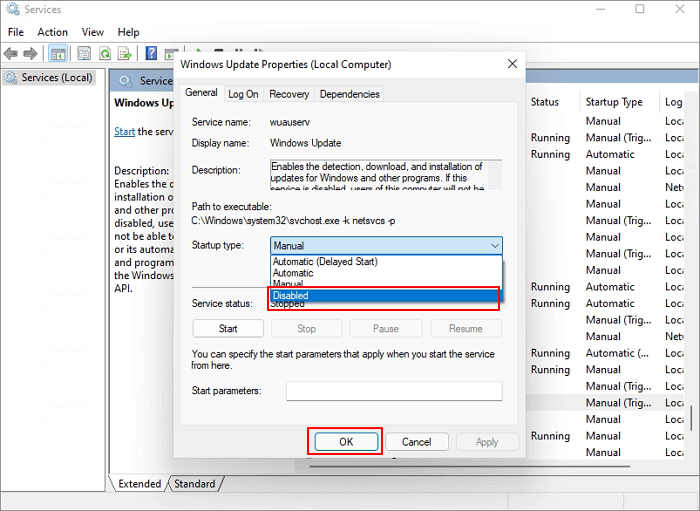
- Finally, hit the Apply button.
This process will successfully stop all the Windows 11 updates for your PC. This will include all the manual updates along with automatic updates. In case, you need to re-enable the Windows 11 updates for your PC, just change the Disabled status to Automatic or Manual followed by Apply button.
Disable Windows 11 Updates via the Registry Editor
Let’s talk about how to use the Registry editor to stop Windows 11 automatic updates permanently. Here’s how to go about it:
- First of all, use the Win+R shortcut key to bring up the Run dialog box on your PC. Now type ‘regedit’ and press the Enter key.
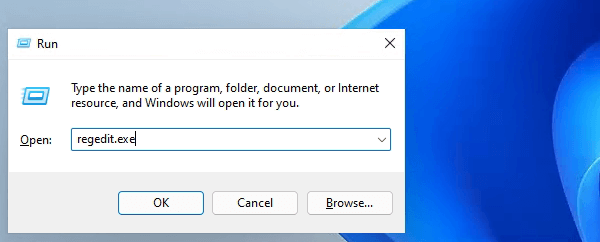
- This will open the Registry Editor on your Windows PC.
- Now you need to access the following location on your Windows PC.
- For this, you can either use the navigation panel on the left or simply copy-paste the following path in the Registry editor’s address bar.
HKEY_LOCAL_MACHINE\SOFTWARE\Policies\Microsoft\Windows - Once you are in the Windows folder, look for the ‘WindowsUpdate’ key (folder) in the left panel.
- In case you did not find it, you can create one. To do so, just right-click the ‘Windows’ key and choose the ‘New’ option followed by ‘Key’.
- After the new folder is created, rename it to WindowsUpdate.
Note: Make sure there is no space between ‘Windows’ and ‘Update’.
- Once done, it’s time to set up another key in the WindowsUpdate key you just created.
- To do so, just right-click the ‘Windows Update’ key and choose the ‘New’ > ‘Key’ option from the context menu.
- Alternatively, you can also choose the ‘New’ > ‘Key’ option from the right pane itself. Both these methods will set up a new within the ‘Windows Update’ key.
- Now you need to rename the newly created key to AU.
- After the rename is successful, right-click the ‘AU’ key to bring up the context menu.
- Now choose the ‘New’ option followed by ‘DWORD (32-bit) Value’.
- This will create a new DWORD within the AU key.
- Now rename the new DWORD to NoAutoUpdate.
- Next, you need to double-click the new ‘NoAutoUpdate’ DWORD and modify its value from 0 to 1.
- Finally, press the OK button to save the changes you’ve just made.
- Now restart your Windows 11 PC to apply the changes to stop automatic updates.
This solution will permanently disable the automatic updates from downloading and installing on your PC. You need to check the settings manually and download the updates from the Windows Update Settings Windows yourself.
If you want to enable the Windows 11 automatic updates as before, just delete the ‘NoAutoUpdate’ DWORD or the complete ‘WindowsUpdate’ key you created in the registry editor.
Use Group Policy Editor to disable Automatic Windows Update
If you are currently using the Professional, Enterprise, or Education edition of Windows 11, you can disable automatic updates using the local group policy editor. Let’s see how:
- Bring up the Run dialog box and type the‘ gpedit.msc’ service and press the enter key.
- This will take you to the Local Group Policy Editor Windows on your PC.
- Now you need to go to the following location within the Local Group Policy Editor.
- To do so, you can take the help of the left navigation pane.
Computer Configuration > Administrative Templates > Windows Components > Windows Update > Manage end user experience - Once in the ‘Manage end-user experience’ window, double click the ‘Configure Automatic Updates.
- Here you need to turn on the ‘Disabled’ radio button and press the ‘Apply’ button followed by ‘OK’.
Doing so will permanently turn off the Windows 11 automatic updates on your PC.
Summing Up
These are the viable ways though will you can stop the automatic updates on your Windows 11 PC. It is recommended to refrain from installing any new updates to avoid catching bugs or running into performance issues on your PC. Once Microsoft begins releasing stable Windows 11 builds, you can resume the automatic updates as before. Hope this helps!
Also Read: 100% Disk Usage In Windows 11 – Fixed


