


 Header Through Cloudflare")


Wondering what is God Mode and how can you enable it on your Windows 11 PC? Let’s find out!
The latest iteration of Windows depicts Windows as the most advanced it has ever been. The interface is sleeker and the graphics are pleasing to the eye. Moreover, the redesigned operating system provides for a flawless user experience possible. As Windows 11 gets sleeker, many settings found in the previous version have somewhat vanished.
The Settings App of Windows 11 is created keeping in mind the ease of use so it is not cluttered. This is the reason why many advanced settings are now harder to access than the older version. This does not mean the settings don’t exist at all; they do but are hidden within different options in the Control Panel. Microsoft has included only the basic settings in the Settings App and the advanced ones are left behind in the Control Center.

In a way, Control Center in Windows 11 is a forgotten entity now. However, developers and advanced users need access to these ‘hard-to-find settings’ to optimize their PC to the very core. This is why God Mode comes into the scene. Enabling God mode is the way by which you can quickly access all the settings of Windows 11.
God Mode was first introduced in Windows Vista and it provides you powers to access almost 200 advanced settings at one place known as ‘Windows Master Control Panel’. Here, you’ll find settings to create and format disk partitions, create System Restore points, change battery settings, update drivers, and what’s not. In a way, it can prove to be a time saver as you don’t have to hunt Control Panel for these settings.
Also Read: How To Boot Windows 11 In Safe Mode
How to enable God Mode in Windows 11
- First of all, sign in to the Administrator account of your Windows 11 PC.
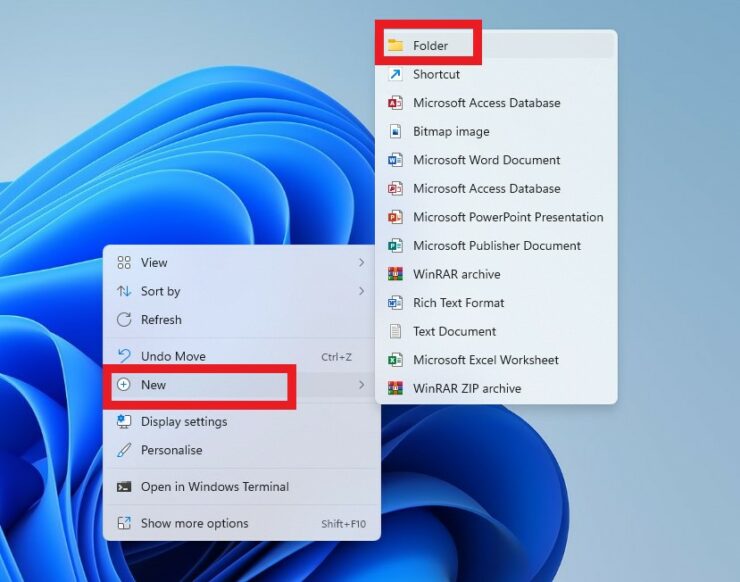
- Now create a new folder on the Windows 11 desktop by right-clicking anywhere and choosing the Create new > Folder option in the context menu.
- Next, right-click the folder and choose Rename option from the context menu.
- Now copy-paste the string of characters mentioned below and paste it in the text box to rename the folder.
GodMode.{ED7BA470-8E54-465E-825C-99712043E01C}
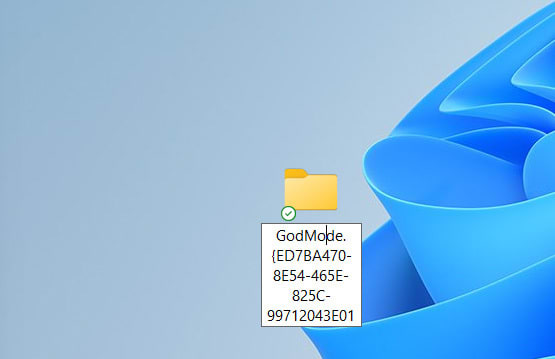
- Note: Make sure you do not modify anything in the name given below. If you would do it, you’ll encounter an error.
After pasting the name in the text box just click outside the text box to finish renaming the folder. - As soon as you’ll do that, you’ll notice that the name you just to the folder has vanished somehow.
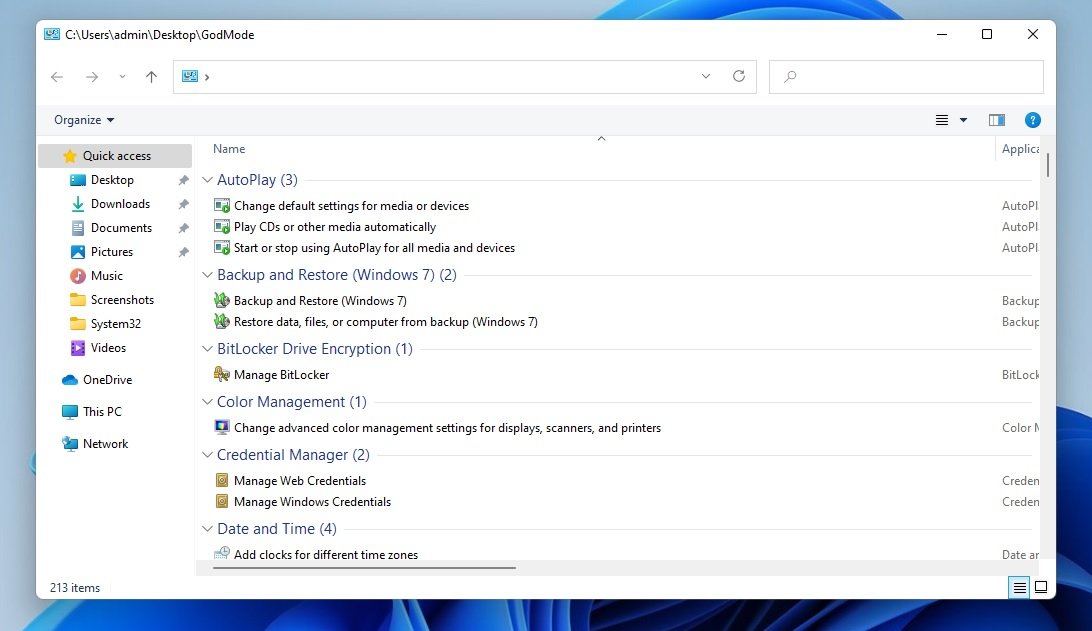
- Now try refreshing the desktop or open the folder and close it. You’ll see that the folder icon has been modified. Congratulations! You’ve been successful in enabling the GodMode on your Windows 11.
- Now double click the ‘Windows Master Control Panel’ folder. You’ll see that around 200 settings and controls are classified into 33 categories here.
Note: The God Mode folder can be created anywhere on your PC besides the Desktop.
How to organize the God Mode Settings
Here’s how you can organize and access the settings and tools present in God Mode:
- To access any settings, simply right-click it and choose the Open option.
- As soon as you’ll do it the dialog box for that window will open on the screen.
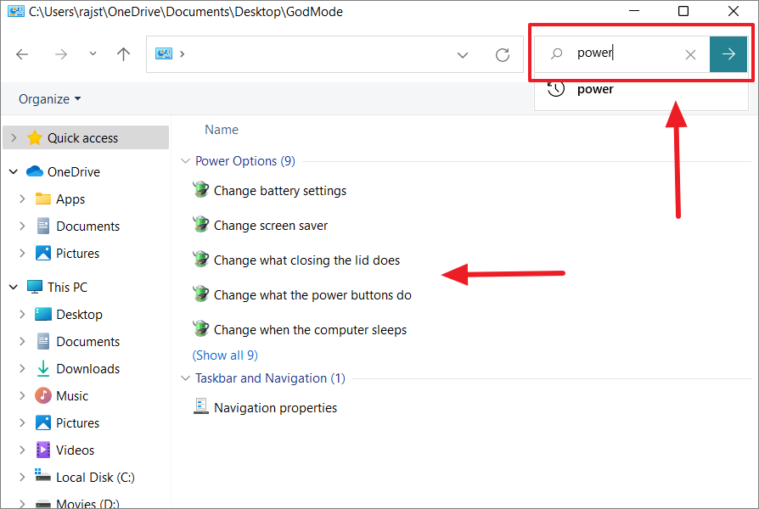
- To look for a particular setting, you can search for it in the ‘Search’ field present.
- To easily access a tool or settings that you frequently need, you can create its shortcut.
- Just, right-click the tool and choose the “Create shortcut” option from the context menu.
- When you’ll choose this option you’ll be warned that you can’t create the God Mode inside the God Mode folder. Choose the Yes option here to create the shortcut on the Windows 11 desktop.
- Windows 11 also allows you to change the default way how these settings are arranged within each of the thirty-three categories. To do so, right-click the space in the God Mode folder and choose the ‘Group by’ option from the context menu.
- Here you’ll find options to group and organize settings according to Name, Application, Keywords, or sort than in ascending or descending order.
Now that you have all the advanced Windows 11 Settings in one place, you can tweak them as per your need. But keep in mind that you should do that only if you have some understanding of these settings. Otherwise, it’s better to disable the God Mode on your Windows 11 to avoid doing more harm to your PC than good. Let’s see how to disable God Mode in Windows 11.
How to Disable God Mode in Windows 11
Disabling God Mode on your Windows 11 PC is as easy as enabling it. Simply right-click the God Mode folder and choose the Delete option from the Context Menu. You can also press the Delete key to part ways with the God Mode on your Windows 11 PC. Once the ‘Windows Master Control Panel’ folder is disabled, the God Mode is disabled automatically.
Conclusion
That was the quick guide on how to enable God Mode on your Windows 11 PC to get access to all the advanced settings in one place. As mentioned, be cautious of changing any setting if you do not know about it since it can even corrupt your PC. Having said that, signing off!
Also Read: How To Enable And Use Wireless Display In Windows 11


