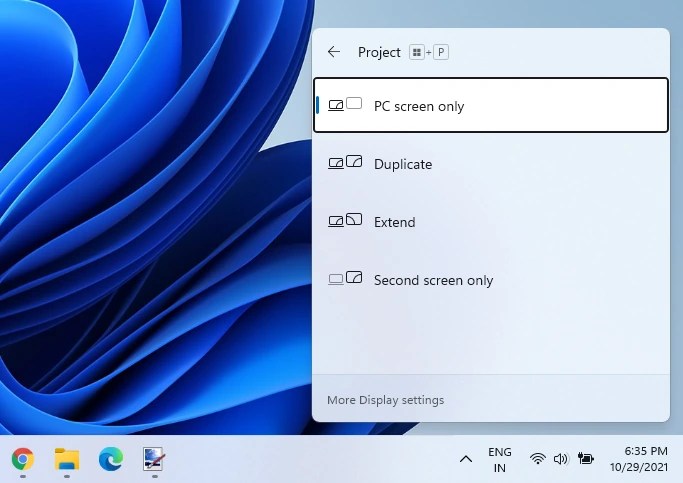
We all often think if it is possible to current your Windows 11 PCs to an external device like a TV screen or your mobile to your laptop. By connection, we mean that the laptop’s screen should be visible on the display screen of an external device. Windows 11’s wireless display feature is capable of doing that.
Wireless display feature is an optional feature in Windows 11 and it also lets you connect other external devices like smartphones and projects its screen on a laptop. What’s interesting is that the input device connected to your Windows 11 PC is also operational on the big screen like TV.

The Wireless Feature is not present on your device by default and you need to install it on your Windows 11 before trying to project the screen. In this article, we will see how to install and use the Wireless Display Feature in Windows 11.
Also Read: How To Install Microsoft SQL Server In Windows 11?
How to enable Wireless Display on Windows 11 PC
Wireless Display is an optional feature in Windows 11 and it’s a very simple process to enable it. Let’s see how:
- First of all, you need to launch Start Menu and choose the Settings option.
- Now you’ll be taken to the settings Window. Choose Apps from the left pane and choose ‘Optional features’ from the right window.
- Look for the ‘Add an optional feature’ option and press the ‘View Features’ button near it.

- You’ll see an ‘Add an optional feature’ pop-up on the screen. Type ‘Wireless Display’ in the search bar and you’ll see it in the suggestions.
- Check the ‘Wireless Display’ checkbox and press the Next button in the pop-up.
- An install button will appear on the screen, click it and the installation process of the Wireless Display feature will begin on your Windows 11 PC.
- Wait for some time until the installation is complete. Then you’ll see the ‘Installed’ remark in the recent actions tab.
- Now you will have to restart your PC so that the changes are applied and you can use the Wireless Display feature.
Read: How To Fix Google Chrome Lagging On Windows 11?
How to use Wireless Display in Windows 11
- Now you need to access the Wireless Display feature n Windows 11. Search for ‘Projection Settings’ in the Windows 11 Search bar and choose the first result to access it.
- The ‘Projecting to this PC’ window will open on the screen and you will see ‘Always Off (Recommended)’ mentioned there. Change this option and set it to ‘Available everywhere’ or ‘Available everywhere on secure networks.
- Next, choose the ‘Launch the Connect app to project to this PC’ option.

- Finally, you will be able to connect your television or Smartphone to this and it will be visible in the Connect window on the screen.
Note: For the connection to be successful, your Windows 11 PC and the other device must be connected to the same Wi-Fi network otherwise the device will not be detected.
Also Read: How To Manually Setup Proxy Server In Windows 11?
How to Uninstall Wireless Display feature from Windows 11
If you don’t like this feature, you can uninstall it from your Windows 11 PC easily. Let’s see how:
- Click the Start menu icon on the taskbar and choose the ‘Settings’ option.
- Click the ‘Apps’ option in the left pane of the Settings Window and then choose ‘Optional features’ from the right pane.
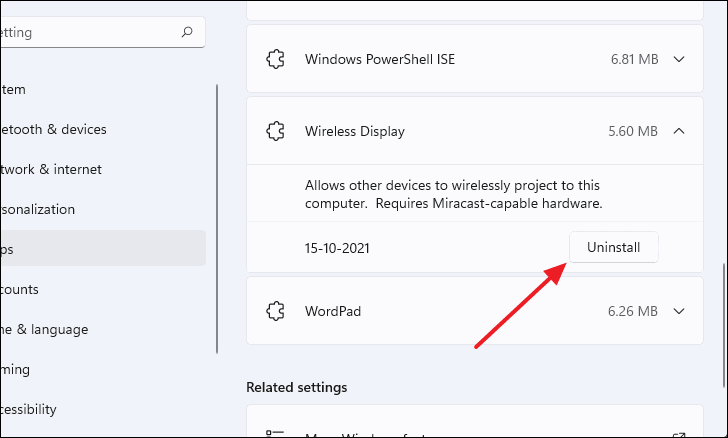
- Keep scrolling to reach the ‘Wireless Display’ feature and open the drop-down next to it.

- Finally, choose the ‘Uninstall’ option to uninstall Wireless Display from Windows 11 PC.
When Wireless Display will be uninstalled, you will see the ‘Uninstalled’ status of the Wireless display.
Troubleshoot Wireless Display Install Error in Windows 11
Here are the methods to fix the wireless display install failed error in Windows 11:
- If you are unable to install a wireless display on your PC try the following fixes:
- First of all, you need to make sure that your Windows 11 PC is connected to the Internet.
- If you are unable to uninstall the Wireless Display feature using this network it may be because of poor internet connection, try to switch to a different internet source
- Head to the Settings app on Windows 11 PC and choose ‘Network and Internet and then Properties. Now turn off the Metered connection option.
- If the above methods fail try installing the Wireless Display feature using Command Prompt.
- Open Command Prompt in Administrator mode and copy-paste the following command: DISM /Online /Add-Capability/CapabilityName:App.WirelessDisplay.Connect~~~~0.0.1.0
Also Read: How To Install Google Play Store On Windows 11
Conclusion
That was all about the Wireless Display feature in Windows 11. This feature is incredibly useful if you know how to leverage it to the fullest. If you found this guide helpful, don’t forget to share it with others. Signing off.


