


 Header Through Cloudflare")


![[Interview] The Future of Screen Experiences ②: From Watching to Understanding With Vision AI Companion](https://www.hawkdive.com/media/samsung-tvs-and-displays-vision-ai-companion-interview_thumb932-218x150.jpg "Exploring Vision AI Companion: Transforming Screen Experiences for Users")


")
Wondering why you see 100% disk usage in Windows 11 even when no heavy tasks are running and how to fix that? Don’t worry; we’re here to help.
Do you see a considerable lag in the performance of your PC ever since you’ve upgraded to Windows 11? Microsoft has designed a Task Manager that lets us monitor the performance of your PC based on different forms such as CPU, Memory, and Disk usage. You can always hit the Ctrl, Shift and Escape keys to bring up the Task Manager on your Windows 11 PC. When your Windows PC seems to be sluggish than usual, you should consider evaluating the disk usage.
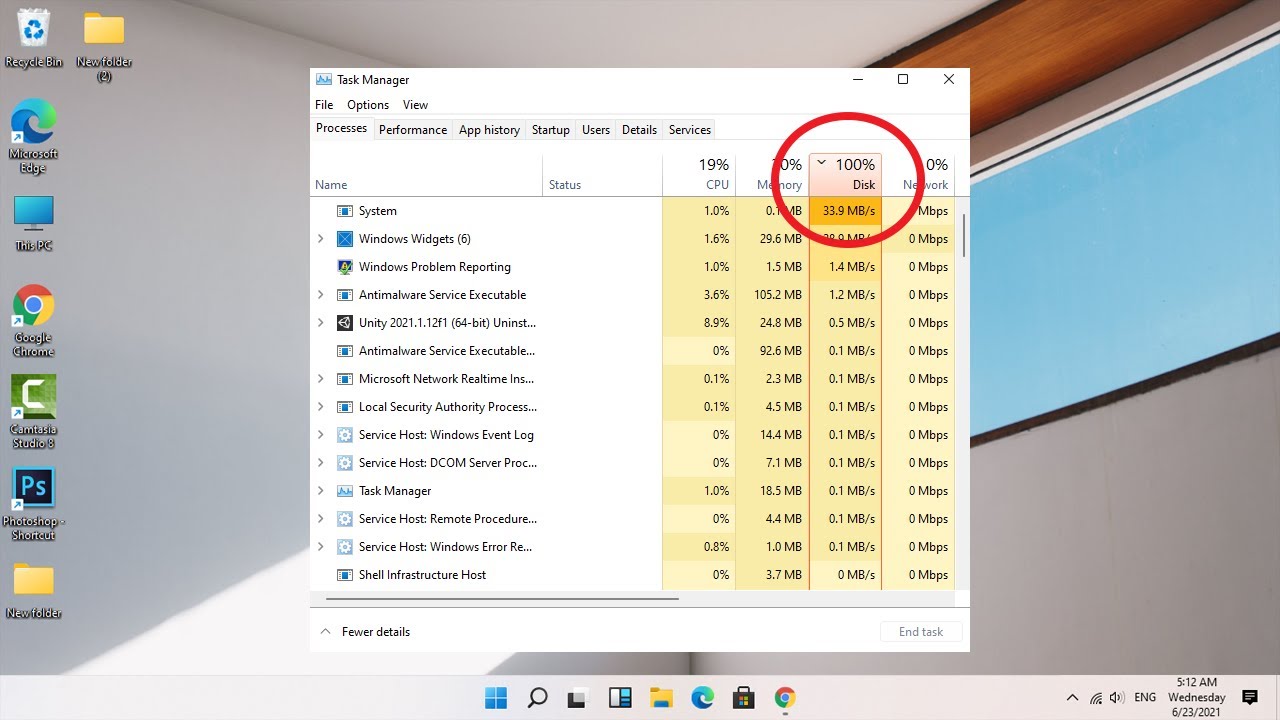
If the Disk Usage column is highlighted in red and depicts 100% usage, you should be worried. In the ideal scenario, the disk usage of your PC should never hit this mark, but certain factors can cause abnormal usage of the disk resulting in the declined performance of your PC.
Let’s see what’s causing the disk to hit 100% usage in Windows 11 PC and what all you can do is set it straight.
Also Read: Hard drive missing after Windows 11 update? Try these fixes
What causes 100% Disk Usage in Windows 11?
There are several reasons why your disk is overworking than it normally should. There may be several tasks running in the background that may be hogging up your PC. Sometimes even new computers are affected by this issue and the reason could be corrupt files, bugs or other issues in software. As
Whatever be the reason, let’s see what you can do to revert the 100% disk usage issue and restore the normal usage. Below are the effective ways that you can try to reduce disk usage on your PC.
Also Read: Windows 11 Restarts Automatically? Try These Fixes.
Rebuild the search index of your disk
The biggest culprit of the high disk usage is the Search Index. It helps you quickly scan the disk to locate the files. The index helps the disk to return quick search results. But sometimes this search index may be affected by bugs and that’s why it turns faulty. As a result, it goes into an infinite loop instead of giving the result causing the disk to overwork.
- Head to the Start menu and type ‘Indexing’ in the Search bar.
- Click on the first search result to open Indexing settings.
- Now open the advanced tab and press the Rebuild button.
- A pop-up will appear to confirm your action, press OK.
- Now the search index will be deleted preventing your PC to be stuck in the search loop.
But this temporary method to delete the search index, if you want it to be permanent, here is what you need to do:
- Use Windows + R button to launch the RUN dialog box.
- Type ‘services.msc’ in the text box and press enter key.
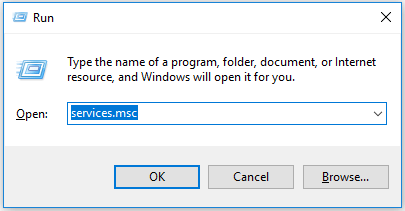
- Now search for ‘Windows Search’ service and double click it.
- Open the ‘Startup Type’ drop-down menu and choose the ‘Disabled’ option.
- Finally, press the OK button.
Disable Superfetch (SysMain) along with Windows Search services
SysMain or Superfetch whatever you call it is another big culprit why the disk usage is shooting up to 100% on your PC. This was first introduced by Microsoft in Windows Vista and renamed in 2018. This service analyses and interprets your disk usage patterns and sees which programs you open quite often. Then it preloads those apps and programs so that when you launch them, they load faster.
But most of the time this service creates more issues than doing good. It occupies a lot of the disk space leading to the sluggish performance of your PC. The only solution to stop this is to disable the service for good. Let’s see how:
- Use the Windows + R shortcut to open up the RUN dialog box.
- Now enter services.msc in the text box and press the enter key.
- In the services Windows, keep scrolling and click the SysMain service.
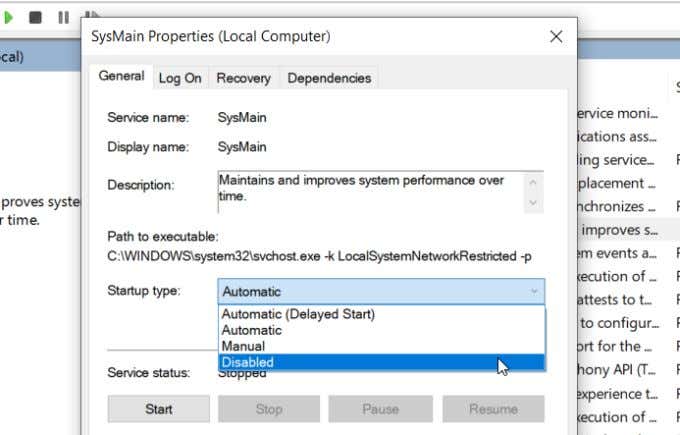
- Now choose Disable in the Startup type drop-down menu.
- Finally hit the OK button to save the changes.
Reset the Virtual Memory
Windows uses the concept of paging to make sure your PC does not run out of RAM. But sometimes the page file gets damaged and creates issues in the hard disk. To avoid that, we can clear the faulty page file so that Windows can create a new one. Let’s see how:
- Hit the Windows and R keys to open the Run dialog box.
- Now type ‘sysdm.cpl’ and press Enter key.
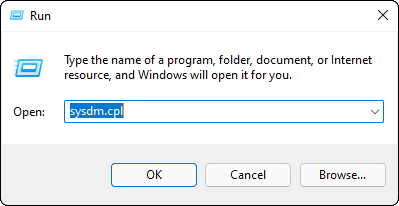
- Now the System Properties will open up, head to its ‘Advanced’ settings.
- Click open the Settings present under the ‘Performance’ tab.
- Now look for the Change button in the ‘Advanced’ tab of the Performance window.
- You’ll see that the ‘Automatically manage paging file sizes for all drives’ option is checked here. Remove the tick from the check box.
- Now choose the C: drive and select the Custom size option.
- Next, you have to enter the initial and the maximum size you want to allow for paging. This will be in MB.
Note: The paging size should not exceed 1.5 times your RAM size. You can also choose the No paging file option to refuse the usage of the virtual memory.
- After you’re done setting the numbers, press the Set button followed by OK.
Reset Sync Apps and Programs
Microsoft allows the Apps such as One Drive to sync with your PC, they also sometimes create issues. They get stuck in the sync process even when there is nothing left to sync at all. As a result, the disk has to overwork without any reason. To fix this, it’s better to reset your OneDrive.
- Fire up the Run dialog box by pressing the Windows and R keys.
- Now type the following command followed by the Enter key.
%localappdata%\Microsoft\OneDrive\onedrive.exe /reset - Now the OneDrive program will reset on your PC and as a result, a considerable amount of memory will be released.
Disable Disk Defragmentation
Another technique used by Microsoft to improve the efficiency of your PC is Disk Defragmentation. It helps organize the file data and improves the efficiency of retrieving the data from the disk whenever you need it in the future. This process does not show up on Task Manager but is the biggest cause why the levels of disk usage are rising up.
Besides, this feature is programmed to run periodically on your Windows 11 PC and increases the disk usage bar from time to time. TO prevent that from happening, we can disable this feature. Let’s see how to do it.
- Open the Start menu and type ‘defragment’ in the search bar.
- Now choose the ‘Defragment and Optimize drives’ option from the search result.
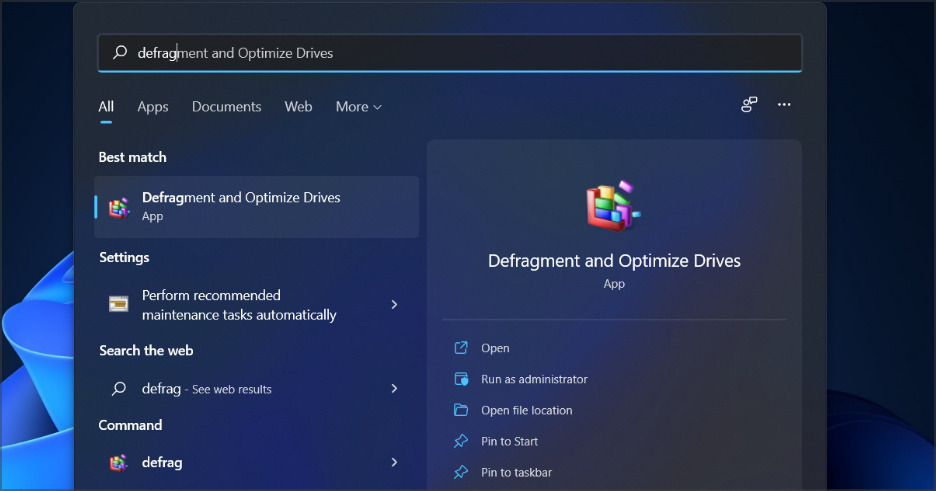
- In the next window that opens up, press the Change Settings button.
- Now remove the tick from the check box next to the ‘Run on a schedule’ option
- Finally, press the OK button.
Now the disk fragmentation will be prevented from launching periodically on your PC relieving your disk from a lot of loads.
Turn off the ‘DiagTrack’ Service
‘DiagTrack’ Service short for Diagnostics Tracking, or Connected User Experiences is also a probable cause why there is high disk usage on your PC. Many users have reported that disabling this service has caused the disk usage to subside down. Let’s see how you can disable it for good:
- First, we have to disable it for time being, for this fire up the Task Manager and switch to the
- To temporarily disable it, open the Task Manager and click on the Services tab.
- Look for the ‘DiagTrack’ service and click the Stop option from the Context Menu.
Now we have to disable it permanently. Here’s how:
- Look for the Open Services button present at the bottom of Task Manager.
- Now look for the ‘Connected User Experiences and Telemetry’ service and click to open it.

- Now expand the drop-down for ‘Startup type’ in the General tab and select the Disabled option.
- Press the Apply button.
- Now you need to go to the ‘Recovery’ tab. Here you need to set ‘Take No Action’ in all the drop-down menus you see here.
- Finally, press the OK button.
Get rid of the Temp files
You should also delete the temporary files on your Windows 11 PC to reduce the load of the disk. This is process is easy to do. Let’s see how to free up disk space after deleting the temporary files:
You can open the Temp folder by following this folder path.
C:\AppData\Local\Temp
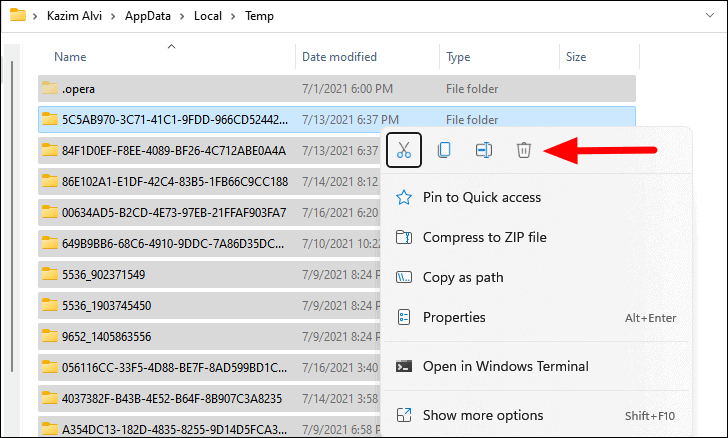
Alternatively, you can also access the temp folder by using the Windows and R shortcut key to open the RUN dialog box. Now type ‘Temp’ in the search box press enter key.
When you are in the folder, press the Ctrl+A key to select all the files and press the Delete key.
Update the Device Drivers
Windows services are not always at fault for the abnormal disk usage on your Windows 11 PC. Some advanced drivers such as StorAHCI.sys are also a reason for this issue. To avoid high disk usage, it’s recommended to get rid of these drivers. But before that let’s see whether you are using these AHCI drivers or not.
- For this, open the RUN box by using the Win+R shortcut key.
- Type ‘devmgmt.msc’ in the text box followed by the Enter key.
- Now you will directly reach the Device Manager window.
- Here, look for “IDE ATA/ATAPI controllers” and click it.
- When it is expanded, look for Standard SATA AHCI Controllers and open its Properties from the Context Menu.
- Move to the ‘Driver’ tab in the Properties window and click on the Driver Details button.
- You need to disable the “storahci.sys” service in case you find it in the driver files.
- Next, switch to the ‘Details’ tab and you’ll see the driver’s value here. Note it down somewhere since you will need it later.
- Now access the RUN dialog box again and type ‘regedit’ in it followed by the Enter key.
- Now head to the following path:
HKEY_LOCAL_MACHINE\System\CurrentControlSet\Enum\PCI\(AHCI Controller)\Device Parameters\Interrupt Management\MessageSignaledInterruptProperties
- You need to put the driver value you just copied in place of (AHCI Controller).
- Now double click to modify the MSISupported present in the right panel of the window.
- Set its value to 0 and press the OK button.
Even if you don’t see this MSI driver on your PC, you still need to update the storage controllers drivers from the Device Manager window.
- For this, click the ‘Storage controllers’.
- Now right-click the storage driver and choose the Update driver option.
- A pop-up will open up. Choose the ‘Search automatically for Drivers’ option here.

- Windows will look for any pending driver updates and install them automatically.
- Once the drivers are updated, spend some time with your PC and see if it made a positive impact on the disk usage.
Replace or Restore the SATA cable
Even though this is a rare case, the faulty SATA case can also trigger 100% disk usage on your Windows 11 PC. To this is the culprit, you need to try reconnecting the SATA cable to the hard drive. See if the issue is fixed to some extent.
You may need to get a new SATA cable if you see that the cable is worn out from places. If the cable is loose from the point of contact with the disk, the disk will have to work harder than usual to fetch the data the requested data.
Run SFC scan to look for corrupt system files
As clear by the name, corrupt files force the services and processes to go crazy on your PC which otherwise was functioning normally. So it’s advised to scan your PC to catch these corrupt files so that you can repair them. To do as intended, follow the steps given below:
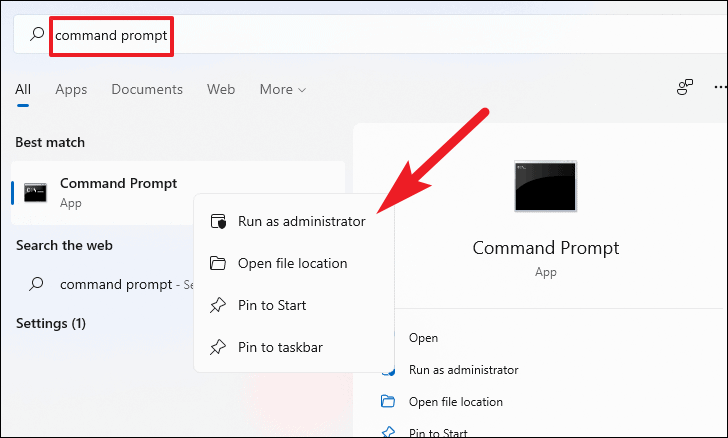
- Launch the Start menu and type in “cmd”, in the Search Bar.
- Right-click the relevant search result and choose ‘Run as Administrator’ from the context menu.
- Once you are in the Command Prompt, type these commands one by one and press the Enter key.
1. DISM /Online /Cleanup-Image /CheckHealth
2. DISM /Online /Cleanup-Image /ScanHealth
3. DISM /Online /Cleanup-Image /RestoreHealth
Note: Wait until one command finishes running and then enter the other command.
- Now Windows will scan your PC for corrupt files and download the replacements for these files as well.
- Once this process finishes, you should also look for any pending updates and install them as well.
Schedule a disk check
This method is similar to the one stated above but the difference is that it scans your disks to look for any potential errors. Let’s look at the quickest way to run a disk check on your Windows 11 PC.
- First of all, you need to open the Command Prompt in the Administrator mode by following the same method stated above.
- Once in the Command Prompt, type the following command and press the Enter key.
chkdsdk.exe /f /r
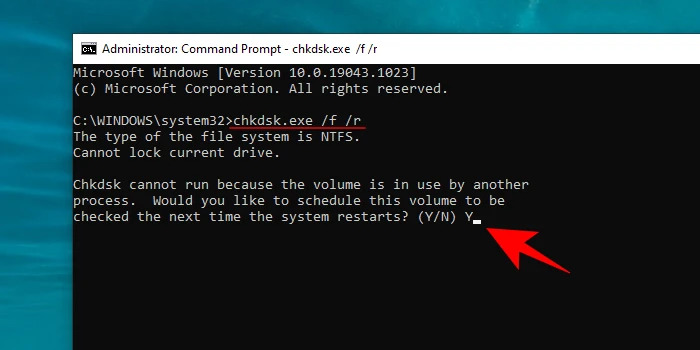
- Command Prompt will display a message asking to schedule the disk scan when the window will restart the next time; press the Y key followed by the Enter key.
- Now restart the PC and let Windows scan your disk.
Let Antivirus scan your PC
Malware infections are the cause of most of the serious issues on your PC and 100% disk usage is one of those. Even if you’ve scheduled your antivirus to run a quick scan on the daily basis, you should still run a deep scan at this moment. This will help catch any deep-rooted infections that are forcing the disk to work abnormally.
Apart from the anti-virus software you use, you can also ask Windows Security to scan your PC. For this:
- Fire up Windows 11 Settings by pressing the Win+I shortcut keys.
- Choose the Update & Security option in the Settings Window.
- From the left pane, choose Windows Security and open the ‘Virus & Threat Protection from the right side of the Window.
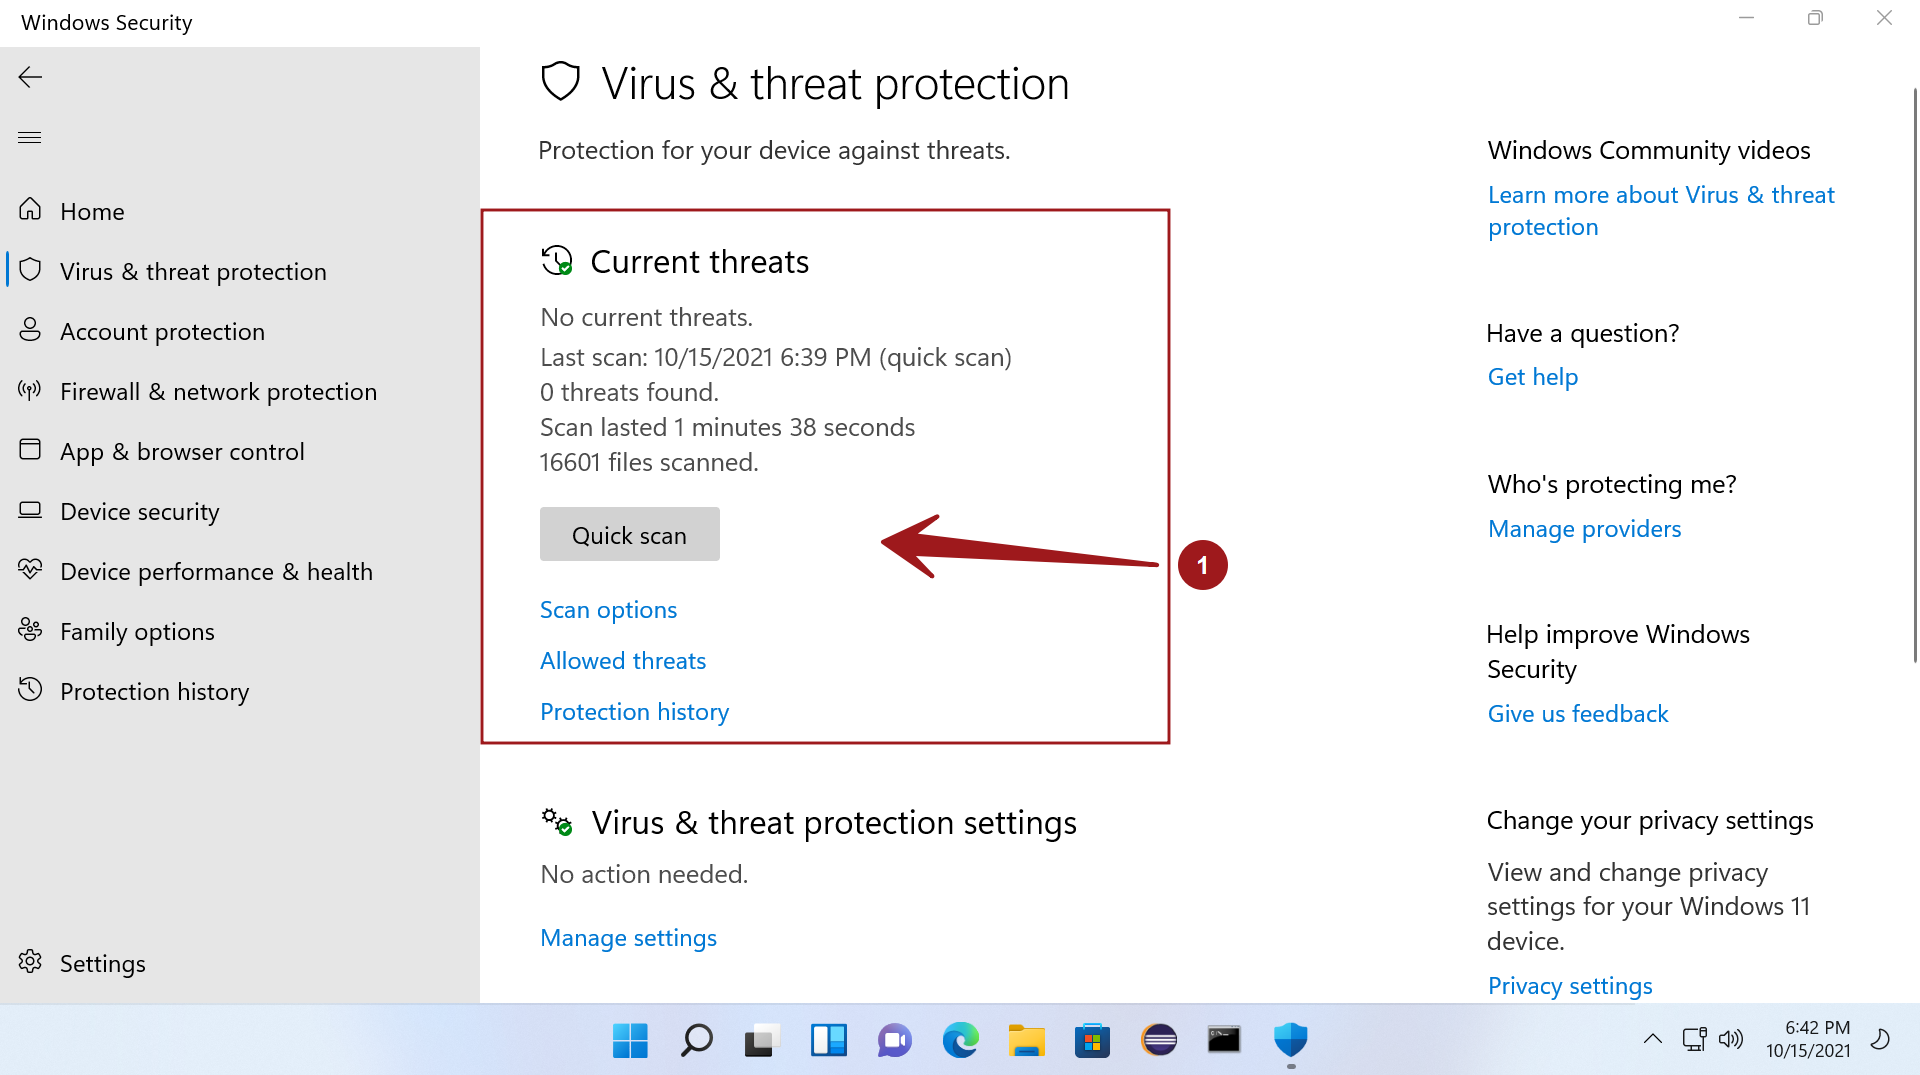
- Now run the Quick Scan.
- Wait until Windows Security scans your PC. If it detects any infection after the scan finishes running, press the Remove button.
Enable ‘Higher Performance’ Power Setting
If you use your PC will the Standard power mode, it’s time to change that and switch to the ‘High Performance’ setting. This is because 100% disk usage in Windows 11 is more of a common sight in the Standard power mode than the High-Performance mode. Let’s see how to perform the switch:
- Bring up the Windows Settings by using the Windows+I shortcut.
- Now click open the System category and choose Power & Sleep Settings in the left pane.
- Next, open the Additional power settings present on the right side of the Window.
- Now choose the ‘Create a power plan’ option from the left pane.
- Select High Performance and press the Next button.
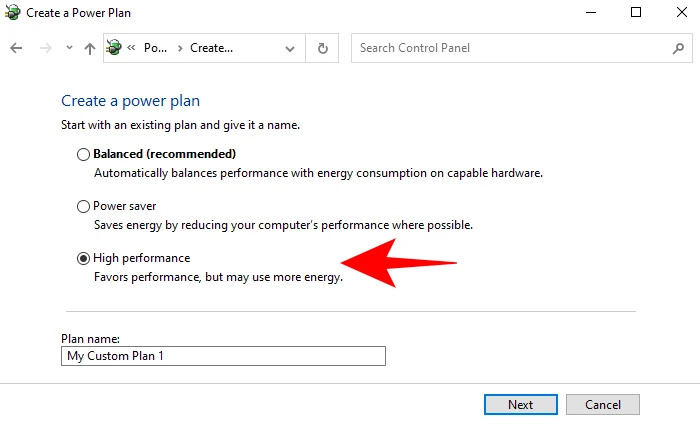
- Customize your plan and press the Create button.
Conclusion
Here we reach the end of a detailed troubleshooting guide to fix 100% disk usage on your Windows 11 PC. Hopefully, one or the other above-mentioned hacks must have helped you in fixing the issue. Know some other method that can quickly reduce the disk usage level? We’ll be glad to know.
Also Read: Windows 11 Restarts Automatically? Try These Fixes.


