


 Header Through Cloudflare")


Windows offers its users many security options like facial recognition and biometric verification. Many Windows users are facing problems with their Windows 11 Hello facial recognition. Additionally, some are also facing an issue with the fingerprint scanner not being compatible, leading to logging-in problems. If you, too, are facing a similar problem, then we have listed down a couple of solutions that will prove to be helpful.
Fix Windows 11 Hello Facial Recognition

Step 1) First, open Start and type settings.
Step 2) Click on the settings app as soon as it comes up at the top.
Step 3) Tap on System and scroll down to locate Troubleshoot.
Step 4) Click on Troubleshoot and then tap on Other Troubleshooters.
Step 5) Furthermore, scroll down to locate the Camera and click on Run.
Step 6) Now wait for your camera to be repaired.
Also Read- How To Configure A Windows Hello Fingerprint Login on Windows 11
Update Driver
If that does not work, go to the next process.
Step 1: Open Start and type Device Manager. When it pops up, open the Device Manager option.
Step 2: When the new window opens, go down and expand Cameras.
Step 3: Right-click on the camera and click on Properties.
Step 4: Open the Driver tab and click on Update Driver.
Step 5: Furthermore, click on Search Automatically for Updated Driver Software. Now your driver should be updated.
Step 6: You can also click on search for updated drivers on Windows Update.
Step 7: Tap on Search for Updates.
If that does not work, let’s move on to the next process.
Step 1) Once again, open Start and type Settings.
Step 2) Open Settings and go to Privacy.
Step 3) Click on Camera and enable camera access to this device.
Step 4) Enable allow apps to access your camera.
Step 5) Furthermore, scroll down and check if your app can access your camera. If it is disabled, just turn it on.
Step 6) Enable the “Let desktop apps access your camera” and close your window.
However, if this method also does not work for you, don’t worry. We have some more methods; just continue reading.
Install Correct Driver
Step 1: Open Start and type Device Manager.
Step 2: Further, open your Device Manager and expand Cameras as you did before.
Step 3: Right-click on the camera and select Properties.
Step 4: Open the driver tab and select Update driver.
Step 5: Now tap on Browse my computer for drivers.
Step 6: Then select ” Let me pick from a list of available drivers on my computer”.
Step 7: Select your camera driver and press Next.
Step 8: Now, your driver should be installed.
Step 9: Close the window and restart.
If that didn’t work, move to the next section.
Step 1) Open Start and type Device Manager.
Step 2) Then open your device manager.
Step 3) Expand the camera app and right-click on it.
Step 4) Click on Properties.
Step 5) Once again, open the driver tab and select uninstall device.
Step 6) Press uninstall and then restart.
Now your problem should be fixed. However, if that did not work, let’s move on to the next part.
Install Windows 11 Anew
Step 1: First, open this link https://www.microsoft.com/en-us/software-download/windows11.
Step 2: On this new page, go to Create Windows 11 Installation Media and press Download Now.
Step 3: A new pop-up window will come on the screen saying Opening Media creation. Click on Save the file.
Step 4: Double-click the file you just downloaded and press yes.
Step 5: On the new pop-up window, press Accept.
Step 6: Select your language and edition.
Step 7: Enable the recommended options for PC and click on Next.
Step 8: In the next window, you will be asked to choose the media. Here select ISO file and tap on Next.
Step 9: Save it as Windows 11 and wait for the file to be downloaded.
Step 10: After the download is complete, press Finish.
Step 11: Double-click the Windows 11 ISO file and click on setup.
Step 12: Tap on yes.
Step 13: Click on Next and press Accept.
Step 14: Select Keep personal files.
Step 15: If you want to do a clean install, click on Change what to keep and tap on Next. Wait for the update to be installed.
Now your problem should be fixed.
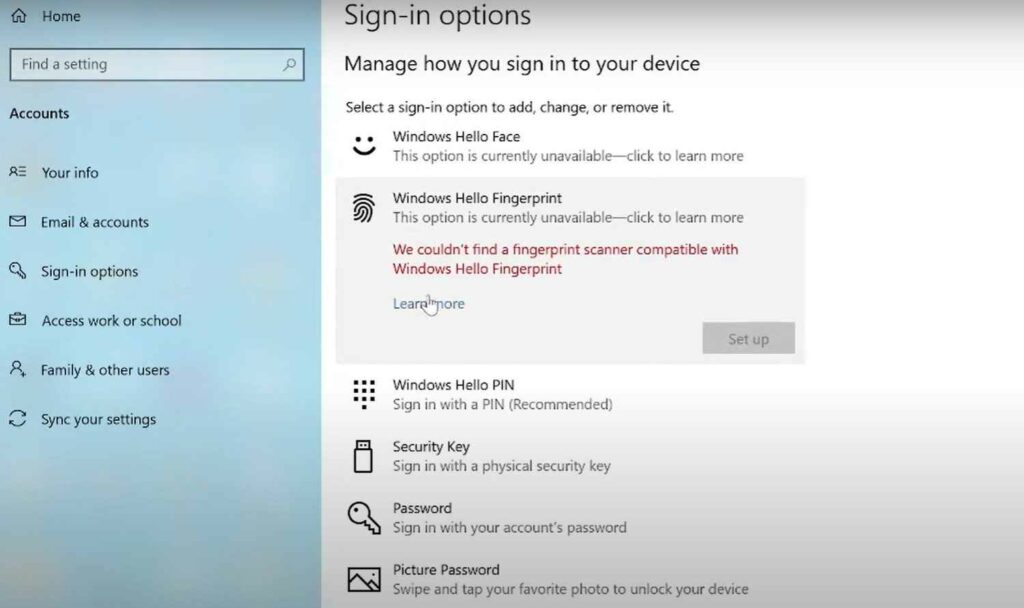
How to fix “We couldn’t find a fingerprint scanner compatible with Windows Hellow Fingerprint”?
Method 1: Check Biometric Service for first-time users
Step 1) Go to the search menu and type services.
Step 2) Click on the Services tab and tap on Run as administrator as you need to modify it. All the services running will be visible on the window.
Step 3) Scroll down and find Windows biometric service and make sure its status is running.
Step 4) Click on it and choose the startup from manual to Automatic. If the service status is stopped, you can start it.
Step 5) Tap on OK, and now you have successfully enabled the service.
Method 2
Now, you need to enable the service from a registry editor, so make sure you
Step 1: Press the Windows button plus the R button.
Step 2: Type gpedit.msc. First, you need to set up the service, and then you can modify it.
Step 3: First, you need to expand the administrative template and double-click on it.
Step 4: You need to scroll down and expand the Windows component.
Step 5: Double-click on it and then expand the option Biometrics.
Step 6: Double-click on it, and you will see five options there.
Step 7: Allow the use of biometrics. Make sure that the status and the stage are running, and choose enabled service.
Step 8: Hit Apply and then OK.
Step 9: Select the third option, which is “Allow users to log on using biometrics. Make sure its service is also enabled”.
Step 10: Hit Apply and tap on OK.
Next Part
Step 1) Double-click on “Allow domain users to log on using biometrics” and enable the option.
Step 2) Tap on Apply and then OK.
Step 3) Make sure three services are running here. The first service is to allow the use of biometrics. The second service is – Allow users to log on using biometrics, and the third service is – Allow domain users to log on using biometrics.
Step 4) Restart your system, as these changes will only affect after restarting.
Then check and do the setup. If you are still facing the same issues after rebooting your system, let’s go on to the third method.
Method 3: Update the latest driver
This method is for those users who have already enabled the service. Make sure you are using the latest driver of your biometric. To do that:
Step 1: Go to the device manager and expand the option, which is biometric services.
Step 2: Click on the View tab and click on Show Hidden Devices.
Step 3: Whatever option you’re getting here, update the driver and tap on search automatically for the driver.
Step 4: Make sure you are connected to the network and close the window. Check now, as your issue should be fixed by using the latest driver.
Step 5: Close the window and click on refresh on the home screen.
However, if you are still facing the same issue, read further.
Method 4: Uninstall the latest update
If you have already updated your system and are facing this issue, then you can simply uninstall the latest update of Windows on your system. For that, do the following:
Step 1) Go to the Control Panel and press the Window + R button together.
Step 2) Type appwiz.cpl and click on OK.
Step 3) It will take you to uninstall and change the program.
Step 4) You need to click on View installed updates. Choose Installed on, and you will be able to see Update for Microsoft Windows.
Step 5) From the top, click on Uninstall and then tap on Yes again. This might take twenty-twenty-five minutes.
Step 6) Restart your system and check if your issue is fixed or not.
However, if this is still not working for you, we have another solution.
Method 5: Run SFC and dism command
In this method, we will perform some commands by which your Windows corruption files can be restored and can fix this issue.
Step 1: Go to cmd and right-click on it.
Step 2: Click on Run on Administrator and then tap on Yes.
Step 3: Type sfc /scannow.
SFC stands for system file checker. It will check all the corruption inside your Windows file and repair those if corrupted. So wait for the process to complete. This might take fifteen minutes, but you need to perform this command till it reaches one hundred per cent. After completing this command, you need to restart your system, and I will show you the other command.
Step 4: Simply type dism.exe/online/cleanup-image/restorehealth and press enter. This command will restore the image of your Windows. This process will take some time.
Conclusion
The methods in this article have been tried and tested by various experts who have shared the solutions on various platforms. If none of these work for you, then maybe your system has a hardware problem. In that case, you must visit the nearest Microsoft customer care store.


