


 Header Through Cloudflare")


")
FaceTime is a great way for Apple users to make audio and videos calls and feel closer to their loved ones. Sometimes you may feel to record those happy family moments as a memory but as you must be aware, FaceTime does give you an inbuilt option to record your call. If you were wondering how to record your FaceTime calls, we have good news! Luckily, there is a tricky way by which you can record your FaceTime call on your iPhone, iPad, and Mac device without any need for a third-party platform.
So without any further delay, let’s see how to record your FaceTime calls on iPhone, iPad, and Mac.

Prerequisite to Record FaceTime Calls on iPhone, iPad, and Mac
To record your FaceTime calls on iPhone, iPad, and Mac, you must have a Mac with QuickTime player installed on it.
As you know, QuickTime is the native software of Mac, so you don’t have to worry about downloading and installing the software as it is already installed on the Mac. Now that you are aware of the prerequisites for recording FaceTime calls, let’s see how you can record the FaceTime call.
Also Read: How To Fix iPhone not showing up in Finder on Mac?
How to Record a FaceTime Call on Your Mac
Follow the steps below to record the FaceTime Call on Your Mac:
- First of all, open the FaceTime app on your Mac.
- Next, open the ‘Screenshot toolbar’ by pressing the ‘Command + Shift + 5’ keys simultaneously on your keyboard. This toolbar lets you access different screen recording options.
- Now choose ‘Options’ from the screen capture menu of ‘Screenshot toolbar’.

- Now click on ‘Save to’ to browse and set the location where you want to save the recording clips of FaceTime calls. By default, the recordings are saved on Mac Desktop.
- Choose the ‘Built-in Microphone’ option under the ‘Microphone’ tab to record the FaceTime calls with audio.
- Next, adjust the recording area by choosing between the ‘Record Entire Screen’ and the ‘Record Selected Portion’ options.
- Finally, press the Record button and the ‘Screenshot toolbar’ will begin recording the screen.
- Now you can start the ‘FaceTime’ call and the FaceTime app screen will be recorded.
After you hang up, tap the ‘Stop Recording’ button present on the top Menu bar.

That’s how you can record your FaceTime call on Mac. You can access the FaceTime call recording by browsing the location which you had selected earlier. Now, you are free to watch the Recorded call over and over again or share it with others on social networking platforms like Whatsapp, Facebook, and others.
Also Read: How To Use Apple Diagnostics To Check Your Mac’s Hardware?
How to Record a FaceTime Call on your iPhone or iPad
You can record the FaceTime calls on your iPhone without audio as Apple does not permit you to capture the audio for privacy concerns.
However, there is a simple method that lets you can record a FaceTime call on your iPhone along with the audio. As mentioned earlier, you need a Mac for this workaround. So, let’s see how to record a FaceTime call of your iPhone along with audio using your Mac:
- First of all, you need a USB-C cable to connect your iPhone or iPad with your Mac.
- After establishing the connection, open the QuickTime Player on your Mac.
- Now, open the File menu and choose ‘New Movie Recording’ from the list.
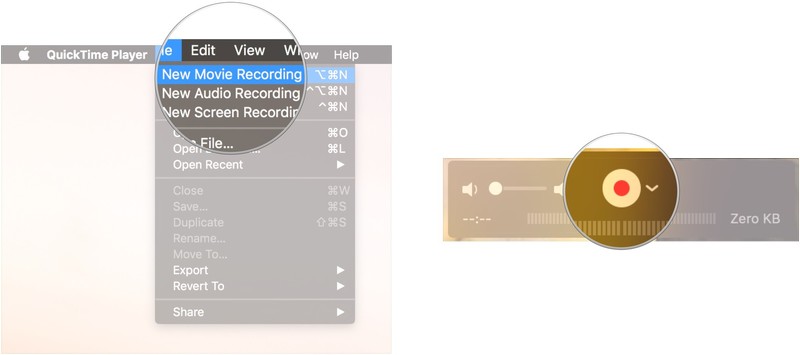
- Click the ‘down arrow’ icon in the QuickTime window near the record button.
- A list of available cameras will open and choose ‘iPhone’ or ‘iPad’ from the list.
- Now unlock your iPhone or iPad and its screen will be visible on the QuickTime Player window open on your Mac.
- You can drag the volume slider of the QuickTime Player to increase or decrease the volume of the audio being recorded from the iOS device.
- Now, open the FaceTime app on your iPhone or iPad and press the ‘Record’ button on the QuickTime Player window.
- Now you can start the FaceTime call with your family or friends and it will be recorded by the QuickTime player on your Mac.
- Once you end the call, you can also stop the recording by pressing the Stop button on the QuickTime player.
- Now save the recording by choosing the ‘Save’ option from the File Menu. Here you can choose the location where you want to save the FaceTime call recording.
Also Read: How To Use iOS 15’s Built-in Password Authenticator On iPhone And iPad
Conclusion
That’s all you need to do to easily record your FaceTime calls on iPhone, iPad, and Mac. Now you can save your good times on the FaceTime call using the QuickTime Player App and savor them later as memories. What do you think about this clever workaround? Let us know in the comments below.
Also Read: How To Fix Overheating Issues On MacBook?


