


 Header Through Cloudflare")


We all need to transfer files from our iPhone or iPad to our MacBook for various reasons. We might need to copy a file for our work-related reasons to our Mac or we just want to watch a video on the big screen.
Syncing and transferring of files has evolved with technology development, have come a long way, iPhone has services like iCloud and iTunes to make the process easier.
Here we have brought five proven ways that can be useful to you. You can use any method to transfer the files on the types of content you’d like to copy to the iPad.

- Image Source: GadgetARQ
Check the detailed process to easily transfer media files like photos, videos, and music as well as books, documents, and so much more from your iPhone or iPad to Mac.
Read: How To Create And Remove A Drive Partition On Mac?
You can use iTunes in two ways to transfer your files: iTunes File Sharing and iTunes Syncing.
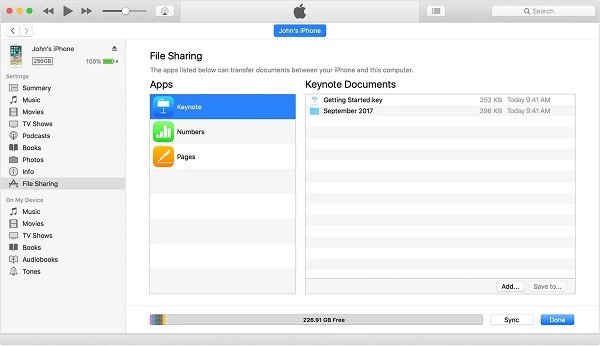
Via iTunes File Sharing
You can transfer: Only files of apps that are compatible with iTunes File Sharing
The File Sharing feature lets you transfer files between your PC and the apps compatible with your iPhone/iPad. Various apps like Keynote, Pages, and Numbers are compatible with File Sharing and you can use iTunes File Sharing to transfer your files.
Follow the steps below to transfer the files from Mac to iPhone/iPad with iTunes File Sharing:
- You should have the latest version of iTunes on your MacBook
- Open iTunes on your desktop and then you have to connect your Apple device to it.
- Now you have to tap the device icon on the screen and select the “File Sharing” option.
- Choose any app that is compatible with File Sharing and then tap “Add” in the iTunes app.
- Next, choose all the files you want to copy to your Mac and tap “Add” when you are done.

- Image Source: EaseUS
Go to the same app on your iPhone and you will find all the transferred files in it.
Read: How To Eject Water From An iPhone To Improve Sound Quality?
Via iTunes Syncing
You can transfer Photos, Videos, Music, Podcasts as well as Audiobooks.
Follow the steps below to transfer the files from Mac to iPhone/iPad with iTunes Syncing:
- Launch iTunes and then connect your iOS device to the PC. Next, unlock your iDevice and trust this computer.
- Move to the “Device” tab on iTunes and choose the category, like Photos, Movies, Songs, and more.
- After selecting the category, tap on “Sync [category]”.
- Now choose the files you want to copy to your iPhone.
- When you are done, click on the “Apply” button to begin syncing your files with iPhone or iPad.

- Image Source: EaseUS
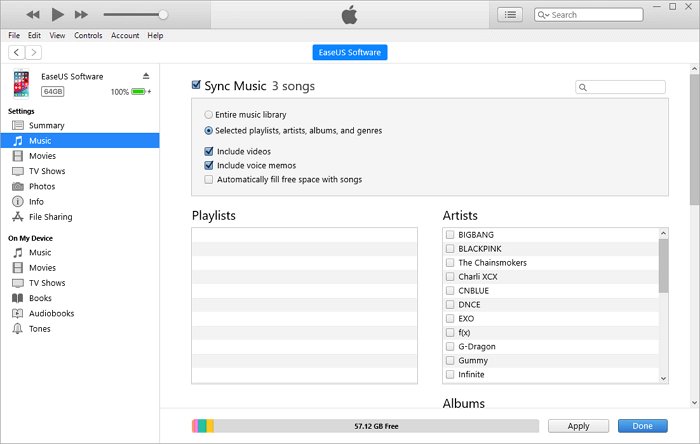
Note: iTunes Syncing can cause data loss on your iPhone because syncing replaces the previously existing files like movies, music, and photos.
Read: How to AirPlay From Your Apple Devices To Your TV
Transfer Files from PC to iPhone or iPad for Free Using iCloud Drive
You can transfer: All types of files
iCloud Drive is Apple’s version of Dropbox. You can transfer all types of files with iCloud but if you want to specifically transfer documents, then iCloud Drive is the best option for you.
You can use iCloud.com to transfer your file to your PC if you haven’t installed the iCloud control panel.
- Visit iCloud.com on your Mac and then you will have to sign in using the same Apple ID that is used for iPhone or iPad.
- In the list of options, look for “iCloud Drive”.
- Now click on the “Upload” button on drive and choose all the files you wish to transfer to your iPhone or iPad from your desktop.
- To find all the transferred from your PC to iPhone using iCloud Drive
- Go to the “Settings” app and then tap your name.
- Next tap “iCloud” and then “iCloud Drive”.
- In iCloud Drive go to the “Files” app and then tap on the “Browse” option and choose “iCloud Drive”.

- Image Source: EaseUS
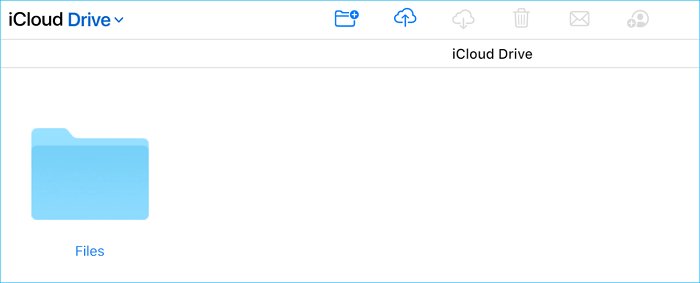
You will find all the files that you have transferred from your PC to your iPhone or iPad.
Read: Best Mac Antivirus Protection Software in 2021
Transfer Files from Mac to iPhone using Dropbox
You can transfer all media files and documents.
Cloud storage services like Dropbox for transferring files between an iPhone and Mac.
Follow the steps below to transfer files between iPhone and Mac with Dropbox:
- Firstly you need to install the Dropbox application on your Mac as well as iPhone.
- Log in to the Dropbox app using the same account.
- Now upload all the files to Dropbox from your Macbook if you have to transfer files from
- Mac to iPhone and upload from iPhone to Dropbox if you have to send files from iPhone to Mac.

- Image Source: EaseUS
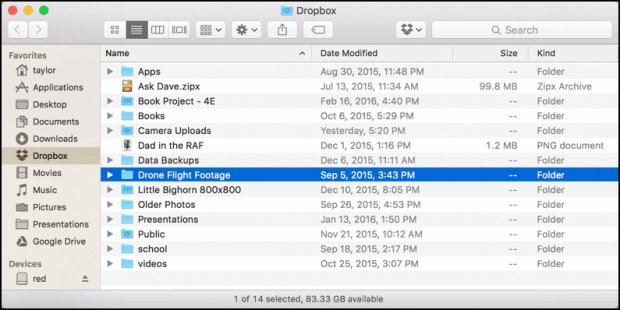
Now on the destination device, open the Dropbox app and you will find the uploaded files in it.
Read: How To Remove Spyware On Mac?
Conclusion
Transferring of files from Mac to iPhone/iPad occurs daily. So it’s necessary to know how to do thing process. Here we have listed the most processes that are frequently used by Apple users. Now you can copy your files within minutes using any one of the processes listed above.


