


 Header Through Cloudflare")


If you are having trouble optimizing your storage space, then partitioning the hard drive can help. Unfortunately, Mac users often overlook the benefit of creating a partition to solve most of their system problems. Moreover, not many users are aware of this feature. Partitioning your hard drive essentially means creating containers for different files, folders, operating systems, and data.
How To Create Hard Drive Partition On Mac?
To learn how to create a partition on Mac, follow the steps below:
Step 1: Go to Desk Utility App and select the volume from the Sidebar. Furthermore, tap on the partition button in the Toolbar. In case your Disk Utility is not opening, click on the Launchpad icon from the Dock. Enter Disk Utility in the Search Bar for it to open.
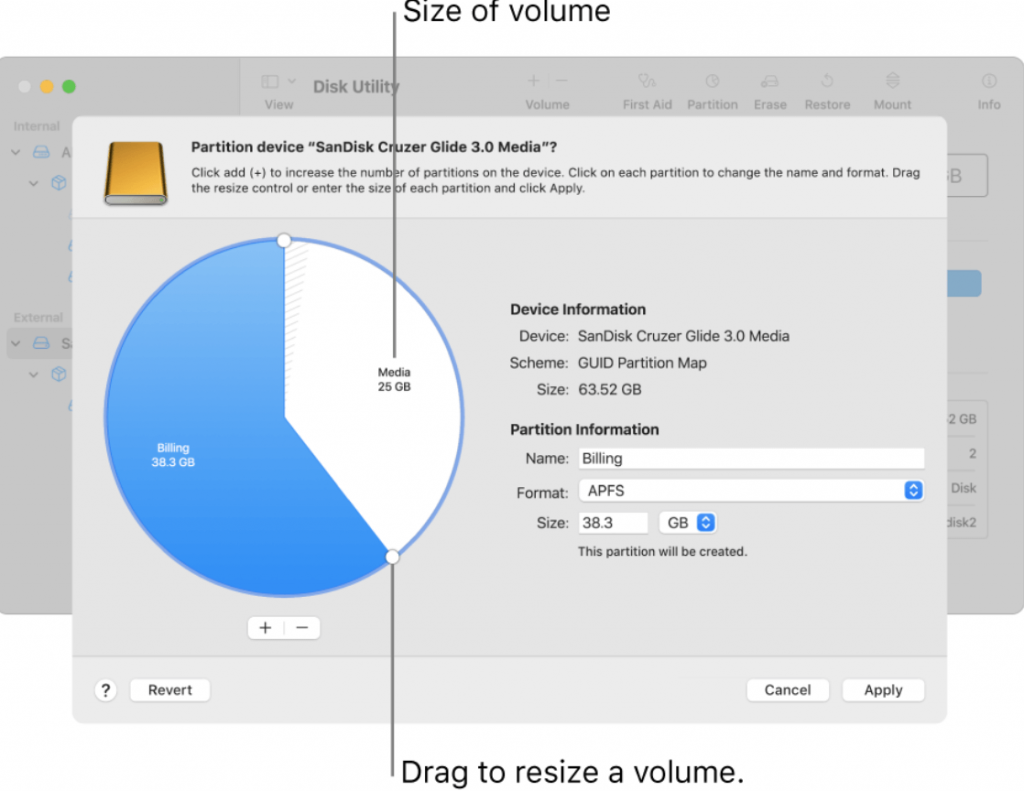
Moreover, if you have more than one storage device connected to your Mac, click the volume of the one you’re going to create a partition. A pie chart will appear on the screen to demonstrate the space available for partition.
Step 2: Tap on the + Add Button under the Pie Chart. A dialog box will appear with the option to add a partition. Enable it after reading the information on it.
Step 3: In the name field, enter a name and click on the Format Pop-Up menu. Select a File System Format.
Step 4: Use the resize control button to adjust the size of the volume as per your need. Tap on Apply.
Step 5: A pop-up menu will appear on the partition device dialog; read the information and tap on Partition.
Step 6: Tap on Done after the process finishes.
Once the partition is created, you will see separate icons for the Disk Utility Sidebar and the Finder Sidebar.
Important Tip: Create a backup for your data before creating the partition. So that if in case something goes wrong, your valuable data will remain secure in the backup.
Read: How To Eject Water From An iPhone To Improve Sound Quality?
How To Delete A Partition On Mac?
If you don’t need the partition anymore and want to get rid of it because it can also make your system complex, follow the steps below:
Step 1: Once again, we will go to the Disk Utility App and choose a volume from the sidebar. Further, from the Toolbar, select Partition.
If your Disk Utility is not opening for some technical reason, go to the Dock and start the Launchpad. And same as before, search for the Disk Utility icon.
Step 2: Go to the Apple File System Space Sharing dialogue and tap on Partition.
Step 3: Select the partition you want to delete from the Pie Chart and tap on Delete. Then click on Apply.
Step 4: On the Partition Device Dialogue, tap on Partition. Click on Done after the process is complete.
Read: How to AirPlay From Your Apple Devices To Your TV
How To Erase A Partition On Mac?
Step 1: Once again, you have to go to the Disk Utility app, select View, and then Show All Devices.
Step 2: Choose the container you want to erase from the Sidebar.
Step 3: Go to the Toolbar and click on the Erase Button on your Mac.
Step 4: Enter a name and click on the Format pop-up menu.
Step 5: Tap on File System Format, and after the process is over, tap on Done.
Read: Best Mac Antivirus Protection Software in 2021
How To Enlarge A Partition On Mac?
If you are struggling with partition space where one volume is running out of space, you can enlarge that partition. Follow these steps below:
Step 1: Go to the Disk Utility App, and once again, Select the volume from the Sidebar and tap on Partition.
Step 2: Tap on Partition by clicking on the Apple File System Sharing Dialogue.
Step 3: Select the partition you want to delete from the Pie Chart and tap on Delete.
Step 4: Tap on Apply and read the information on the Partition Device Dialogue.
Step 5: Click on Done.
Read: How To Remove Spyware On Mac?


