Everyone these days has an external media like a flash drive or an external hard drive which they use to expand their storage space, or transfer files and folder between two computers or to keep some personal or confidential documents separate from the computer. A new external hard drive or a USB flash drive that you just bought can be used with both Mac and PC, but not always straight out of the box because most of them (external hard drives or USB flash drive) are sold in NTFS format, which is fully compatible only with Windows. A Mac can only read the NTFS formatted hard drive but can not write any data on to it until you install a third party apps like NTFS for Mac or NTFS-3G to enable write access to NTFS partition under Mac OS X. So, If you wish to use the hard drive for Mac, you need to format the external media in Mac OS X native file system called “Mac OS Extended (Journaled)” filesystem. This will ensure full Mac compatibility of a new external hard drive or flash drive.
Why would you format an External Disk or a Flash Drive in Mac OS Extended (Journaled)?
There are a good number of reasons why you might want to format an external disk or a flash drive for full Mac compatibility. Here are the following most common reasons why would you like to format an external disk or a flash drive for Mac under Mac OS Extended ( Journaled).
- Mac OS X can only be installed on a hard drive formatted in Mac OS Extended ( Journaled), filesystem. So if you wish to clean a hard drive for a fresh install of OS X you will need to format it under Mac OS Extended ( Journaled).
- If you want to create an encrypted drive for Mac, it should be formatted in Mac OS Extended (Journaled).
- If you want to use the drive for Time Machine backup, it must be formatted in Mac OS Extended ( journaled).
- You must format the external disk or flash drive in Mac OS Extended ( Journaled) with GUID partition table, If you want to make it a bootable USB installer disk for OS X.
How to Format an External Disk or a Flash Drive for Mac?
Please be aware that formatting a drive will erase it completely, so make sure you have backed up any important data you want to keep in case you are not using a brand new external hard drive.There are two ways to format an external disk or a flash drive for Mac. You could either use Disk Utility or Terminal command to format it for Mac.
Format an External Disk or a Flash Drive for Mac using Disk Utility in OS X El Capitan and macOS Siera.
To reformat the drive in Mac OS X El Capitan or macOS Sierra :
- Connect the External disk drive or Flash Drive and open Disk Utility.app from /Applications/Utilities/ folder.
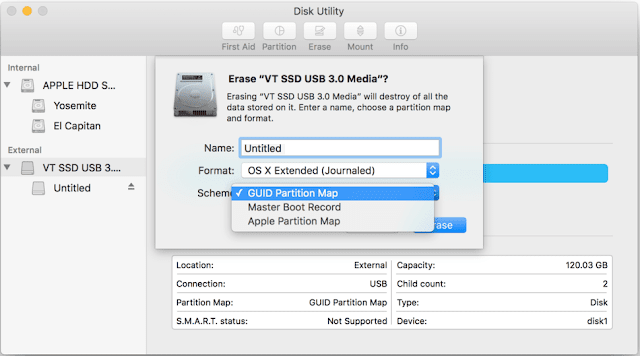
- Select the External drive or Flash Drive on the left that shows the capacity and not the Volume which appears indented below the drive. Even if you select the Volume, it will also format the Disk, because there is no other Volume on this disk as shown in the picture. You must select the drive name as a correct way to format the disk.
- Click on the Erase option across the top in the main window.

How to Format an External Disk or a Flash Drive for Mac - You will be presented with a dropped down panel where you need to type a name for the Volume and select the format type as Mac OS Extended ( Journaled) and partition map scheme as GUID. OS X Extended (Journaled) is the default Mac file system with GUID partition scheme. Though, you can choose between different partition scheme: GUID Partition Map, Master Boot Record, or Apple Partition Map. GUID is the most recent one, while Master Boot Record (MBR) is older. Both also work with Windows PCs while Apple Partition Map works only with Mac.

How to Format an External Disk or a Flash Drive for macOS Sierra - Select the GUID Partition Map if you are creating a bootable install Disk or going to use with Time Machine backup. And then click on “Erase” to erase and format the external disk or Flash drive.

Formatting an External Disk or a Flash Drive for Mac
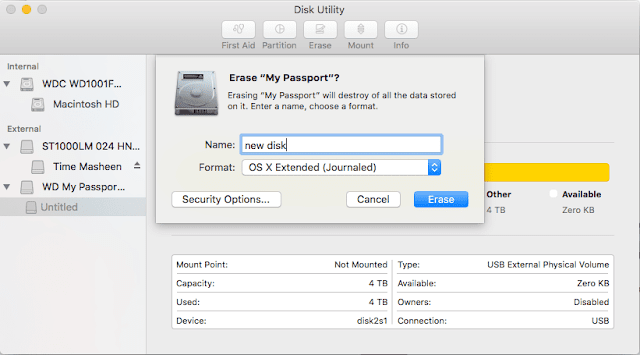
- Please note that, when you select the indented Volume name below the drive name on the left, then you also get the security option during erase/Format. But the partition scheme option will be unavailable, because you are formatting a volume not the disk.

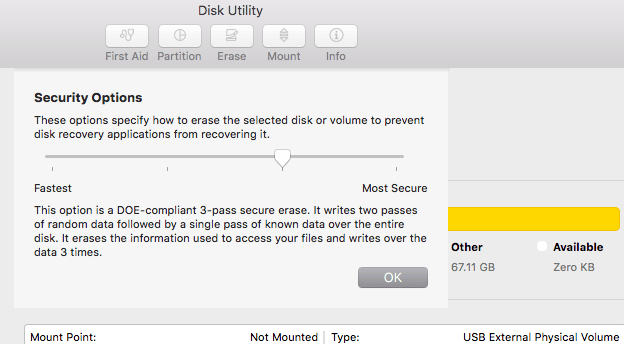
Format a volume for Mac in macOS Sierra using Disk Utility - Security Options will allow you to erase the Volume securely by overwriting the contents of the drive upto seven times before removing the header information from files and folder. When you click on security option, you get a new pop up window with a slider to adjust the level of security ( in terms of data overwrite) while erasing the disk. This secure erase will make it almost impossible to recover the contents or data of the hard drive using any data-recovery software. But secure erase will take ages to complete, depending upon the size of the volume. Use it only when you really need to erase content securely and if you had highly confidential information in the drive otherwise leave the slider to fastest to erase it quickly.

Adjust the security level while formatting an external disk or Flash drive for Mac
- Once the erase is completed, click on the done and now you can use the external drive or the formatted Flash drive for Mac as you want.
Format an External Disk or a Flash Drive for Mac using Disk Utility in OS X Mavericks and below versions.
- Connect the External disk drive or Flash Drive and open Disk Utility.app from /Applications/Utilities/ folder.
- Select the External drive or Flash Drive on the left that shows the capacity.
- Click on the Erase option across the top in the main window.

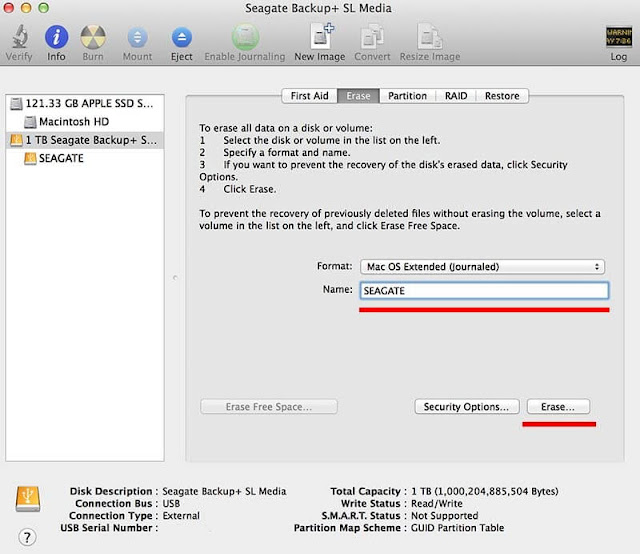
Format an External Disk or Flash Drive for Mac in Maverics - Now type a new name for the Volume and select the format type as Mac OS Extended ( Journaled).
- Now click the “Erase” button and confirm again on the next pop-up window to format the External Disk or a Flash Drive for Mac
Format an External Disk or a Flash Drive for Mac using Terminal Command
 |
| Format an External Media for Mac using Terminal Command |
2. Note down the disk identifier of the disk you want to format. In our case here the disk identifier is disk2.
3. Now type the following command to erase and format the external disk or the flash drive for Mac.
diskutil eraseDisk JHFS+ MyBackup disk2
The above command will erase and format the external disk or flash drive (disk2 in my case) in Mac OS Extended ( Journaled) filesystem. All the contents of the disk will be erased and Volume will be renamed to MyBackup as mentioned in the command and the newly formatted drive will appear on your desktop.
Note :- If you want to use this External disk or a flash drive formatted for Mac on windows you will need to use HFS Explorer or HFS for windows by Paragon Software, or you can format this external drive or flash drive in exFat, which will be compatible for both Mac and PC.





![The Apex Legends Digital Issue Is Now Live! Apex Legends - Change Audio Language Without Changing Text [Guide]](https://www.hawkdive.com/media/5-Basic-Tips-To-Get-Better-On-Apex-Legends-1-218x150.jpg)


