


 Header Through Cloudflare")


")
In this article we have put down the potential fixes that can help speed up the slow Steam Client on Windows 11.
Steam is the ultimate choice of gamers to play games and interact with the gaming community. While Steam is a robust platform and rarely runs into issues, sometimes users tend to feel that Steam client is lagging considerably on their PC and desktop that runs Windows 11. The issue can worsen, and the Stream program can freeze and even crash on the machine.
If you’re upset with the sluggish behavior of the Steam client, we know how much nuisance it can create. Fortunately, it is pretty easy to bring Steam back on track. To speed up Steam on your browser, we have curated this troubleshooting guide that contains the potential hacks to help you do so.
So, let’s begin troubleshooting the issue hogging the Steam client.
Also Read: Unable To Join Multiplayer Game Session On steam? Try These Fixes

Why Steam is slow?
For the unversed, Steam’s browser client caches the game files to help improve the gaming experience. Sadly, the cache files do the opposite of what it is destined to do.
So, to get started with the troubleshooting process, you should wipe off all the cache files and cookies stored on your browser. It is recommended to do this from time to time as it speeds up the browser as well.
Additionally, you can also use the Repair Steam option present in the client to fix the corrupt and missing Steam files. We are explaining the different steps of fixing the slow Steam client on Windows 11.
Step 1- Uninstall Third-Party apps
Before we move towards advanced troubleshooting hacks, it’s sensible to see if the sluggish behavior is because of the issues hogging your PC. To rule out this condition, you should go for disk cleanup and disk defragmentation to put the system in an optimized state.
In this context, you should first try to uninstall bloatware and unnecessary third-party apps from your Windows 11 PC.
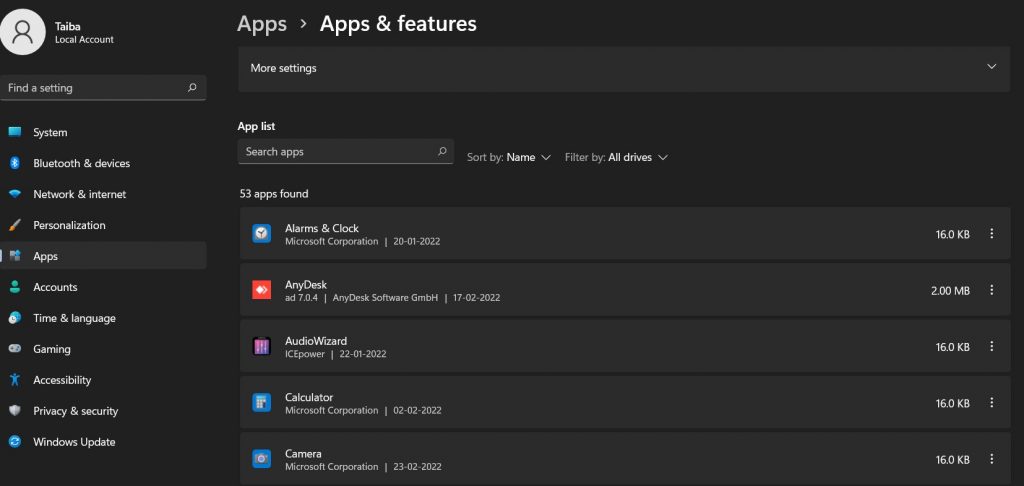
- For this, you can go to the Settings app on your PC and then click on the Apps option in the left pane.
- Now you will see the list of apps installed on your PC.
- If you find some apps that are of no use to you, click on the kebab menu and choose the uninstall option.
Also Read: Steam Overlay Not Working In Windows 11? Try These Fixes
Step 2- Clear Steam’s cache and cookies
As mentioned before, when the cookies and cache files accumulate in the Steam client’s browser, they drastically affect the performance of the Steam client. For the uninitiated, Steam client has its in-built browser that comes in handy to browse the Steam Store. So, let’s clear the cache and cookies of the browser.
- First, launch the Steam client and then click on the Steam icon.
- Next, choose the Settings option from the menu to access the Settings window.
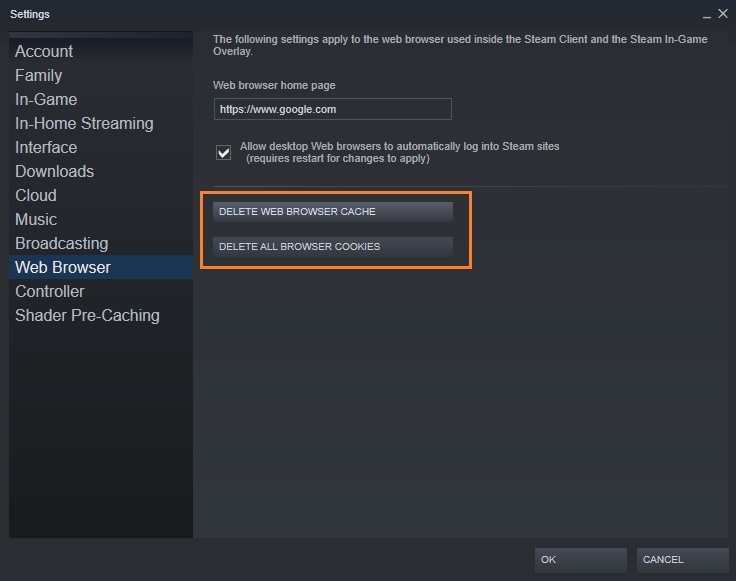
- Click on the Web Browser option and choose the Delete Web Browser Cache button.
- Press the OK button to confirm the action.
Also Read: Unable To Download Games In Steam? Try These Fixes
Step 3- Delete the download cache
Steam can turn sluggish due to the excessive amount of download cache accumulated on your PC. To boot the Steam performance, it is essential to part ways from the download cache. For this,
- Launch Steam client on Administrator mode by choosing the option from the context menu.
- Now click on Steam and then choose the Settings option from the menu that unfolds.
- Now tap the Download option in the left bar.

- Here you will find the Clear Download Cache button; click it.
- Next, click the OK button on the confirmation pop-up.
After the process is successful, close the Steam client and relaunch it.
Also Read: How To Play Steam Games On The Oculus Quest 2
Step 4- Tweak proxy settings
As per some users, disabling the Automatically Detect Proxy option tries to fix the slow Steam client issue. So let’s see how can you do it on your PC:
- Use the Windows key + Q hotkey to bring up the search box.
- Now type Internet Options in the search box and choose the first search result you see.

- In the new window that opens, choose the Connections tab.
- Look for the LAN settings button and press it.
- Next, uncheck the Automatically detect settings check box located on the next window.
- Press the OK button to confirm.
Also Read: How To Play Steam Games On Android TV
Step 5- Repair Steam
If none of the methods mentioned above fixed the slow Steam client on Windows 11, it’s time to fix corrupted Steam files.
Note: Only the Admin account can repair the Steam client.
- Bring up the Run dialog box using the Windows+R shortcut key.
- Now type in ‘C:Program Files (x86)SteambinSteamService.exe /repair’ in the command box and press the OK button.

Even though the above method works like a charm to boost Steam performance, be mindful that it will lead to data loss.
Wrapping up
So we’ve reached the end of this quick troubleshooting guide. Anyways, accelerating the Steam client is not a big deal and can be done using the series of steps mentioned above. If you know some other methods that can fix the slow Steam problem on Windows 11, don’t forget to mention them below.


