


 Header Through Cloudflare")


Microsoft maintains a reputation of periodically releasing software updates to patch up the bugs and issues in the software. Microsoft has recently launched its major Windows version and people are migrating to the newest Windows 11. However, a lot of Windows users have reported that they are unable to install the latest builds of Windows 11 PC and encountering a specific error code 0x800f0988 while trying to update the software.
Although Windows is known for handling such errors themselves, without bothering its users, this error code is not yet fixed. But no worries, this error can either occur to do some random settings or issues of your Windows 11 PC and can be handled just as easily. But if the issue is not solved easily, it can occur due to other reasons like corrupt system files, update cache, and more. Whatever is the reason for this, in this detailed troubleshooting guide, we have presented four methods by which you can solve this error code and update your system. So let’s get started!
Also Read: File Explorer Not Responding In Windows 11 [Solved]
Manually Download and Install the Updates
Microsoft allows you to manually download and install software updates on your PC. However, you need to know the base number of the Windows update you need to install which can be taken note of from the ‘Software Update’ screen of your Windows 11 PC. Here’s how you can download and install Windows 11 updates manually:
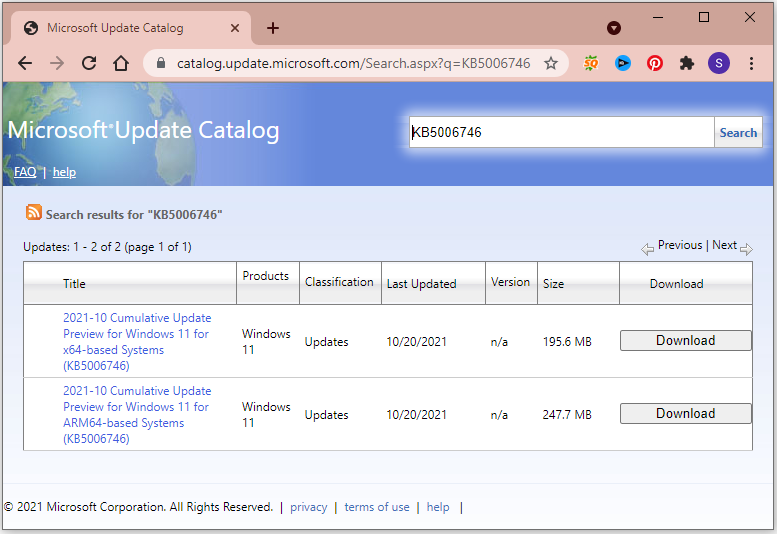
- First of all, you need to visit Microsoft’s official Update Catalog Website which is ‘catalog.update.microsoft.com’ on any web browser.
- Now look for the search bar in the right and enter the KB (Base Number) of the update you want to download on your PC. Press the Enter key so that the search is performed.

- Now all the updates related to the base number entered by you will be displayed on the screen. Click or hover over the title of the update to get more information about the update package.
- A new browser window will be opened to display the package information. Information like classification, products supported, and the languages supported by the update package will be displayed in it. You can also access information like Installation resources, Package details, and more from various tabs.
- If you what to download any software update, simply press the Download button present at the end of the row.
- Now right-click the download link on the new Window and click the ‘Save Link As’ option. Now choose the preferred location and press the ‘Save’ button. Now the ‘Windows Update Package’ will begin downloading on your Windows 11 PC. It will take some time for the package to get downloaded.
- Once the download is finished, browse the location where you downloaded the Update package. Double-click the file to run it on Windows 11 PC.
The Windows Update Standalone Installer will launch on your PC and it will prepare your Windows 11 PC for installation. This process might take several minutes.
- You’ll see a prompt on the Windows screen to notify you that the update is ready to be installed on your System. Choose the ‘Yes’ option to begin the installation process.
- Now the Windows update package will begin installing on your Windows 11 PC. It will take some time and you should wait until the process is completed. Do not switch off your system at this time.
- When the update is installed on your PC, you will be asked to restart your system. Reboot your PC to complete the installation process.
Also Read: How To Install Dolby Atmos In Windows 11?
Use Windows Terminal to Run DSIM tool
DSIM or ‘Deployment Image Servicing and Management is a Windows command-line tool. Here we will use this tool to troubleshoot the current Windows image on your Windows 11 PC.
Follow the steps below to run the DSIM tool on your Windows 11 PC:
- Access the Search bar present on the taskbar of your Windows 11 PC and enter ‘Terminal’ in it. Now right-click the Windows Terminal and click the ‘Run As Administrator option.
- Now the desktop screen will be greyed and you’ll see the UAC (User Account Control) pop-up on the screen. If you will not be logged in to the admin account currently, you will be asked to enter the password to log in. Otherwise, you will have to choose the ‘Yes’ option on the pop-up.
- Now the terminal window will appear on the screen and press the downward arrow and click ‘Command Prompt’.
Note: Use can also use the shortcut ‘Ctrl+Shift+2’ key to launch the command prompt.
- Now you will have to copy-paste or type the following command in the command prompt and press the enter key.
dism /online /cleanup-image /startcomponentcleanup

- Now the Windows Image Cleanup process will begin on your Windows 11 PC and it will take some time to finish. Do not shut down the PC or interfere with the process in any way. When the cleanup will be completed, you will see a pop-up on the screen with the message.
Also Read: How To Split Screen In Windows 11 For Multitasking?
Uninstall Additional Languages from Windows 11 PC
Microsoft Windows is known to support a large number of languages owing to a vast number of its users. But there is a good chance that the default or additional language of your PC is the reason why you are facing this issue on the computer. So you will have to uninstall the language pack from your Windows 11 PC.
- To do so, first of all, you need to launch the start menu on your computer and navigate to the Settings app.
- Use can also press the Windows+I key to open the Start Menu on your Windows 11 PC. After this, you need to access the ‘Time & Language’ tab from the left pane of Windows 11 Settings.
- Now choose the ‘Language & Region’ option from the right side of the Settings Window.
- Now look for the additional language settings in the Languages tab and press the three horizontal dots here. Look for the Remove option in the overflow menu and tap it.

- Once the language package is removed from your PC, reboot your computer and install the package once again.
Remove the Windows Update Cache on your PC
Many users have reported that the issue is resolved when you empty the Windows Update Cache. This is so because the damaged and corrupted update files from the system are uninstalled from the PC. This is a very generic method to resolve the issue but it is very effective at the same time.
Let’s see how to do it:
- First of all, hit the Ctrl+Shift+Esc keys to launch the task manager on your Windows 11 PC. Now go to the ‘File’ tab found in the top left corner and press the ‘Run New Task’ option.
- Now enter ‘wt.exe’ in the new task creation tab and enable the checkbox ‘Create this task with administrative privileges. Finally, press the ‘OK’ button in the tab.

- Now the terminal window will appear on the screen. Press the downward arrow here and click ‘Command Prompt’.
Note: Use can also use the shortcut ‘Ctrl+Shift+2’ key to launch the command prompt.
- Now type the following command or copy-paste it and press the Enter key to halt all the Windows Update-related services.
net stop bits
net stop wuauservnet stop cryptsvc
- Now as the services are stopped, press the Windows+R keys to open the Run dialog box on your PC. Now type or copy-paste the following path and press the Enter keyC:\Windows\SoftwareDistribution\Download
- Now head to the Files Explorer and select all the files here by hitting the Ctrl+A key and now press the Shift+Delete keys to thrash these files permanently.
- Next, go to the address bar and choose the ‘SoftwareDistribution’ directory.
Now, click the ‘DataStore’ folder here. - After this select all the files by hitting the Ctrl+A key and pressing the Shift+Delete keys to delete these files permanently.
- Now you go back to the Command Prompt Window and enter or copy-paste the following commands and press the enter key. This command will restart all those services that you had disabled earlier in this method.net start bits
net start wuauserv
net start cryptsvc - Now restart your Windows 11 PC and try to update your PC again. Most probably the issue will be resolved by now.
Also Read: How To Install Windows 11 On An Unsupported CPU?
Conclusion
Here we come to the end of our detailed guide on how to resolve the 0x800f0988 error while installing updates on your Windows 11 PC. The above methods are tried and tested and will prove to be effective in resolving this issue. If you need any further help, let us know in the comments.


