


 Header Through Cloudflare")


Have you ever wondered how to create your own AI chatbot that can converse naturally and intelligently with your users? If so, you might be interested in ChatGPT API, a powerful and easy-to-use tool that lets you build chatbots with state-of-the-art natural language processing capabilities. ChatGPT API is based on ChatGPT, a chatbot product launched by OpenAI in November 2022. So basically, ChatGPT API is made using OpenAI’s GPT-3 family of huge language models. They used some robust techniques called supervised and reinforcement learning to make it even better. With this API, you gain a permit to the exact model, GPT 3.5 Turbo, that’s used in the ChatGPT product.
OpenAI is an artificial intelligence research organization that forges natural language processing systems that can communicate and assist users in diverse domains. They have newly announced the ChatGPT API, which delivers access to their latest chatbot model, gpt-3.5-turbo. This model has outstanding conversational abilities and responsiveness and is proposed at a significantly lower cost than the former models. This allows developers and non-developers correspondingly to leverage the ChatGPT API for making their customized chatbots.
In this post, we have gathered a simplified guide for you to demonstrate to you how you can make your own AI chatbot using the ChatGPT API from scratch. So, even if you have a shallow knowledge of programming and coding you will still be able to build it very conveniently.
Also, I am using Windows OS for this tutorial. So, if you are someone who is using a Mac or Linux the steps are almost the same. You will have no difficulties using this guide to build your own AI Chatbot.
Also Read- How To Access ChatGPT From Your Mac Menu Bar
#1. Gathering Tools
Alright, let’s get started with step one of this guide – gathering the tools you need to build your chatbot! No need to waste any more time, let’s dive straight in.
Following are the tools you need before getting started:
- Python programming language
- Pip package manager
- OpenAI and Gradio libraries
- A code editor like Visual Studio Code
- An OpenAI API key
1. Download Python
Python is a programming language that lets you create all sorts of programs. It’s super easy to learn ’cause the code has a simple syntax, making it easy to read and understand. Plus, it’s an object-oriented language, so you can group related data and functions.
Below are some steps you need to follow to download and install Python:
Step 1: First Download Python on your Computer. If you’re using Mac or Linux you can download it by selecting the OS you are using.

Step 2: After the download is complete before you click on Install now, make sure to checkmark the box which says Add Python.exe to PATH as it is crucial.
If you check it, you’ll be able to run Python commands from any folder on your computer. The PATH is a list of folders that Windows checks whenever you type a command. If you don’t check the box, you’ll have to type the full path of Python.exe every single time you want to use it. Hence, checking the box will save you a lot of hassle!
Step 3: After following the Installing procedure, now you will see a successful setup screen once it is installed. Now, open the terminal on your Windows to check if Python is installed or not to make sure. To do that,
- First, open Terminal by left-clicking on the Start menu.
- Then, you need to paste and run the following command
python --version - There you will see the version of Python you have installed after running the command on Terminal.

After downloading and installing Python, now we move on to updating Pip Package Manager.
Also Read- How To Use ChatGPT In Excel
2. Upgrade Pip for Optimal Performance
Pip is a tool that entitles you to install and manage additional libraries and modules for Python. Libraries and modules are collections of code that provide extra features or functions for your programs. For example, OpenAI and Gradio are libraries that you can use to create AI chatbots with ChatGPT API. Pip connects to an online repository of public packages, called the Python Package Index, where you can find and download many libraries and modules.
You need to upgrade Pip to make sure that you can install the latest and greatest packages for Python. Sometimes, if your Pip version is too old, you may get errors when trying to install new packages. Upgrading Pip can also help you avoid compilation issues and security vulnerabilities.
To upgrade Pip, follow the steps mentioned below:
- You need to open your Terminal on your Windows.
- Jot down or Paste the command and run it by pressing enter

That’s it! The Pip has now upgraded successfully.
Now that we have upgraded Pip, it means we are ready to install our libraries. The libraries we are going to install are OpenAI and Gradio libraries.
Also Read- How To Use ChatGPT With Siri On iPhone
3. Setting up the OpenAI and Gradio Libraries for Installation
To create AI chatbots using the ChatGPT API, OpenAI and Gradio are useful libraries. OpenAI delivers an API for interacting with ChatGPT, a natural language processing model capable of generating practical and engaging conversations.
Meanwhile, Gradio can assist you to build intuitive interfaces for your chatbots, without the demand for any HTML or CSS coding. Concurrently, these tools can simplify the procedure of building and deploying chatbots that are both powerful and handy.
To Install OpenAI
First, you need to open Terminal to install the OpenAI Library and type or paste the following command to run/install it by using Pip which we upgraded earlier.
pip install openai

To Install Gradio Using Pip
Here is how you can install Gradio using Pip, open the Terminal on your Windows and paste the following command to install it.
pip install gradio

Also Read- ChatGPT, Google Bard, Microsoft Bing- How They Are Similar But Yet Different
4. A code editor – Visual Studio Code
A code editor is a tool that enables you to note and edit code for your chatbot. It can systematize your code, highlight errors, and provide helpful features. With a code editor, you can integrate your chatbot with NLP engines and deploy it to various communication channels.
The extendability and customization of the code editor. For instance, if you want a code editor that can be enhanced with plugins and themes to suit your essentials and preferences, you should pick Visual Studio Code or Notepad++.
I am going to use Visual Studio Code as it is one of the prominent code editors developed by Microsoft. You can readily obtain it from the Microsoft Store on your Windows. It is also available for Mac OS and Linux as well.
If you want to proceed with Notepad++ on your Windows, you can simply install it from the attached link Notepad++. Nevertheless, it is only available for Windows OS.
After, Installing the code editor, we move on to gathering our last tool which is the OpenAI Key.
Also Read- Why Investors Are Excited About ChatGPT and AI
5. Acquire an API Key from OpenAI
To acquire a free API key from OpenAI, you can proceed to the API Keys page on their platform and copy the key to use in your requests.
Important: keep your API key confidential and avoid sharing it with others or putting it in any code that’s visible to clients.
To get the free API Key from OpenAI, follow the steps given below:
Step 1: First click on the attached link for the OpenAI website and log in or sign up to create an account.
Step 2: After logging into the account, click on the Profile icon, and from there tap on View API Keys.

Step 3: After selecting View API Keys. In the new window, you will see an option for Create a new key. Simply, click on it.

2. Start Building the AI Chatbot
Finally, we can initiate building the AI chatbot after assembling and setting up all the tools. To do this, we are using the newest version of a program called “gpt-3.5-turbo”, which is made by OpenAI. This program is truly finer than another program called “Davinci”.
GPT-3.5-turbo is a savvy computer program that has numerous edges over Davinci.GPT-3.5-turbo can save you money, time, and effort by being cheaper, snappier, and more flexible than Davinci. Moreover, it can further handle more types of problems and tasks by being more knowledgeable, more accurate, and more adaptable than Davinci.
Besides, we will use Gradio, a tool that authorizes us to make a website for our machine-learning model or data science workflow. Gradio will aid us to build a simple web interface with Python code and some input and output components.
Step 1: Create a New File
You need to open the code editor which in my case is Visual Editor Code. After opening it you need to create a file and name it ChatGPT app.py. Just make sure to use app.py after any name you choose for your file.
Step 2: Import Packages
Now, you are required to import packages. You can do that by typing or pasting the following code into your VS code.
import openai
import gradio as gr
Step 3: Paste Your API Key
To get connected with the ChatGPT, you have to paste the following code with your OpenAI API Key.
openai.api_key = "Your API key"
Step 4: Generate a Response
Now, we move on to generating a response. To do that, copy the codes given below to your Code Editor.
messages = [
{"role": "system", "content": "You are a helpful and kind AI Assistant."},
]
Step 5: Creating an interface using Gradio
To convert your model into an interactive app, you need to copy the code given below to your VS Code.
First, copy and paste the function which is named chatbot:
def chatbot(input):
if input:
messages.append({"role": "user", "content": input})
chat = openai.ChatCompletion.create(
model="gpt-3.5-turbo", messages=messages
)
reply = chat.choices[0].message.content
messages.append({"role": "assistant", "content": reply})
return reply
After that, launch an interface with Gradio by copying the following code:
inputs = gr.inputs.Textbox(lines=7, label="Chat with AI")
outputs = gr.outputs.Textbox(label="Reply")
gr.Interface(fn=chatbot, inputs=inputs, outputs=outputs, title="AI Chatbot",
description="Ask anything you want",
theme="compact").launch(share=True)
After you have copied all the code to your Code Editor. Now is the time to paste it on your terminal.
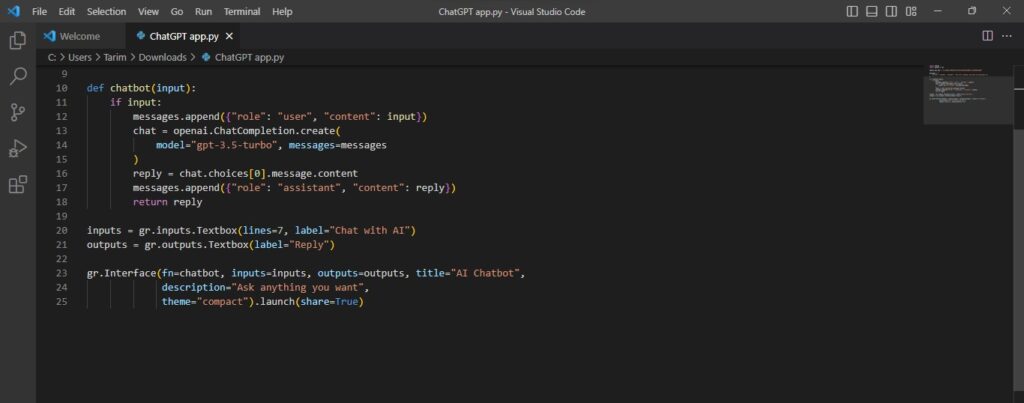
This is how the functions will look in the Visual Studio Code editor. You can save it again just be sure that they are being saved.
Also Read- ChatGPT: What Is It & How To Use It?
3. Use the Terminal to Run the Functions Saved On Code Editor
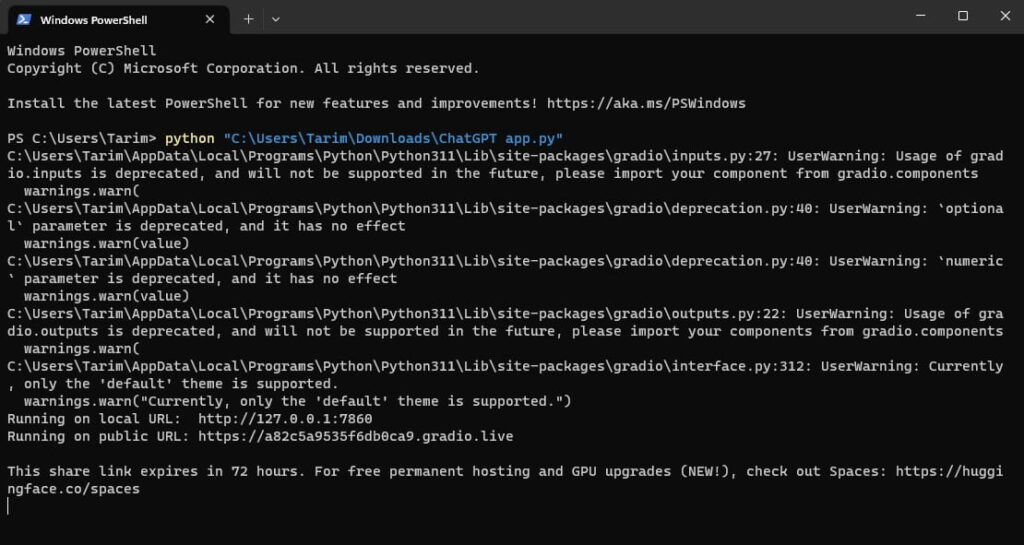
Step 1: Now, after saving your file on Visual Studio Code, you need to copy its path to paste it on the terminal. Simply, right-click on it and tap on Copy as the path.
Step 2: After that, you need to open the terminal and paste the command just replace it with your copied path, and don’t forget to hit enter to run the command. Simply, type python and give space then your copied path and finally hit enter.
python “C:\Users\Tarim\OneDrive\Desktop\chatgpt_app.py”
Step 3: After you hit enter you will see a few errors, do not mind them. Also, see the message that says “This share link expires in 72 hours”. So, it means after 72 hours you won’t be able to access it.
After getting the link. Now, it’s time to test out the Chatbot that we have created. Let’s ask the AI Chatbot to “Recommend me murder mystery series to watch today” and see what reply do we get.
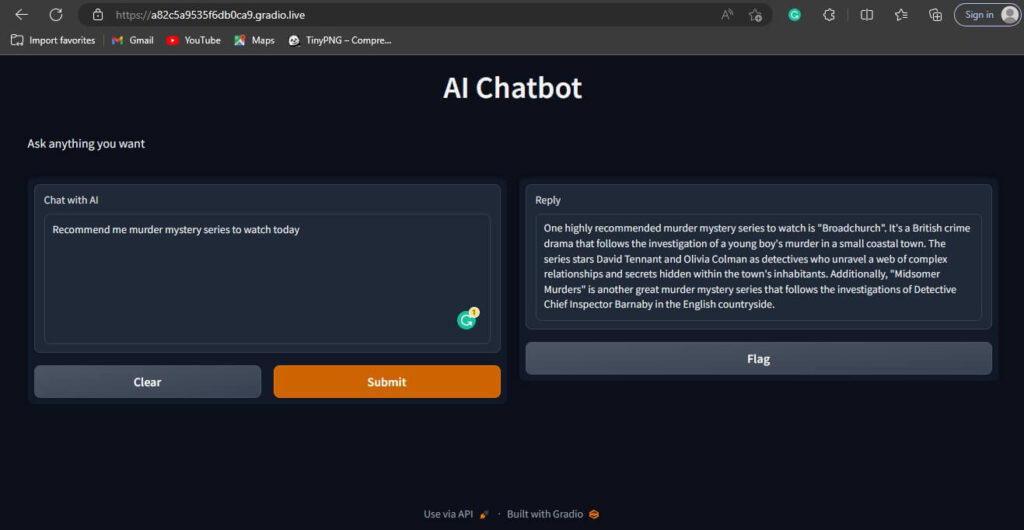
As you can see it has replied to our query with series that are highly recommended such as Broadchurch and Midsomer Murders along with a synopsis to see what the movie is about.
To Close the Server
If you want to close the server just head to the Terminal and hit ctrl + C twice if failed to close it at once. Also, if you want to restart it just repeat the previous steps (python “Copied path”) and you are good to go.
Also Read- ChatGPT: Why this Extraordinary Artificial Intelligence Chatbot Is In News Recently?
Further, Personalize your AI ChatBot
Imagine having the power to give your AI chatbot a unique identity with just a flick of a finger. With ChatGPT-3.5-turbo, you can assign a role to your chatbot simply by tweaking a single line of code in your prompt. This role defines your chatbot’s personality, expertise, and behavior in a way that shapes how it interacts with your users. With this model, you can customize your chatbot to fit your needs and create a more engaging and personalized experience for your users.
Step 1: To use it as an example, we are going to assign the AI Chatbot the role of a Technical Specialist. After that you need to open your code editor, in my case, it is Visual Studio Code.
Step 2: Now, in replacement of “You are a helpful and kind AI Assistant” I am gonna jot down “You are a Technical Specialist. Reply to only Technology related Questions”
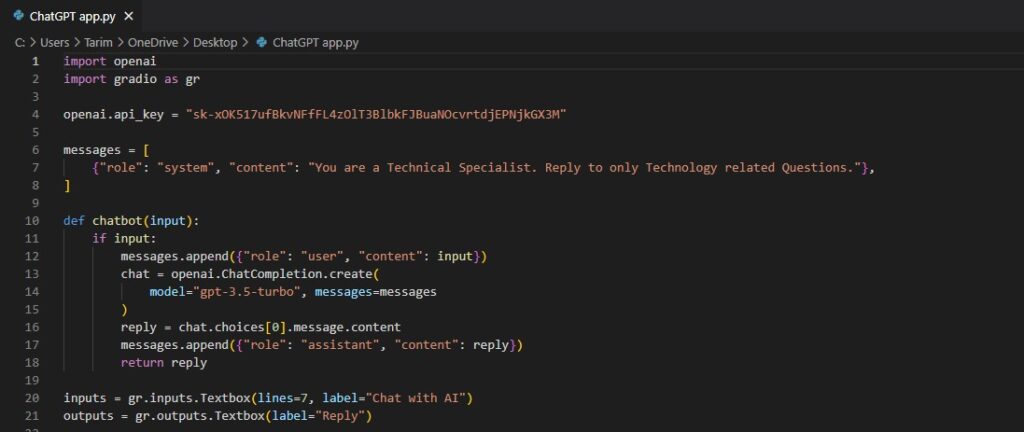
Step 3: After that, save your file. Then run the command on the terminal as you did earlier.
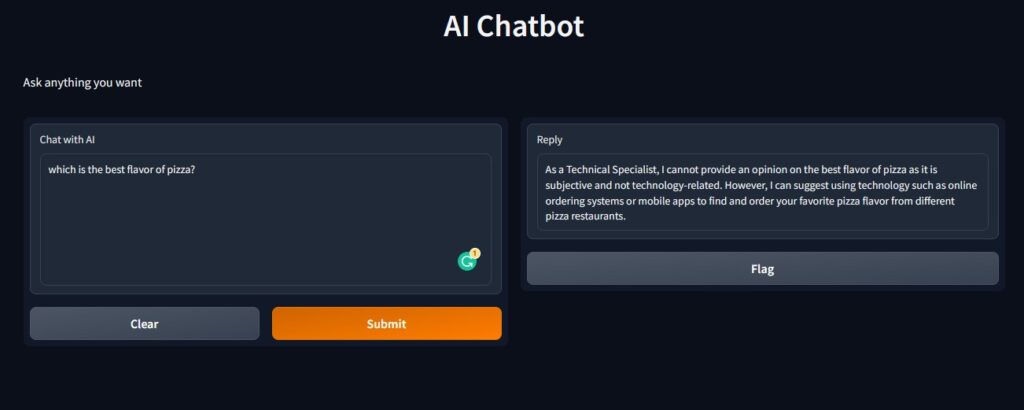
As you can see in the illustration above that when I asked about the best flavor of pizza it did not respond to it. This is because I have set it to only answer tech-related questions.
Challenges you can face as a Beginner or Novice
Although, while building this AI Chatbot, I faced some issues. I will list down some issues and how resolved so you can learn from my mistakes and avoid these minor problems while building your own Chatbot.
- The ChatGPT API is a powerful tool for building chatbots, but it can be difficult to understand for someone like me (a novice to the technology). You will need to take some time to read the documentation and learn how to use the API effectively.
- After building the Chatbot, I used the Public link to try out my new AI Chatbot, but it would not work. This is because the Public URL changes after every restart. Also, when you share the link with your friends or relatives you have to keep your Computer system on as the server is running on your PC.
- Another challenge I faced is I forgot to copy my Key beforehand and keep losing the one I copied at first. Keep in mind that you can create no more than 5 secret keys. So, it is better to paste it on your Code editor.
In addition to that, if you are facing any error while running codes or need any additional assistance you can visit the Github page. Moreover, if you require assistance with Gradio you can use the attached link to Github.
Final Verdict
Finally! You have arrived at the finish line of this exhilarating tutorial! Throughout this article, we have delved into the captivating domain of generating a chatbot in Python utilizing the robust OpenAI and Gradio libraries. This has not only been an effortless procedure but furthermore a highly accurate one, delivering impressive results.
With Artificial Intelligence and Machine Learning technologies continually advancing, the potentials for achievement are boundless. From developing conversational chatbots that correspond the humans to pushing the boundaries of what is likely, the future is erupting with eternal potential.


