


 Header Through Cloudflare")


Apple has recently rolled out the macOS Ventura and its beta version is already available for download. If you are a developer, you can sign up for the developer beta version and install it on your Mac. The general Mac owners have to wait until fall for the public version.
If you are fascinated by the newly introduced features of macOS Ventura and want to install it on your device, you are at the right place. In this guide, we have explained the step-by-step procedure to clean install macOS Ventura on your compatible Mac.
While there are other methods also to clean install macOS Ventura on your Mac, a clean installation is always preferred for the following reasons.
- Improved performance
- Better stability
- Increased responsiveness
- Better compatibility with apps
- No wastage of space
So let’s check out the basic requirements for initiating the clean install of macOS Ventura and then proceed with the process.

As recommended by Apple, you should have at least 60GB of free storage space on your Mac to ensure no problem is the operation of your OS on your machine.
Next, you should ensure that your Mac supports the new macOS version because older Mac models do not support macOS Ventura.
Also Read: Stage Manager In macOS Ventura :How To Use
Here is the list of all the compatible Mac models:
iMac (2017 and later)
iMac Pro (2017 and later)
MacBook (2017 and later)
MacBook Air (2018 and later)
MacBook Pro (2017 and later)
Mac Mini (2018 and later)
Mac Pro (2019 and later)
Mac Studio (2022)
Before preceding the installation, it is recommended to back up your Mac to avoid losing everything if something goes wrong.
How to clean install macOS without a bootable USB?
Also Read: macOS Ventura: How Is It Different From All Other versions
Before initiating the installation process of macOS Ventura, it is recommended to clean the disk drive of your Mac. Doing so by uninstalling the error-prone or buggy software. Here are the instructions to do it:
- Shut down your Mac and long-press the Command+R keys as soon as you power it on. This will boot your Mac into recovery mode.
Note: If you own Mac M1, long-press the Power key until the Start Volume and Options tab appears on the screen.
- Next, choose Options and press the macOS utility button.
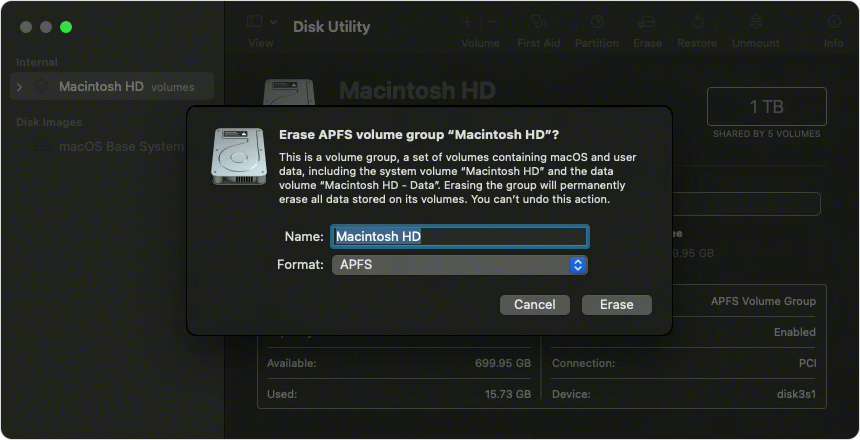
- Choose Disk Utility and press Continue. On the new pop-up window, press the Erase button that appears on the top.
- Choose APFS format if you have a new device and macOS Extended Journaled for old Mac models and press the blue Erase Volume Group button. Doing so will format your disk drive.
- Once again, boot into the recovery mode and press the Reinstall macOS version_name button followed by Continue.
- Next, choose Agree and select the storage drive. Wait until a fresh copy of the macOS Ventura is installed on your device.
- All that’s left to do is to choose the WiFi network and follow the on-screen instructions to set up the newly installed macOS Version.
Also Read: How To Install macOS Ventura On Unsupported Mac
Perform clean install using a Bootable USB Drive
This process is a little more complicated than the first one so you should stay vigilant while installing macOS Ventura as a single error can create problems in the installation. For installing macOS Ventura, you need a USB drive with at least 16 GB of space. When have to transform this USB drive into a bootable drive. Here are the steps to do so:
- First of all, you need to download the macOS installer on your Mac.
- Next, insert the USB drive into your desktop.
- Once connected, format your USB drive using the Disk Utility pop-up that opens up.
- Next, launch the Terminal app and type the following command in the terminal window followed by the Return key.
macOS Ventura: sudo /Applications/Install\ macOS\ 13\ beta.app/Contents/Resources/createinstallmedia –volume /Volumes/ventura –nointeraction
Also Read: How to Install macOS Ventura on Hackintosh
- Performing the above process will convert your USB into a bootable drive.
- When prompted, provide your login credentials. Wait until the Mac terminal finishes with the process and your bootable drive are ready to be used.
- After completing the above process, power off your Mac.
- Insert the USB drive into your Mac and power it on.
- Long press the Option key while turning on your Mac until you see a set of options on the screen to boot your Mac.
- Choose the installer drive from the list of options and go through the on-screen instructions to initiate the installation process of macOS Ventura on your Mac.
- Finally, press the Continue button and go through the set-up process of macOS Ventura to access its home screen.
Also Read: Hands-On With macOS Ventura
Conclusion
And lo! You have successfully installed the macOS Ventura on your Mac using the clean install process. If you face any problems in doing the entire installation process, you can comment down below to seek out help. We will be more than happy to provide you with a solution.


