


 Header Through Cloudflare")


In today’s digital age, email has become a substantial part of our private and professional lives. Nevertheless, occasionally we may need to change our email address due to various reasons such as switching to a new email service provider or creating a more professional email address. Or maybe you have ever experienced ridicule for your email address. It may seem unimportant, but it still occurs occasionally. It could be your actual username, but more often than not, people will mock the domain name of your email account. Older email accounts with domains such as AOL, Hotmail, Yahoo may cause a chuckle from someone more technical who is aware of the history and age of these domains.
But the fear of losing important data, such as contacts, emails, and files, can make the process seem daunting. Fortunately, there are steps you can take to ensure a smooth transition and transfer all your important data to your new email address without any loss.
In this guide, we will dig into some applicable strategies to alter your email address without losing any crucial data.
#1. Pick a Unique Email Address
To change your email address without losing crucial data, it’s essential to pick a unique email address that you’ll operate for a prolonged period. It’s advisable to get your domain name and associate it with your real name, as it has more persisting power compared to using a provider’s domain. You can set up an email address with your domain registrar and use it through familiar interfaces like Gmail. Although this process may cost a little extra each month, having a custom email is a worthwhile investment.
Other than that, you can still create an email address with a free provider such as Gmail or Outlook instead of operating the email offered by your internet service provider, organization, or school. When picking your new email address, opt for a name or phrase that will withstand the test of time. If you have a common name, consider using your surname first, or a mixture of your initials and first or last name.
Additionally, I highly recommend selecting an email address that’s both memorable and “grown-up” in nature. Spare yourself the embarrassment of cringe-worthy names and opt for something that exudes professionalism and maturity.
Also Read- Email Spoofing- Know How Scammers Forge Fake Emails
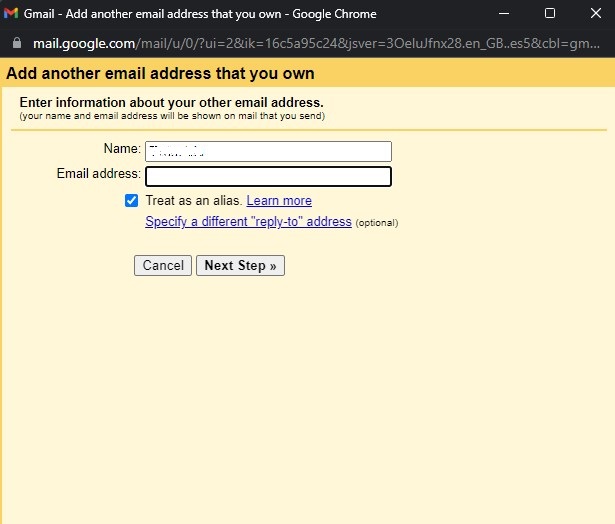
#2. Setup a Redirection or Add an alias to your Account
Keep your old account
To ensure a seamless transition when switching email accounts, it’s important to retain access to your old account for a short period. If you’re changing jobs or departing from an educational institution, it’s advisable to inquire about the duration for which your old email address will remain active before being deactivated. While most organizations prohibit access to the old account, some may offer email forwarding services to your new account for a limited period. Therefore, it’s prudent to plan and make the necessary arrangements accordingly.
Note: The steps involved in the email forwarding procedure are likely to be similar across other email providers as well. Hence, you can easily take assistance with this guide.
Now, let’s move on to setting up a redirection or adding an alias to your Account.
Simply creating a new email account is not the end of the road. If you desire to receive emails sent to your previous email address on your newly created Gmail account, it’s imperative to configure email forwarding.
Forward Emails from your Old Gmail to your New Gmail
Setting up a Redirection
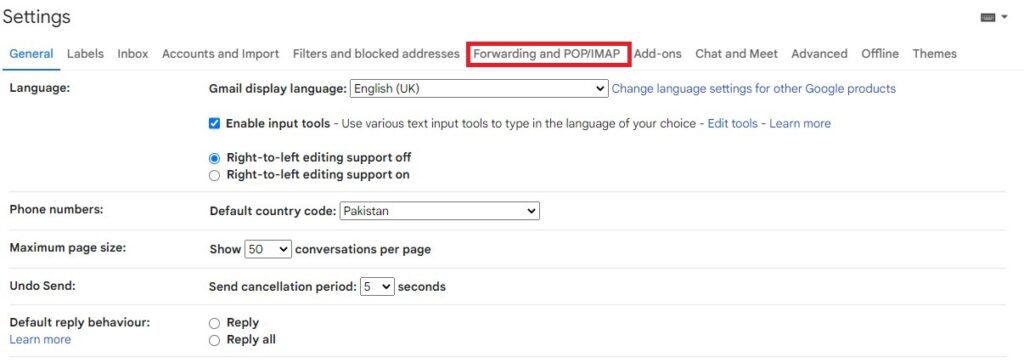
Step 1: First, you need to sign in to your Gmail account. The one that you like to forward emails from which is going to be your old one of course. Once you are logged click on the Settings icon and select See All Settings > Forwarding and POP/IMAP.
Step 2: Now you are on the Forwarding and POP/IMAP page. You will see the option to Add a forwarding address. Simply, click on that option and jot down the email address that you made in the prior step.
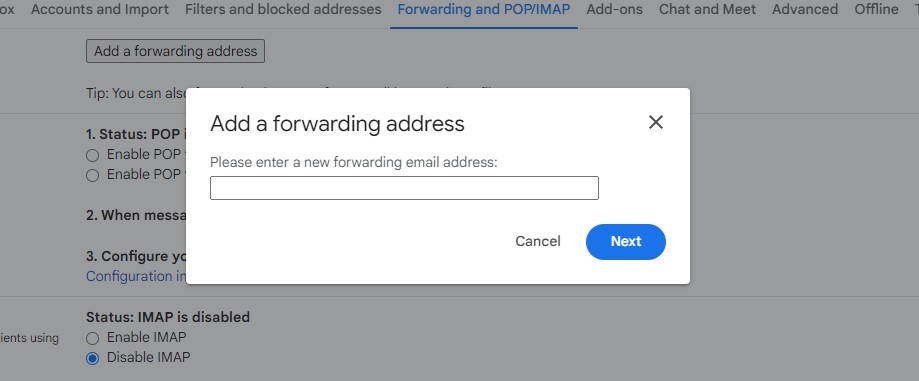
Step 3: You will receive a confirmation code from Google in your new Gmail inbox. Open the email and follow the link inside it. Then click Confirm.
Step 4: Go back to your old account and reload your browser. In the Forwarding and POP/IMAP tab, you should see your new Gmail address. Choose Forward a copy of incoming mail to enable mail forwarding. Click Save changes and you’re done.
Now, your old Gmail address will act like a bridge and send any emails it gets to your new email address. If you want to be picky about which emails you want to cross the bridge, you can set up filters that only forward the ones you care about and leave behind any junk or spam in your old email.
You can do it by going to the Forwarding and POP/IMAP and in the forwarding section select creating a filter.
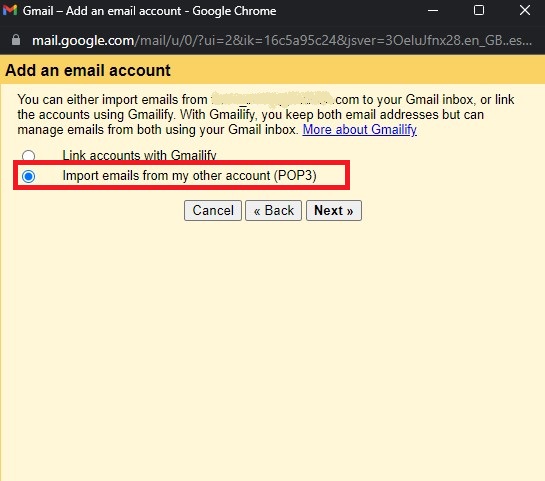
Import your old Emails to your New Gmail Account
Importing your old emails and contacts to a new email address can be a hassle-free experience in most circumstances. If you’re a Gmail user, the following steps can guide you through the process with ease.
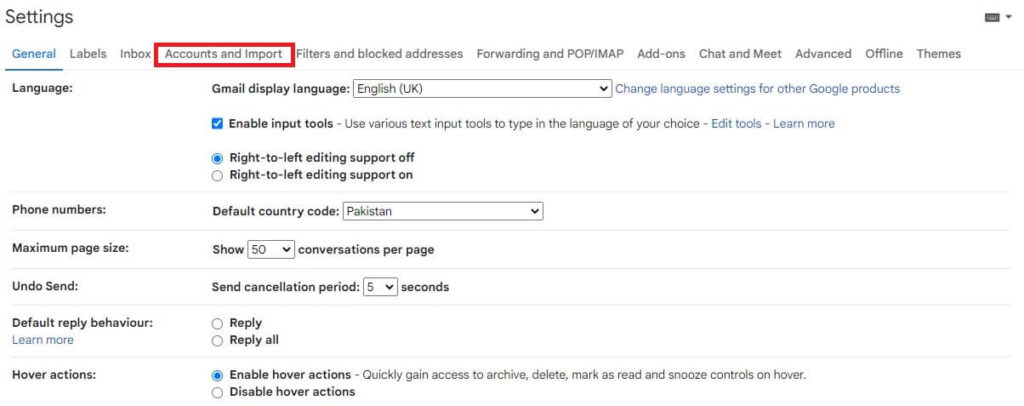
Step 1: On your new Gmail account, go to Settings > See all Settings. This time select Accounts and Import.
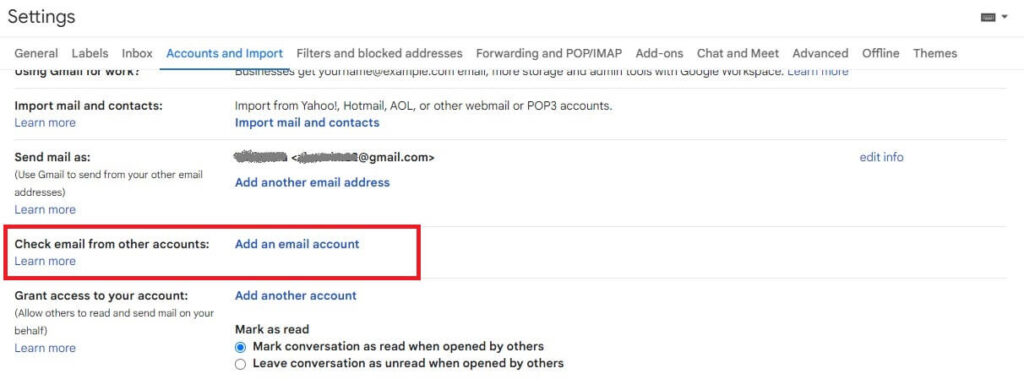
Step 2: On the Accounts and Import page, you will see a Check mail from other accounts portion. There, you will see the option to Add an email account. Click on it and jot down the email address of your “Old Gmail Account”.
Step 3: After that simply hit “Next“.
Step 4: After entering your email, select Import email from my other account (POP3) then select Next.
Step 5: Now, enter your password and make your preferred selections by checking the box and then finally press Add Account.
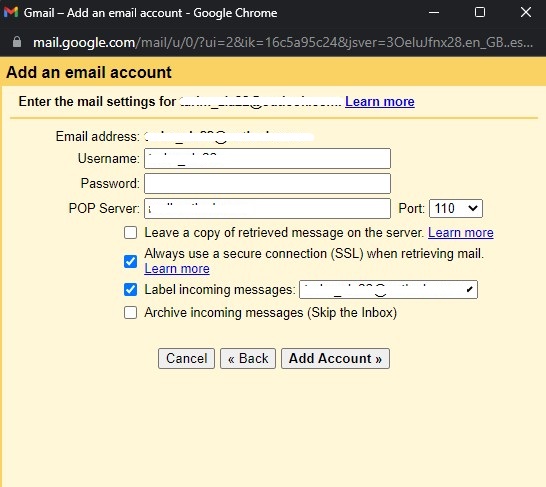
Now, your previous emails will be transferred to your new account, and you will receive any current incoming emails as well.
Also Reads- 7 Best Free Email Clients For Mac In 2023p
Import Contacts from your Old Yahoo Account to your New Yahoo Account
Upon successfully establishing a Yahoo email address, it is important to note that modifications to certain account details are limited. Yahoo solely permits the updating of personal information, such as name, nickname, gender, and date of birth.
However, if opting to create a new Yahoo email address entirely, the procedure of importing an existing contact list can be accomplished by following the same steps used in conjunction with Gmail.
Also Read- macOS Ventura- After updating Slow Email Fetch Issue (Fixed)
To Change Email Address in Outlook via alias
Microsoft Outlook has a remarkable feature that lets you change your email address without forming a new account or using email forwarding. Outlook lets you change your email address easily and quickly. You’re going to make an alias that connects your new email address to the old one. This way, all your contacts, and settings will remain the same without moving anything to a new account.
You can add the Outlook alias by following the steps given below:
Step 1: First, log in to your Microsoft account by heading to the Microsoft login page and entering your login credentials. Once you’re logged in, locate the “Your info” option on the top navigation bar and tap on it. This will get you to your account profile page.
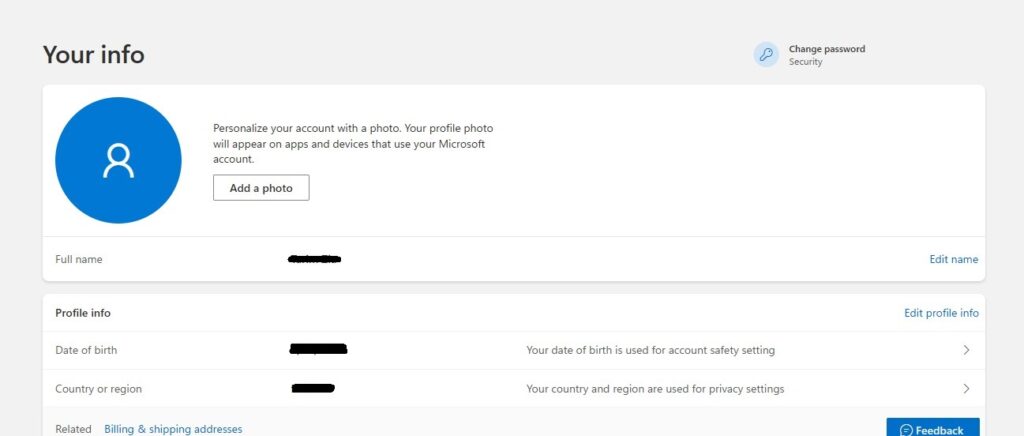
Step 2: On your account profile page, scroll down to the “Account info” section and click on the “Edit account info” link located on the right side of the screen.

Step 3: Within the “Edit account info” section, locate the “Account alias” subsection and click on the “Add email” link.

Step 4: You will now be presented with two options: you can either create a new Outlook email address or add an existing email address as your Microsoft account alias. Now, select your preferred option out of the 2 options given.
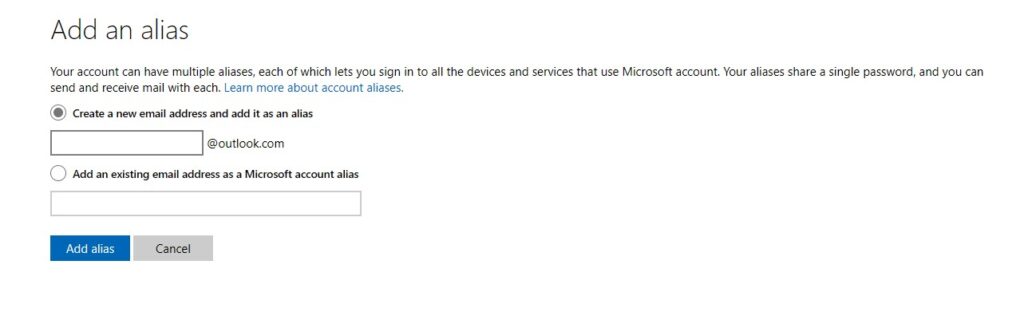
Step 5: If you choose to create a new Outlook email address, follow the prompts to set up your new email account. Alternatively, if you decide to add an existing email address, enter the email address you wish to use and click on the “Add alias” button.
Step 6: Whichever option you choose, the email address you add or create will become your new primary email address associated with your Microsoft account.
Also Read- Get Email Notification When Someone Visits A Particular Page In WordPress
#3. Update Your Email Address Across Multiple Online Accounts
Managing a new email address can be a nuisance as you have to edit it on all your online accounts. Nevertheless, utilizing a password manager can make this process much easier by providing a list of all the sites where you have accounts. It’s important to take the time to log in to each site and update your email address, while also updating your password manager with the new information.
If you don’t utilize a password manager, digging through your old emails for phrases like “confirm your email” or “welcome to” can help you create a list of websites and newsletters you need to update.
Also Read- How To Recover Deleted Emails And Repair Corrupt PST Files
#4. Tell Your Contacts about Your New Email Address
Once your new email is up and running. Let everyone know about it by sending an email to your contact list. Moreover, to ensure privacy, use the Bcc (blind carbon copy) option when addressing the email, so that you don’t mistakenly share others’ email addresses with the group. Further, add a signature to your email that indicates your email has changed. This way, recipients will be able to update their records accordingly.
For Gmail:
Head to Settings > See all settings > General, then scroll down to Signature and add your new signature.
For Outlook:
Go to Settings > View all Outlook settings > Mail > Compose and reply to add your new signature.
For Yahoo:
Go to Writing email > Signature in More Settings and turn on the Signature switch for your Yahoo email address. After that, in the text box, you need to jot down your Signature.
Also Read- Gmail Offline: How To Send Email Without Internet
Conclusion
To sum up, changing your email address can appear daunting. But by following the steps outlined in this guide, you can safely and securely transition to a new email address without losing any crucial data. Remember to revise your email address on all relevant accounts and notify your contacts of the change. With these precautions in place, you can enjoy a seamless and successful transition to your new email address.
Also Read- Why Am I Not Receiving Emails On My Phone?


