


 Header Through Cloudflare")


Gmail is by far the most popular email service in the world. Most Apps and websites let you create or signup to them with just your Gmail Account. Gmail’s app is nothing more than a mail client. So, there shouldn’t be too much space for potential issues. Its only job is to deliver emails from to do its only job? What if you are not receiving emails on your phone? Well, in that case, you have a problem that needs to be addressed as soon as possible. Here are a few steps to follow if you are not receiving emails anymore:
Also Read:How To Change Your Inbox Layout In Gmail
Content:
- Ensure Automatic Email Sync is available
- Perform a Manual Email Sync
- Clear your Android Device’s Storage
- Ensure the correct password is entered in your Email App
- Clear the Cache and Data for your Email App
- Update your Email App
- Re-Add the Email Account to your Email App
- Enable notifications for your Email App
- Check the servers
- Disable data saver
- Check the filters
- Airplane mode
- Check internet connection or wifi connection
- Restart Your device
- Clear your google storage space
Also Read: How To Block Email Address In Gmail
Now, let us discuss these in detail:
1. Ensure Automatic Sync is Available
Most Email clients have automatic sync enabled so that you can receive emails without any delays. However, if you have sync turned off in the email app, which can happen on accident then you will stop getting emails on your android phone. You can check if this is why your emails aren’t syncing by enabling the auto-sync option in your email app. The app should then automatically look for new emails and let you know when a new message arrives.
You can enable auto-sync from the settings menu of your email app. Here we show how to do it in Gmail, but the steps should be similar for most of the other email clients:
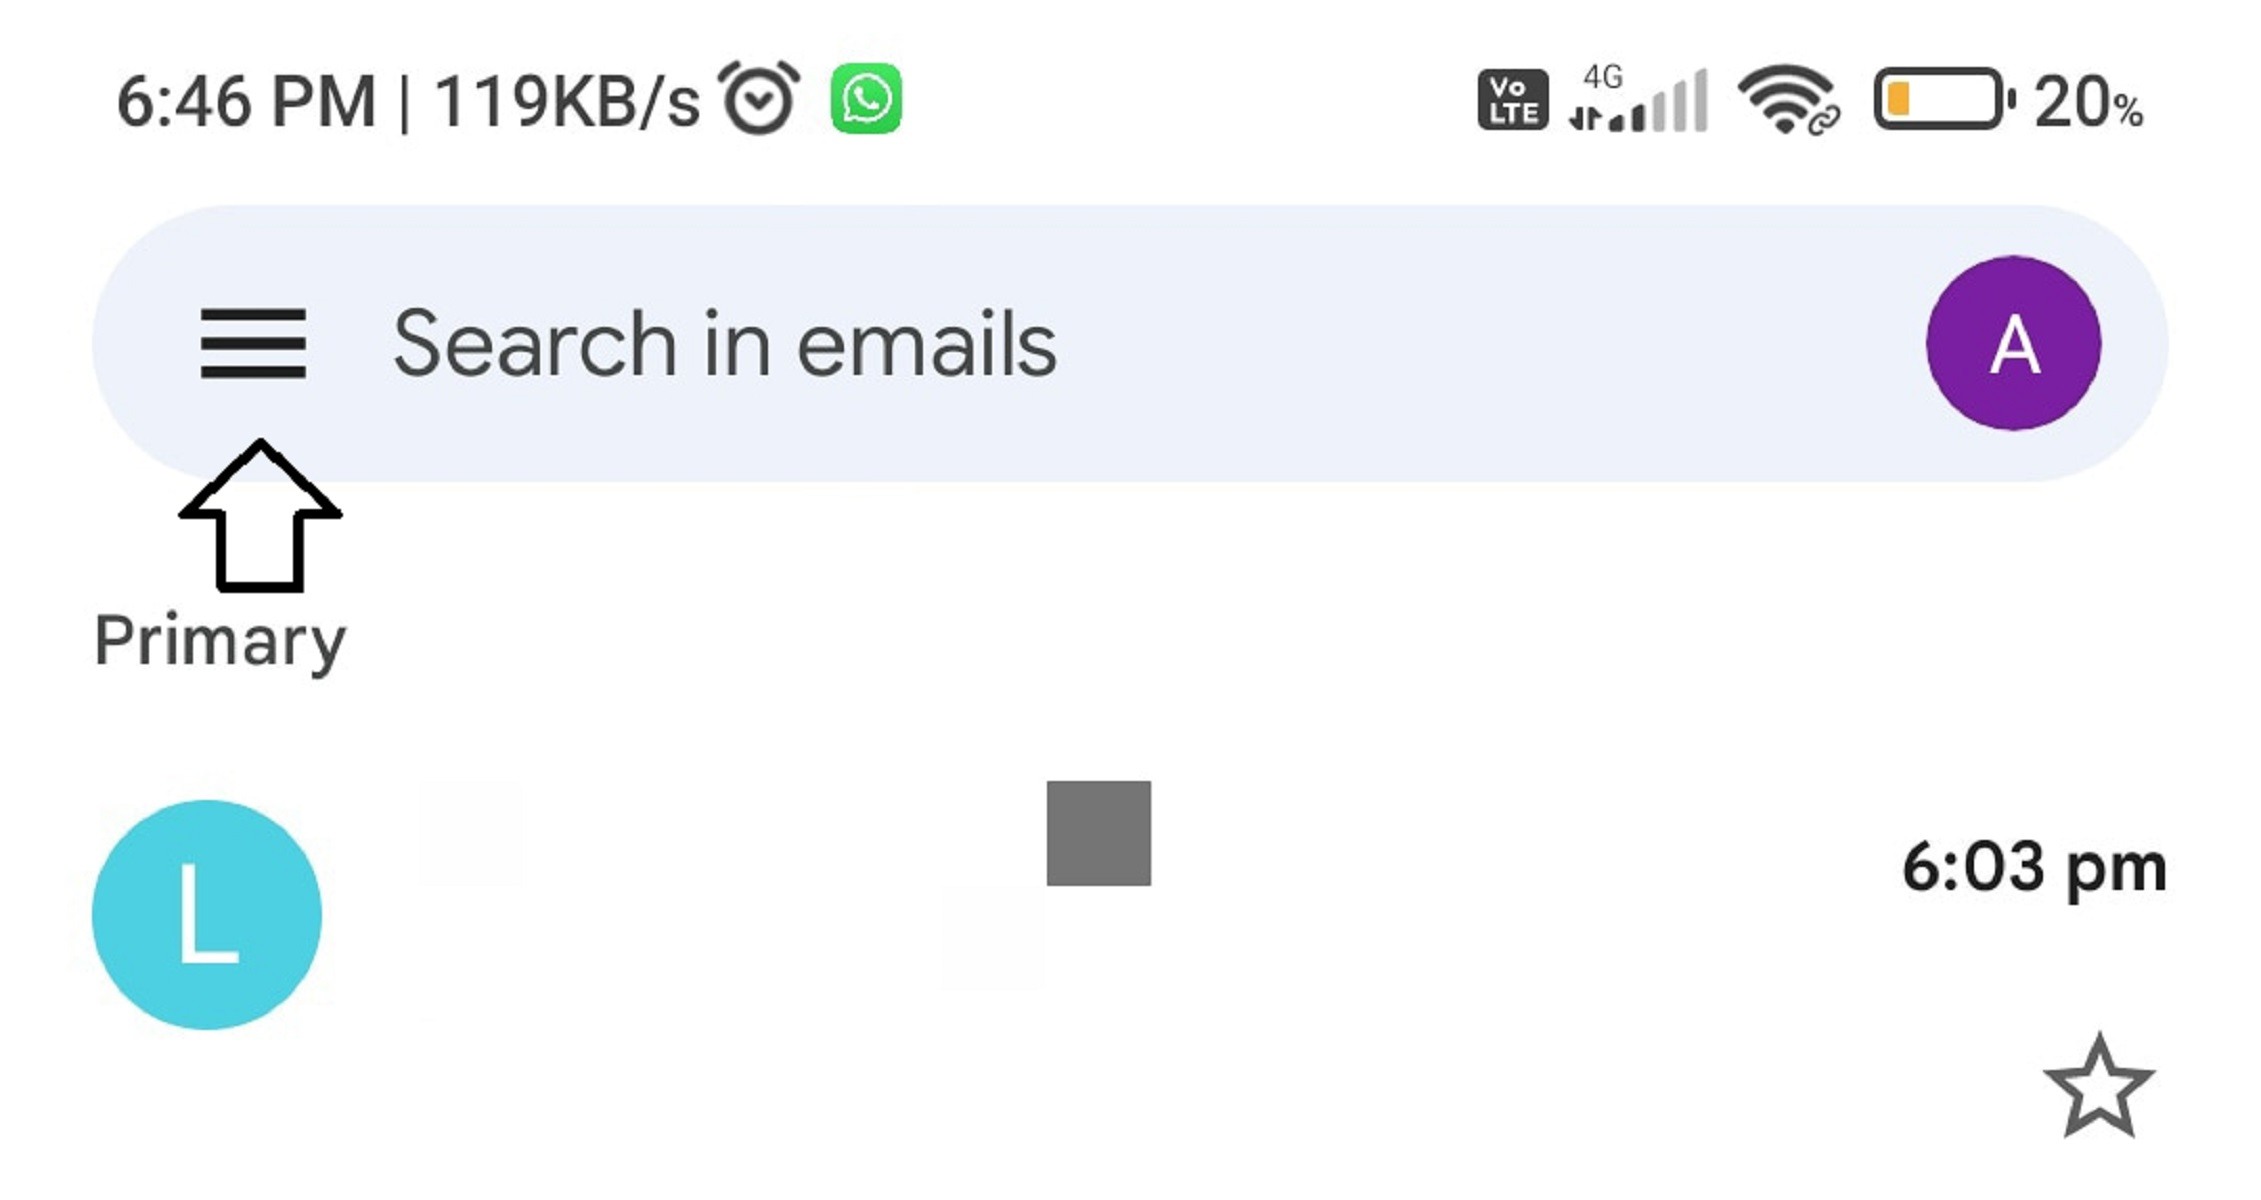
- Launch your email app which would be Gmail.

2. Tap the hamburger (three horizontal lines) icon in the top-left corner.
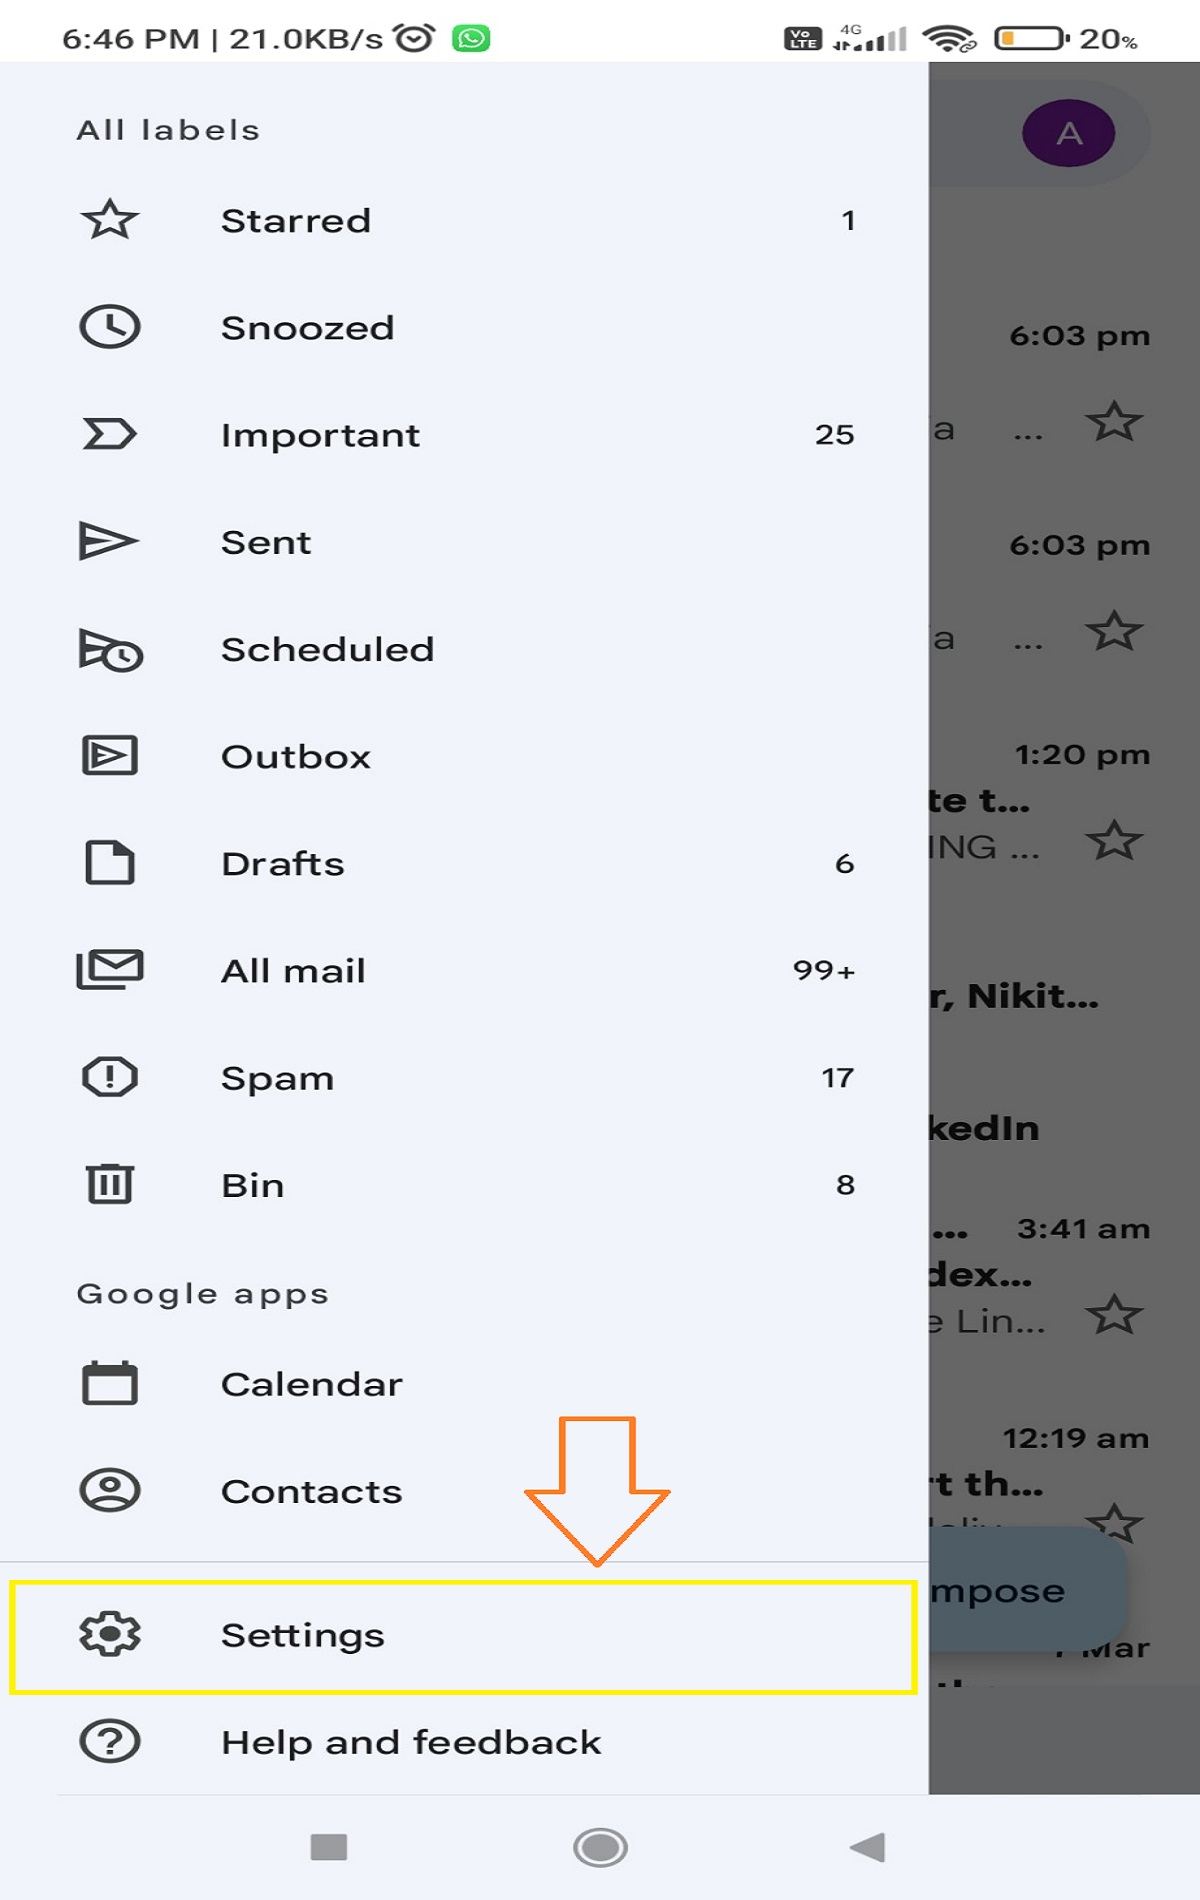
3. Now select the Settings option.
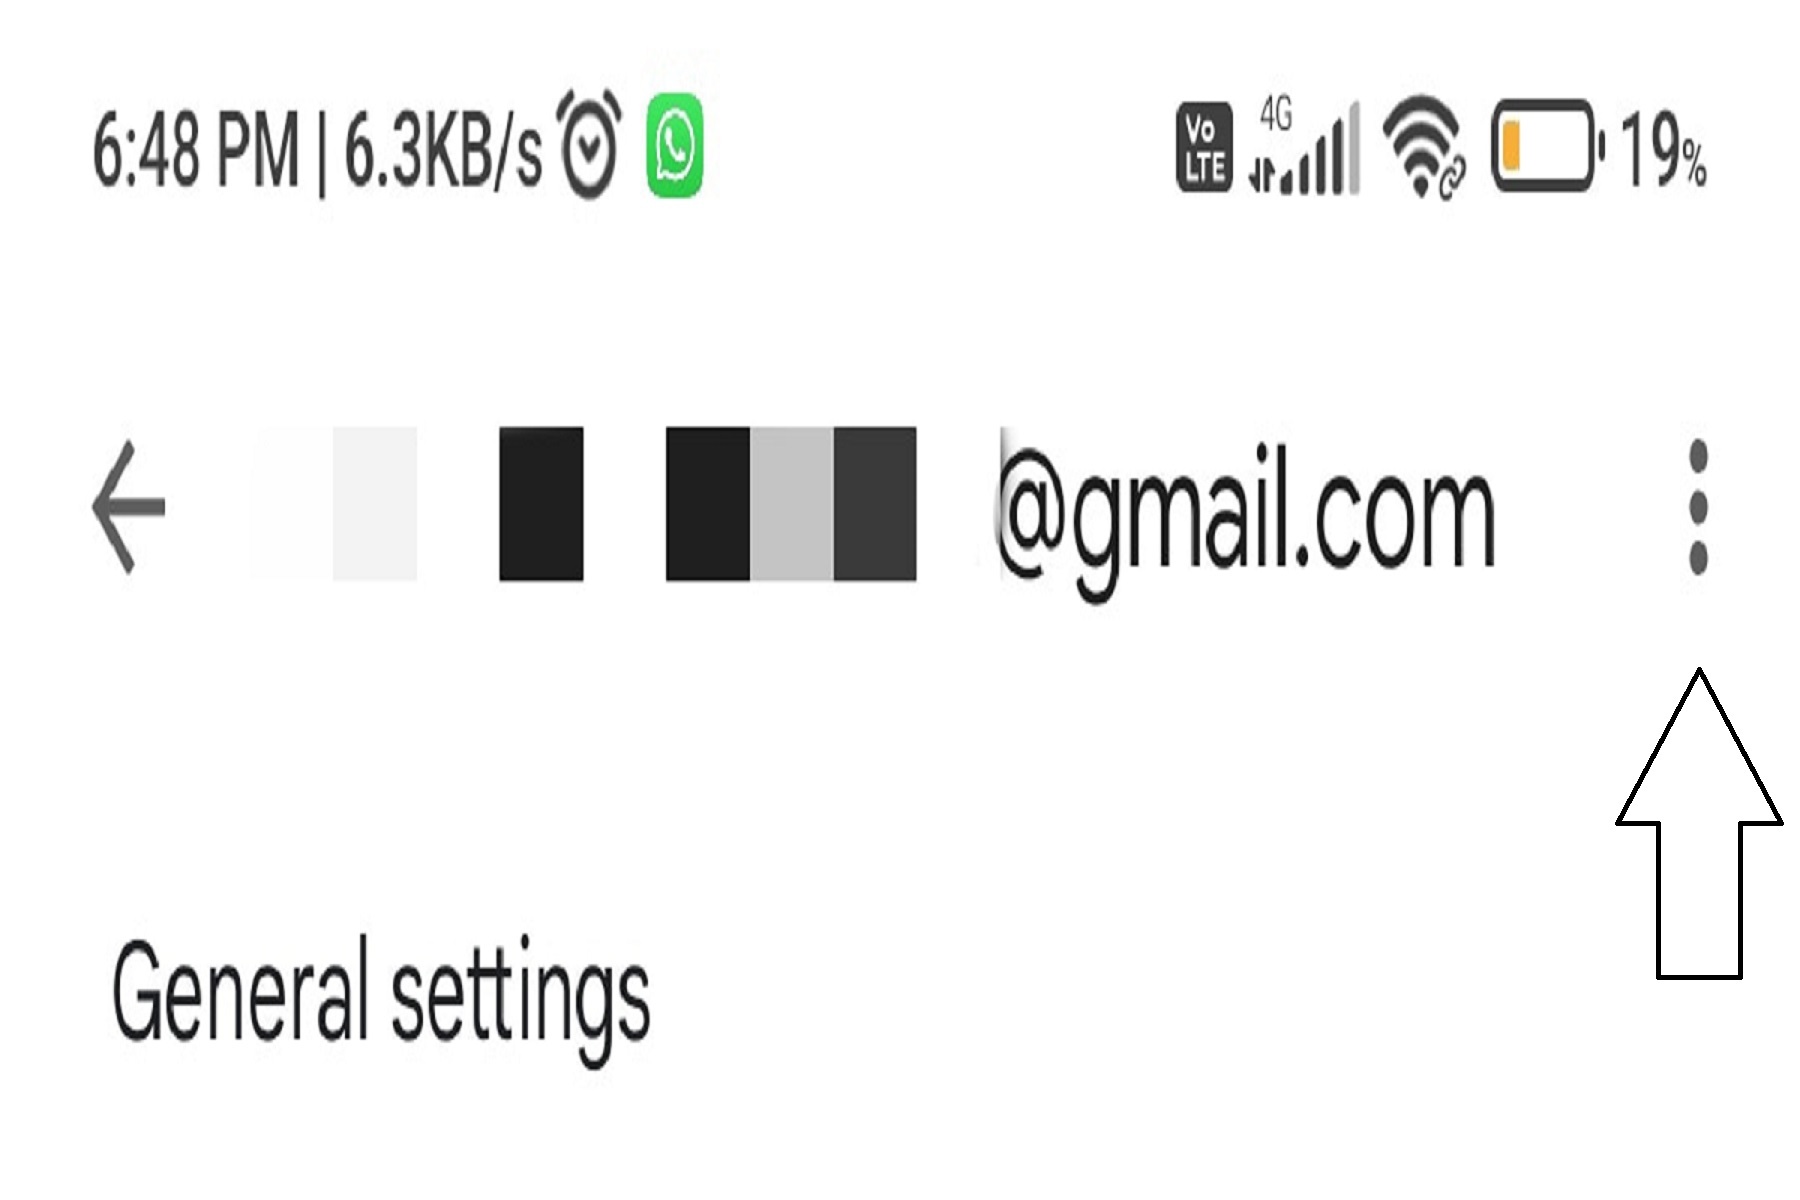
4. Now click on the three dots again.
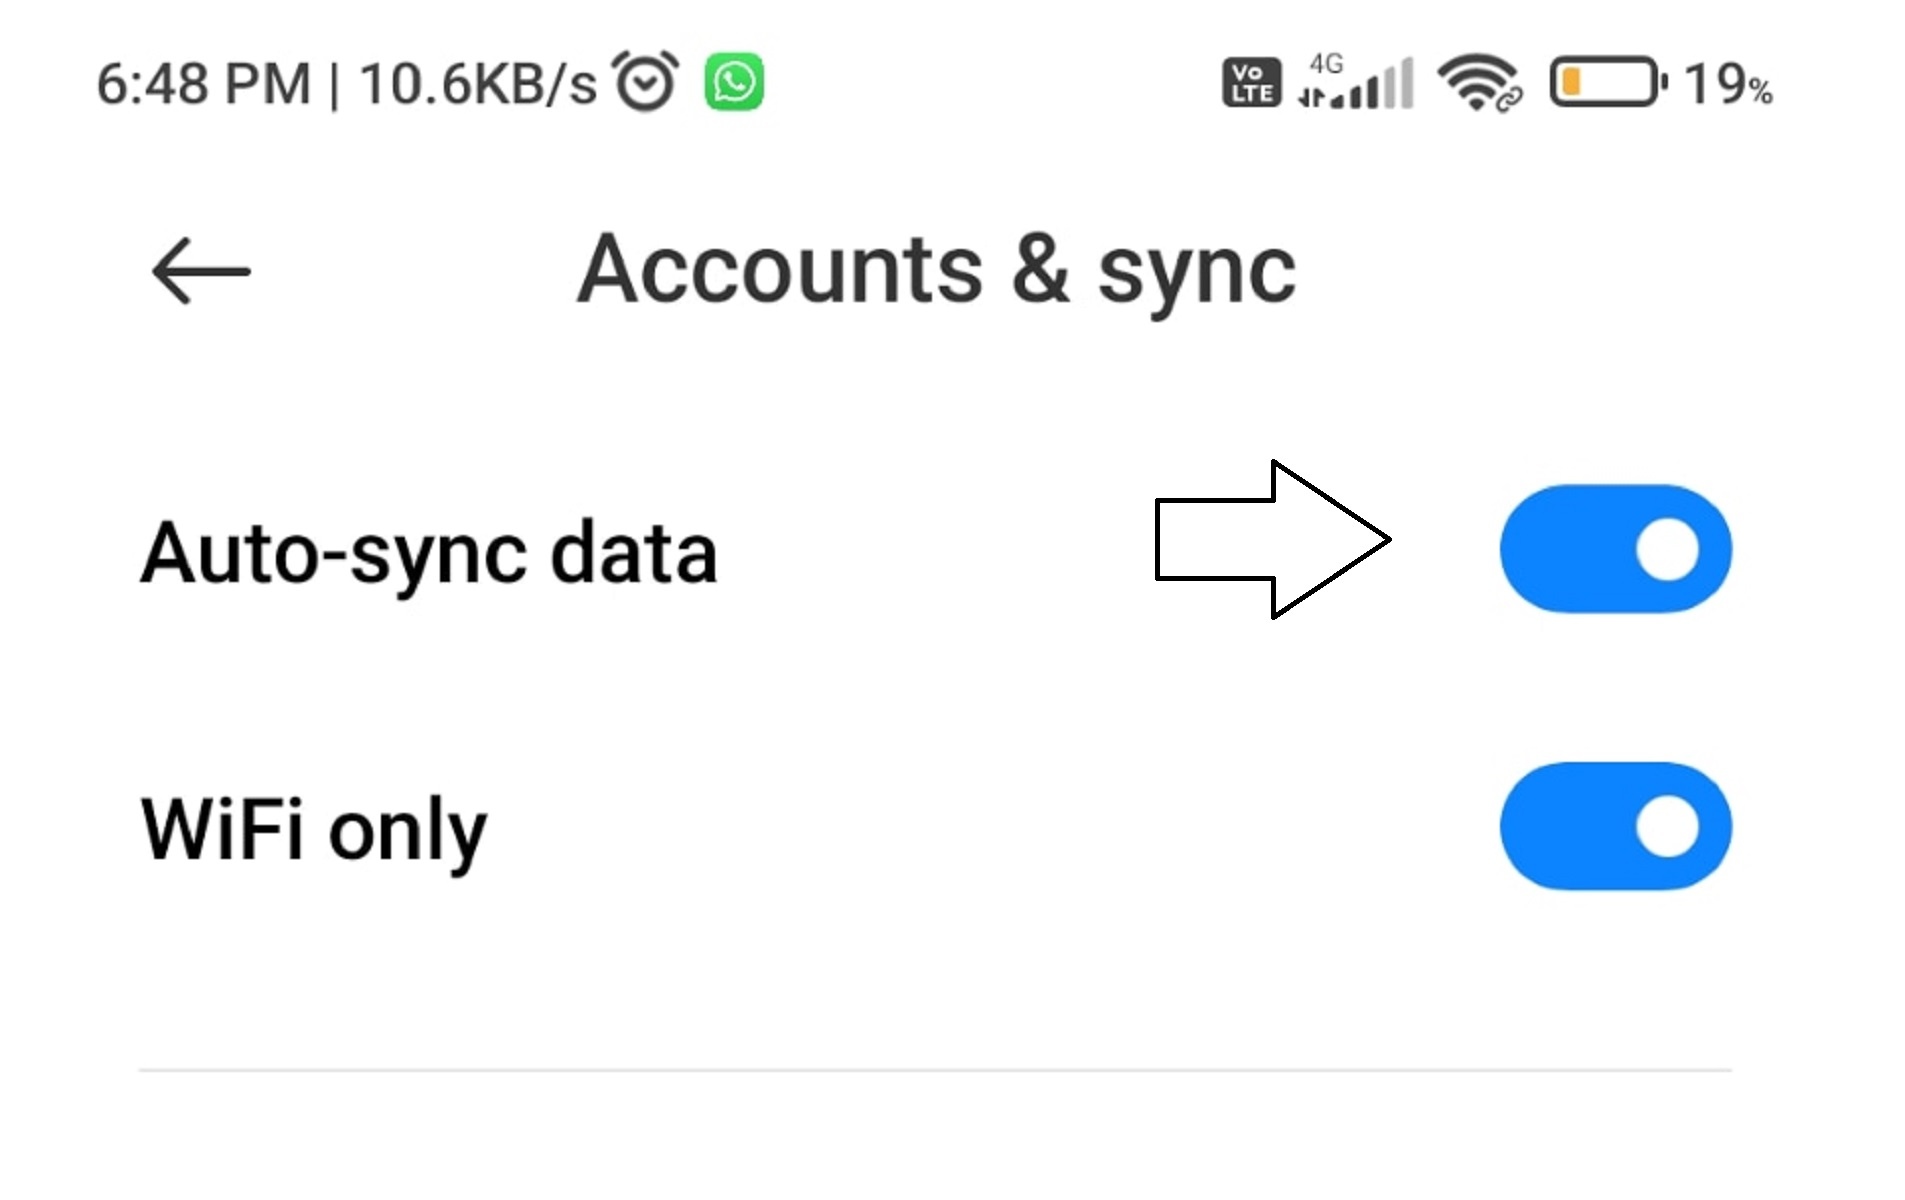
5. Select the Accounts and Sync option and then turn the Auto-Sync data option on.
Also Read: How To Turn On Gmail Read Receipts
2. Perform a Manual Sync
If automatic sync is turned off or won’t work for some reason, your phone has an option to perform a manual sync. This forces your email app to sync, find, and download all new emails to your device. This option works just like the regular sync, except you must manually go into the settings and tap an option. Remember, precise steps vary from device to device.
To manually sync your emails on android:
- Open the Gmail App
- Then tap three horizontal lines on the left top.
- Now select the settings option
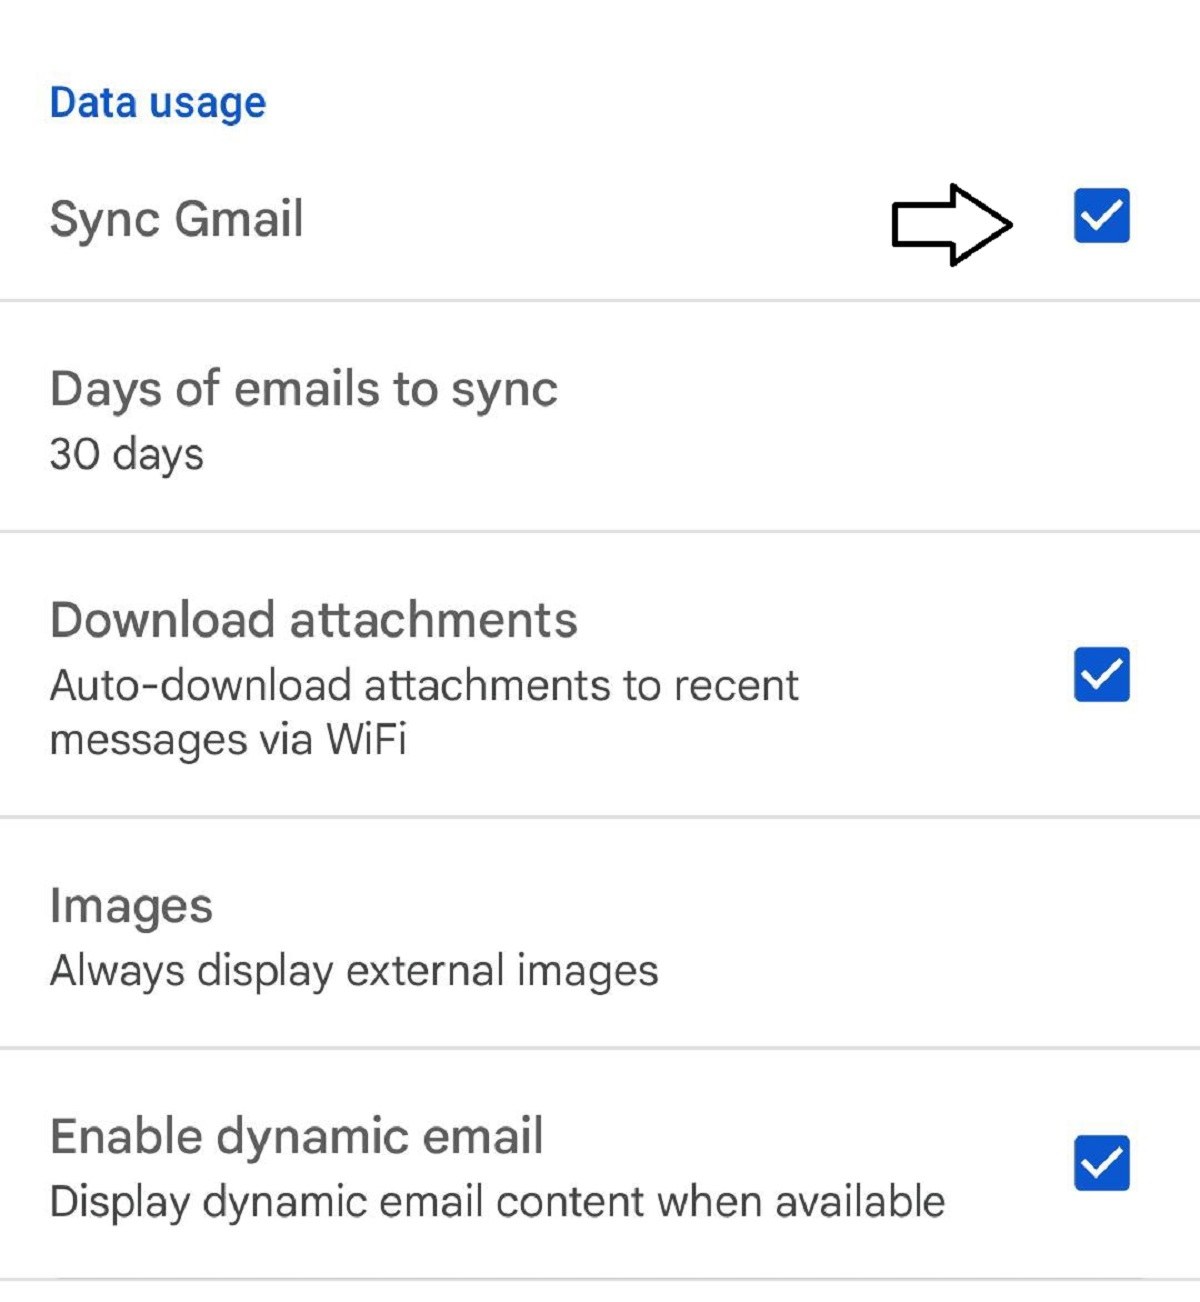
- Choose the email account where you have sync issues.

- Then select the bar Sync Gmail.
3. Clear your Phone storage
When your phone downloads an email, it takes up some space on your device’s memory. If you’re running out of storage on your phone, that may be why your emails aren’t syncing and you are not receiving emails. You can fix this by deleting unneeded files from your phone as follows:
- Open the Settings app and tap on Storage.
- You’ll see the total and available memory space on your device.
- Tap Free Up Space to find files that you can remove to make some space on your device.
- There are many other ways in which you can free up some space from your device.
Also Read: iCloud Storage: How To Delete Files, Photos, And Backup
4. Ensure the Correct Password is entered in your Email app
Mail apps typically save/store your email provider’s server settings, including your username and password, so that it does not have a repeatedly ask you for these credentials again and again. Unfortunately, if there is ever a problem with this stored information, most email apps and providers don’t do a great job of letting you know that the information it’s trying to use isn’t working, or is being rejected. Because of this, it’s best to double-check that you’re using the right password for your email by logging in with a web browser on your computer. The app will then connect to the email servers and fetch new messages for you.
Steps of changing or adding a password to Gmail are:
- Open Gmail, and select the menu in the top left corner.
- Scroll to the bottom, and select Settings
- Select your email account from the list.
- If you have a web-based mail account, select Manage your Account.
- Look through the settings and select the Password option.
- Enter Password.
Note: Remember to update the password everywhere else you use that account whenever you change the password.
Also Read: How To Join Google Meet Call In Gmail
5. Clear the Cache & Data of your Email app
Like all apps on your device, your email app saves data and cache files on your phone. While these files don’t normally cause any issues, it’s with clearing them to see if that fixes that email sync issue of not receiving emails on your device. Resetting the email program on your device entirely will wipe all settings for all mail accounts, and require you to reset everything, then re-download all your mail.
while this is usually safe, you can end up losing mail, contact, and other information through this process. If you are worried about losing this information, stop and do not proceed- call your mail provider for assistance instead.
Steps including the process of clearing cache and data are:
- Open Settings, and select Apps & notifications.
- From your apps list, select Gmail.
- Select storage & Cache.
- Select Clear Storage.
- You will be asked if you are sure, select OK.
- Now the problem of not receiving emails would be solved.
6. Update your Email App
For best performance, you should keep your apps up to date. If it’s been a while since you have been updated your email app, it’s worth looking in the play store if an update is available. New updates fix many existing bugs in the app. If your emails aren’t syncing because of such a bug, then follow the steps shown below:
- Launch the Playstore app on your phone.
- Search for your email app using the search feature, or tap your account icon in the upper right and select Manage App and Device and tap Updates Available to check for apps and pending updates.
- If an update is available then download and install the update.
7. Re-add the Email Account to your Email app
If your email is not syncing yet, you may have an issue with account configuration. in this case, removing and re-adding your account to the app could fix it. This way you could fix it. And you can confirm the settings to make sure nothing is misconfigured.
Here’s what you need to do:
- Go to Settings.
- Click on Accounts.
- Click your Gmail account(it’s usually your email address).
- Go to Remove account and confirm.
- Now, head over to Gmail, you’ll see the “Account sync is off. Turn it on in Account settings” message. Tap the message.
- Tap Manage your Google Account > Add account.
- Log in to your Google Account again.
8. Enable notifications for your email app
It could be that emails are syncing just fine, but your phone isn’t sending you the notifications for them. You can fix this issue by enabling notifications for your email client.
The steps are:
- Head to Settings > Apps & Notifications and tap on your email app.
- Click the notifications option.
- Turn the toggle for all Show notifications options to the On position.
Also Read: How To Silence Notifications On iPhone
9. Check the servers
Gmail uses Google’s servers to deliver new mail to your inbox. Obviously, if the servers are down, you won’t be getting any new emails. Now, this doesn’t happen quite often, and its unlikely servers will remain down for an extended period of time. However, it won’t hurt if you check the server status, just to be sure. if the problem was indeed caused by a server outage, just wait some time until Google fixes it, and you’ll start receiving emails again.
10. Disable data saver
Data saving features will limit the performance of almost any app that requires data. There are two solutions in this case. You can either whitelist Gmail in data saver, or disable the data saving feature. Sure, whitelisting Gmail will eat up more data, but Gmail itself is not a data-hungry app. So you won’t have to worry about it. Just make sure not to open any media-heavy emails.
Here’s how to whitelist Gmail in Data saver:
- Go to Settings.
- Tap Network & Internet > Data usage > Data saver
- Tap Unrestricted data
- Find Gmail and toggle it on.
11. Check the Filters
One of the possible reasons you’re not receiving emails is filters! If your filters are not properly set, they’ll automatically redirect your “good” mail to the Spam folder or some other folder like All mail. All in all, it doesn’t deliver emails to where it should, and that’s the Inbox folder.
So you’ll probably want to check the filter settings and remove all the filters that are blocking the email flow. You can manage filters in the android apps, so you’ll have to fo it in your computer’s browser.
Here’s how to do it:
- Go to gmail.com in your computer’s browser.
- Go to the Settings > Filters & Blocked addresses.
- Check if there’s a filter redirecting your mail.
- If such a filter is created. delete it.
Also Read: How To Set Google Voice On Android
12. Airplane Mode
As you probably know, airplane mode drastically restricts your phone’s functionality. Especially when it comes to the internet and communications. Since there are no calls or internet connections in airplane mode, you obviously won’t be able to receive any emails.
Sure, the airplane mode won’t be enabled all the time, but as it’s usually placed in the top settings panel, accidental taps may occur. So, disable the airplane mode and check Gmail once again.
13. Check internet or wifi connection
Sometimes, the internet connection itself isn’t working, or a public Wifi hotspot requires you to sign in or agree to their terms, first. Checking with your browser, which is simpler than other tools you may use, can help.
- Open your browser, in the address bar at the top, type in google.com, then press Enter.
- Make sure you’re able to load google.com. once this loads, make sure you’re able to search. Type something in the Search box, then select Google Search.
- Make sure search results load properly.
- If searching doesn’t work, then there’s reason to believe that you’re not connected to the internet. Fix the connection issue before proceeding.
14. Restart your device
Many basic problems can be solved simply by restarting your device. This clears caches and forces the device to re-load the program or webpage you may be having issues with, rather than use something that may be partially wrong.
- Hold down the power button on your Android device
- Select Power off
- Wait 30 seconds
- Press the Power button for a few moments and your Android device will start back up.
15. Clear your Google storage Space
Plenty of us is guilty of hoarding messages and files that we don’t need. If your inbox is filled with old emails, you run the risk of running out of storage space.
Go through your inbox to delete large files from your account or Google Drive to help free up space. If you want more space to save your emails, you can also upgrade your storage plans.
Conclusion
That’s about it. I certainly hope at least one of these solutions helped you resolve the problem with Gmail not receiving new emails. If you have comments, questions or suggestions, just let us know in the comments below.


