


 Header Through Cloudflare")


A restore point is a useful feature of System Restore that creates a type of snapshot of the software, registry, and driver configuration on your System at a certain point in time. Then, if required, you can take your PC back to that instant in time. Nevertheless, you would also lose any unintended changes that might have been performed without your knowledge. Although you might lose part of the work you’ve done since you established that restore point.
Be mindful that only manually made restore points or those made when a new software or driver is installed will create new restore points. Furthermore, the data required to bring the system to the selected state exists in each restore point. Your personal files folder stands unaffected by restoring, however, updates, drivers, and apps that add after the restore point will delete.
System Restore is a useful tool without a doubt. Though, you must have one or more previously generated system restore points for the Windows 11 installation to restore Windows 11 to an earlier time. So, to see all the available restore points, have gathered different methods which you can use to see all the manual or system-made restore points.
Also Read-How To Install Photos Legacy App In Windows 11
Method 1: See all Available Restore Points via System Protection
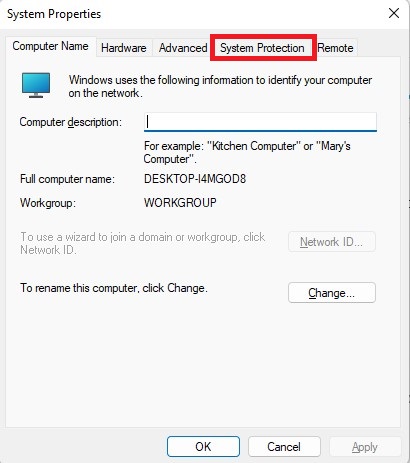
Step 1: First, you need to jot down Sysdm. cpl in your search option given in your taskbar.
Step 2: Then, enter to proceed. After that, you will see a window of System Properties.
Step 3: From there, tap on the System Protection option
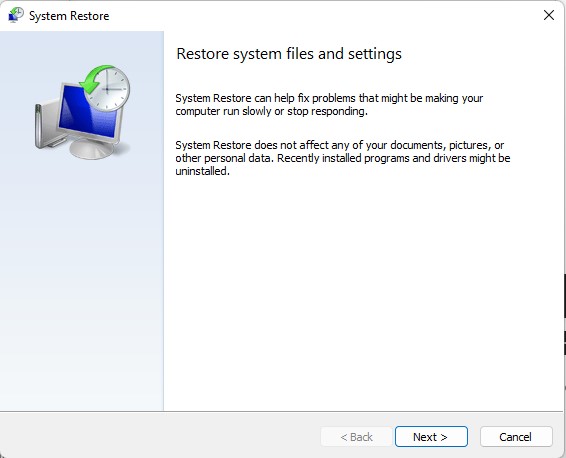
Step 4: On the System Protection menu, you will see the System Restore. Simply click on it. You will be directed to System Restore Wizard
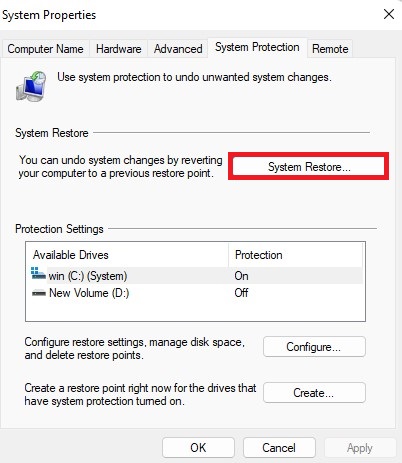
Step 5: You will now see the next option, tap on it.
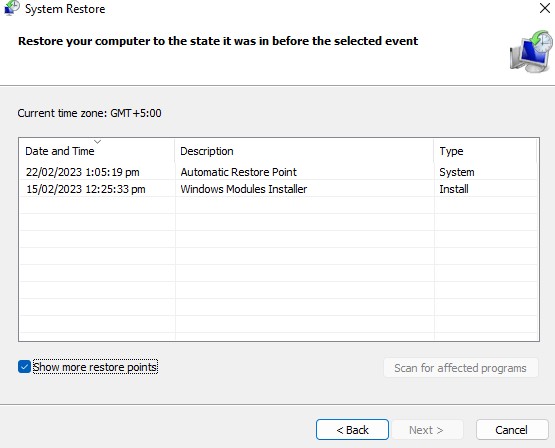
Step 6: On your System restore window you will notice the latest restore point. If you want to see all the available notice points. Simply checkmark on the “Show more restore points” option.
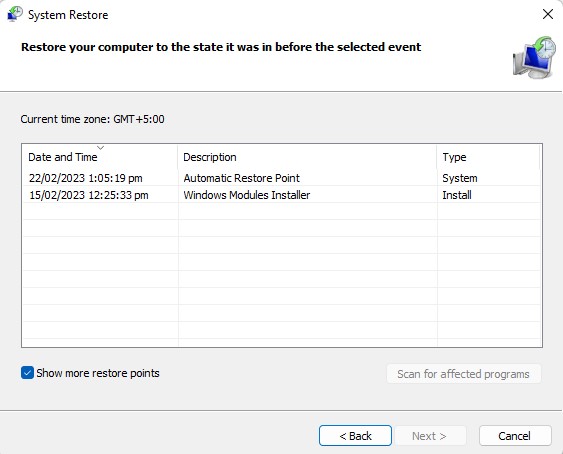
Step 7: After that, you will notice all the available restore points along with the date and time when they were created.
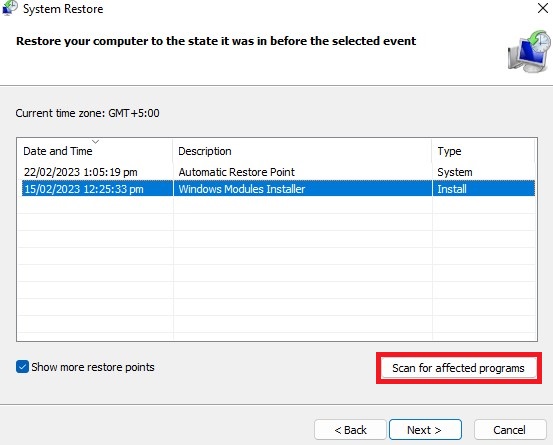
Further, if you want to see the last updates drivers, and programs that were upgraded after the creation of your desired restore point. Simply click on Scan for affected programs once you select your restore point.
All-in-all, it is a wonderful function that might help you solve time-consuming PC issues. The built-in troubleshooters and Reset this PC options in Windows 11 are cutting-edge features, nevertheless, the System Restore tool can fix problems rather quickly.
Furthermore, if you like to restore the system to resolve any frustrating issue with your PC. We advise you to establish a restore point before causing any significant modifications to your Windows 11 installation.
Also Read- You Can Now Run Windows 11 On An Apple Silicon Mac
To get started with creating a restore point, follow the steps mentioned below.
Creating A Restore Point On Windows 11
Below are some easy steps you need to follow to make a restore point:
Step 1: Type sysdm.cpl in the search option and then press enter to proceed
Step 2: Then, in the system properties. Make sure that the “system restore feature” is enabled. If it is not enabled click on the Configure option.
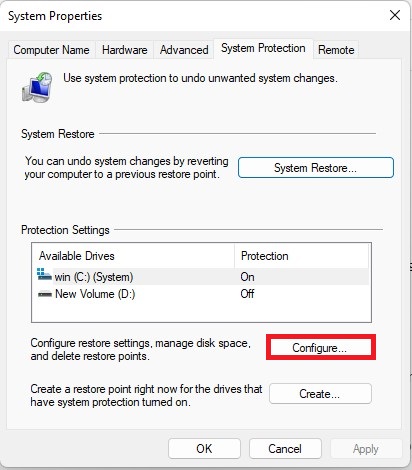
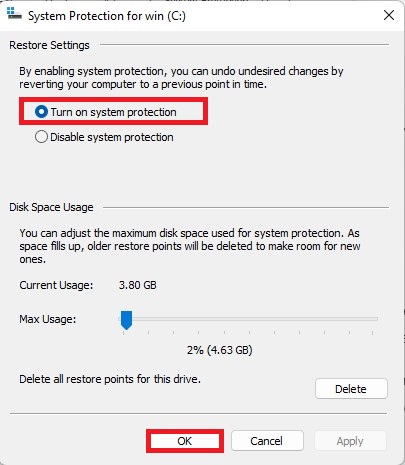
Step 3: You will direct to restore settings and there you will see the option to Turn on system protection just enable this option then click on OK
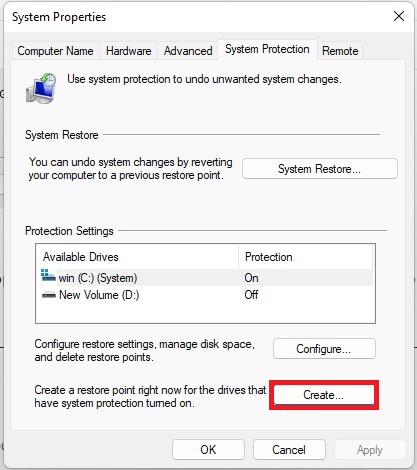
Step 4: Back at the System Properties windows. Now, clicking the Create button will prompt you to immediately create a new restoration point.
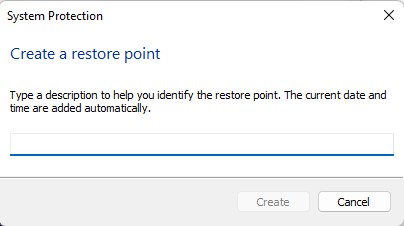
Step 5: In the pop-up window, give your restore point a name, then select Create. You will see another window after a short while declaring that the restore point successfully generated. Now tap close.
Now that your system “restore point” created successfully. You can now easily restore your system to its previous state if you happen to face any issues after a while and you like to go back because you prefer how it was operating before.
If you wish to restore your system you can follow these simple steps that we have provided to make your work smooth and much faster on your Windows 11.
Also Read- How To Download Fonts For All Languages In Windows 11
Utilize your Restore Point to Restore the System
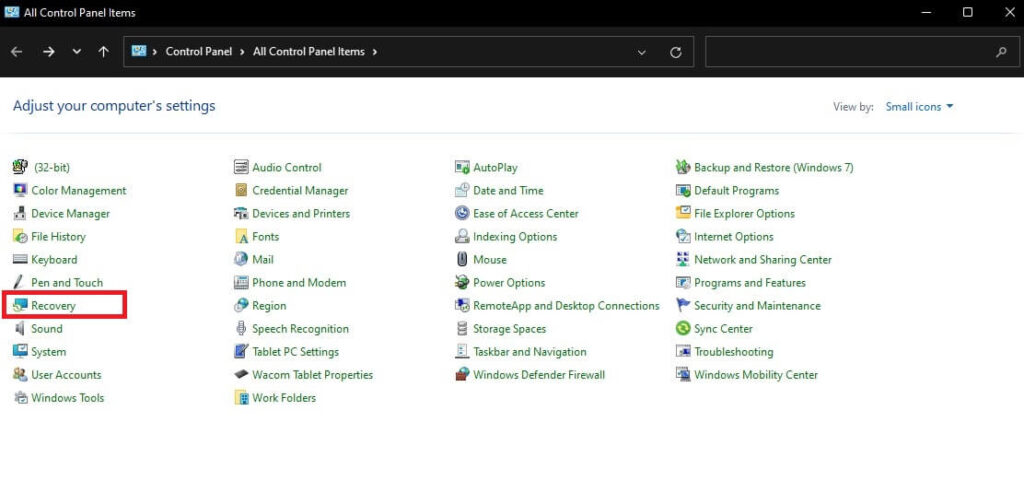
Step 1: On the search option, type Control Panel and click on it
Step 2: On the control panel window, tap on the Recovery option.
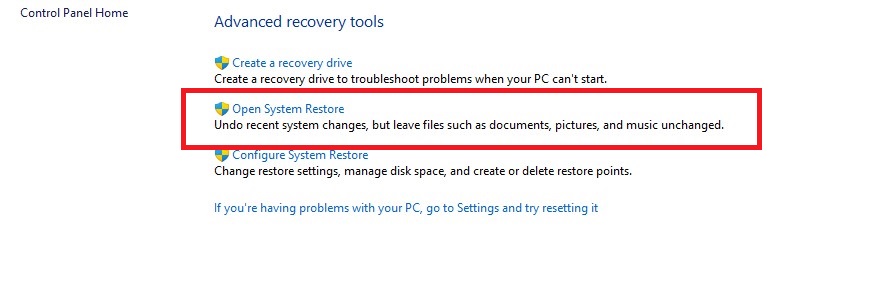
Step 3: On the recovery window, you will see Open system restore, simply click on it
Step 4: After that, you notice a window that will ask you if your want to Restore system files, click on next
Step 5: There you will see the list of points, created manually or by the system. Click on the one you desire to go back to
Step 6: Click on Scan for affected programs just to be safe. You’ll receive a list of the apps that will delete and those that restore automatically as a result. Click Next after closing the window.
Step 7: The next thing you will see is the restoration point you’ve selected, the drive it will impact, and a warning that you might wish to use a USB drive to create a password reset disc if you’ve recently changed your Windows password are all listed in the final confirmation window. Also, you will have one more chance to search for impacted programs.
Finally, to start the procedure, click Finish.
That’s it! Hopefully, we have guided you well on how you can see, create and restore points to do a proper and successful System restore.
Also Read- How To Enable Or Disable Changing Desktop Background In Windows 11


