


 Header Through Cloudflare")


TPM 2.0 is one of the system requirements to upgrade to Windows 11. So you have to enable it as without the TPM, your computer cannot upgrade to the next level of the Microsoft operating system.
A TPM or trusted platform module is a chip attached to your computer’s motherboard, or you can add it separately. The purpose of a TPM is to tighten the security of your hardware so that no malicious software can attack it. Moreover, you can see versions of TPM in a virtual or firmware variety which requires users to keep their motherboard BIOS updated.
According to Microsoft, PCs shipped in the past five years will have the TPM 2.0 enabled without exception. However, those who have customized their PCs according to their use may have to enable it separately.
They already have the setup for TPM 2.0, but by default, theirs might be switched off. Moreover, if you do not have expertise and understanding of this level of technicality, you should contact your system manufacturer.
The solution will depend on easy to complex steps hinged on the computer you’re using. Furthermore, it might vary from one Windows PC to another if you also have to manage the UEFI BIOS. If you don’t know what that is, and this blog post’s solution for TPM does not work for you, don’t worry.
I will discuss all the steps in detail to ensure you can both manage your UEFI BIOS and enable TPM 2.0.
Also Read: How To Install Windows 11 On An Unsupported CPU?
Why Enable TPM 2.0 For Windows 11 And Do You Really Need It?
According to Microsoft, Windows 11 cannot work without TPM 2.0 as it serves these functions:
- An important building block that enhances hardware security in Windows 11
- BitLocker for data protection
- Activates features like Hello for business
- Measured Boot
- Device encryption
- Windows defender application control
- Credential guard
- Device health attestation
- UEFI Secure Boot
- Virtual smart card
- Certified storage
- Autopilot
- SecureBIO
Moreover, this microchip is responsible for most of the security of our hardware as well as software. And it makes complete sense that an upgraded version of Windows will demand more security.
Read: Windows 11 Installation Assistant: How To Upgrade For Free?
Still Didn’t Understand? Read This
In simple terms, a TPM is essentially a system component that stores secrets in a tamper-resistant way. For example, you encrypt a hard drive and need to keep that key safe somewhere to access it later. But at the same time, you want to protect it from malicious software and cyber attacks. A TPM is that solution for you as it works both ways.
Therefore, a TPM is a special cryptographic processor that is built into your CPU or added later. Intel and AMD have both already started to integrate TPM into their processors for a while now. So it’s not a brand new technology in the market as it’s been around since the 2000s.
Some security features use TPM in companies like SOPHOS Central Device Encryption. Also, Windows 10 and Windows Server have been using it along with bit-locker and device attestation as mentioned above.
Method 1: How To Check If Your PC Has A TPM?
As I mentioned before, all PCs come with a TPM, even those that run multiple operating systems. However, depending on manufacturers, some may not have it or have the lower version or disabled one. So here’s the way to check yours.
Step 1: Go to the Start menu on your Windows 10 PC and click on the Windows icon.
Step 2: Click on Run. The Run dialog box will appear on the screen.
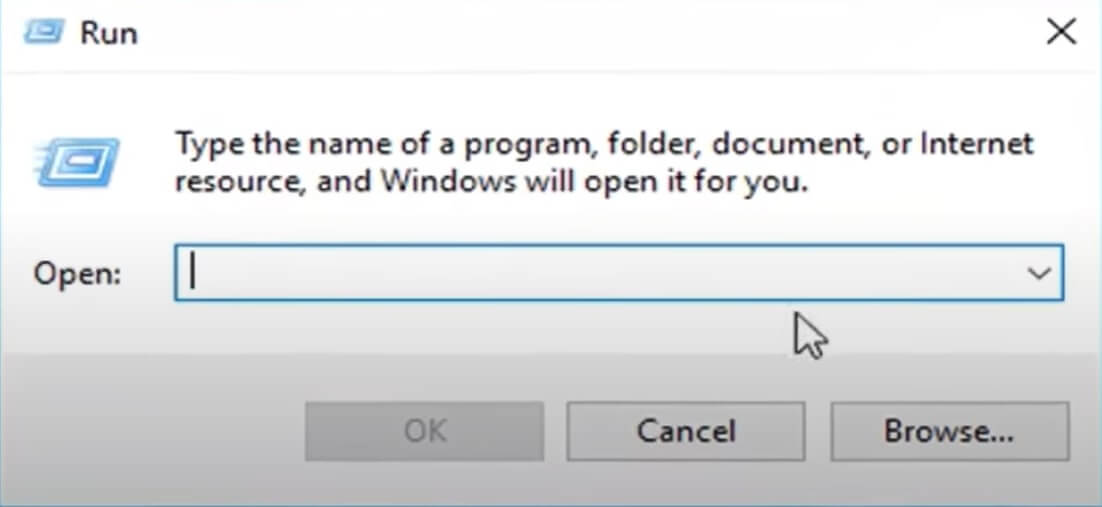
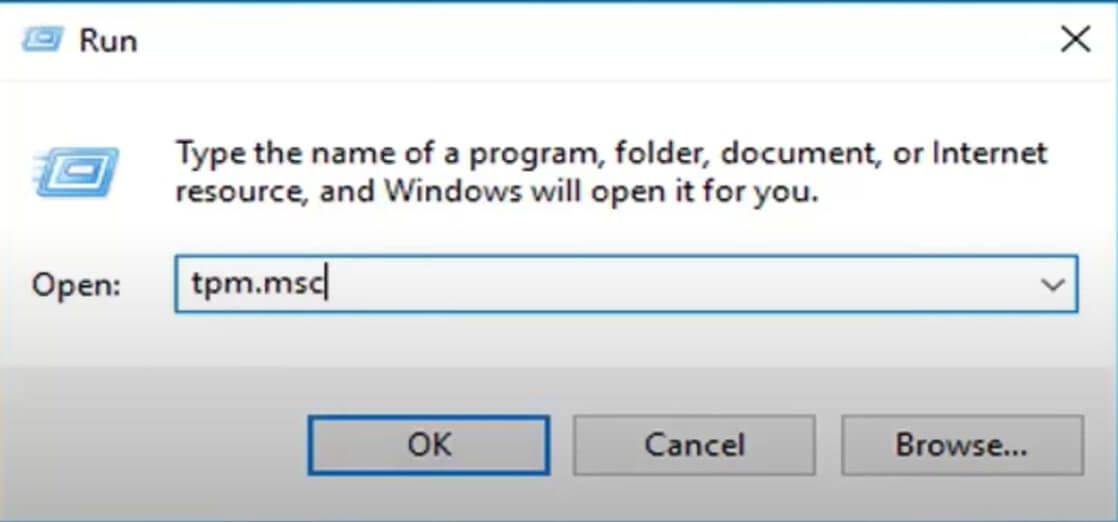
Step 3: In the dialog box, type tpm.msc and click on Okay.
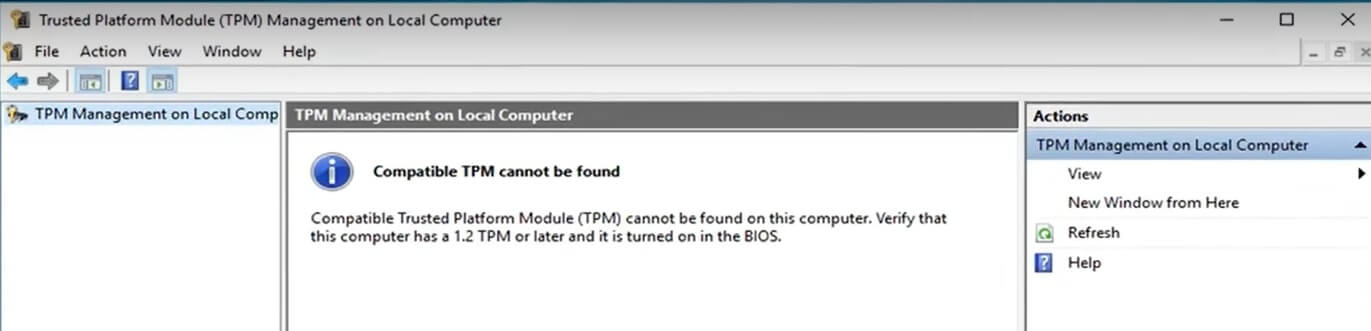
Step 4: It will open the TPM window. Here you can see that if your TPM has a lower version than 2.0, you will most likely see this window.
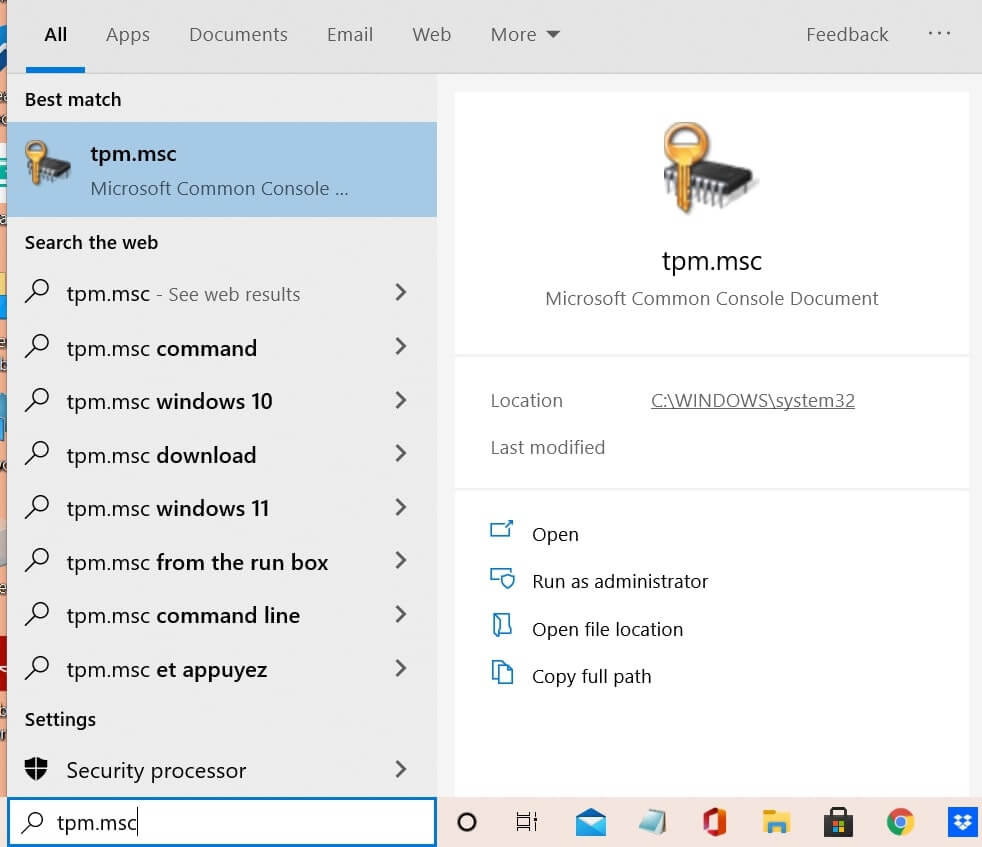
Step 5: Moreover, if you have the updated version of Windows 10, simply type in tpm.msc in the search bar next to the Windows start button and click on Enter.
Step 6: After that, the TPM window will open, and you will be able to see this message if your TPM is updated to 2.0.
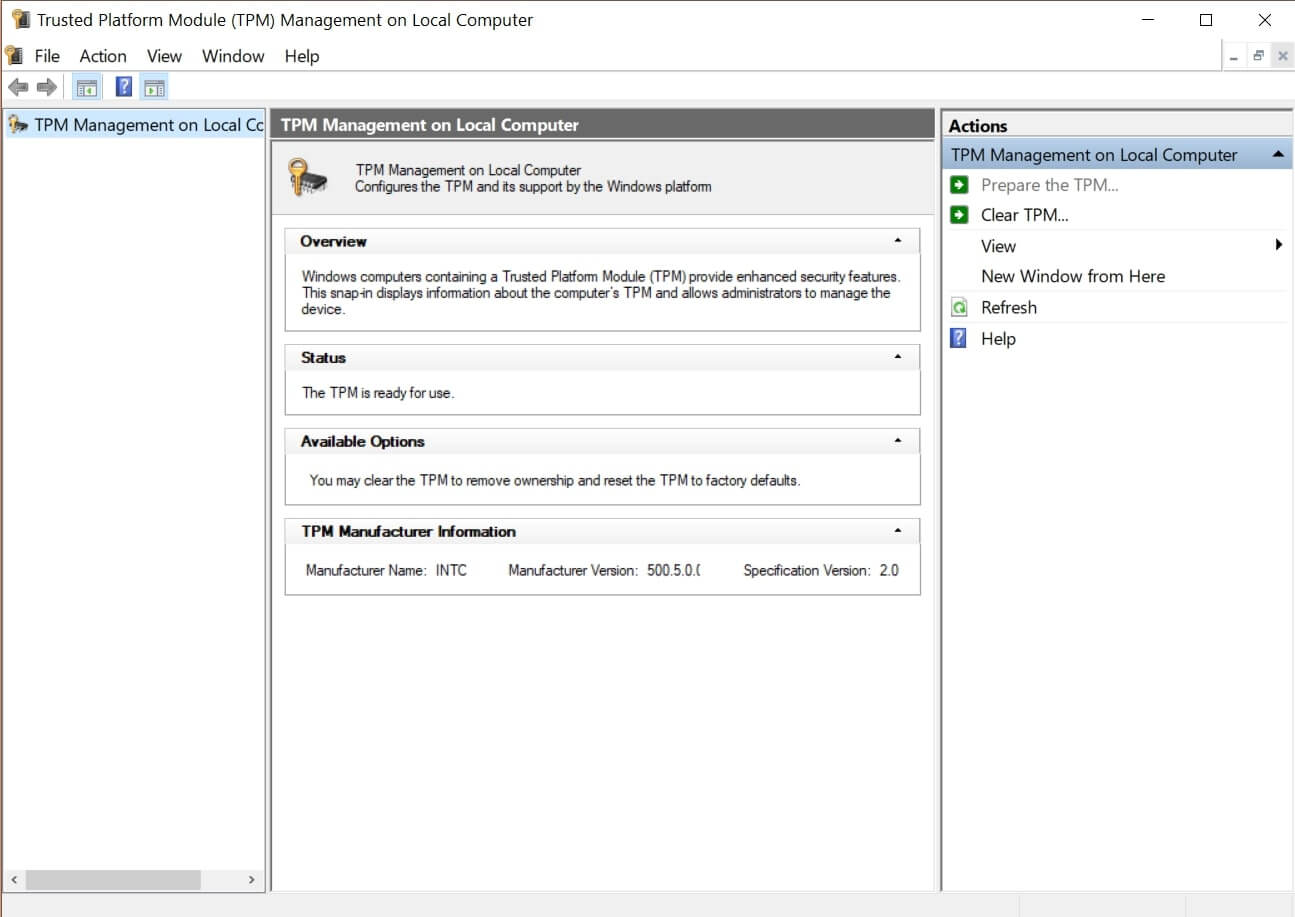
Important Tip: If your computer has a TPM, only then you will be able to see this Trusted Platform Module Management on the local Computer window. If not, then it will display: TPM not found.
Method 2: How To Check If Your PC Can Enable TPM 2.0?
Step 1: Switch on Windows and Press Windows + R to open the Run command box.
Step 2: Here, we will write the command devmgmt.msc and press the enter key.
Step 3: It will take you to the Device Manager window, where you have to scroll down and find the option Security Device.

Step 4: Expand on this to see if your computer has a TPM and which version it is.
Method 3: How To Check If Your PC Can Enable TPM 2.0?
Step 1: Go to Windows Search and type Power Shell.
Step 2: When Windows Power Shell comes up, click on Run As Administrator.
Step 3: Click on Yes, and the Power Shell Window will open.
Step 4: Moreover, here you have to type one command: get-tpm
If your system has a TPM, Power Shell will display the output with all the information. If you notice closely, most of the output results will be TRUE.
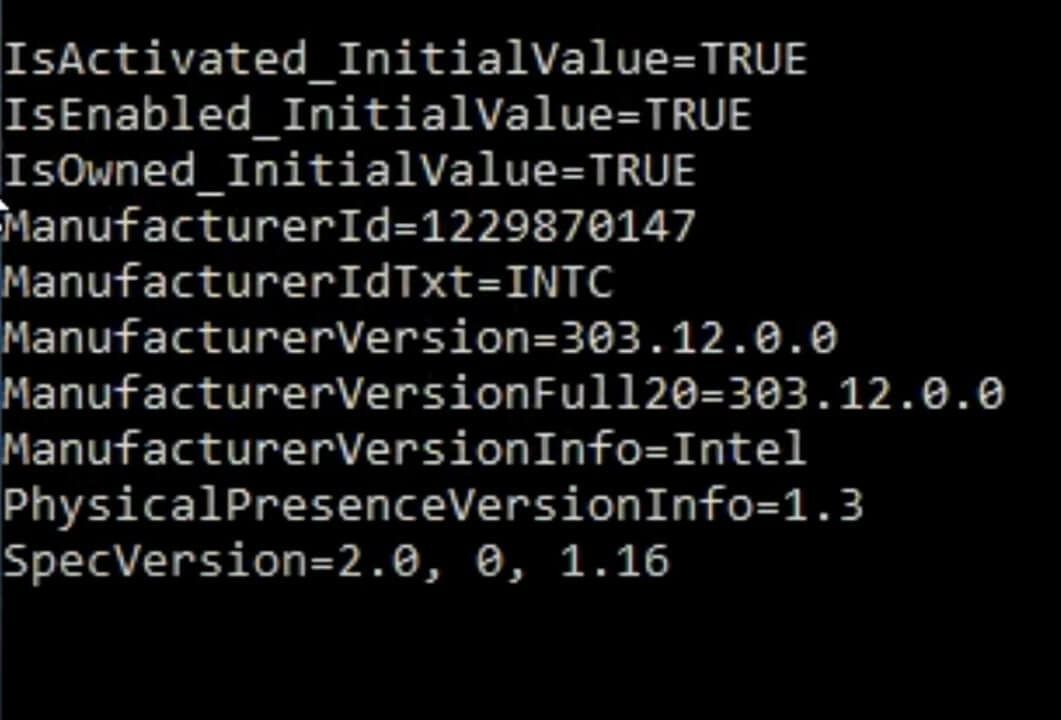
However, if you happen to get a False output, it means the BIOS settings for TPM are disabled.
Moreover, if you don’t receive an output, you can ensure that your system does not have a TPM.
Must Read: How To Check If Your PC Can Upgrade To Windows 11?
Method 4: How To Check If Your PC Can Enable TPM 2.0?
Step 1: Go to the Windows search button, type cmd, and press enter key. Now we will use the command prompt to check for TPM.
Step 2: When the Command prompt app appears, click on Run as administrator.
Step 3: Type the command: wmic /namespace:\\root\CIMV2\Security\MicrosoftTPM Path Win32_Tpm get /value. And press enter key.
Step 4: When you press the enter key, the values for the output will be TRUE.
If the output is TRUE, then your system has TPM and version 2.0. If not, then your system does not have it enabled. Moreover, if there’s no output, then TPM is absent from your computer.
Method 5: How To Check If Your PC Has A TPM?
Step 1: Enter BIOS on your computer. For most Windows computers, you have to restart your system and press the S, K, F10, F12, F1, F2, or Delete buttons.
It can be any of these keys. It’s better to check with your manufacturer on which keys work for your computer.
Step 2: Once your computer has entered BIOS, go to system settings and then to security.
Step 3: Then click on Trusted Computing. It will give you the complete information on your TPM.
Here, you will see options like a security device, TPM device, and Harsh Policy, etc. From the security device, you can select enable or disable for your TPM. Furthermore, most computers, by default, have it enabled.
These are the five ways in which you can find out the TPM of your computer and if it exists or not.
If your TPM is disabled and you need to enable it, read further.
Method 1: Enable TPM 2.0 By Installing A TPM Chip
- Easier said than done; it will take you some professional assistance too. If you are using a desktop setup, your motherboard might have a TPM module. This module will be different from computer to computer.
- If you use a laptop, you should go to the nearest service center and pay a professional to solder it to your motherboard.
Method 2: Enable TPM 2.0 In BIOS
- If your computer is manufactured after 2010, it will have a TPM functionality regardless of its TPM chip. Most of these computers have a firmware called Platform Trust Technology called PTT from Intel.
- Many AMD Ryzen chips also include FTPM, also known as Firmware TPM technology. You can enable your computer in BIOS by rebooting and entering BIOS. Then go to Advanced Mode and press F7 as well.
- Once you’re in the Advanced Mode, click on the Advanced Tab. Furthermore, click on the PCH-FW Configuration. When you click on it, it will open a new window called TPM Device Selection. Make sure that the option is Firmware TPM instead of hardware TPM.
- Therefore, you will have a functioning TPM module after you reboot the system and open the TPM window.
For those using Intel, you might not be able to see any TPM option.
So this is what your process will look like
Step 1: Restart your PC and enter BIOS by pressing F12 or F10.
Step 2: Click on Enter Setup.
Step 3: In your BIOS menu, go to the peripherals tab.
Step 4: On the Intel chip set, you might not see the TPM option. Find Intel Platform Trust Technology PTT and double click on it.
Step 5: Tap on Enable
For those using AMD processors, you will get the TPM option right on top. You just have to enable it. Moreover, after the process is done, click on F10 from your keyboard, click on Yes for Save Configuration, and Exit.
Second Way Of Entering Into BIOS
You have read one way of entering into BIOS, but that’s not it. I understand not all computers are the same. And therefore, I cannot recommend a one size fits all approach. Here’s the second way.
Step 1: Navigate to the Start Menu and tap on Settings.
Step 2: Go to Update and Security, and from the left menu, tap on Recovery.
Step 3: Moreover, under Advanced Startup, click on Restart Now.
Step 4: Your machine will reboot into this screen window shown in the image below.
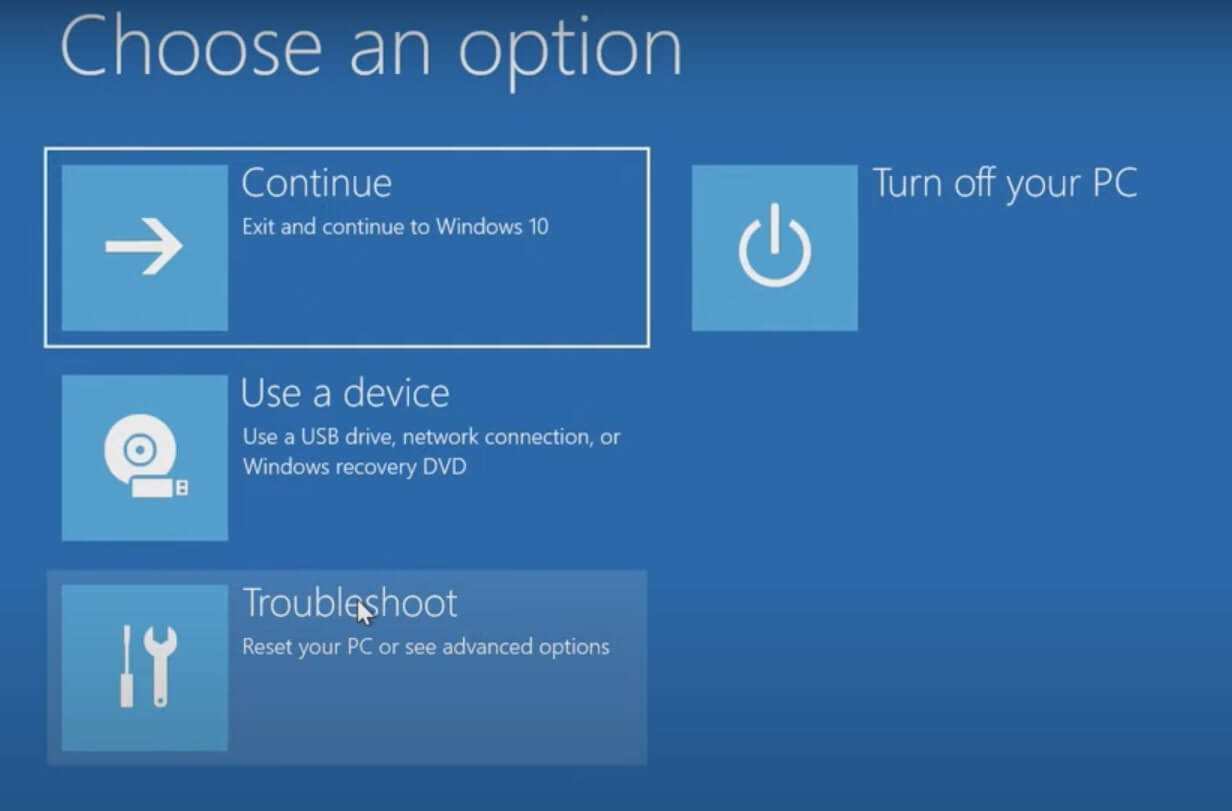
Step 5: Click on the Troubleshoot option and then Advanced Option.
Step 6: Furthermore, look for the UEFI Firmware Settings, and click on Restart.
Step 7: Thus, your PC will reboot and load into the BIOS.
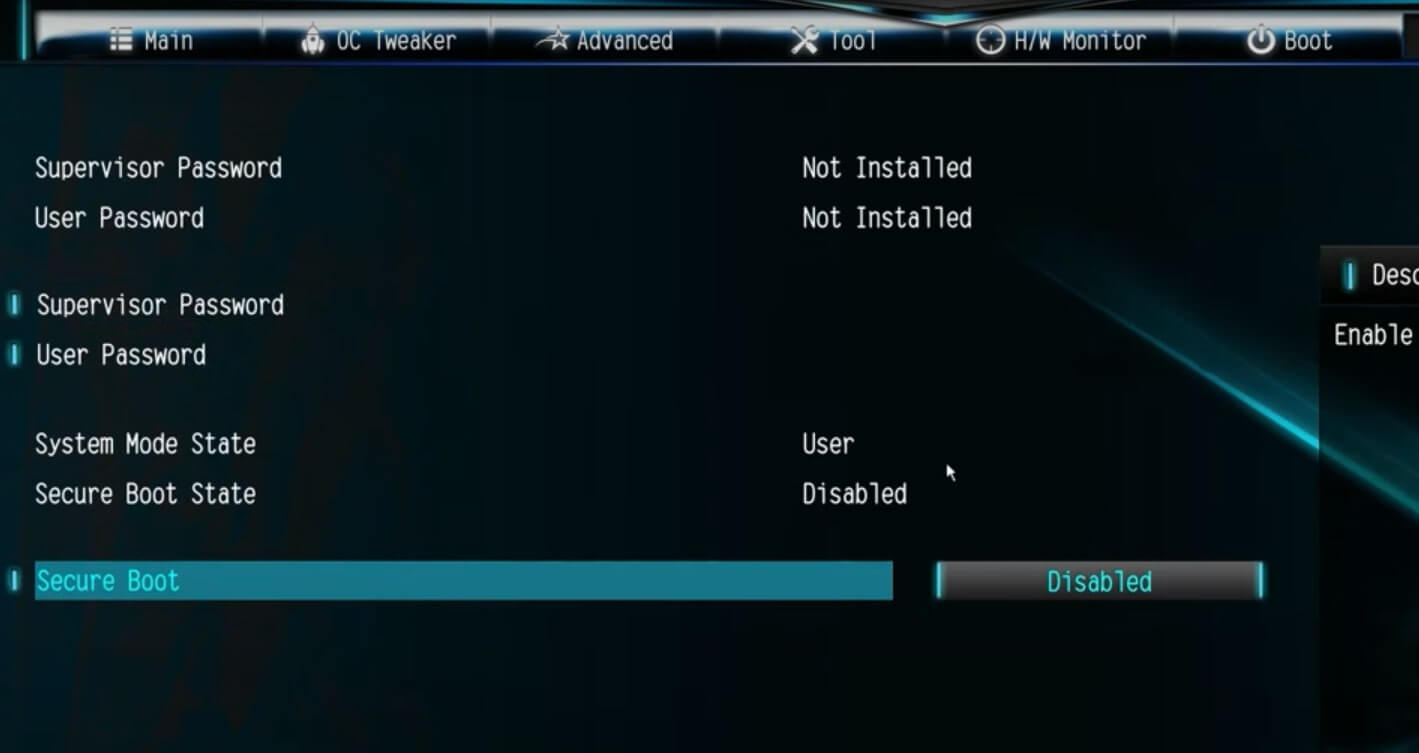
How To Enable Secure Boot?
Depending on your manufacturer, your security boot settings can be anywhere in BIOS. It could be under the Boot tab, Security tab, or the Authentication tab. However, once you find the secure boot tab, double-click on it to enable it. Furthermore, save and exit your BIOS.
After that, simply restart your computer, and you will be able to see the TPM settings. In addition, it is possible that you will not be able to find a secure boot at all. Some computers will load secure boot settings under a custom tab, while others will not allow you to enable secure boot until and unless you restore certain factory settings.
Thus, in this case, it is better to take your system to your manufacturer if you’re not a hardware and software expert.
How To Clear Your TPM?
TPM is not a light software setting you can play around with. When enabling the TPM in BIOS, avoid messing with it unless your IT administrator asks you to and you’re an expert yourself.
Caution: If you mistakenly clear your TPM or change other settings, you will not get any of your computer software and data back. Thus, doing irreversible damage to your software.
Anyhow, if you still want to clear your TPM, first, create a backup of your data. Then follow these steps:
Step 1: Go to the Windows start menu and click on Settings.
Step 2: Furthermore, click on Windows Security and then Device Security.
Step 3: Now go to Security Processor and click on Security Processor details.
Step 4: Tap Security Processor Troubleshooting.
Step 5: Go to the Tab Clear TPM and select Clear TPM.
Once this process is done, restart your computer.
How Is Secure Boot And TPM Different?
As the name suggests, Secure Boot also deals with the safety of your computer but is slightly similar in its function. Secure Boot is part of UEFI firmware settings responsible for allowing a computer to start its operating system.
Only when it trusts that the operating system is safe will it go ahead with the booting process.
However, if the operating system is not safe, not signed by someone digitally that your firmware trusts, it will not allow the operating system to start. In many systems, the secure boot is off by default so that more than one operating system can run on it.
Say, for example, you have a computer where you want to run both Windows 11 and Linux. The secure boot, in this case, may not allow the operating system to start in the first place. On the other hand, TPM checks for security in the hardware.
Why Is It Important To Enable TPM 2.0 And Secure Boot In Windows 11?
It is important to have both the secure Boot and TPM 2.0 enabled because cybercrimes are on the rise these days. Hackers are going the extra mile to steal data, source code, and devices’ vulnerable information.
Operating systems like Windows 11 and even the others that exist in the market are always under attack by malicious malware.
Both the Secure Boot and TPM 2.0 give all-around protection to your PC in the hardware and software. Microsoft and others use these technologies to constantly raise the bar on security so that your computer is not compromised.
Secure Boot stops any sort of problematic error from coming upright when your computer boots. So it’s like the main gate of your house that keeps robbers and burglars away.
Similarly, after the first security line, the TPM keeps the secret keys and encrypted codes safe.
Read: How To Fix Widgets Not Working In Windows 11?
What Is The Difference Between Secure Boot, TPM 2.0, And An Anti-Virus?
So, the secure boot and TPM are the first and second lines of security for your computer. They are extremely important and cannot, rather should not be disabled. They are the security forces that work to protect the hardware and outside the operating system.
The anti-virus, on the other hand, comes after the operating system. And protects it from viruses and malware that come after. A secure boot makes sure that the safe things load first and then the anti-viruses, thereby making it more effective.
Conclusion
Even though TPM has been around for a while, it is only in 2021 that it has come to the surface. Moreover, it is wise that you enable the TPM and then install it to Windows 11. Of course, there are ways to bypass it, but what good will it do in the long run unless you have a spare old PC to experiment with?
Secondly, if your computer does not have the TPM and cannot enable it, it is best to buy a new computer. If not, you can continue running Windows 10 as Microsoft will support it until October 2025. And if I am not wrong, by that time, you will want to move to a new PC anyway!
Should Read: How To Hide The Taskbar Search Icon On Windows 11?


