


 Header Through Cloudflare")


![[Interview] The Future of Screen Experiences ②: From Watching to Understanding With Vision AI Companion](https://www.hawkdive.com/media/samsung-tvs-and-displays-vision-ai-companion-interview_thumb932-218x150.jpg "Exploring Vision AI Companion: Transforming Screen Experiences for Users")


Are you weary of your Windows system always prioritizing Ethernet over WiFi, even though you’d prefer the opposite? Nowadays, it’s quite expected to encounter computers equipped with both wired Ethernet and wireless Wi-Fi adapters. Also, with the widespread usage of virtual machines and VPN clients, we often see further virtual network adapters created. These adapters also receive their unique network priority value to determine their position in the network.
With so many different network adapters available, Windows needs to prioritize which connection to use for internet access and other network-related tasks. By default, Windows assigns a network metric value to each adapter to determine its priority. In computer networking, a metric is a value designated to an IP route for a distinct network adapter interface. The metric symbolizes the cost associated with utilizing that route and uses by the operating system to determine which adapter to use for a certain network task.
By default, Windows uses the Automatic Metric feature to designate metric values to network adapters based on their link speed. This means that the adapter with the highest link speed assigns the lowest metric value and priority over other adapters. For example, if you have both Ethernet and Wi-Fi adapters active, Windows will choose the one with the highest link speed to route your internet traffic.
However, in certain situations, you may want to manually adjust the network adapter priorities to better suit your needs. It is perhaps you want to switch to Wi-Fi for a faster and more stable internet experience. The default priority order in Windows is set to prioritize Ethernet over Wi-Fi and cellular connections. In this guide, we’ll walk you through two ways by which you can manually Change Network Adapter Interface Connection Priority Order on your Windows 11.
Also Read- Remote Assistance With Quick Assist App In Windows 11- A Complete Guide
Method 1: Configure Network Adapter Interface Connection Priority Order in Powershell
Step 1: First, you need to open Windows Terminal, choose Windows PowerShell, and paste the command provided below to view a list of all network adapters and their current InterfaceMetric on your PC.
Get-NetIPInterface | Format-Table -AutoSize
Now you will see the execute will display various information, including the connection state, about all network adapters along with their unique interface index numbers. The priority of each adapter defines by its InterfaceMetric value, where lower numbers indicate higher priority over larger numbers.
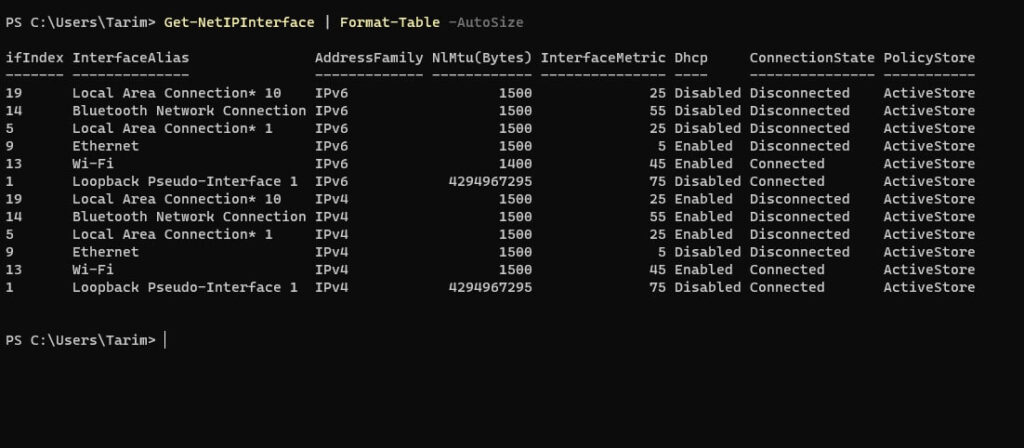
Step 2: Now you have to note down the interface index number (In my case, it is “13”) listed under the IfIndex column. And the network adapter name ( In my case, it is “Wi-Fi”) under the InterfaceAlias column, for which you want to modify the connection priority. My “AddressFamily” for the “InterfaceAlias” is IPv6.
Step 3: To meet the requirements, simply execute the following command:
For both Network adapters (e.g. IPv4 and IPv6) :
Set-NetIPInterface -InterfaceIndex "XX" -InterfaceMetric "YY"
In this command, “InterfaceIndex” represents the ifIndex of the network adapter, while “InterfaceMetric” determines the new priority value for the network adapter.
For Individual Network adapters:
Use this command for individual Network adapters:
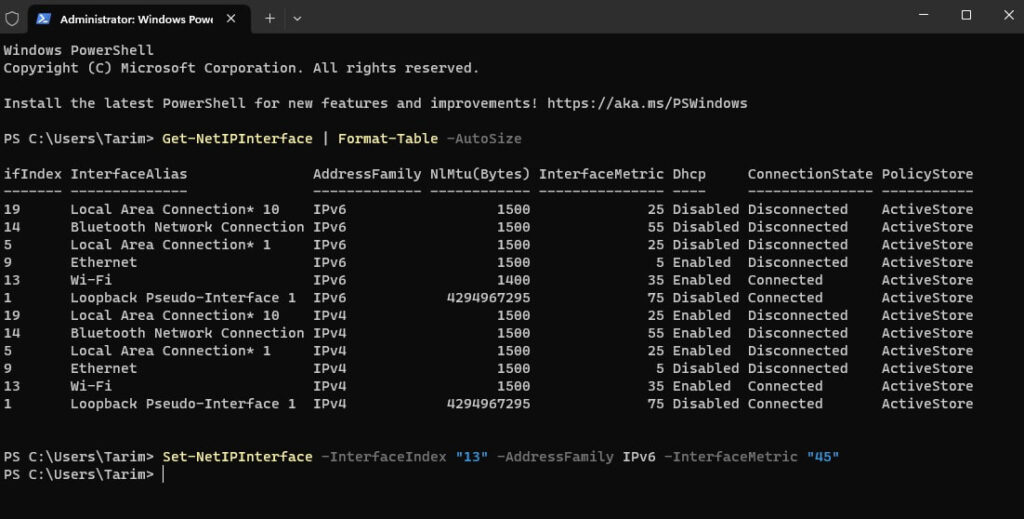
Set-NetIPInterface -InterfaceIndex "13" -AddressFamily IPv4/IPv6 -InterfaceMetric "YY"
Consider this example in my case:
Set-NetIPInterface -InterfaceIndex "13" -AddressFamily IPv6 -InterfaceMetric "45"
This will modify the priority of the network adapter with an interface index of 17 to 45. Please note that there will be no confirmation message displayed upon completion. ( See the illustration below)
Also Read- How To Change Theme In Notepad App In Windows 11
Method 2: Configure Network Adapter Interface Connection Priority Order in Control Panel
In Windows 11, you can change the Network Adapter Interface Connection Priority Order in the Windows Control Panel with a few simple steps. Adhere to the following steps to make the changes.
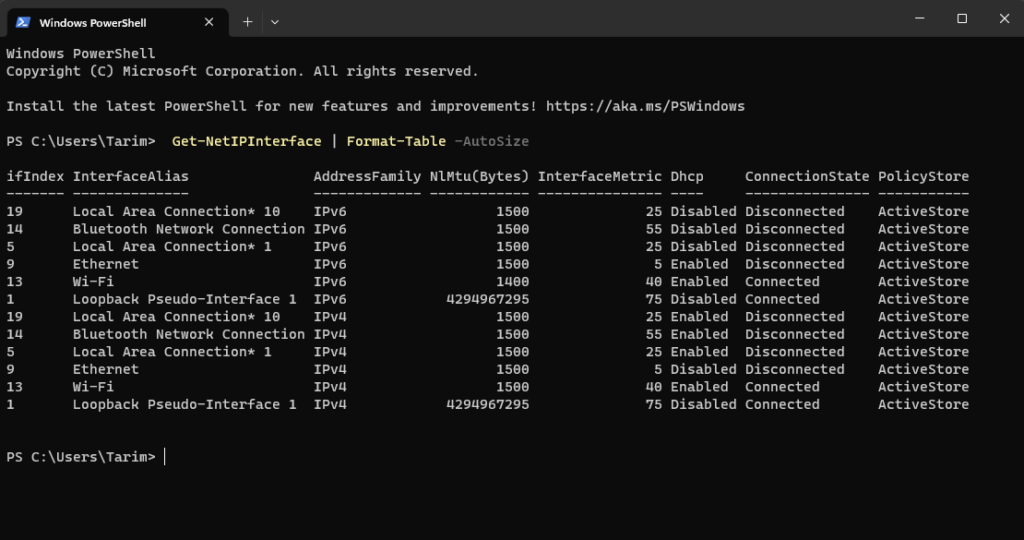
Step 1: First, you need to open the window shell terminal by right-clicking on the Start option and selecting Terminal. After that, paste the command provided below to Run it, do it by pressing enter.
Get-NetIPInterface | Format-Table -AutoSize
Head To the Control Panel to do Further Modifications
Step 2: Now you are required to open Control Panel on your windows 11 by manually searching Control Panel > Change Adapter Settings via the search option or you can use the win + R and run this command ncpa.cpl to directly open the Network connections.
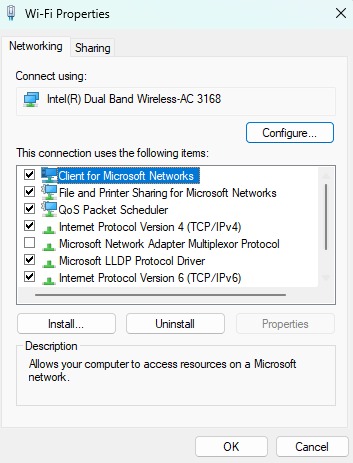
Step 3: After that right-click the network adapter whose priority order you are looking to change (In my case, it is wifi). Right-clicking it will open the drop-down menu, now select properties from it.
Step 4: To change the metric for a specific network adapter. You need to select either Internet Protocol Version 4 (TCP/IPv4) or Internet Protocol Version 6 (TCP/IPv6) for the corresponding IP route. And then click or tap on the Properties button.
Note: It’s important to note that if your network connection or adapter is IPv4 type. TCP/IP Version 4 (TCP/IPv4) would be the preferred choice. You can verify this by executing the command outlined in step 2 and checking the AddressFamily values.
Step 5: After clicking the preferred Internet protocol version, the properties option will light up. You can now click on it and head to the properties to further modify.

Step 6: Now, on the Internet Protocol Version window, select Advanced.
Step 7: On the Advanced TCP/IP settings. First, you need to uncheck the Automatic metric option and input a custom Interface metric value. A smaller value for the Interface metric will result in a higher-priority network connection for that input. While a higher Interface metric value will result in a lower network connection priority. After inputting your preferred metric value. Finally, click OK to save the changes and close the Network Connections window to return to your desktop.

That’s it! By following these steps, you can easily configure the network connection priority in Windows 11.
Also Read- How To Change PowerShell Script Execution Policy In Windows 11


