


 Header Through Cloudflare")


Have you ever needed help with your computer but couldn’t find anyone nearby to assist you? Or have you ever wanted to help someone else with their computer issues but couldn’t reach them physically? If so, you might be interested in the Quick Assist app in Windows 11. This app allows you to connect to another Windows 11 device remotely and either give or receive assistance. You can view or control the other person’s screen, chat with them, and troubleshoot their problems.
Quick Assist
Quick Assist is a pre-installed feature in Windows that enables users to share their screens remotely for the purpose of receiving or providing assistance. The party offering assistance gains the ability to diagnose, troubleshoot, and assume complete control of the remote screen. Conversely, the recipient of assistance benefits from the opportunity to learn and execute instructions and procedures.
Also Read- How To Change Theme In Notepad App In Windows 11
Quick Assist vs Remote Assistance
Although, Quick Assist and Remote Assistance have similarities but also have some differences. Quick Assist is a cloud-based service that only requires one outbound connection from each user’s PC to the cloud service/Microsoft server. In contrast, Remote Assistance creates a direct RDP connection between the users’ computers and requires the TCP port 3389 to be opened on the client machine and the firewall/NAT/router behind it.
Additionally, Quick Assist is a general service provided by Microsoft to share computer screens with others, while Remote Assistance is a service typically used by office workers to invite a technician to fix problems within a specific device.
Also Read- How To Install Or Uninstall VBScript Feature In Windows 11
So, What can you actually do with Quick Assist?
The Quick Assist, an unsung hero of Windows 10 and 11! This nifty app allows you to remotely access another PC over the internet, granting you control and troubleshooting capabilities from afar. Whether trying to run an anti-malware program or remove a pesky hardware driver, Quick Assist has your back.
Not only does Quick Assist give you complete control of the remote PC, but it also lets you share its desktop with the other user. This feature makes it a fantastic teaching tool for showing someone how to perform a specific task or use a particular application.
Suppose you find yourself in a sticky situation where you need to provide technical assistance to a colleague, family member, or anyone else remotely. In that case, Quick Assist is your go-to solution. So, buckle up and get ready to experience the power of Quick Assist – the ultimate remote access tool for Windows 11.
In this guide, we will show you how to use Remote Assistance with the Quick Assist app in Windows 11 step by step. You will learn how to set up the app, how to request or provide assistance, how to adjust the settings and permissions, and how to end the session. By the end of this guide, you will be able to use Remote Assistance with the Quick Assist app in Windows 11 like a pro. Let’s get started!
Also Read- How To Change PowerShell Script Execution Policy In Windows 11
What You Need to Know Before You Get Started with Quick Assist
Before you start using Remote Assistance with the Quick Assist app in Windows 11, there are a few things you should know.
How Does Microsoft Establish the Connection
Both the person who wants to help and the person who needs help should open Quick Assist. The helper selects “Assist another person” and gets a session code from the Remote Assistance Service. They give this code to the person who needs help.
The person who needs help enters the code in their Quick Assist app to join the same session. The helper can then choose to either view or fully control the other person’s desktop, and the other person has to confirm that they allow this.
Once this is done, Quick Assist connects to the RDP Relay service which allows the helper to see what’s happening on the other person’s screen and share inputs.
Therefore, the rationale to explain this is that the individual requiring assistance with their Windows must be present in front of their System, at least at the beginning, to allow Quick Assist to establish a connection between their PC and the computer operated by the individual who will support them.
Also Read- Steps For Backup And Restore Quick Settings In Windows 11
Update to the Latest Version
Quick Assist is an application available on both Windows 10 and 11 operating systems that allows users to provide or receive remote assistance with their PC. However, the existing built-in Quick Assist app is approaching its end of service. To assure the security of your remote assistance sessions, it is necessary to download the new version of Quick Assist from the Microsoft Store. To acquire the newest version of Quick Assist, follow these steps:
- First, click on Start. Then, head to the Microsoft Store and search Quick Assist.
- After selecting the app. You will see the Get option. Tap on that option and it will start downloading.
- Now, check you have installed the newest version. Simply search Quick Assist and go to the App Settings.
- In the app settings notice which version are you using it must be 2.0.x.0. (For instance, in my case it is 2.0.19.0).
- After checking the latest version. If you have the older version on your system, you can now delete it.
Stable Internet Connection and Microsoft Account
Quick Assist is a straightforward application that doesn’t require any special roles, permissions, or policies to use. As long as both parties have a suitable network and internet connectivity, they can connect through the application.
The helper, or the person assisting, needs to have a Microsoft account, you need a Microsoft user account such as Office 365, Microsoft 365, Outlook, or Hotmail. If you don’t have one, Quick Assist lets you sign up for free.
After ensuring the points mentioned above, let’s move on to how you can assist users using Quick Assist.
Also Read- How To See Seconds For Windows 11 Clock
Here is How you Can use Quick Assist
Now, to start a Quick Assist session, either the support staff or the user can take the initiative. This is what you need to do to get started with Quick Assist:
Step 1: First, the support staff, aka the “helper,” can start Quick Assist by typing “Quick Assist” in the search box and hitting ENTER.
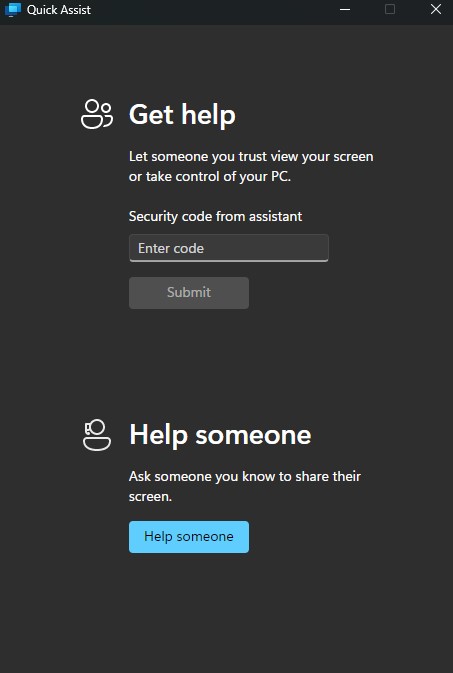
Step 2: In the Quick Assistance window, select “Help someone.” Then, you need to sign in or choose their account.
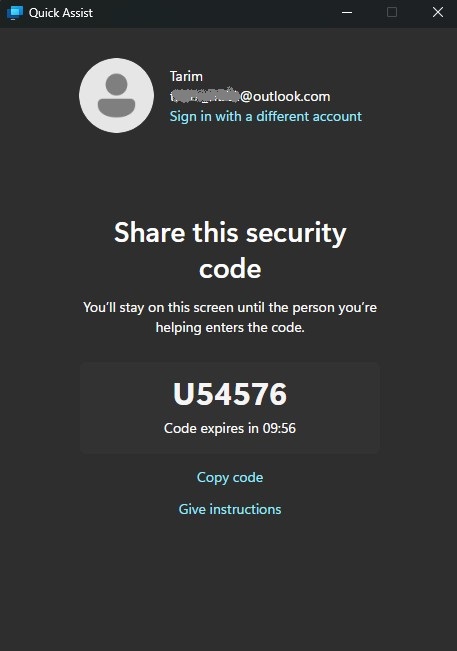
Step 3: Quick Assist will then generate a unique security code that’s valid for a limited time. The helper shares the security code with the user through a messaging system or over the phone.
Step 4: Quick Assist will open on the user’s device. They need to enter the provided code in the “Security Code from assistant” box and click “Share screen.”
Step 5: The helper will receive a dialog box that lets them choose to either take full control of the user’s device or only view its screen. Once they select an option, they should hit “Continue.”
Step 6: The user gets a dialog asking for permission to show their screen or allow access. The user grants permission by clicking on the Allow button.
Tip: If you’re assisting someone while connected, Quick Assist offers a variety of tools that you can use, including a laser pointer, annotation features, chat for typing messages, and many others.
Step 7: Once you have finished assisting, click or tap on “Leave”.
Once you finish this step, the remote session is ready to go. But hold on! Let’s explore some of the handy support tools in the menu a bit more.
Also Read- How To See List Of Available Restore Points In Windows 11
More about the Tools you can use on Quick Assist
Some of the tools you can use in Quick Assist are:
- Annotate: This tool enables you to draw on the screen using various colors and shapes. And you can erase your annotations individually or clear them all at once. It can help highlight or explain something to the sharer.
- Restart: If necessary, you can utilize this tool to restart the sharer’s device without ending the session. After restarting, a message saying “Waiting for device to restart” will appear until the device reconnects.
- Task Manager: This tool allows you to access the Task Manager on the sharer’s device. This can be beneficial in monitoring the device’s CPU, memory, disk, and network usage. Additionally, you can view the running programs and close any problematic ones.
- Pause/End: Pause and End let you pause or end the connection between your PC and the remote PC. When you click Pause, a Resume button shows up; click it to resume the connection. When you click End, a Reconnect button shows up. If you press it, a popup window requests the user of the other PC to permit you to join their computer once more.
- Toggle Instruction Channel: Provides a basic chat feature
- Actual Size: Displays the remote resolution without enlarging it on your screen
Conclusion
Finally, Remote Assistance with Quick Assist app in Windows 11 is an uncomplicated and effective way to help or get assistance with PC problems. You can utilize Quick Assist to share your screen or grab control of another device over a secure connection. You can also use various tools to annotate, restart, manage tasks, and pause or resume the session. Quick Assist is effortless to start and use, and it can save you time and hassle when you require PC support.
Also Read- How To Install Photos Legacy App In Windows 11


