


 Header Through Cloudflare")


If you’re using a Mac on thee latest macOS Ventura, you may have encountered the error “File Can’t be Found.” This error occurs when an application or program cannot locate a file on your system. An incorrect file path or a missing file usually causes this. You can try a few different things to fix this problem. Even though dealing with the File Can’t be Found error can be annoying, you should be able to fix it with the proper troubleshooting techniques. Hopefully, you can resolve your problem thanks to the guidance provided in this article.

Also Read: Quick Action Touch Bar Not Working In macOS Ventura [Fixed]
FIX 1: Reset NVRAM
M1/M2 and Intel-based Macs have NVRAM, or non-volatile random access memory, which stores data about your Mac’s setup.
Your desktop settings, mouse, keyboard, time zone, and display resolution are just a few of the things they retain. So, its linked hardware or software component may not be able to function as intended if its stored data becomes corrupted. As a result, you must reset the NVRAM by following the instructions below:
Restarting your computer on an M1 or M2 Mac will reset the NVRAM.
To use an Intel-based Mac, you must first shut down your computer.
Then simultaneously press the CMD, Option, P, and R keys just before the grey screen displays.
Press these keys repeatedly until your Mac restarts, and the starting sound is heard.
You can then let off the keys, and the NVRAM reset is finished.
Check if it resolves the Ventura Mac not awakening from the Deep Sleep issue.
Also Read: Cannot Install Any .pkg Files In macOS Ventura
FIX 2: Reindex Spotlight
The indexing database could become faulty or outdated, which would also cause the problem. As a result, think about wiping off the indexing database and letting the OS start over with a clean copy of the data. Here are some possible solutions:
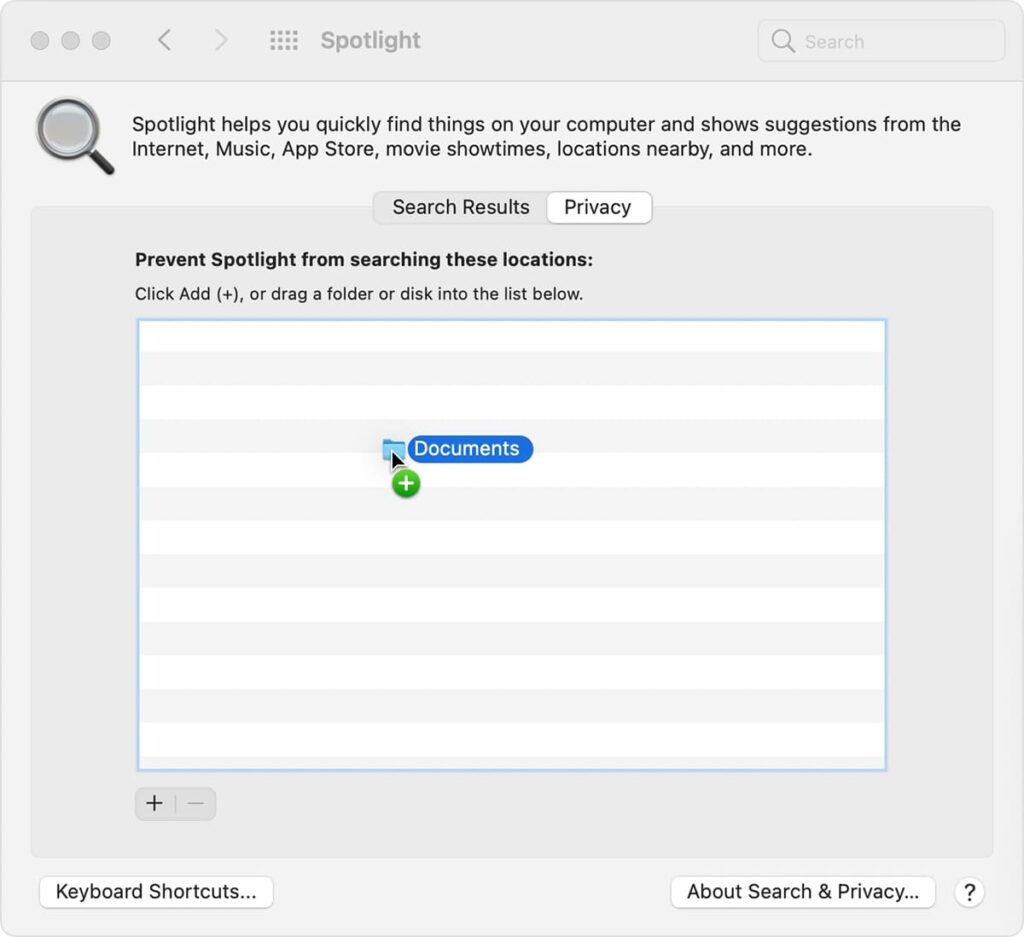
Siri & Spotlight can be found on the left-hand side of System Settings.
After that, select Spotlight Privacy by scrolling to the bottom.
Click the minus icon after choosing the folder from the list.
To add that folder again, press the plus icon.
Check to see if it repairs when it has finished.
Also Read: iTunes Home Sharing Not Working In macOS Ventura [Fixed]
FIX 3: Boot to Safe Mode
A third-party app or service is typically at blame for this problem. You should start your computer safely to disable any third-party software to confirm the same.
And if the problem is fixed this way, a third-party app must be uninstalled as soon as possible because it is undoubtedly the cause. Here is how all of this could be done.
About the Mac M1/M2 chipset:
Your Mac should be turned off.
Press and hold the power button when “Loading startup options” appears.
Choose your disc, hold down the Shift key, and select Proceed in Safe Mode.
For Macs with Intel chipsets:
Restart your Mac.
Then hold down the Shift key while waiting for the login window to appear.
Once you log in, Safe Mode will start up on your Mac.
Once your Mac Computer has entered Safe Mode, see if the error message “File not found” still appears. If not, restart your Mac normally and gradually remove each recently installed software until you can no longer duplicate the problem. When that occurs, the most recent app deleted is the offender, so keep a safe distance from it for now.
Also Read: High CPU Usage In macOS Ventura [Fixed]
FIX 4: LaunchAgents and LaunchDaemons
Your LaunchAgents and LaunchDaemons may need to be fixed if you are still experiencing this problem. There could be remnants of your deleted programs, which would be problematic.
These can be found in the Library folder. You should complete these steps for both of the Library’s two folders. What you can do is as follows:
Activate the Finder.
At the top menu bar, select Go.
Then select Computer > Macintosh HD > Library. Locate the LaunchAgents and LaunchDemons folders.
If there are any leftovers from removed apps, check them out by opening them. If so, remove them. Delete nothing from the existing installed apps.
We will now open the other Library folder to remove the leftovers from deleted apps. How to do it is as follows:
Visit Finder.
Click Go.
The Library option will appear if you hit and hold the Option key.
Press Library.
Do the same as before by opening the LaunchAgents and LaunchDaemons folders.
Also Read: How To Use Passkeys In macOS Ventura And iOS 16
Wrapping Up
These distinct approaches enable you to resolve the File Can’t Be found problem on macOS Ventura. Which of these methods worked successfully in resolving the problem, do let us know in the comments.


