


 Header Through Cloudflare")


In this article, we will be discussing the various ways to fix the on-screen keyboard not working in Windows 11/10. The Onscreen keyboard comes in handy when you are working in tablet mode. It is a great alternative to the physical keyboard. Additionally, it helps those who can not type using the physical keyboard due to physical injury or any other reason. However, your experience with this useful feature may not be always pleasant. So, in this article, let us discuss the various ways to fix the on-screen keyboard not working in Windows 11/10.
Fix on-screen keyboard not working in Windows 11/10
- Check Touch Keyboard services
- Enable on-screen keyboard
- Pin touch keyboard option in the taskbar
- Create an on-screen keyboard shortcut
- Launch it from the Start menu
- Launch it using the Run dialog box
- Run SFC scan
- Enable on-screen keyboard in Tablet mode
- Uninstall recent Windows update
Now, let us discuss the various ways to fix the on-screen keyboard not working in Windows 11 one by one.
Also Read: Windows Key Not Working – Fixed
But, first of all:
Before trying any of the major troubleshooting methods, try the quick fixes given below. In most cases, one of them fixes the problem.
- Restart your Windows 11 PC and try to launch the on-screen keyboard.
- Secondly, it is wiser to keep your Windows up-to-date. Check for your pending updates and update the OS. Now, relaunch the on-screen keyboard to see if the problem has been fixed.
- Try pressing Windows + Ctrl + O hotkey on your physical keyboard to launch the on-screen keyboard.
- Turn on tablet mode on your PC by clicking the Tablet mode option in the notification center.
- If you are facing the on-screen keyboard not typing issue, try running the system troubleshooter.
Check How To Run Troubleshooters In Windows 11
If none of the quick fixes seem to work, move on to the troubleshooting methods given below. One of them is sure to fix your problem.
1. Check Touch keyboard Services
A major reason behind the issue you are facing may be touch keyboard services not running automatically on your PC. So, below is how to check and enable Touch keyboard services on your Windows 11 PC:
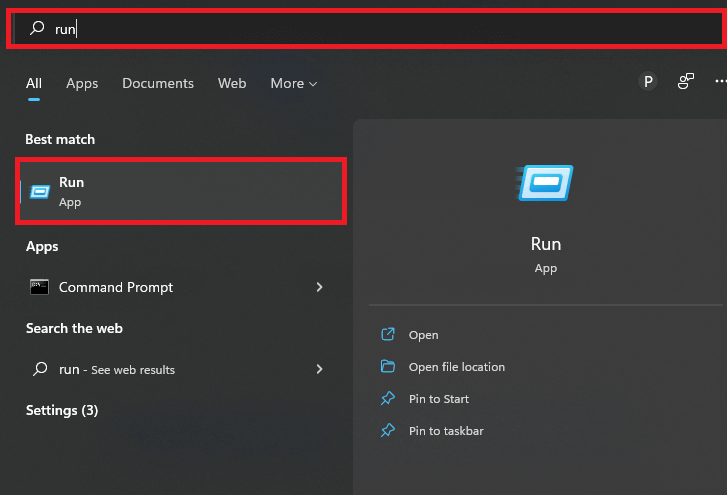
- Type Run in the search bar. Now, under best match, click on Run application to launch it.
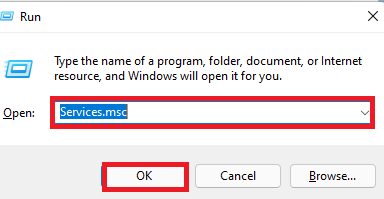
2. Enter services.msc in the Run dialog box and hit OK.
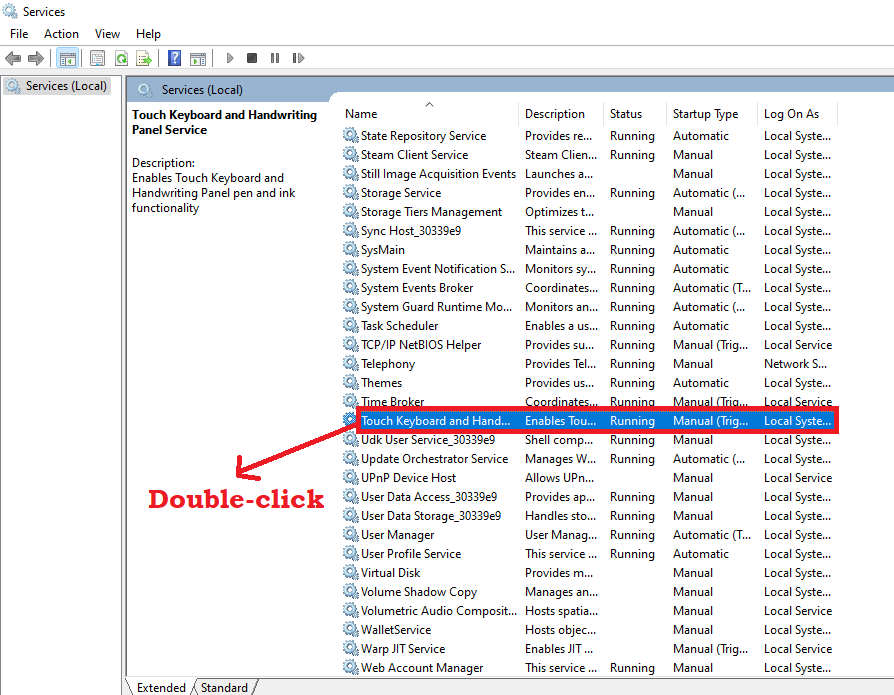
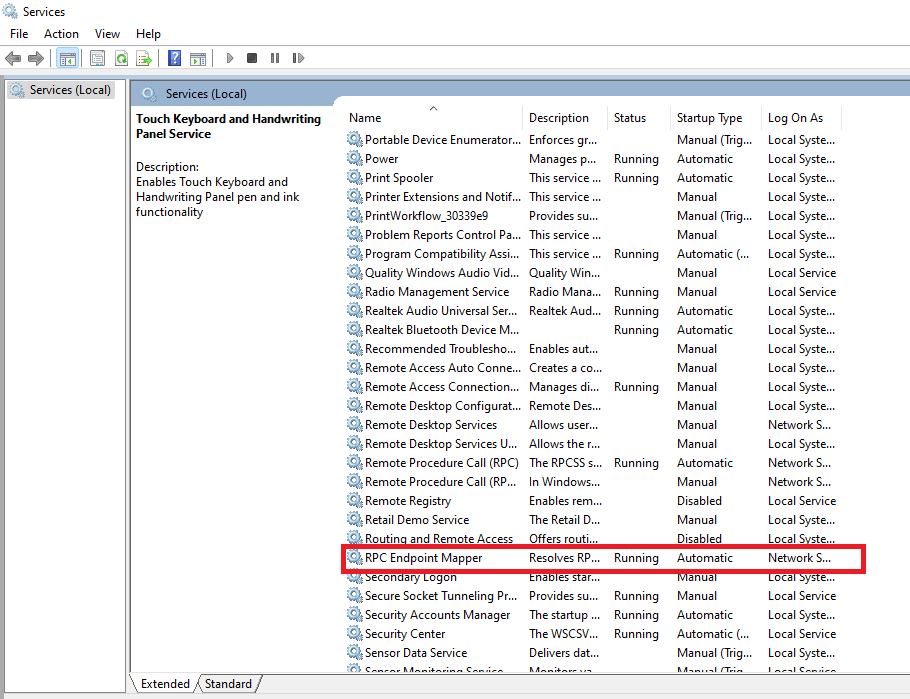
3. Locate Touch Keyboard and Handwriting Panel Service. Then, double-click on it to open its Properties.
4. Now, next to Startup type, click on the drop-down box and select Automatic from the menu.

5. Additionally, set the service status to Running. In case is set to Stop to Stopped, click on Start to run it.
6. Click on Apply and then OK. The on-screen keyboard must start working now.
In case you are still having issues with it, check for other essential services. Just follow the steps mentioned below:
7. On the Touch keyboard and Handwriting Panel Service Properties window, go to the Dependencies tab.
8. Double-click on Remote Procedure Call( RPC) to expand it.
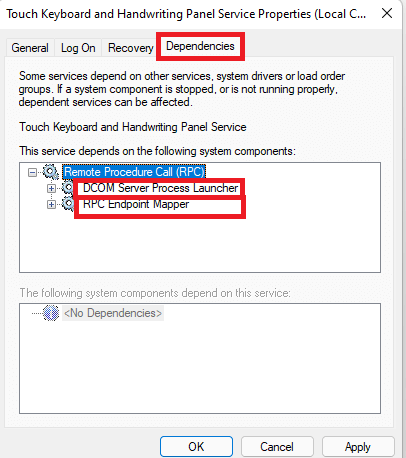
9. Take a note of the Services indicated in the screenshot below. Shut the Properties window.
10. Now, again go to the Services Window and locate these services and see if they are running and set to automatic. ( If any of the services are not running, double-click on them individually. Follow the steps numbers 3,4 and 5 to set them to running and automatic.)
In the end, restart your PC and relaunch the on-screen keyboard. If still the issue persists, kindly move on to the next solutions given below.
Also Read: How To Disable Ads In Windows 11 File Explorer
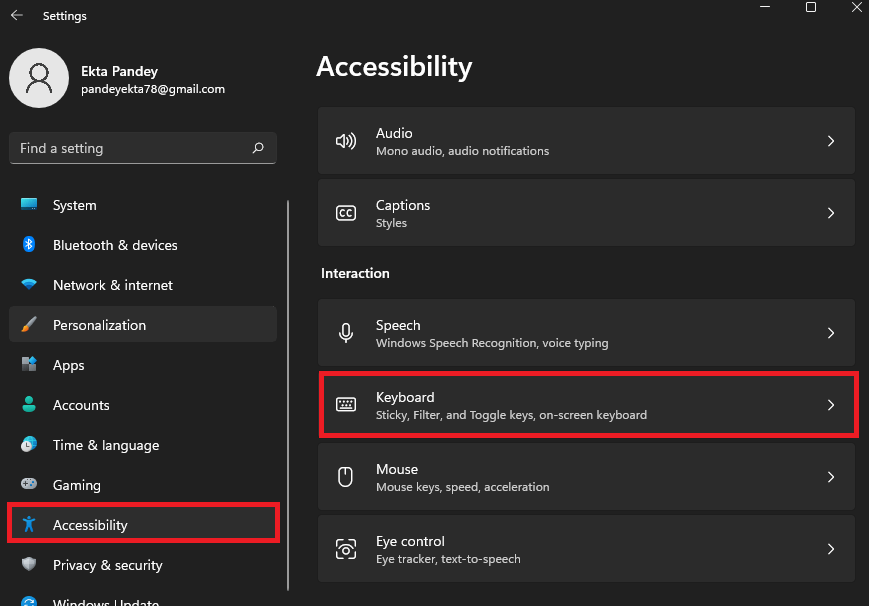
2. Enable on-screen keyboard in the Settings
The second method is to check whether you have enabled the on-screen keyboard in the settings. Below is how to do it:
- Launch Settings on your PC by pressing the Windows + I hotkey.
- Click on the Accessibility option on the left side.
- Scroll down on the right side and tap the Keyboard tile.
4. Now, turn on the toggle next to the on-screen keyboard.
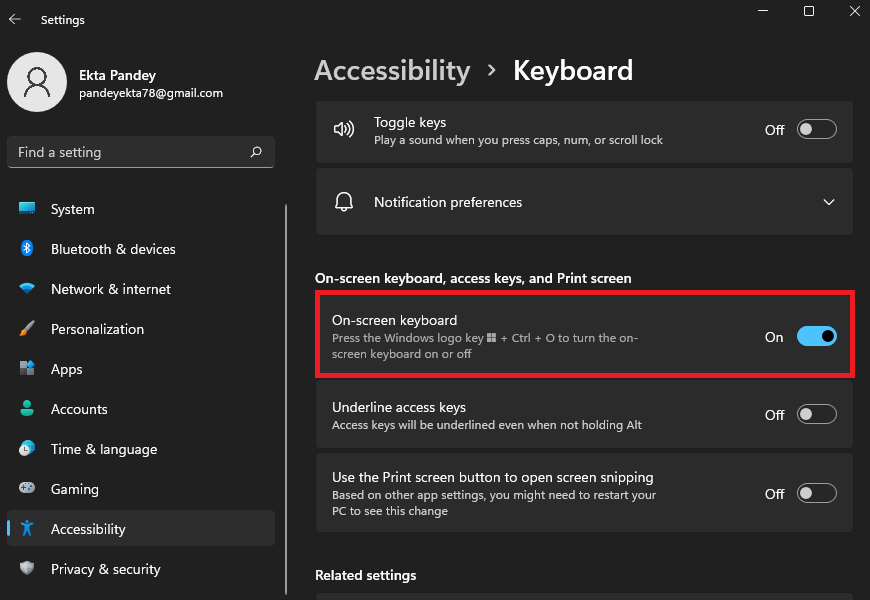
Doing this shall immediately launch the on-screen keyboard on your PC. If not, try the next solutions given below!
Also Read: Amazing Windows 11 Keyboard Shortcuts You Should Know!
3. Pin keyboard option to the taskbar
Another method you should try is to pin the on-screen keyboard shortcut to the taskbar. Below is how to do it:
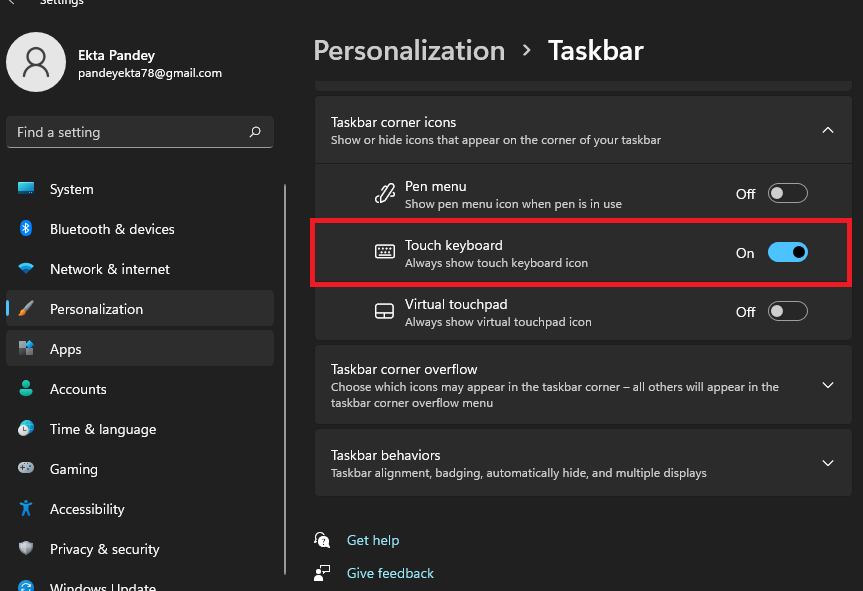
- Hover over the taskbar and right-click on it.
- Now, tap the Taskbar Settings option.
- Turn on the toggle next to the Touch keyboard. It will immediately pin the on-screen keyboard option to the taskbar.
4. Create an on-screen keyboard shortcut
To fix the On-screen keyboard not launching on Windows 11/10 issue, another fix is to create a shortcut. Below is how to do it:
- Go to the desktop.
- Righ-click on the desktop and select New> Shortcut.
- Enter the following path in the Type location of the item input box.
%windir%\System32\osk.exe 4. Then, click Next and then Finish. An on-screen keyboard shortcut will be created immediately on your Windows 11 PC.
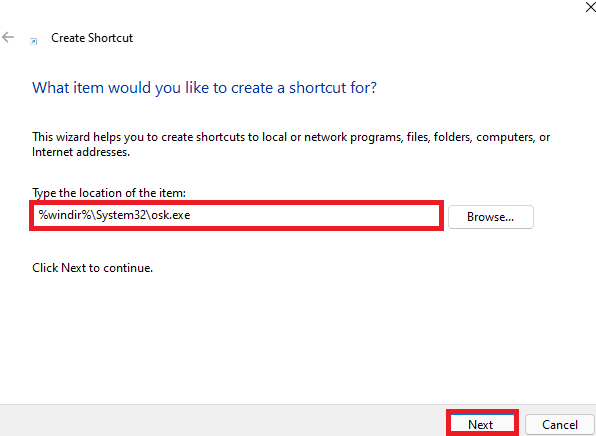
This shortcut will allow you to launch the on-screen keyboard directly by clicking on it.
5. Launch it from the start menu
There are numerous ways to launch the on-screen keyboard. You can also do it from the start menu. Sometimes, a particular method fails to launch an application. In such cases, it is better to try other methods to open that app. So, below is how to launch the on-screen keyboard from the start menu:
- Simple open the start menu by clicking on the Windows icon in the taskbar.
- Now, search the on-screen keyboard in the search bar on the top.
- Then, just click the app under best match.
- This will immediately launch the on-screen keyboard on your PC.
Also Read: Set Up Parental Control On Windows 11- An Ultimate Guide!
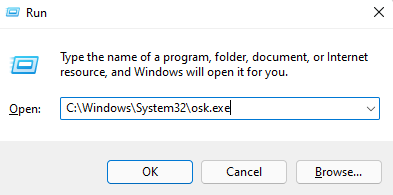
6. Launch it from the Run dialog box
The on-screen keyboard can also be launched from the Run dialog box. Below is how to do it:
- Go to the start menu and enter Run in the dialog box on the top. Alternatively, simply press the Windows + R hotkey.
- Tap the Run application under the best match.
- Enter the following command in the Run dialog box and tap OK.
C:\Windows\System32\osk.exe Now, this command will immediately launch the on-screen keyboard on your PC.
7. Run SFC scan
System File Checker is a great tool to verify and fix any missing or corrupted missing files. If the issue you are facing is due to a corrupted or missing system file, an SFC scan may help. Below is how to run it:
- Open the Run dialog box by pressing the Windows + R key combination.
- Type cmd in the dialog box.
- Press Ctrl + Shift + Enter hotkey to open the command prompt with administrative privileges.
- Enter the following command and press enter.
sfc /scannow
This process takes time. So, wait until the process is completed successfully. You will get one of the following results:
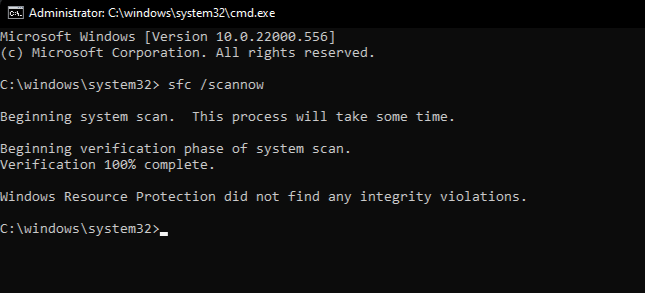
SFC scan results
- Windows Resource Protection did not find any integrity violations – There are no corrupted or missing system files.
- Windows Resource Protection could not perform the requested operation – An error took place during the scan. The user is required to run an offline scan.
- Windows Resource Protection found corrupt files and successfully repaired them. Details are included in the CBS.Log %WinDir%\Logs\CBS\CBS.log – It means that the corrupted files were detected and were successfully repaired.
- Windows Resource Protection found corrupt files but was unable to fix some of them. Details are included in the CBS.Log %WinDir%\Logs\CBS\CBS.log – The user must repair the corrupted files manually.
Now, check if the issue of the on-screen keyboard not working on Windows 11/10 has been fixed.
8. Enable on-screen keyboard in tablet mode
In case you are in the Tablet mode and the on-screen keyboard is not showing up, you need to enable the on-screen keyboard in the tablet mode. For this just follow the steps given below:
- Go to the Tablet Settings.
- Click on System and then Choose Tablet> Change Additional Tablet Settings.
- Turn on the toggle next to ” Show the touch keyboard when there’s no keyboard attached”.
The problem you are facing must be fixed now! In case it persists, try our next method that has helped many users.
Also Read: Fixed: The No User Logon Steam Error On Windows 11
9. Uninstall Windows update ( On-screen keyboard not working after windows update?)
If the on-screen keyboard has disappeared after the recent Windows update, there must be something wrong with the update itself. In such a case, it is advised to uninstall the recent Windows update. Below is how to do it:
- Open the run dialog box.
- Enter ” appwiz.cpl” and hit Enter.
- Tap on View installed updates on the left side as shown below in the screenshot.

4. Double-click on the most recent update.
5. Tap Yes to the ” Are you sure you want to uninstall this update ?” prompt.
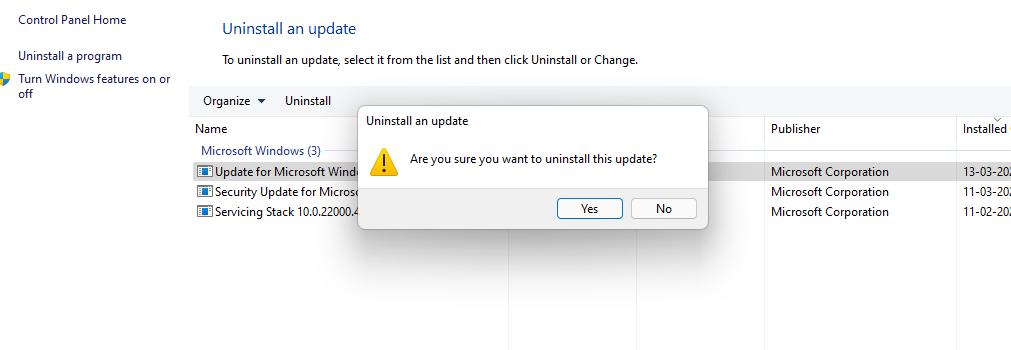
The PC will restart after uninstalling the update. Now, check if the problem with the on-screen keyboard has been fixed.
Related: Turn On Or Off Focus Assist In Windows 11
CONCLUSION
So, these are the different ways to fix the on-screen keyboard not working in Windows 11/10. Go ahead and try these methods in no specific order. Additionally, if you face any problems while performing any of the fixes, do let us know in the comment section. We would love to help you.


