


 Header Through Cloudflare")


The Windows best Registry Hacks contains all the changes to tailor your Windows experience. So to deal with little annoyances that Microsoft incorrectly expects every user will enjoy. There are adjustments for everything. From changing the look of Windows to unlocking secret functionality. Here are a few Windows registry hacks worth trying to improve your Windows 11 experience.
Also Read: Download Official Windows 11 ISO File From Microsoft
1. Add Any Program to the Context Menu in Windows 11
You may use this Registry hack to add your favorite program. Such as a NotePad or a media player, to the right-click menu in Windows 11. So, You can quickly open your favorite program by right-clicking. And Remember that these shortcuts have been added to the old context menu. So you will need to click on “Show more options” to access your preferred software. Here’s how you do it.
1. Once you’ve pressed the Windows key, type “registry.” Now, launch the “Registry Editor.”
2. Copy the path below and paste it into the address bar of Registry Editor. Then press Enter.

Computer\HKEY CLASSES ROOT\Directory\Background\shell
3. Once here, right-click on “shell” and select New -> Key.
4. From the context menu, name the program you want to open. For example, I’m adding a Notepad shortcut to my PC’s context menu.

5. Next, right-click on the new entry (in my case, Notepad) and select New -> Key.
6. Change the name of the newly formed key to command.
7. Next, open the Default file under “command” and paste the program’s executable path into “Value data.” Continue to the following step to determine a program’s executable path.

8. To obtain the executable address, right-click on any program and open the file location. Right-click on the EXE file and select “Copy as path.”
9. Close the Registry Editor and then right-click on the Desktop. When you click “Show additional options,” you’ll notice that the new program has been added to the Windows 11 context menu due to the Registry hack you just performed.
Also Read: How To Restore Classic File Explorer With Ribbon In Windows 11
2. To install the Windows 11 update, you must bypass the TPM and CPU checks.
Do not be concerned if you have upgraded to Windows 11 from Windows 10. But are unable to install new Windows 11 updates because your requirements have not been met. Microsoft has described a Registry hack that allows users to install Windows 11 upgrades on not officially supported hardware. The following is how it works:
1. Once you’ve pressed the Windows key, type “regedit.” Now, from the search results, launch Registry Editor.
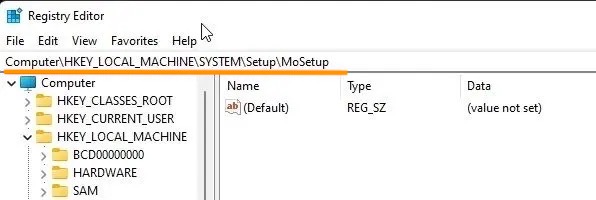
2. Next, navigate to the path below by pasting it into the Registry Editor’s address bar.
Computer\HKEY LOCAL MACHINE\SYSTEM\Setup\MoSetup

3. Once here, right-click on an empty spot in the right pane and select New -> DWORD (32-bit) Value.
4. Next, give it the name AllowUpgradesWithUnsupportedTPMOrCPU.
5. Open it by double-clicking it and changing the Value data from 0 to 1. Finally, restart your computer after closing the Registry Editor. Now, go to update Windows 11. There will be no TPM or CPU issues this time.
Also read: How To Pause And Resume Updates For Windows 11
3. Disable Bing Search from the Start Menu in Windows 11
While the Windows 11 Start menu has been updated. So we don’t appreciate how anytime we perform a local search. And it also gets results from Bing. It slows down and frustrates the whole search process. However, we’ve also included all of the Registry adjustments needed to remove Bing search results from the Start menu. Here’s a quick rundown of the steps you’ll need to take.

1. Launch the Registry Editor and navigate to the path listed below.
Computer\HKEY_CURRENT_USER\Software\Policies\Microsoft\Windows
2. Make a new key called Explorer here. After that, in the right pane of Explorer, create a new “DWORD (32-bit) value” and rename it DisableSearchBoxSuggestions.
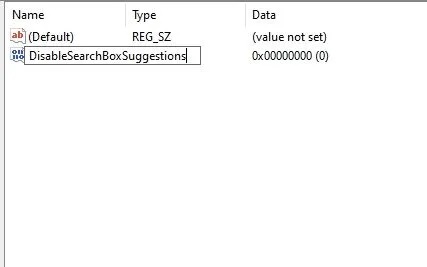
3. Double-click “DisableSearchBoxSuggestions” and set the “Value data” to 1.
4. Finally, restart your Windows 11 PC. And Bing Search will be removed entirely from the Windows 11 Start menu.
Also Read: How To Activate And Deactivate Cortana In Windows 11
4. On Windows 11, you can restore the old context menu.
This is one of the most requested and popular Registry hacks for Windows 11 because it allows you to reinstate the classic context menu that we miss so much in Windows 10. So, follow the instructions on this page, and you’ll have the old Windows 10 context menu operating on Windows 11 in no time. We’ve included some crucial steps below to get a sense of how it works.
- Navigate to the path below in the Registry Editor.
Computer\HKEY CURRENT USER\Software\Classes\CLSID
2. In the left sidebar, right-click on “CLSID” and create a new key. Then, give it the name shown below. Then, right-click on the mentioned key, create a new key, and rename it InprocServer32.
{86ca1aa0-34aa-4e8b-a509-50c905bae2a2}
3. In the right pane. Open the Default file under “InprocServer32” and click “OK.” There is no need to input any value.
4. Now, shut the Registry Editor and open the Desktop context menu. Fantastic! The old context menu has returned to your Windows 11 machine.
Also Read: How To Activate And Change Scrollbar Size In Windows 11
5. Increase Your Internet Speed
The internet is one of the most crucial technological tools that has shaped the twenty-first century. As a result, things like Augmented Reality and self-driving automobiles are a reality. The majority of us rely on the Internet, either directly or indirectly. As a result, slow internet might slow your work.
Follow the instructions below to boost your Internet Speed with the aid of the Windows 11 Registry:
Step 1: Navigate using the following route:
HKEY_LOCAL_MACHINE\SYSTEM\CurrentControlSet\Services\LanmanServer\Parameters
Step 2: Right-click on Parameters> New> DWORD 32.
Step 3: Name it “IRPStackSize.” Then double-click on it and change the value to 32.
After setting this up, you should restart your computer to increase your network speed.
Also Read: How To Close All Open Windows For App At Once In Windows 11
6. In Windows 11, remove the ‘System Requirements Not Met’ watermark.
Microsoft has begun applying a “System requirements not met” watermark on PCs that do not meet Windows 11’s new minimum system requirements. Some users are unhappy, and they want the watermark removed from the Desktop and Settings apps. Fortunately, this Windows 11 Registry hack allows you to remove the ‘System requirements not met’ watermark. You can either follow the detailed guide listed above or the steps below.
1. Navigate to the path listed below in the Registry Editor.
Computer\HKEY_CURRENT_USER\Control Panel\UnsupportedHardwareNotificationCache
2. When you arrive here, the right pane will display either “SV1” or “SV2” items. Open and set the value to 0. That’s all. Restart your computer to remove the ‘System requirements not fulfilled’ watermark from your Windows 11 computer.
Also Read: How To Turn On And Off Touch Indicator In Windows 11
7. Search Highlights in Windows 11 can be enabled or disabled.
Microsoft has introduced Search Highlights. A new feature in Windows 11 that displays trending queries and related events whenever you open Windows Search. To be honest, I enjoy this feature because it keeps me informed of everything going on around me. However, you can keep Windows Search as light as possible. So you can disable this option. Using the Registry Editor in Windows 11. You can enable or disable Search Highlights. So you can make changes based on whether you like the feature. Here’s how you do it:
- Navigate to the URL indicated below in the Registry Editor.
Now, open “IsDynamicSearchBoxEnabled. “
Computer\HKEY_CURRENT_USER\Software\Microsoft\Windows\CurrentVersion\SearchSettings
2. If you want to disable Search Highlights in Windows 11, update the Value value to 0. If you’re going to use Search Highlights, set the Value data to 1.
3. Finally, exit the Registry Editor and restart Windows Explorer using the Task Manager. The Search Highlights feature in Windows 11 will be enabled or disabled based on your modifications.
Also Read: How To Fix Memory Issues On Windows 11
8. Stop Windows 11 Automatic Updates
Yes, you read that correctly. This is one of the best Windows 11 Registry hacks. That allows you to prevent automatic updates on Windows 11. If you do not want to get significant feature upgrades. You can turn it off and be at ease. Here’s how to do that with the Registry Editor.

- To begin, launch the Registry Editor and navigate to the path listed below.
Computer\HKEY_LOCAL_MACHINE\SOFTWARE\Policies\Microsoft\Windows\WindowsUpdate\AU

2. Create a new DWORD (32-bit) Value under “AU” by right-clicking in the right pane and naming it NoAutoUpdate.
3. Now, open “NoAutoUpdate” and set it to 1.

4. Finally, exit the Registry Editor and restart your computer. Your Windows 11 PC will no longer automatically download updates.
Also Read: How To Connect And Disconnect AirPods To Windows 11
9. On Windows 11, disable Microsoft Defender.
You can use the Registry Editor to permanently disable Microsoft Defender on Windows 11 and replace it with a third-party antivirus application for Windows. This clever Registry hack will disable Microsoft Defender on Windows 11, and all changes will be retained even after an upgrade. Furthermore, Microsoft does not override the policies. Here are the measures to take.
1. Navigate to the location listed below in the Registry Editor.
Create a new DWORD (32-bit) Value by right-clicking on “Windows Defender.”
Computer\HKEY_LOCAL_MACHINE\SOFTWARE\Policies\Microsoft\Windows Defender
2. Then, open it and name it DisableAntiSpyware. Change the value data to 1 and then click “OK.”
Also Read: Fix Weather Widget Not Showing On Taskbar Windows 11
10. Turn off Cortana in Windows 11
So, If you don’t find Cortana useful in Windows 11. You can disable it completely using the Registry. To speed up Windows 11 PC. We always turn off Cortana and other native programs. With this Registry hack for Windows 11. You may prevent Cortana from executing its services in the background indefinitely. Here are a few quick steps you can take.
1. Navigate to the path below in the Registry Editor. Right-click and select New DWORD (32-bit) Value in the right pane.
Computer\HKEY_LOCAL_MACHINE\SOFTWARE\Policies\Microsoft\Windows\Windows Search
AllowCortana should be renamed. After updating the value data to 0, click “OK.” Finally, exit the Registry Editor and restart the computer. Cortana is now turned off on your Windows 11 PC.
11. In Windows 11, enable Windows Photo Viewer.
If you’re fed up with Windows 11’s slow and sluggish Photos app, don’t panic. You may still use the tried-and-true Windows Photo Viewer. It will rapidly become your favorite photo viewer on Windows 11. So, try out this Registry hack on your Windows 11 PC.

1. First, open Notepad on your PC and copy + paste the below commands into the new document.
Windows Registry Editor Version 5.00
[HKEY_CURRENT_USER\SOFTWARE\Classes\.bmp] @=”PhotoViewer.FileAssoc.Tiff”
[HKEY_CURRENT_USER\SOFTWARE\Classes\.gif] @=”PhotoViewer.FileAssoc.Tiff”
[HKEY_CURRENT_USER\SOFTWARE\Classes\.ico]. @=”PhotoViewer.FileAssoc.Tiff”
[HKEY_CURRENT_USER\SOFTWARE\Classes\.jpeg] @=”PhotoViewer.FileAssoc.Tiff”
[HKEY_CURRENT_USER\SOFTWARE\Classes\.jpg]. @=”PhotoViewer.FileAssoc.Tiff”
[HKEY_CURRENT_USER\SOFTWARE\Classes\.png] @=”PhotoViewer.FileAssoc.Tiff”
[HKEY_CURRENT_USER\SOFTWARE\Microsoft\Windows\CurrentVersion\Explorer\FileExts\.gif\OpenWithProgids] “PhotoViewer.FileAssoc.Tiff”=hex(0):
[HKEY_CURRENT_USER\SOFTWARE\Microsoft\Windows\CurrentVersion\Explorer\FileExts\.ico\OpenWithProgids] “PhotoViewer.FileAssoc.Tiff”=hex(0):
[HKEY_CURRENT_USER\SOFTWARE\Microsoft\Windows\CurrentVersion\Explorer\FileExts\.jpeg\OpenWithProgids] “PhotoViewer.FileAssoc.Tiff”=hex(0):
[HKEY_CURRENT_USER\SOFTWARE\Microsoft\Windows\CurrentVersion\Explorer\FileExts\.bmp\OpenWithProgids] “PhotoViewer.FileAssoc.Tiff”=hex(0):
[HKEY_CURRENT_USER\SOFTWARE\Microsoft\Windows\CurrentVersion\Explorer\FileExts\.jpg\OpenWithProgids] “PhotoViewer.FileAssoc.Tiff”=hex(0):
[HKEY_CURRENT_USER\SOFTWARE\Microsoft\Windows\CurrentVersion\Explorer\FileExts\.png\OpenWithProgids] “PhotoViewer.FileAssoc.Tiff”=hex(0):
2. Now, on the top menu. Choose “File” and then “Save as.”
3. Choose “All files” from the “Save as type” drop-down option. Now, enter a name for the file. I used the name “Windows Photo Viewer” as an example. To make a Registry file, So append.reg to the end of the file name. Finally, press the “Save” button.
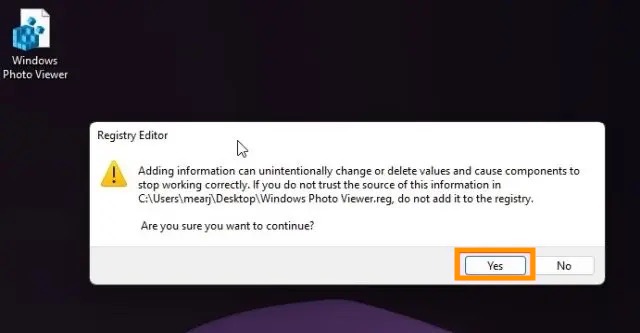
4. Go to the location where you saved the .reg file. And then, double-click the file to perform the registry command, and then select “Yes.” This will combine the entries with those in your Registry.
5. So, Right-click any image. And select Open with Windows Photo Viewer. So, you will notice that the Windows Photo Viewer opens images quickly and without any lag. Enjoy!
Also Read: Steps To Perform A Clean Boot On Windows 11 ( Simplified)
12. Return to the ‘Classic’ Start Menu in Windows 10.
When the Windows 11 preview build was leaked online. And one of the most contentious changes was the redesigned Windows 10 Start Menu.
Microsoft updated the Start Menu. So, which we recognize with Windows and with a new one based on the now-defunct Windows 10X with Windows 11.
While some individuals enjoy the new Windows 11 Start Menu. So many others dislike it and wish they could revert to the Windows 10 version.
The good news is that Microsoft has provided a Registry variable named ‘Start ShowClassicMode’ that enables “Classic Mode,” which uses the Windows 10 Start Menu.
To change this registry entry. Create a DWORD 32-bit value called ‘Start ShowClassicMode’ in the following directory:
HKEY_CURRENT_USER\Software\Microsoft\Windows\CurrentVersion\Explorer\Advanced\ “Start_ShowClassicMode”
The following DWORD 32-bit configurations for the Start_ShowClassicMode value are possible:
0 = Use the new Windows 11 Start Menu
1 = Enable Windows 10 ‘Classic’ Start Menu
13. Windows 11 taskbar dimensions
You can modify the height and size of the taskbar icons. So, in Windows 11 by editing the Registry variable “TaskbarSi.”
So, to configure the TaskbarSi value. And you may choose whether to display a small, medium, or big taskbar, as seen below.
So, change this registry value. Create a DWORD 32-bit value called ‘TaskbarSi’ in the following path:
HKEY_CURRENT_USER\Software\Microsoft\Windows\CurrentVersion\Explorer\Advanced\ “TaskbarSi”
So, The following are possible DWORD 32-bit TaskbarSi values:
0 = Small
1 = Medium
2 = Large
Also Read: How To Turn On Or Off Auto HDR In Windows 11?
14. Context Menu: Add Command Prompt
It can be tedious to type commands into the command prompt constantly. So, It would be a lot easier if you could, and for example, right-click on a location and open the command prompt pointing directly to that area.
Navigate to: in the registry editor
HKEY_CLASSES_ROOT\Directory\shell\cmd
You must now assume ownership of the “cmd” registry key, protected by default.
So, after that, right-click the “HideBasedOnVelocityId” entry in the cmd folder’s right-hand pane, select “Rename,” and add a “_” to the beginning of the name, so it no longer registers.
So, that’s the end of it. When you close the registry editor. The option “Open command window here” should display in the right-click context menu.
15. Enable or disable the new Snap Assist flyout in Windows 11.
Windows 11 includes a revamped Snap Assist function. This allows you to hover over the maximize button to see a flyout with four basic Windows snap layouts.
So hovering your mouse cursor over the maximize button in an open window in Windows 11. So, you may now select four predefined Windows to snap layouts. As illustrated below.
HKEY_CURRENT_USER\Software\Microsoft\Windows\CurrentVersion\Explorer\Advanced\ “EnableSnapAssistFlyout”
The following are possible DWORD 32-bit configurations for the EnableSnapAssistFlyout value:
0 = Disable
1 = Enable
For changes to take effect, you must restart Windows 11 or the Windows Explorer process.
Also Read: How To Disable Modern Standby In Windows 10 And Windows 11
Last Thoughts
So, these are the greatest Registry hacks for Windows 11. And you should be aware of and employ to have the finest PC experience possible. Most of these Registry modifications can be used to stop unwanted programs and services. Having said that, make sure to build a restore point before making any modifications. That’s all we have for now.


