


 Header Through Cloudflare")


In my previous article, I discussed how to capture high-quality photos and videos using an iPhone, emphasizing the importance of composition, angles, and various settings. However, I did not cover the aspect of editing, which is also a crucial component in achieving exceptional results.
Well, you see, editing is a whole different chapter to a story of creating Video or Photo content- it has 2 branches: one would be you editing and color grading a photo, and the other one would be working with video; they work almost the same way, except- they are a little different.
So in this post, let me show you the art of color grading your photos using just your iPhone via the Adobe Lightroom Application.
What is color grading?
Color grading in photography or videography refers to the process of enhancing, adjusting, or manipulating the colors and overall look of an image or video footage. It involves altering various aspects of color, such as brightness, contrast, saturation, tint, and tone, to achieve a desired visual aesthetic or mood.
Color grading is typically performed in post-production using specialized software, and it is often used to give a project a specific aesthetic or to correct for lighting and color imbalances in the original footage.
What is Adobe Lightroom?
Well, this is a program from Adobe that allows you to color correct, color grade, and edit photos. If you are subscribed to their creative cloud service, you would also be able to edit your videos from here- sadly; I am not. Though since we are only talking about photos. So, I will be guiding you every step of the way in having a good image out of this application. You may watch the following YouTube Video associated with this article for more in-depth knowledge.
Difference between Color Correct and Color Grade.
A lot of people get these 2 things mixed up; the main difference is in their names themselves. Color correct meaning correcting the colors; as we know, lenses are a major factor, especially the sensor of the camera. These specifically affect colors temperatures, and the way we are shooting; some of these things may not look as true to life as possible. Hence in this process, we correct those colors.
Color grades, on the other hand, are related to adjusting and manipulating the overall look, the creator uses it to show how we want a certain scene to look or feel. This involves manipulating the brightness, contrast, saturation, hue, and other color attributes of an image or video to achieve a consistent and cohesive look.
How to Color Grade Photos on an iPhone Using Adobe Lightroom?
In order to color-grade Photos, you need to first install Adobe Lightroom on your iPhone. So here are the steps:
- Install Adobe Lightroom: Download and install the Adobe Lightroom app from the App Store on your iPhone.
- Import Photos: Launch the Lightroom app and import the photo you want to color grade. You can import photos from your iPhone’s camera roll or directly from the Lightroom camera.
- Access Editing Tools: Once you have imported the photo, tap on it to open it in the editing interface. At the bottom of the screen, you’ll find a toolbar with various editing tools.
- Adjust Basic Settings: Start by adjusting the basic settings like exposure, contrast, highlights, shadows, whites, and blacks. Slide the corresponding sliders to achieve the desired effect. This step helps in setting the overall tonal balance of the image.
So we will be dealing with these three parts: Lighting, Color, and Details.
#1. Lighting.
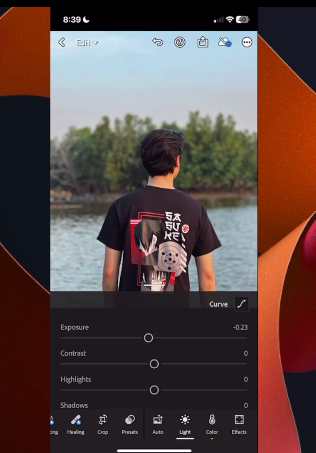
When you click the light tool, you will be able to adjust many different settings related to it, though the most important and basic settings would be the following:
- Curve
- Exposure
- Contrast
- Highlights
- Shadow
Those are some of the important settings that you must use to have the adequate and desired effect of your imagination to be reflected in the photos that you are editing
Curves are usually made to create S-Curves which allow you to add or subtract punchiness to your photos according to the darkest and brightest spot on your image.
While the Exposure, Contrast, Highlights, and Shadows are very self-explanatory, I use them to eliminate the crushes in my brightest and darkest spots in the photo. I also use them to bring out the details again, the brightest and darkest spots.
#2. Colors
Tap on the “Color” tab to access color-specific adjustments. Here, you can adjust the temperature (warmth/cooldown), tint, vibrance, and saturation. Slide the respective sliders to achieve the desired color balance and intensity.
So basically, in this part, you would be coloring (by technically mixing colors) on your image. Most settings in this space have something to do with the color of your image according to HSL (Hue, Saturation, and Luminance) – Hue Changes the color according to the hue wheel, Saturation is how visible or saturated certain colors are and the luminance would be the brightness of the color.
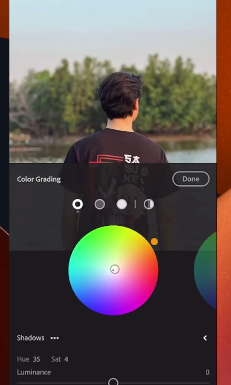
Some of the things that you would probably fiddle around with in this tab would be the
- Temperature (how cool or warm your photo is)
- Vibrance (Vibrancy)
- Color Grading and Color Mix.
I used this part to set the tone of the photos, especially of how you want the overall image to feel and look.
Honestly, this part is the best part of all due to you having the ability to change what you want to change and be playful according to your vision of the photo. You can experiments in this tab to find the feel that you like for the photo. Though there are no proper rules, of course, you would have to keep it professional and pleasing to everyone’s eye.
#3. Detailing
In order to keep this article quick and short, I have divided it into three parts. However, it is highly recommended that you watch the accompanying video, as it shows extensively the sources and techniques referenced in this article. The video showcases a more detailed exploration of the options and methods utilized within the Lightroom editing software to enhance the quality of the photos. By watching the video, you will gain a deeper understanding of the complexities involved and the specific adjustments made during the editing process.
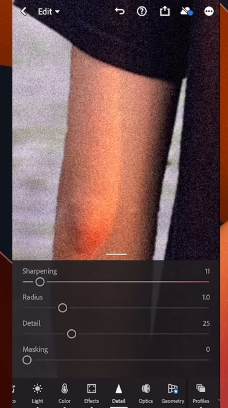
Honestly, I called this part “Detailing” for the sole reason that in this part you would be not fiddling with the photo coloring or lighting, but instead with the added details such as:
- Clarity
- Haze
- Vignette
- Details
- Texture
- Grain
These are the stuff that would make or break your image. Such as for clarity, too much of anything in this tab will surely destroy the quality of the photo. So make sure that you only adjust as needed. For grains, acts like film grains while the haze makes the photo feel more like it was shot with an NV filter.
Anyway, talking about photo color correcting and grading is something that is hard to really showcase in a quick and short article. I highly recommend you watch the YouTube video on this.
If there is any specific trend photo style you want me to cover instead, make sure to comment them down on either this article’s comment section or the youtube video. I hope this article helped you beautify your image quickly using just your iPhone. Thank you for reading!


