


 Header Through Cloudflare")


![[Infographic] The Origin of Art TV: The Frame’s Journey in Bringing Art Into Everyday Life](https://www.hawkdive.com/media/samsung-tvs-and-displays-the-frame-the-frame-pro-samsung-art-tv-infographic_thumb932-218x150.jpg "The Frame: How Art TV Transformed Everyday Life Through Art")


Remove Language In Windows 11
Windows 11 is all about making the Windows user interface better through a completely new layout. Some examples of this are a completely new Start menu, with a new Start button that is now in the middle of the taskbar. In addition, Windows 11 makes a lot of changes to how well your computer works.
Each of Windows 11 and Windows 10 is an operating system that lets you use it in another language if that’s what you prefer. It’s very simple to add a new language pack and get the Windows display language that you like and can read and write in. When this is the case, though, you might want to do the opposite: get rid of a display language you no longer need. If you want to, you can remove a Windows display language with just a few clicks or taps. The Settings app lets you do that. However, there are times when the computer doesn’t work right, and you can’t get rid of a language from Windows 11 or Windows 10.
Also Read: How To Change Display Language in Windows 11
The things you need to know about deleting display languages from Windows 11 and Windows 10.
Remove a language from Windows 11 or Windows 10. There are two ways to do this. The first thing to do is to use the Settings app. The second thing to do is to use some special commands in PowerShell or the Windows Terminal to get things done. However, each method does a little bit different thing:
- When you use the Settings app to remove a language pack, you don’t remove it. There are still other languages that you can use on your computer or device. There’s no way for Windows to get the same display language again if you try to install it again. It only lets you use it quickly. Check the first chapter of this article to delete a Windows display language from Windows 11 or the second chapter to remove a language pack from Windows 10. If this is what you want to do, follow the steps.
- However, sometimes Windows doesn’t work the way it should. Even if you delete a language from the Settings app, it keeps coming back even though you’ve removed it from the app. That might make you wonder, “Why can’t I get rid of a language from Windows 10 or Windows 11? It’s a shame, but we don’t have a clear answer. There are times when the problem is caused by a mistake with the Windows update or a bug in the operating system.
Also Read: How to Hide Files And Folders From Search In Windows 11
How do I get rid of a language pack from Windows 11?
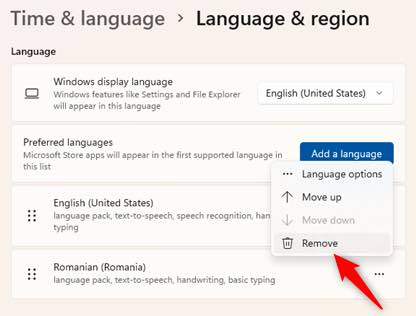
To remove a language pack from your Windows 11 device, you must open the Settings app. To do this, you select Windows + I at the same time. When you’re done with that, choose Time & language on the left sidebar, and then click on Language & region on the right pane.
Make sure you look through all of the language packs on the Language & region page. Then, find the one you want to get rid of. Then, select the three dots button on the right side of that language.

Finally, click on the “Remove” option in the menu that comes up, and you’re done.
Remove the language pack, and that language is gone and no longer an option for your Windows display language when you choose what it looks like on the screen.
Also Read: 5 Ways To Fix Game Stuttering On Windows 11
How do I get rid of a language pack from Windows 10?
Windows 10 users can remove a language pack by going to the Settings app. This is a quick way to do it, but there are other ways to do it, which you will read in this article. As soon as you get to Settings, click or tap on the Time & language category to get inside of it!
Time & language: Select Language from the left sidebar on this page to change the language you see.
When you look at the right pane, scroll down to the “Preferred languages” area. In it, find the Windows 10 language pack that you want to uninstall and click or tap on it to select it. Then, click the Remove button next to that language.
Remove the language pack as soon as you do. It can’t be used as your Windows language anymore.
The last comments.
Windows 11 and Windows 10 have two ways to get rid of their display languages. One is easy, and the other is more thorough. If the first one doesn’t work, then the PowerShell commands should help you get the job done. We hope this guide has helped you to solve any problems you have while trying to remove language packs. People who use Windows are going to like the new layout in Windows 11. With just a few clicks, you can change the language that Windows shows on your screen. Windows 11 and Windows 10 don’t work all the time, and you can’t get rid of a language from them.
Also Read: How To Fix Nvidia Geforce Error Code 0X0003


