


 Header Through Cloudflare")


Explore the potent capabilities of the Deployment Imaging Service and Management Tool (DISM) within the realm of Windows troubleshooting. This guide navigates the process of utilizing DISM to rectify compromised Windows images, address system anomalies, and fortify overall stability. Operating seamlessly via a command-line interface, DISM stands as a pivotal remedial force, proficiently restoring compromised Windows image sources.
Instances of corruption within Windows system files can trigger significant consequences. As a solution, this article strategically employs DISM’s “restorehealth” function and offers precise instructions for initiating boot sequences from installation media. This journey culminates in a comprehensive grasp of the multifaceted Windows image repair process, ushering in an era of enhanced system resilience and maintenance.
What is DISM?
DISM is a vital Windows tool for troubleshooting and system maintenance. When conventional solutions like CHKDSK and SFC fall short, DISM steps in as a powerful option. It acts as a final line of defense before resorting to repair or reinstallation.
Keep in mind that an internet connection might be necessary for certain DISM commands, as advised by Microsoft.
DISM serves two primary functions:
- Managing Windows Image Data:
This includes cataloging components, updates, drivers, and applications within a Windows image. It can also perform tasks like capturing, partitioning, appending, or erasing images in a .wim file. Mounting images is also possible.
- Servicing the Windows Image:
DISM controls the image itself. It can add or remove driver packages, modify language settings, enable/disable Windows features, and upgrade to a higher Windows edition.
In essence, DISM is not a complete Windows reinstallation. Instead, it targets core files for system functionality and data retrieval. It repairs or upgrades files affected by corruption or obsolescence. Think of it as a skilled mechanic fixing a failing transmission without needing a full replacement.
DISM stands as a valuable tool for preserving and restoring systems, effectively addressing various complex anomalies.
Important Warning: Before proceeding, it is strongly recommended to perform a system backup as a precaution against potential unforeseen complications. Additionally, ensure the secure backup of your essential files before initiating the DISM command.
Checking the System Image
Before proceeding with the repair process, it’s important to check the Windows image for any issues. You have two methods to assess the image’s integrity: “Check Health” and “Scan Health.”
Check Health:
Quickly determine repair feasibility:
- Open the Start menu.
- Search for “cmd”
- Right-click on “Command Prompt” from the search results and choose “Run as administrator.”
4. Enter in Command Prompt: `DISM /online /cleanup-image /checkhealth`.
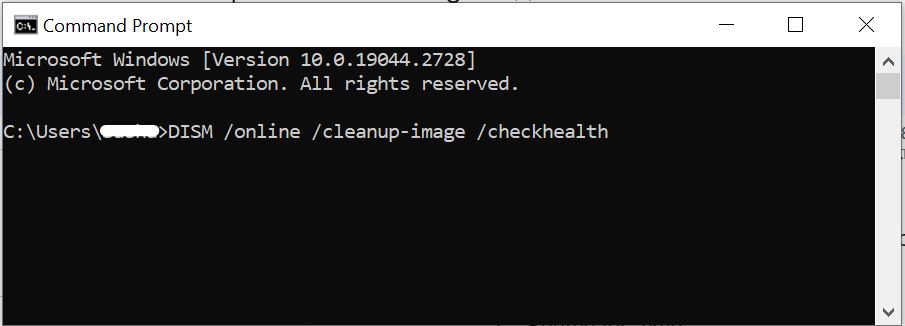
5. Run the dism.exe command.
This command assesses the image’s state.
Scan Health:
Identify potential corruptions:
- Open Command Prompt.
- Input: `DISM /online /cleanup-image /scanhealth`.
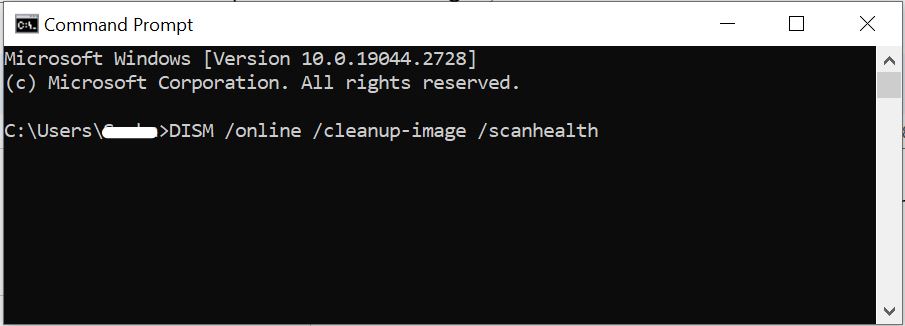
Remember, these assessments don’t repair, only evaluate the image’s condition.
Repairing Windows Image
When facing system image issues, DISM’s “RestoreHealth” option offers an automated solution for common problems.
Follow these steps to initiate the repair process for image concerns using the DISM command tool:
- Open Command Prompt.
- Input: `DISM /Online /Cleanup-Image /RestoreHealth`.
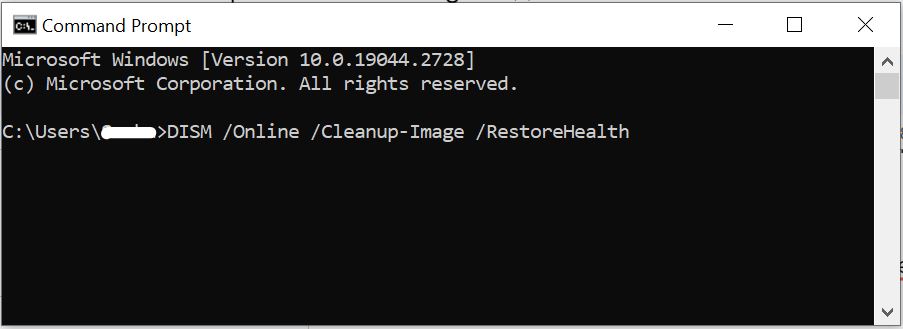
Upon completion, DISM will connect to Windows Update to download and replace damaged files as needed. This method efficiently restores your Windows system image, ensuring optimal functionality and health.
Utilizing DISM with an Alternate Source (install.wim) Image
In scenarios demanding the utilization of an alternate source image, specifically install.wim, within the ambit of DISM tool, adhere to these procedural guidelines:
- Open Command Prompt.
- Input: `DISM /Online /Cleanup-Image /RestoreHealth /Source:G:\Sources\install.wim`
It is imperative to substitute the “G” with the pertinent drive letter associated with the ISO mount point, evident in File Explorer.
- (Optional) To confine the reliance on Windows Update, introduce the subsequent command and execute by pressing Enter:
`DISM /Online /Cleanup-Image /RestoreHealth /Source:G:\Sources\install.wim /LimitAccess`
- (Optional) Alternatively, introduce the ensuing variation of the aforementioned command to achieve an analogous outcome:
`DISM /Online /Cleanup-Image /RestoreHealth /Source:wim:G:\Sources\install.wim:1 /LimitAccess`
Within the command structure, it is pivotal to customize the “G:\Sources” segment to precisely delineate the pathway leading to the “install.wim” file.
Using DISM with Online or Offline Images
One of the remarkable features of DISM is its ability to work with both online and offline images. An online image pertains to your currently running Windows installation, while an offline image refers to a separate Windows image file. By using the `/Online` or `/Image` parameter, you can specify the target image for DISM to operate on.
Handling Common Errors
During the repair process, encountering errors is not uncommon. Some of these errors, such as 0x800f081f (indicating source files couldn’t be located) or 0x800f0906 (denoting that DISM is unable to access necessary files), can be resolved. Often, these errors arise due to missing or corrupted system files. To address these issues, you can use the Windows Installation Media or specify an alternate source path.
Best Practices for Using DISM
To make the most out of the DISM tool and ensure effective repairs, consider the following best practices:
- Always execute DISM with administrative privileges.
- Maintain a stable internet connection, especially when utilizing the /Online parameter.
- Use the /Source parameter to specify a trusted source for repair files.
- Regularly create system restore points prior to employing DISM for added safety.
Conclusion
In conclusion, our exploration of DISM tool has emphasized its pivotal role in resolving Windows image concerns. We’ve discussed its functionalities, encompassing the repair of corrupted system files, application of the “restorehealth” feature, and utilization of alternate source images.
Through DISM’s leverage, we fortify system integrity and enhance our proficiency in effective troubleshooting. As we navigate the dynamic Windows landscape, DISM remains a steadfast companion, ensuring system vitality and reinforcing technical adeptness.


