


 Header Through Cloudflare")


This article describes the common Oculus quest issues and solutions that users are encountering these days. Although, Oculus Link has had its share of ups and downs since it first went into beta testing in 2019. The beta version has always had flaws, from the Black screen of death to updating glitches. Oculus Link will launch Oculus Quest 2 in October 2020, surpassing Beta status. However, this does not imply that the equipment is now completely free of problems.
Oculus has published 14 software versions to date, yet none of them are bug-free. The delivery of a new update often brings with it new problems. However, each of these problems can be fixed.
As a result, if you’re looking for a resource that covers all the most common Oculus Link issues and how to fix them, look no further. We’ll go over some of the most common Oculus Link problems and solutions in this post. Then, without further ado, let’s get started.
Also Read: 10 Best Alternatives To Oculus Quest
Problems and solutions are linked through Oculus.
The sections below contain answers to some of the most common Oculus Link problems.
1. Oculus Link Connection Problem
Several users have claimed that after connecting to a PC, the Oculus Quest or Oculus Quest 2 automatically disconnects and returns to the home screen. Most of the time, this issue arises right at the beginning of the system’s startup. Fortunately, resolving this problem is a piece of cake.
When you connected the Oculus Link to the PC or the other way around, you probably saw it ask for storage permission. As a result, denying storage permission is required in order to resolve the connection problem. Any time your Quest 2 prompts you for storage access, simply select “Deny Storage Permission.”
If you’ve granted Windows access to the device’s storage, the headset will instantly disconnect whenever Windows discovers a new file. Windows has had this feature since its birth, and it works perfectly with other devices, such as cameras or cellphones. It facilitates the transfer of photos and videos between various electronic devices. However, many other gadgets, notably the Oculus Quest, have not been so fortunate.
Solution
It’s possible that outdated drivers are to blame for the problem. If you haven’t updated your Windows PC’s drivers, this issue is more likely to occur. Another important factor is an old motherboard. Make sure your PC’s display drivers are up to date to address this issue. Follow these procedures to accomplish:
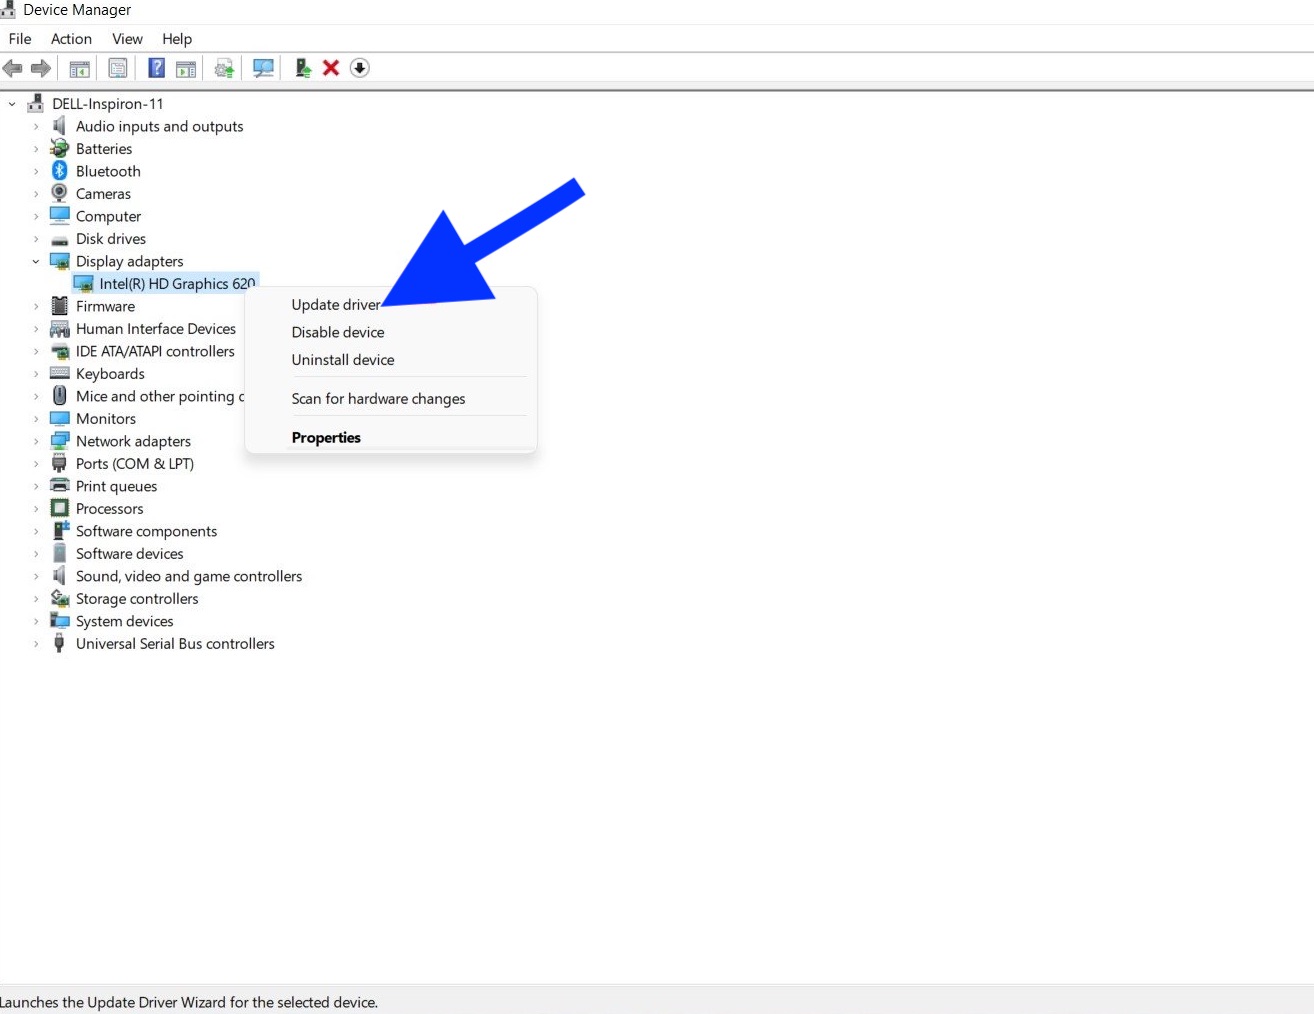
- To open the Start menu, use the Windows key.
- Now, type Device Manager into the search box and press the Enter key.
- The Device Manager will open up.
- Expand the Display Adaptors menu by selecting it twice.
- When you right-click on the graphics card, you have the option of upgrading its driver.
- Select “Search automatically for drivers” from the confirmation menu that appears.
Microsoft’s latest operating system will look for and install the most recent graphics driver when one is available. If it’s found, it’ll download it automatically.
A fresh USB cable is the last resort if none of the other proposed remedies worked for you in repairing the connection problem. The official Oculus Link cable is recommended. Because of its strong construction, it is unlikely to be damaged in the first place. It’s also 15 feet long, so you won’t have to worry about running out of room.
Oculus Link’s only drawback is its price. 2 to 3 times more expensive than a standard USB cable, in the most specific terms. However, in light of the high level of quality you receive, the price seems reasonable.
Also Read: What To Expect From Oculus Quest 3: Meta’s Upcoming VR headset
2. Incorrect Height Calibration
You’ve probably observed that the device exhibits various heights when connected to the PC. This is not a long-term issue, but rather one that comes up from time to time. To be more specific, if you have this issue, you will notice that your VR height is either too tall or too short.
In-game calibration options are a good starting point for troubleshooting. In the worst-case scenario, restarting the process is the last resort if the collaboration option fails to help. Turn off your PC, then turn it back on again. Once you’ve done that, reopen the game to see if the improper height issue still exists.
3. Problems Connecting to a USB Device
The USB cable connecting the Oculus Quest to the PC sometimes fails to be recognized by the PC. Even if you are using the official Oculus Link cord, or even the third-party recommended Anker USB 3.0 cable, this problem persists. Aside from that, this can be readily remedied. To find a solution that works for you, simply try one of the below workarounds.
Disconnecting the Oculus and PC USB cables is a good place to start. If a lack of connection stability was the root of the problem, performing this step may be of assistance. The USB connection problem might also be caused by outdated or mismatched software. Your PC’s Oculus software and the official Oculus application must be of the same version. If you don’t, you’ll very certainly have to deal with the previously mentioned issue. On both the Oculus Rift and PC, you may check the version number by following these steps.
To run on a PC
- The Oculus app can be opened on your PC.
- Select the OS version from the drop-down menu under Settings.
- In this section, you can view the version of the Oculus app loaded on your device.
- To get the most recent update, go to the Library > Updates section. “Install the latest developer updates” is the option. The Public Test Channel option should also be disabled.
For the purpose of Quest.
- The “Settings” menu is where you’ll find what you’re looking for.
- The “About” section can be found by clicking “See all” and then “Tap.”
- Now, select “Version” from the drop-down menu. Here, you can see what version of the software you have installed.
- In the event that an update is available, select the option to install it throughout the downloading process.
Make certain that the Oculus software and the official PC program both have the same version number before doing a power cycle on your device. In the end, the power cycle is just a simple reboot. As a result, turn the device off first, then turn it back on.
Also read: Oculus Quest 3: Everything We Know So Far
4. Crash Problem
Since its creation, the device has had a problem with crashing. In spite of following the preceding instructions precisely, it is still possible to encounter this issue. When users connect Quest to their PC, the software immediately crashes. In most cases, the problem is caused by a fault with the PC’s hardware. Take the following actions to fix the problem.
- Right-click “This PC” and select “Properties” from the context menu that appears.
- Check your computer’s specifications here. Make a list of all the components of your Windows PC, including the graphics card, processor, RAM, operating system, and any USB connections.
- Go to the compatibility page for Oculus Link now.
- Oculus Quest PC system requirements and suitable graphics cards can be found here.
Compare your PC’s installed specifications to the Oculus Quest’s minimal specifications. Since most laptops aren’t PCVR enabled, you’re out of luck if you want to use the device with one instead of a PC.
In the Oculus compatibility list, however, if you can’t find your PC’s GPU name. You can’t do anything if the GPU name is followed by a “Not presently supported” notice. Oculus will be compatible with the installed graphics card in the near future.
5. Poor Quality Game
What if you’ve finally connected the device to your PC, but are now experiencing poor in-game graphics quality in graphically heavy games? It’s impossible to blame the Quest hardware for bad image quality. The primary culprit here is a malfunctioning PC that’s connected to the network. There may be issues with the power supply, the software, or even the USB cable that’s being used to connect the computer.
You should check the Oculus link compatibility page first in either situation. Verify that your system’s GPU is VR-compatible before purchasing a VR headset. The Quest can be plugged into a different USB port on your PC if the compatibility test shows that your PC is compatible. A malfunctioning USB port may be to blame for this problem. The power-saving mode on your PC can be turned off if moving the USB ports doesn’t fix the problem. Follow these procedures to accomplish this.
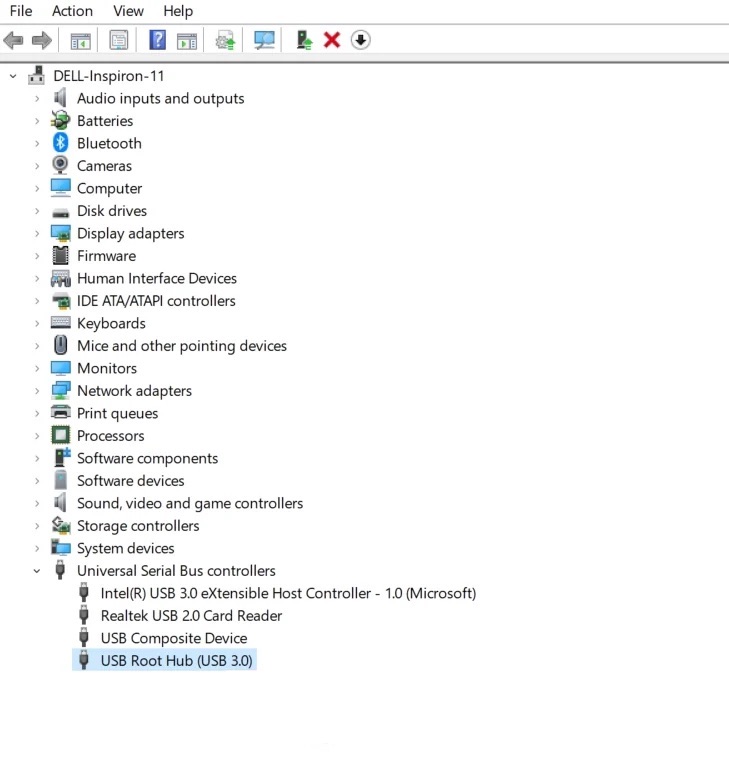
- To open the Start menu, simply press the Windows key.
- Now, type Device Manager into the search box and press the Enter key.
- Device Manager will open up.
- Expand the Universal Serial Bus Controllers option by double-clicking on the menu item.
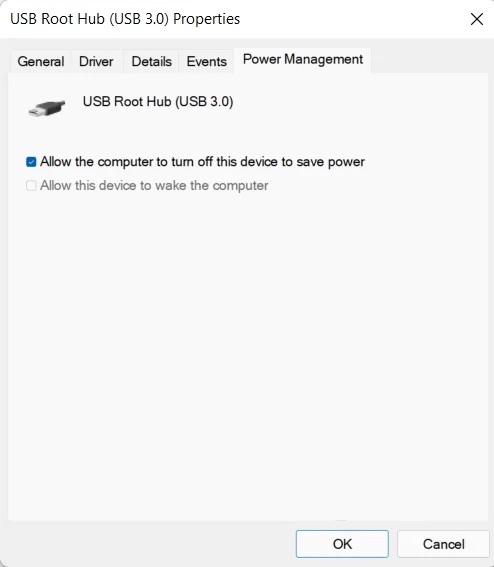
- Select “Properties” from the context menu by right-clicking on USB Root Hub.
- Select “Power Management”.
- To save your changes, select “Allow this device to wake the computer” and then click “OK”.
That’s all there is to it. Although in the worst-case situation the bad quality of the game may necessitate enhancing VR performance, we will discuss this in a separate guide.
Also Read: How To Use Oculus Move To Track Your Fitness Goals
6. Problems with the Audio or Microphone
The smartphone has made headlines owing to issues it has had with microphones and headphones. The issue has been since beta and continues to bother users, which is sad. However, there have been reports that the current version has fixed the mic or audio issue. That’s why the first thing to look at is whether or not you have the most recent operating system version installed on your computer.
Is it possible that the problem persists after the newest OS update? The actions listed below will help you resolve this issue if it ever arises.
- Press the Windows + R shortcut key to open the Run dialogue box on your PC.
- Search for “mmsys.cpl” in the search bar and press the Enter key.
- Locate the “Oculus Virtual Audio Device” in the “Sound” section.
- Using a right-click on the choice, select “Properties”.
- Using the “General” menu, select the “Headphones” option.
- Take a step forward by pressing the “OK” button on your keyboard.
- Locate the microphone icon labeled “Oculus Virtual Audio Device” in the recording area.
- Once you find it, right-click it and select “Properties” from the menu.
- Tap the “OK” button once you’ve renamed the device to “Headset Microphone” in the “General” section.
- It’s time for the final step in changing your default audio device to be “Oculus headphones and microphone”.
To be safe, restart your PC. You should no longer have an audio or microphone problem after doing so.
Also Read: Oculus Quest 2 Controller Not Working? Try These Fixes!
7. Low-Quality Images
It is most likely that you will encounter poor visual quality if your bitrate is set at a low level. If your PC has a low bitrate, it will compress the image before sending it to your Oculus Quest headset via the connections. In contrast to other streaming programs like YouTube, Oculus has a default bitrate of 150 Mbps.
Even though the bitrate is increased, the visuals are still compressed. When you’re looking at a beautifully detailed image or the color red, it’s easy to tell the difference. The 150 Mbps connection chosen by Oculus ensures interoperability with a wide range of PCs currently available on the market. In order to improve the visual quality, you can easily boost the bitrate if you have a more powerful PC.
Follow these procedures to accomplish this.
- Start by ensuring that the Oculus Debug Tool is installed on your computer. Don’t be fooled by the name; the software is quite simple to use.
- Go to your Windows PC’s File Explorer now.
- Go to the address shown below.
C:\Program Files\Oculus\Support\oculus-diagnostics
4. Open OculusDebugTool.exe in the specified folder.
5. You will see the Oculus Debug tool appear.
6. The next step is to disable “Encode Dynamic Bitrate.”
7. Set the encode bitrate to 250 Mbps. The number 150 is pre-programmed to begin with. For those who have a high-end computer, this can be fixed.
And with that, I bid you farewell for now. Close the Oculus Debug Tool and then unplug the Oculus Quest to complete the process. Plug the Oculus Rift back into the PC and restart the Oculus Link after a few minutes.
You’ll notice a noticeable improvement in picture quality. You can go as high as 500 Mbps, although Facebook advises against exceeding 250 Mbps. It’s worth noting, however, that the performance degrades slightly above 350 Mbps.
Also Read: 5 Oculus Quest 2 Settings You Did Not Know About
8. An issue with stuttering
In Oculus Link, you may easily remedy the stuttering problem you’re having. The first thing to examine is whether or not the room has adequate illumination. If you don’t, you’re more than likely to encounter the problem referred to above, as cameras require light to view what’s around them.
Even if the room is well-lit, you can try adjusting the bitrate to see if it helps. You might want to experiment with enabling the Encode Dynamic Bitrate (see the approach described above). Allowing the option to be enabled ensures you obtain an image quality that matches your bandwidth.
To see if it helps, lower the refresh rate and see if it helps. Oculus Quest, by default, only supports 72 Hz refresh rates.
What you need to do to change the refresh rate is as follows.
- Open the official Oculus PC program.
- Right-click the “Devices” option on the left side of the screen.
- All of the devices that are currently connected will be displayed in the following window.
- To play Oculus Quest, go to the Games menu and select “Oculus”.
- Once you’ve selected a device, a new window will appear with a number of options for how to use it.
- Take a look at the “Graphics Preferences” option that may be found at the bottom of the screen.
- You can select the refresh rate in the next box. The frequency is set to 90 Hz by default. The system’s performance, however, may suffer as a result.
- This 70 Hz option is the lowest refresh rate setting available. Once you’ve finished, click “OK.”
Observe whether or whether the stuttering issue has been resolved. Disable the automatic resolution option if you don’t want it to happen. Although the visual quality may be weaker, the overall performance will be improved.
When all else fails, try downloading the most recent versions of your motherboard and display driver software.
Also read: How To Take And Share Screenshots And Video Clips On Oculus Quest
9. Unable to load profile, games, etc.
Profiles won’t load, and your games may be gone if you turn on Oculus Quest 2. Quest tells you that it can’t load your profile. Were you unsuccessful in your attempts to fix the problem by turning on and off my headset, verifying my internet connection, and trying to load the mobile app for Oculus?
Check the steps below for a fix:
1. Make sure the headset is on and nearby.
2. If you don’t have a headset, make sure it’s on and close by.
3. To connect your headset to your phone, make sure Bluetooth is enabled on the phone.
4. Go to the “Devices” page in the Oculus app on your headset-linked phone and pick “Wi-Fi”.
5. Disconnect the WiFi headset and re-enter your WiFi password in the prompt.
If everything went well, you should now be able to see your profile on the headset.
10. Sharing apps on multiple headsets
In the holidays for Christmas, your sons /daughters/friends may have got quest 2 headsets. One is signed in with your Facebook account, the other is signed into your husband’s/uncle Facebook account. Check the steps below for a fix.
There is no need to perform a factory reset.
- Delete or sign out of the secondary account on the second Oculus Quest 2.
- Using the Oculus app, connect the device to the master account, and then log in. As a result, you can use two Oculus VR headsets with a single master account.
- Allow Oculus app sharing.
- Make sure to add the extra account to the second device.
- Install the games while logging in as a secondary account.
Final Words
These are the most common issues and fixes for the Oculus Link. It’s important to let us know if the issue you’re having has been addressed in the post. If it isn’t, please let us know in the comments.


