


 Header Through Cloudflare")


")
Introduction
According to Microsoft, high contrast themes on Windows 11 use a small set of colors to help make UI elements easier to see, reduce eye strain, and improve text readability for people with low vision and light sensitivity.
It’s important not to confuse high contrast themes with light and dark themes on Windows. Compared to high contrast themes, light and dark themes use a larger palette of colors but don’t necessarily increase contrast or make things easier to see.
When you enable the feature, elements like text, links, buttons, and background will use a specific set of high-contrast colors that makes it easier to see and read content on Windows 11 and across the internet. You can even create and apply a custom theme with custom colors suited to your needs.
In this article, we will be discussing how to enable/disable contrast mode on Windows 11 and more. So, let’s begin.
Content
- How to enable/disable contrast mode?
- How to create a custom contrast mode?
- Use Color Filters in Windows 11?
Let’s discuss these points in detail:
1. How to enable/disable Contrast mode on Windows 11?
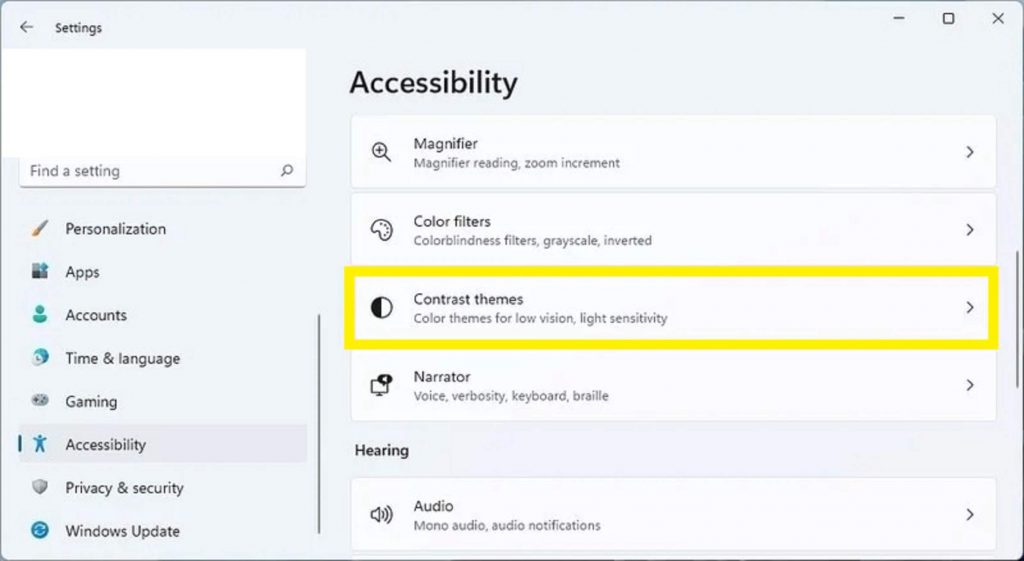
To switch to one of the contrast themes on Windows 11, use these steps:
- Open Settings.
- Click on Accessibility.
- Click the Contrast themes page on the right side.

- Under the “Contrast themes” setting, select one of the available themes:
Aquatic.
Desert.
Dusk.
Night sky.
- Click the Apply button.
- (Optional) Use the Left Alt key + Left Shift key + Print screen keyboard shortcut to enable or disable the contrast theme.
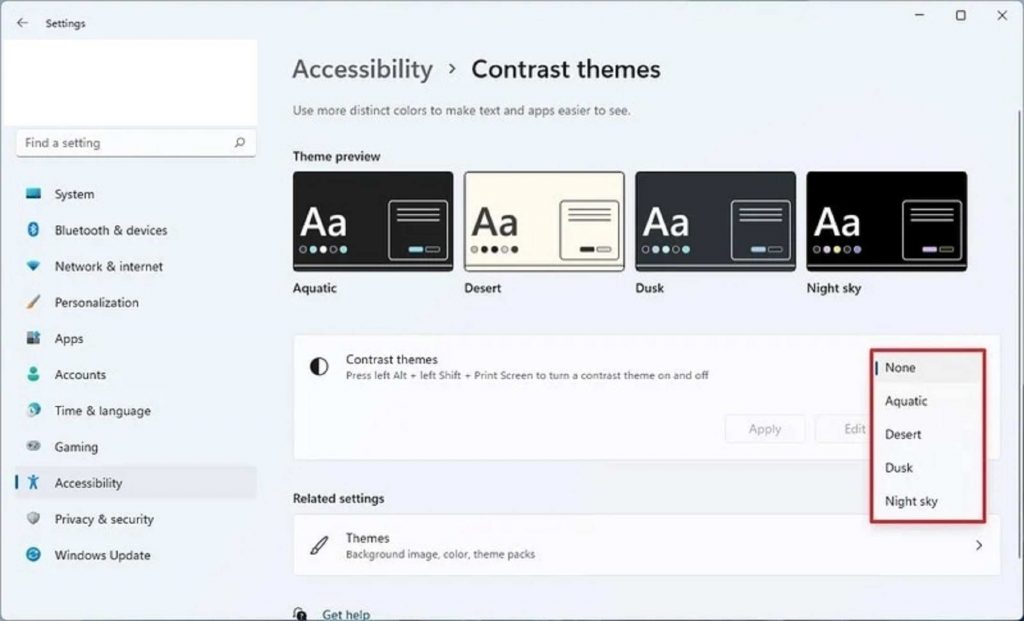
Once you complete the steps, the Windows experience will switch to the high-contrast mode. When applying a high-contrast theme, it’s normal to see a “Please wait” screen for a few seconds while the system applies the changes.
Also Read: [Fixed] DLLRegisterServer Was Not Found On Windows 11
2. How to create a Custom theme on Windows 11?
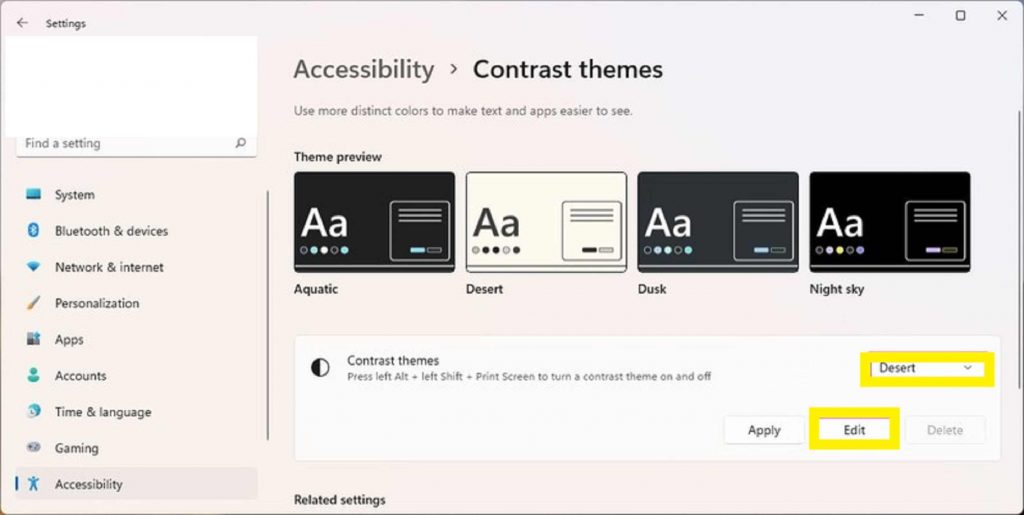
To create a custom high-contrast theme, use these steps:
- Open Settings.
- Click on Accessibility.
- Click the Contrast themes page on the right side.
- Under the “Contrast themes” setting, select one of the available themes — for example, Desert.
- Click the Edit button.

- Use the Background setting to set the background for the elements that show text on Windows 11.
- Use the Text setting to set the text color for Windows 11 and web pages.
- Choose the Hyperlink setting to set the text color of links available on Windows 11 or web pages.
- Use the Inactive text setting to change the text color for inactive text across the experience.
- Use the Selected text setting to choose the text color for text selection.
- Click on the Button text to set the color for the buttons and the text inside the buttons.
- Click on Save as.
- Confirm a name for the new custom theme.
- Click the Save and apply button.
As you make the changes, you will see a preview in the setting. After you complete the steps, the theme will apply immediately with all the custom settings.
Also Read: 10 Things You Should Do After Installing Windows 11 In 2022
3. How to use Color Filters in Windows 11?
To reduce the eye strain, Windows 11 uses the Night light feature. If you’re still having problems seeing what’s on your screen, you can use Windows 11 built-in color filters. It will help you to distinguish between things that differ only by color. This changes the color palette of objects on the screen, which brings out the contrast and could help you see clearly. These built-in color filters of Windows 11 might help people with vision loss or color vision deficiencies.
3.1 How to adjust Color Filters in Windows 11?
- Open Settings app
- When Windows Settings appears, select Accessibility from the left sidebar
- On the right sidebar, click the Color Filters
- In Color Filters settings, flip the toggle switch to On beside the Color Filters option.
- Next, you’ll see six filters. These are the following:-
Red-green (green weak, deuteranopia)
Red-green (red weak, protanopia)
Blue-yellow (tritanopia)
Grayscale
Grayscale Inverted
Inverted - Select the color you’d like to use.
- When you select the filter, it will be applied immediately and automatically. If you want to see the preview of the effects of the filter, scroll up the window to view the “Color filter preview” section. Here, you will see a color wheel, sample photo, and grid of colors.
That’s it. Now color filters are applied
Also Read: How To Add Or Remove Remote Desktop Users Windows 11
Conclusion:
We discussed contrast mode and color filters in this article. We explained how to use them. Hope this article is helpful for you. If you face any problem, then please ask us through the comments section.


