


 Header Through Cloudflare")


Apple released the M1 chip in the MacBook last year in 2020, which allows users to restore their devices into DFU mode. You need to use the DFU or device firmware update because it is the same as your iPhone. Let’s say you need to restore your iPhone by pressing the power button and home button to put it into the DFU mode.
This helps in restoring your iOS in your iPhone or iPad, and this system is now present in your M1 MacBook Pro. Moreover, with this method, you can do two things. First, if you need to troubleshoot and thus boot your mac to recovery mode, you will hold down the power button. And you get an exclamation mark on your screen with an error message.
Benefits Of DFU Mode In M1 MacBook
In this case, you don’t have to reinstall the eraser disk and instead reinstall macOS recovery with the help of the Apple configurator. Moreover, Apple did not make this possible in Intel macs. So if you had to troubleshoot, you had to reinstall everything to get back recovery.
Furthermore, now you can revive and at the same time, you get the option to restore macOS. It reinstalls macOS recovery as well as reinstalls the latest version of macOS. Therefore, these are the things you can do with the Apple configurator 2.
Must Read: How To Fix FCP 10.6 Not Working On MacOS Monterey?
Method 1: How To Boot Your M1 MacBook Pro Into DFU Mode While Power Off?
Step 1: Power down your 14-inch MacBook Pro and hold it for a few seconds.
Step 2: After that, the screen will go Black. Furthermore, wait for about five to eight seconds for it to entirely turn down.
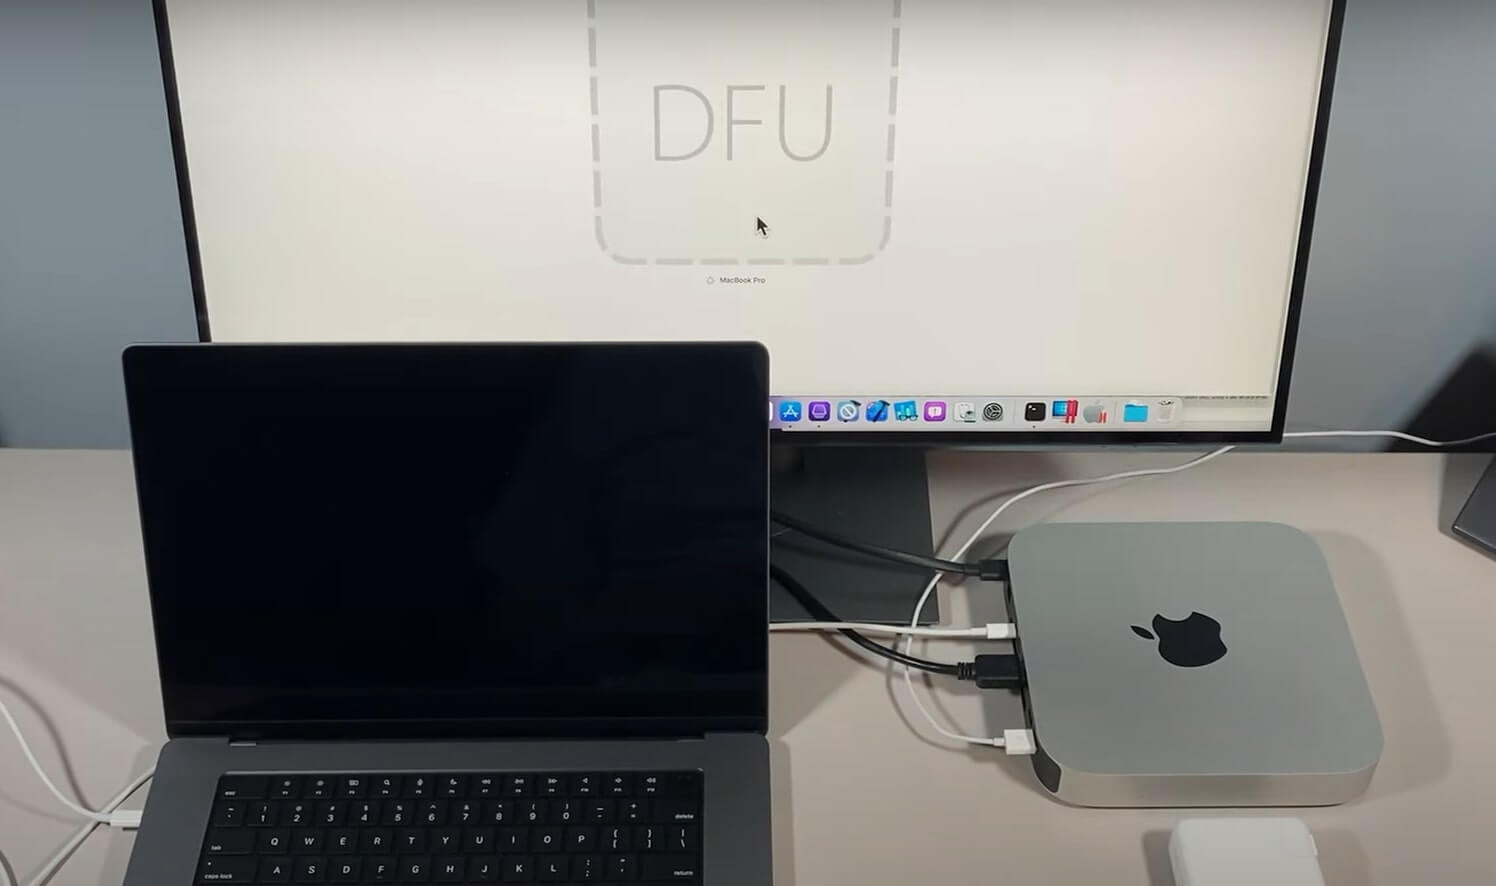
Step 3: Get your hands on a USB 3.0 cable or a charging cable and plug one end to the host device and the other end to your MacBook Pro. Make sure you plug in the port closer to the mag safe or the screen on all M1 macs.
Step 4: Furthermore, the MacBook will power on. Power it back off, and now it is ready to boot into DFU mode.
Step 5: According to Apple’s website, press down the power button, then the right shift, then the left Control and left option.
Step 6: Furthermore, continue to press it for ten seconds. On the other hand, you can press all the four keys I mentioned except for the power button precisely for ten seconds or more. After that, your M1 MacBook Pro will immediately go into DFU mode.
Step 7: After the connection is complete, go back to the Apple configurator 2. Moreover, make sure you run the latest version from the app store.
Tip: Make sure that your operating system is on par and not above or below. For example, if you want to reinstall Monterey from Big Sur, it will create problems. But if you are doing Big Sur to Big Sur, it will be a smooth process.
Step 8: Hold down the four keys above for ten seconds and after that, leave all the keys except for the power button.
Also Read: How To Run Android Apps In M1 MacBook Air?
Boot 16-Inch M1 MacBook Pro Into DFU
Step 1: Plug in the USB cable while keeping the mac on power-on mode. Once again, make sure that you plug it into the post closest to the MagSafe or the screen because that is the DFU port.
Step 2: Moreover, hold down the power button and turn it off. Also, remember to give it another five seconds to turn off entirely.
Step 3: Furthermore, check if both the host and the target mode are plugged incorrectly, and you’re ready. Hold down all the four keys for ten seconds, and after that, let go of the Control, Option and Shift. Moreover, let go of the power button after one second.
Step 4: Your mac will boot into the DFU mode right after you let go of the power button.

Furthermore, you have to be careful about a few things while doing this process. Firstly, you have to practice this a couple of times to make your hands faster. If you are even a fraction of a second slow or too quick, you will miss the DFU window.
How Different Is Booting Into DFU With An Intel MacBook Pro?
It is pretty likely that after reading the above method, you will ask yourself that how is this any different than an Intel Mac, right? Honestly, it is not drastically different but just five seconds faster than the older macs.
Step 1: Take your old MacBook and plug it into the USB 3.0 cable with the DFU mode as well as the host mac.
Step 2: Press down the power button and wait for a few seconds to shut it down completely.
Step 3: Furthermore, we will follow pressing down the same four keys for ten seconds on the keyboard. They are the right shift, power button, left option and Control.
Step 4: Let them off except for the power button after the first ten seconds. Let off the power button after another six seconds.
Step 5: Moreover, after you let off the power button, your mac will immediately boot to DFU mode.
Therefore, this difference of five seconds makes the process slow in comparison to the newest M1 MacBook pro. It could be possible Apple looked into it and improved it for the user’s benefit.
Read: How To Boot Intel Mac Into DFU Mode?
Method 2: Fast Way Of Booting Your M1 MacBook Pro Into DFU Mode
Step 1: Connect both ends of the USB or charging port to the host mac and target mac.
Step 2: Furthermore, press down the power button, right shift, left Control and left option until it powers off.
Step 3: Wait for exactly three seconds, then let off the keys except for the power button. Then your mac will be in DFU mode.
Step 4: Moreover, you need to go back to the Apple Configurator 2, which will tell you when to let go of the power button. Once again, press hold of all the four keys until the mac powers off.
Step 5: Count till four seconds, and right after that, your mac will go into DFU mode.
This method was originally discovered by a former Apple employee Tim who shared this method on his Twitter handle.
Method 3: Fast Way Of Booting Your M1 MacBook Pro Into DFU Mode Using macvdmtool
macvdmtool is an open-source tool that you can download and install to prepare your mac for DFU mode.
You can and should use this method to boot your Mac into DFU mode despite the ways I talked about before because if your mac starts having problems, this is just one click away.
Moreover, if you have multiple macs in an assembly line, you can simply plug them all in and click on one button to put them into DFU mode. To do that:
Step 1: After the download and installation process is complete, you have to run the directory in the terminal window.
Step 2: You have to build the tool and put it into the directory. Furthermore, take the binary and change the directory into the folder. Moreover, once you have built that and are in the directory, you can run a command.
Step 3: Type the command sudo ./macvdmtool dfu. You will be running it as an administrator.
Step 4: You have to type enter and enter your administrator password.
Step 5: Thus, your mac immediately enters the DFU mode after hitting enter.
This process works great if your mac is having keyboard issues. Moreover, it allows Linux to become a host and restore IPSW files. It means that only mac computers can be a host, but in future, Linux stands a chance in the future.
Must Read: How To Unlock AirPlay For Monterey On Mac?
How To Use Apple Configurator 2?
Step 1: On your Apple Configurator 2, right-click on the DFU image, and you will be able to see the option Restore. If your right-click is not activated, tap on Control and then click.
Step 2: Moreover, you will also be able to see the Revive option, which will reinstall the macOS recovery partition back to the mac.
So if you try to boot into recovery by holding down the power button and you get the error message, but the operating system boots just cannot get it, this is your solution. Furthermore, click on Revive device, and it will immediately start to go.
Moreover, it will download the 12GB of macOS IPSW, which will be the latest version. And the same thing is true for Restore. The Apple configurator two will always download the latest version of the macOS.

But if you want to downgrade to the previous version like a Big Sur or Catalina, you can get that from macintosh.com.
Conclusion
In this way, you will easily be able to boot your M1 MacBook pro into recovery mode in three easy steps. To install macOS, you can refer to the website I have mentioned for Big Sur, Catalina and Mojave. Furthermore, for the latest version, choose to revive, and the Apple configurator will download macOS Monterey, or whichever latest version is available.
Read: How To Install macOS Monterey On Unsupported Mac?


