


 Header Through Cloudflare")


By default, Steam has a setting that allows it to auto-update games in the background. Although it is super useful as you don’t need to update each and every game individually. Ultimately, it saves a lot of time. However, this default configuration can prove to be problematic at times. Users who have limited internet connection or device storage are specifically troubled by this. So, in this article, we will get to know how to disable auto-updates on Steam.
There is no direct option to turn off universal automatic updates on Steam. But there are various indirect ways to do that. So, below are some of the methods to turn off automatic updates on Steam.
How to turn off automatic updates on Steam?
- Turn off automatic updates for a game
- Set time restrictions on auto-update
- Limit bandwidth
- Turn off Steam’s startup process
Now, let us discuss these ways to disable auto-updates on Steam in detail!
1. Turn off automatic updates for a game
A great way to turn off Steam automatic updates is to disable it for individual games. If you have a limited number of games on the Steam client, this method can be helpful. However, if there are a large number of games installed, this task can be a little tiring. So, below is how to disable automatic updates for a single game:
- Launch the Steam client on your PC. To do this, just go to the start many by clicking on the Windows icon. Now, search Steam in the search bar on the top. Then, tap on Steam under best match to open it.
- Switch to the Library tab. This list of all your Steam games will be there on the left side of the screen.

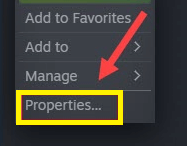
3. Now, make a right-click on the game.
4. Choose Properties from the context menu.
5. Switch to the Updates tab.
6. On the Updates tab, you will see an Automatic updates section.
7. Click on the drop-down box below Automatic updates.
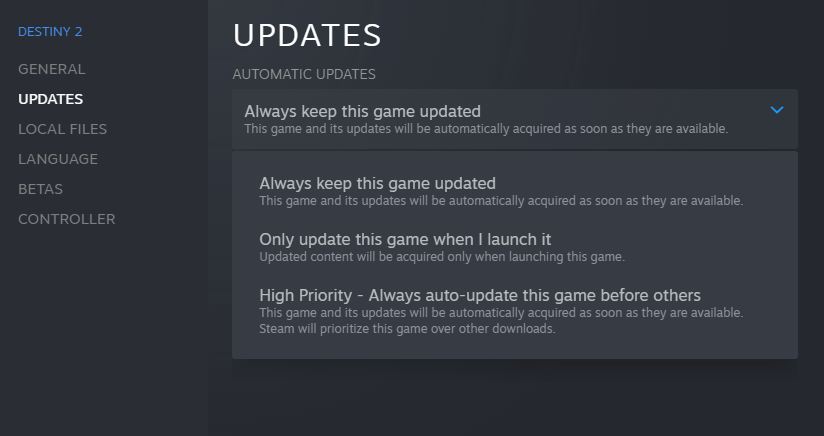
Select any of the following options as per your preference:
- Always keep this game up to date: It will allow Steam to update your game whenever there is an internet connection.
- Only update this game when I launch it: This option turns off the game’s automatic updates and forces it to update only when you launch it.
- High Priority-Always auto-updates this game before others: The chosen game will be updated before any other game. It is a useful option when you play a game regularly.
Also Read: Fix Steam Running Slow/ Lagging Games Issue 2022
2. Set time restrictions on auto-updates
Another indirect way to turn off Steam’s automatic updates is to set time restrictions on auto-updates. You may be experiencing slow internet speed during working hours because of Steam automatic updates. So, with this option, you can limit the time of automatic updates for Steam. It will prevent it from updating games at any time of the day. Below is how to do it:
- Launch the Steam client on your PC. Just go to the Start menu by clicking on the Windows icon in the taskbar. And then, search Steam in the search bar on the top. Then, under best match, click on Steam to launch it.
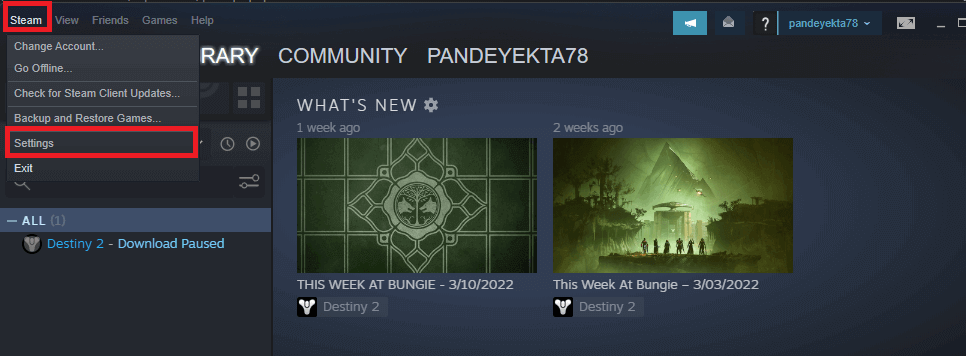
- Click on the Steam option in the top-left corner.
- Choose Settings from the drop-down menu.
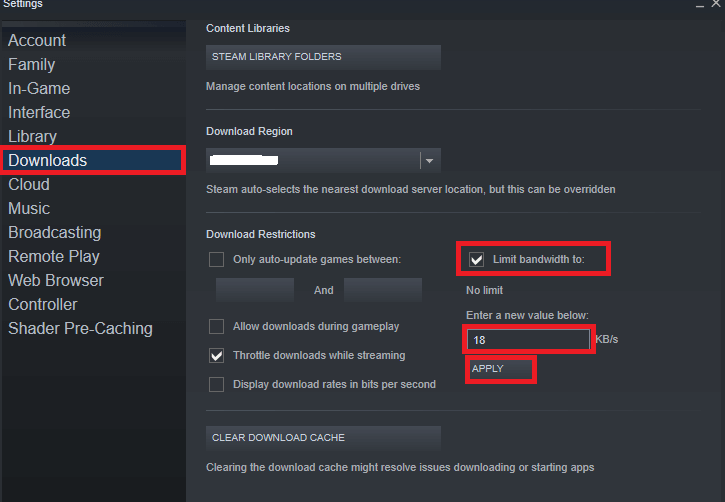
4. Go to the Downloads tab.
5. Under Download Restrictions, check the box next to Only auto-update games between:
6. Next, choose a time period between which you want the Steam updates to take place.

This option is very convenient as you can also set the update time to when you are sleeping. It will save you time.
Also Read: 8 Best Games On Steam 2022! (New Releases)
3. Limit Bandwidth
This option makes sure that Steam does not consume data at a speed higher than specified. It enables you to perform all the other tasks on your PC along with the Steam updates. In short, you don’t face the issue of slow internet connection due to the Steam updates. So, below is how to limit bandwidth for Steam:
1. Launch Steam on your PC.
2. Click on the Steam option in the top-right corner as shown below in the screenshot.
3. Choose Settings from the drop-down menu.
4. Switch to the Downloads tab.
5. Check the box next to limit bandwidth to:
6. Select an internet speed as per your preference and tap Apply to save the changes.
Also Read: Elden Ring Steam Restart Required Loop- Top 6 Fixes!
4. Disable Steam’s startup Processes
One more way to disable Steam’s automatic updates is to turn off Steam’s startup processes. This will prevent the game client from starting up at the PC startup. The basic logic behind this fix is that Steam will not able able to start updates until is open. So, below is how to perform this method:
- Launch Steam on your PC.
- Click on the Steam option on the top-left side.
- Choose Settings from the drop-down menu.
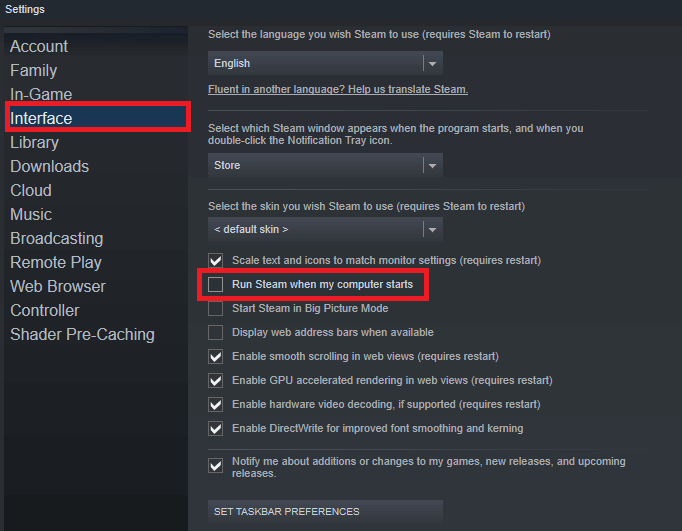
- Now, switch to the Interface tab.
- Uncheck the box next to ” Run Steam when my computer starts”.
Then, close the Steam client.
Now, Steam will not be launched until you open it manually. It is one of the best ways to disable or turn off automatic updates on Steam.
Also Read: Unable To Join Multiplayer Game Session On steam? Try These Fixes
CONCLUSION
So, that’s all for now! These are the four best ways to disable auto-updates on Steam. Since there is no direct option to turn off universal automatic updates on Steam, these workarounds have proved to be effective. Go ahead and try these tricks. In case you face any difficulties while doing so, do let us know in the comment section. We would love to help you.


