


 Header Through Cloudflare")


Microsoft is working on a project called Phoenix to provide the Edge browser with a reinvigorated look. They want to match it with the design of Windows 11 and are endeavoring new elements and ways to make it work nicely with Windows. The Microsoft User Research team is leading the project to invent a fresh vision for the Edge browser on Windows 11. One of the most favored ideas they came up with was a split-screen feature.
The split screen feature in Microsoft Edge is a worthwhile tool for multitasking and browsing multiple websites at once. By enabling this feature, users can view two websites side-by-side on the same screen, making it effortless to compare information or data on two tasks concurrently. Nevertheless, not everyone may see the split screen feature as valuable, and some may frankly find it distracting.
As stated above, Split screen is a new feature in Edge that isn’t turned on automatically. Though, you can activate it manually by going to edge://flags.This post will walk you through the process of turning on or off the split-screen function in the new Microsoft Edge.
Also Read- 8 Reasons Why Microsoft Edge Is The Best Browser For Mac
Enable or Disable the Split Screen option in Microsoft Edge Browser
Follow the steps below to enjoy the amazing Split screen feature in the Microsoft Edge browser.
Turn on/Enable the Split Screen function in Microsoft Edge
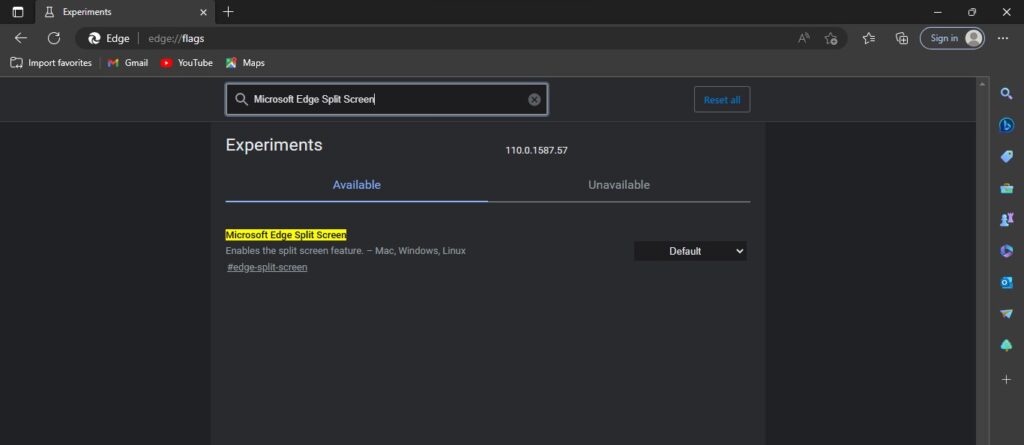
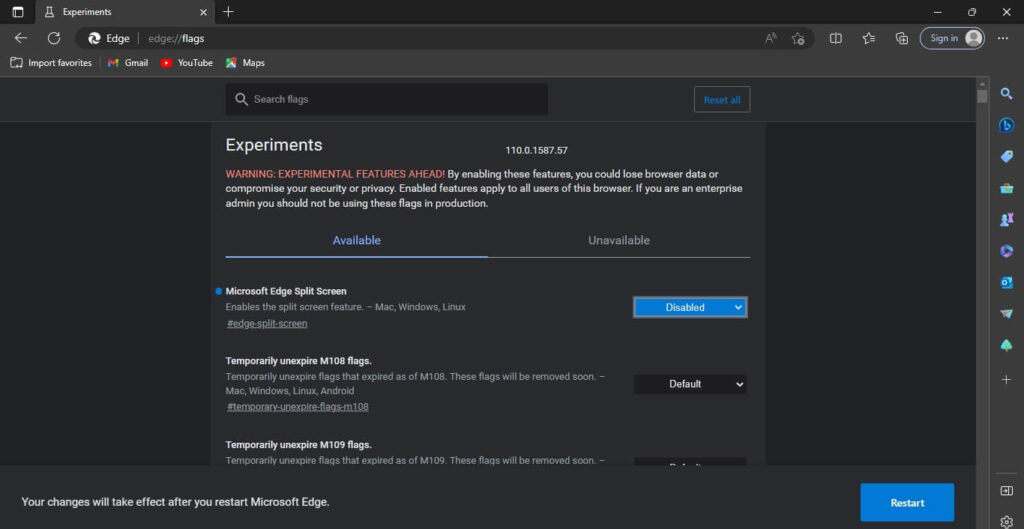
Step 1: First copy the following path given below after you launch the Microsoft Edge browser
edge://flags
Step 2: Now, on the search box jot down “Microsoft Edge Split Screen”. The split screen option will automatically come on top of the search results.
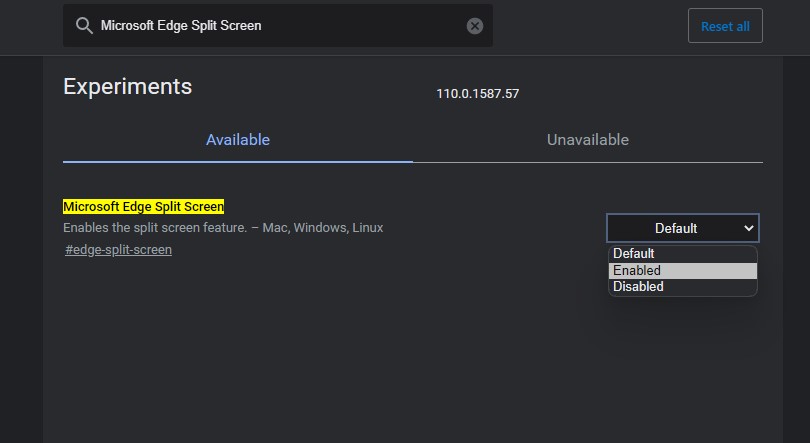
Step 3: There, you will see the drop-down menu beside the split screen option. Click on it and enable it.
Step 4: After you select it, you will notice a note on the bottom suggesting you relaunch or restart edge to save and view the changes. Simply, click on the Restart option.
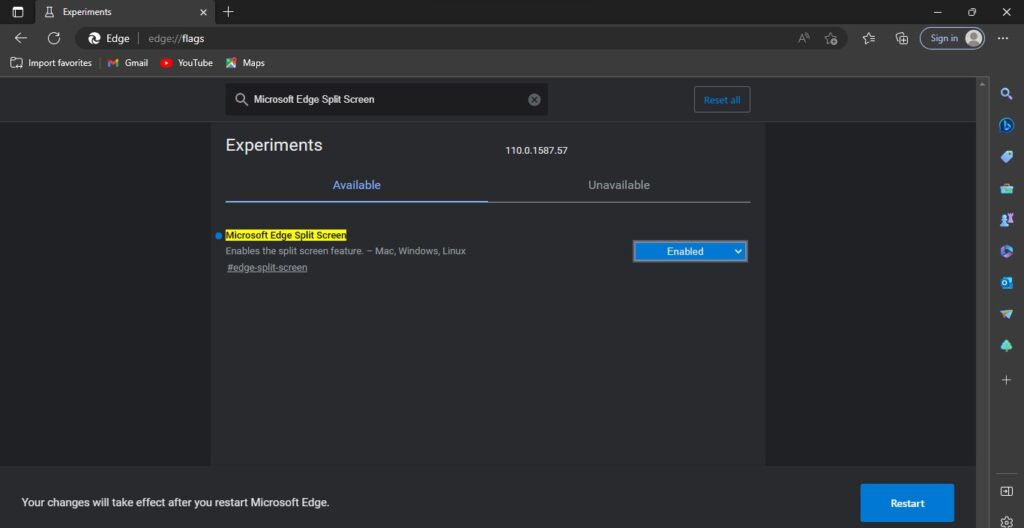
After you click on Restart, you will see in a quick flash Microsoft Edge will quit and Restart.
Here is How to Use the Split Screen Feature on the Edge
Now moving on to how to Split screen in Edge. Follow the simple steps given below to enjoy this feature:
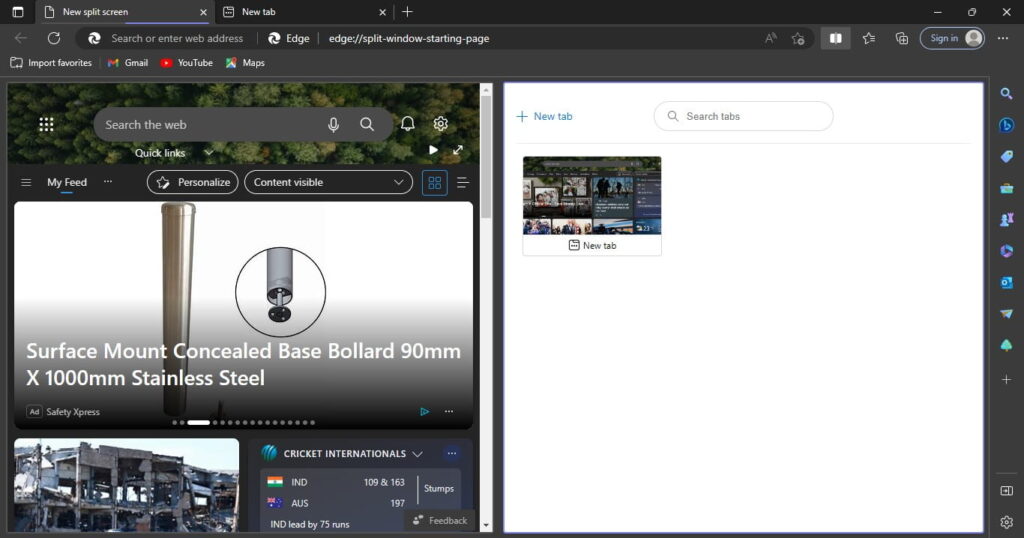
Step 1: On your Edge (Windows or Mac), open two tabs.
Step 2: Now, on either of the tab, you will notice an icon located beside the address bar.
Step 3: Simply, click on that icon and you will see your screen split in half. Finally, enter the website of your choice and enjoy this amazing feature.
Adjust the size of both pages: The screen is split equally between two pages by default. However, you can adjust the size of each page by dragging the intersection line between them. To do this, move your mouse cursor on the line until it changes to a double arrow. Then click and hold your mouse while moving it left or right to resize the pages
Modify How links open: You can modify how links open in split-screen mode by clicking the more options icon beside the split-screen icon. Now, you have the option of opening links in the currently active tab or viewing them across the right-to-left tab option.
Close the Split screen tab: To exit Split Screen mode and keep only the left page on the screen, click the Split window icon again. If you want to close a specific page instead, move your mouse to that page and look for a menu in the top-right corner. Click the close icon within that menu to close the page.
Turn off/Disable the Split Screen feature in Microsoft Edge
Here’s a possible rewrite of the steps:
Step 1: Launch Edge on your computer (Windows or Mac). Then, in the address bar, enter edge://flags and press Enter.
Step 2: To access the “Microsoft Edge Split Screen” option, jot down “split screen” into the search bar. Change its setting to either “Disabled” or “Default”.
Finally, click “Restart” and relaunch Edge to save changes.
Thats it! Now you will be able to easily enjoy the Split Screen feature on your Windows or Mac.
Also Read- How To Add Or Remove Buttons On Toolbar In Microsoft Edge
Final Verdict
In conclusion, Microsoft Edge’s Sidebar and Split Screen features deliver users the ability to multitask and access multiple apps and websites without losing focus on their current web page. While the Sidebar does not provide access to browser settings, both features authorize the convenient resizing of tabs. The addition of a new option to open links in a split screen when right-clicking on a link further enhances the user experience. These features are especially worthwhile for users who constantly have multiple tabs open at once.
Finally, if you have any inquiries or encounter any difficulties in adhering to the aforementioned guide, please do not hesitate to inform us in the comment section below.
Also Read- 8 Reasons Why Microsoft Edge Is not the best option for Mac users


