PHP zip archive is a process or tool installed on your web hosting server that enable PHP script / command to archive a file or zip and unzip a file or you can say compress a file and extract a compressed file. Now your must be thinking that why do you need to compress or extract a compressed file on your web hosting server? Well, if you were to simply upload one or two files of small size then you would simply use file manager in your hosting cPanel or upload the file using FTP client like FileZilla or Core FTP. What if you have to upload hundreds or thousands of file in order to migrate a website to a new hosting server or you need to download the complete backup of your site. In either of the situations, you will need to upload multiple files one by one as file Manager and FTP clients like FileZilla transfer them one at a time and you will have to wait for too long for the transfer queue to be completed. This is why everyone prefer to compress all the files before uploading to a server or downloading from server. Compressed files are smaller in size and transfer very quickly. However, some of the web hosting providers like Godaddy does not support the PHP Zip archive feature by default and it becomes a headache when migrating a website or taking full backup of your site from such hosting services. In this post, I will show you a very simple method to enable PHP Zip Archive Support Module on your shared hosting from Godaddy.
Before we move further, let’s quickly recap why and when do we need PHP Zip archive to be enabled on our hosting account?. We need the PHP Zip Archive support utility to be working or enabled on our hosting account in the following cases:
- To quickly upload multiple files on your hosting server.
- Migrating the whole website from one server to another
- Changing the hosting service provider
- Installing software such as CRM, Online Forum etc.
- Installing a custom theme or manually updating a plugins.
- Backing up the whole site or restoring it.
- Using duplicator plugin for WordPress site migration.
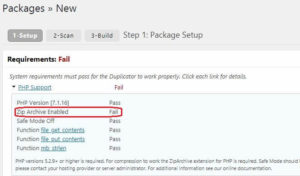 |
| Duplicator- WordPress Backup and Migration Utility Does not work due to PHP Zip Archive module disabled |
To Enable PHP Zip Archive Support Utility on Godaddy’s Shared Hosting
Option – 1
1. Simply login to your GoDaddy account and go to My Products menu.
2. Click “Manage” button next to your hosting service.
 |
| Click Manage Button next to your Web hosting Service |
3. Click on “cPanel Admin” button at the top right.
 |
| Click cPanel Admin button to log into cPanel |
4. Now you will be in the cPanel Administration setting. Look for section called “Software” and choose option “Select PHP Version”.
 |
| Select option called “Select PHP Version” to enable Zip Archive |
5. Now make sure you have selected the latest working PHP version from the drop down list and check the box next to Zip option, which is the second last in the list.
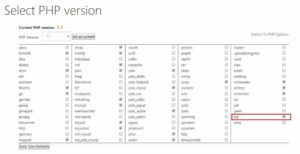 |
| Check the box next to Zip to enable PHP Zip Archive in GoDaddy Shared Hosting |
6. Click on save button at the bottom left and you are done. There is one more thing to do for the changes to take effect.
7. Go back to Software section and this time select “PHP Processes” option then click on “Kill Processes” button to restart the PHP processes and to make changes take effect.
 |
| Kill PHP Processes for the changes to take effect |
After following all the above mentioned steps, I went back to WordPress admin area and tried to run duplicator. And much to my delight, it worked just fine.
Option 2
For those hosting service providers where you do not get an option to select PHP version and simply enable the Zip module. You will need to install the Zip Archive module separately manually. Here is how you can do that:
1. Go to cPanel Admin and choose “PHP PEAR Packages” under software section.
 |
| Select PHP Pear Packages from cPanel Admin to install Zip_Archive Module for PHP |
2. Now type keyword “Zip” in the box next to “Find a PHP Extensions and Applications Package” and click “Go” button.
 |
| Type Zip in the box and click Go button to find Zip_Archive Utility |
3. Click Install next to module named “Archive_Zip” and wait for a minute or two.
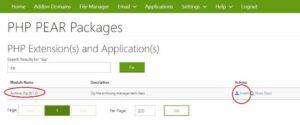 |
| Click Install Next to Archive_Zip to install the module |
4. Go back to Software section of cPanel Admin.
5. Select PHP Processes and kill all the processes for the changes to take effect. Try using the archive or compress and extract feature in your hosting account now.
If none of the above method works with your hosting service provider, I suggest you call their technical support department and simply ask them to enable PHP Zip Archive module on your hosting account. They should do it in a minute. I hope this article fixed your problem. In case you are still facing the same problem with GoDaddy hosting or you are getting some other error message. Please share the details with us through the comment section below and we will try to find the best solution for you.


![The Apex Legends Digital Issue Is Now Live! Apex Legends - Change Audio Language Without Changing Text [Guide]](https://www.hawkdive.com/media/5-Basic-Tips-To-Get-Better-On-Apex-Legends-1-218x150.jpg)




Option 1 worked for me thanks. Duplicator is extracting the backup right now! Thank you!
Thank you so much for the clear and correct fix to the Zip Archive extension issue with WordPress. Option 1 worked for me and was super easy. Cheers!
Worked like a charm, thanks!
Thank you, seems to be running now!
Option 1 worked for me thank you
love you
this worked, finally; elementor requiring zip to be enabled and pretty sure its disabled by default
Hi, thank you for this. I’ve tried the 2nd option but still can’t get it to work. It does not even display the installation page. I’ve tried enabling ZIParchive myself, as well as from Godaddy but still doesn’t work. Not sure how else to troubleshoot, would be grateful for your help. Thanks
Under teh software section there is no “PHP Processes” option. Everything else seems fine. Suggestions?