


 Header Through Cloudflare")


Now you can install VMware auto-unlocker to get different versions of macOS that are not possible by default. VMware allows users to run the mac operating system on virtual machines on their computers. This can be an excellent opportunity for developers looking to experiment and explore macOS.
In this blog post, I discuss the steps in brief so that you can install the VMware auto-unlocker without any hassle. This method will work on VMware workstation version 11 – 16 and VMware player version 7-15.
So without any further ado, let’s get started.
Install VMware Workstation Pro For Auto-Unlocker
On your Windows 11 PC, download and install VMware workstation pro. To do that, follow the steps below:
Step 1: Install VMware workstation Pro on your PC.
Step 2: Launch the VMware workstation, but it does not accommodate the MacOS by default. Since Apple does not let it run on anything else apart from Apple hardware, you have to run on an unlocker.
Step 3: Shut down the VMware workstation completely. Moreover, make sure that there is no residual VMware stuff. Check in your taskbar for any VMware program and shut them down.
Read: How To Install Android Apps In Ubuntu 20.04?
Download The Auto-Unlocker
Step 1: Go to Google Chrome and type Github.
Step 2: The unlocker is by Paolo Projects, and the latest release is Auto-Unlocker v1.1.3. Thus, scroll down and download the file Unlocker-x64.zip.
Step 3: After the download is complete, right-click and tap on Extract All.
Step 4: Click on it and run it as an Administrator. Tap on Yes and wait for a while as it starts downloading.
Step 5: Launch VMware and click on Create a new virtual machine. Tap on Next and click on Browse.
Step 6: Select your ISO file and click on Open.
Step 7: Click on Next, and you will be able to see the MacOS option now available.
Step 8: Select the Mac option and go down to choose the version of the mac you want to install.
Step 9: Furthermore, click on Next, select maximum disk size, and click Next.
This is the method to install VMware Unlocker on your PC. Moreover, if you do not know to get the VMware workstation in the first place, I have discussed the steps in detail below.
Install VMware Workstation Pro 16 For Auto-Unlocker
Step 1: Open your Google browser or any browser for that matter. Type Workstation 16 Pro and click on the Download link from the official website.
Step 2: It will direct you to the download page. Furthermore, click on Download Now and tap on Save File. The file is about 622 MB and will take a while to download.
Step 3: To begin the installation process, click on Setup.
Step 4: It will prompt you for a few things like License agreement and permissions etc.
Step 5: Furthermore, it will prepare for installation. Tap on Next.
Step 6: Click on Allow for terms and conditions.
Step 7: Tap on Next again, and then you can click on Change if you want to alter any inside settings.
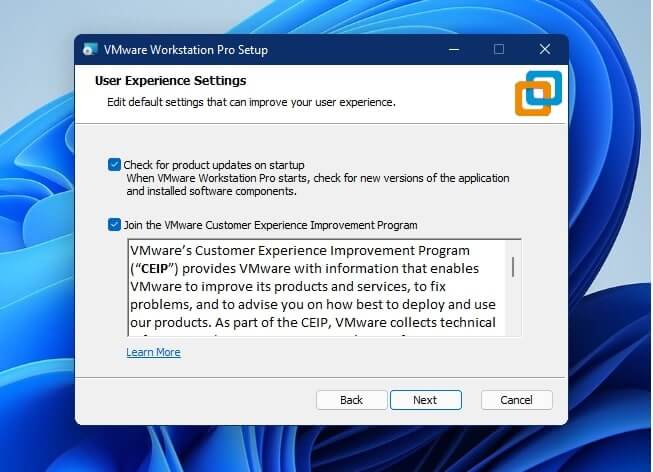
Step 8: For user experience settings, click on Check for product updates on Startup and Join the VMware customer experience Improvement Program. Moreover, click on Next.
Step 9: Select the Desktop and Start Menu Programs folder under shortcuts.
Step 10: Furthermore, click on Next and tap on Install.
P.s. If your PC is older than 2011, it can run into issues with support, virtualization and installation. But if your PC is newer and from 2011 onwards, it will support the VMware installation smoothly.
Complete Setup For VMware Auto-Unlocker
Step 1: After the installation is complete, two options will appear. The first is License and the second one is Finish.
Step 2: If you have a license, click on License and enter the number. If not, tap on Finish. However, it might still ask for a license key where you can enter the free trial license number.
Step 3: Click on Continue and wait for a while for it to load up on your screen.
Step 4: Moreover, click on Finish to complete the process.

With the free trial version, you can use all the features of VMware for thirty days. After the free trial ends, you have to either get a paid license or quit using it.
Conclusion
By installing VMware on your PC, you can get any MacOS to explore and create new stuff with. VMware unlocker’s latest patch update allows you to do the same for macOS Catalina and Mojave. This is a great tool to use macOS on your PC for those who use Linux and Windows.
Also Read: How To Install macOS Monterey Using Oracle VirtualBox?


