


 Header Through Cloudflare")


Are there WebP pictures you’ve downloaded to your Mac and would like to convert to JPEG format? If so, you’ll be happy to know that the Mac makes it easy to achieve this. The best part is that it comes built right into macOS. So there’s no need to download and install any other software.
Google’s WebP image format uses lossy and lossless compression methods. WebP images can be anywhere from 25-35% less in file size than those saved in the most used format, JPEG, with no noticeable drop in image quality. Despite the format’s apparent potential, compatibility problems frequently arise due to its low adoption rate.
You may need to convert the files before using them on another device. You email them to someone else. Changing WebP photos to JPG format on a Mac is easy with the help of the steps outlined later in this article.
Let us understand different Formats
You’ve probably seen many file types flash across your computer, but do you know what they all mean? A JPEG is a common image format, but what are PNG and TIFF? What file type allows for a background-less image? Underlying will address these issues and more.
1. JPEG
The Joint Photographic Experts Group (JPEG) is responsible for creating this format. Many people use it because their cameras and scanners can record a wider spectrum of colors in that format (JPEG works well for black-and-white photos, too). JPEGs are wonderful for saving space on your camera’s memory card, sharing online, or sending through email, but they are also compressed, meaning some detail is lost in the process.
2. TIFF
For images with a lot of fine detail, such as photographs, no compression method is applied to TIFF files, they are quite huge. Using the TIFF format when working with an image file on a Mac is a solid approach to preserving the highest possible quality. If you need to send the file to someone else, you should choose a compressed format like JPEG so that it doesn’t take up too much space on their end.
3. PNG
Portable Network Graphics (PNG) is a graphic format that may be easily transferred across devices. To easily place an image on top of another background. Its ability for a large color palette and transparency is a huge plus. Because of the lossless compression method used, all of the original image quality is preserved. Therefore, it creates more high-quality photographs than JPEG format, but with larger file sizes.
You can choose between the PNG-8 and the PNG-24 format. The latter is preferable for uploading photos with complex gradients, drop shadows, or other effects that require a wider color gamut and/or the ability to display partially transparent pixels (a smooth transition from one color to another, like a big sky). Compared to JPEG, PNG maintains the clarity of text and logos when uploaded online; this makes it a useful format for social network profile pictures.
4. GIF
Graphics Interchange Format (GIF) is a common image format used online. It’s ideal for web graphics with few colors (like cartoon art), a translucent background, or animation, and it generates a modest file size ( this column has more animated GIFs). This file format is still extensively used for animated graphics on the web or in a slide deck, although its use has declined since the advent of high-speed Internet due to the superior quality of PNG.
5. PSD
Adobe Photoshop and Photoshop Elements use the PSD format exclusively, while many other image editors can also read and write to this file type. Due to the format’s support for layers, it’s possible to store various elements, such as text, graphics, and picture edits, on their own individual “layers” within a single document. By saving in PSD format, you may safeguard your original image and continue making changes to the document at a later date without losing any of your layers(Layered Photoshop files can also be imported into Apple Photos.)
6. PDF
PDF stands for “portable document format” and is widely used to distribute documents online for reading or printing. To save a document in this format is analogous to snapping a photo of it: It has the same appearance and feels as the original, complete with fonts, graphics, and videos, but without requiring you to have the original program. All computers will be able to read and print from this file.
What exactly is WebP? What makes it different from.JPG and.PNG files?
WebP, short for “Web Picture,” is a Google-created image file format that supports lossless and lossy compression methods for storing image data. It reduces the file size of photos by 34% compared to JPG while keeping the same level of detail. We will examine it more deeply to understand better how WebP accomplishes these space savings.
Everyone is aware that pictures are just collections of pixels. This image format reduces data by “guessing” the color of pixels near a given pixel, reusing previously stored information. As a result, information about a single pixel can be reused multiple times without additional storage space.
Now that we’re done with color theory, let’s look at how to change Mac OS WebP photos to JPG or PNG easily.
Using Mac’s Preview application
Preview is a built-in app for viewing images on macOS. In addition to being able to view, edit, crop, and annotate photographs, Preview on the Mac may also be used to convert WebP files to JPG.
Although time-consuming, this method provides fine-grained control over the final image’s quality. Learn the steps here.
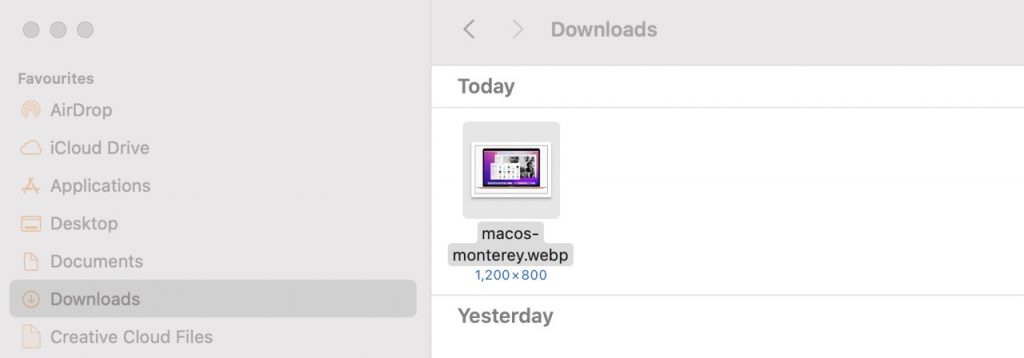
- The WebP picture can be viewed in Preview.

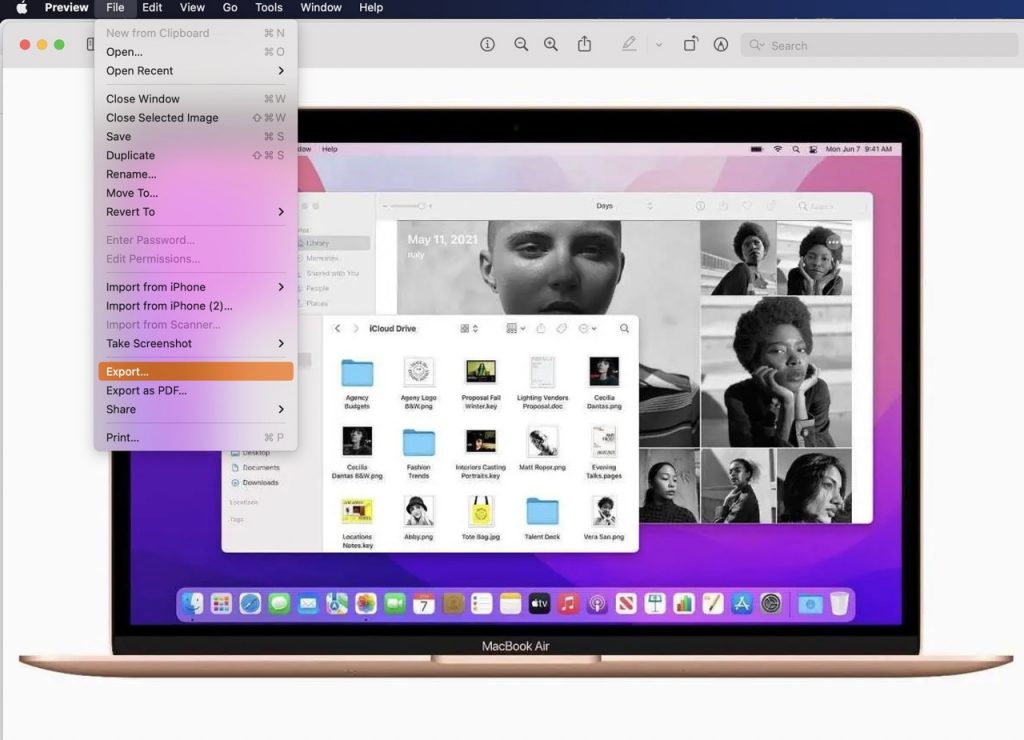
- Select File > Export from Preview’s main menu.

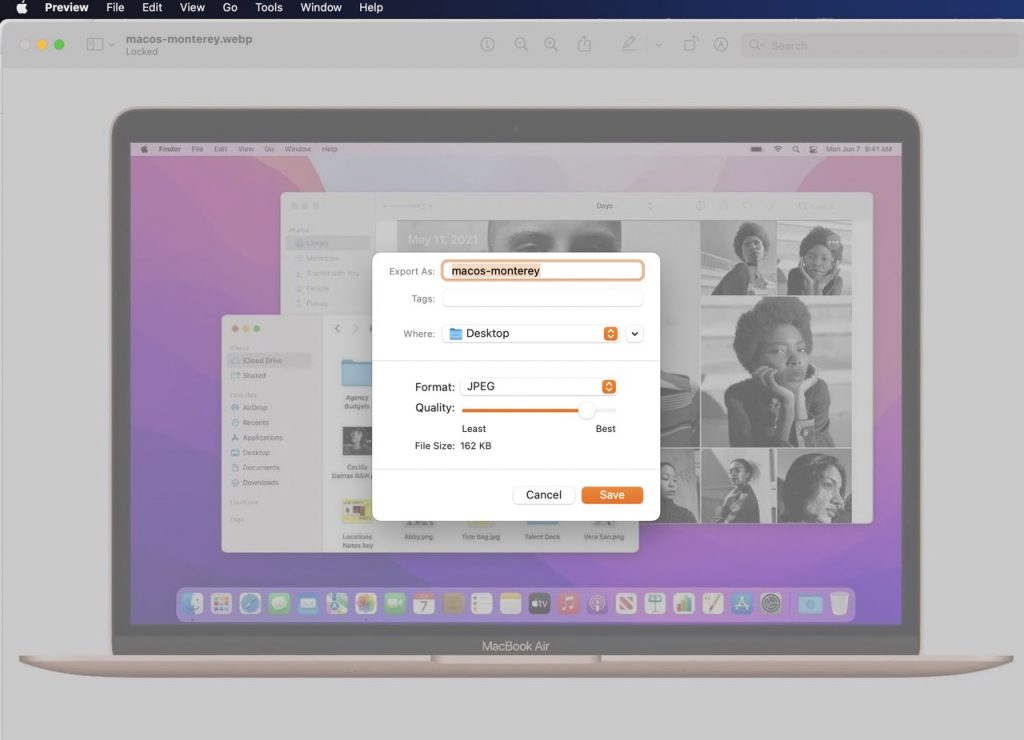
- It will prompt you to choose an export format for the image in a new window.
- JPEG, PNG, TIFF, and even PDF are just a few options for saving images online.
- Make changes to the image’s quality with the slider.
- After making your changes, remember to click the “Save” button.
For more information on how to use this method to convert WebP photos. Click System Preferences> Keyboard>Shortcuts>App Shortcuts, click the Add button and then select Preview. Add “Cmd + E” as a shortcut and paste “File Export…” into the menu item’s title.
The next you use Preview to convert WebP photos, you can easily access the Export box. Simply open the image and click Cmd + E.
Last Words
We trust that you were able to change the WebP photos on your Mac. To the more widely used JPEG format before sending or sharing them. Do you have any thoughts about converting files with the built-in Preview app? Do you have any additional files you’ve converted using Preview in macOS? Please comment below to tell us about your experiences and provide constructive criticism.


