


 Header Through Cloudflare")


Lately, it seems that some Windows 11 users are undergoing persistent issues with Autopilot.dll, precisely linked to the indexing of WIL data. This could potentially result in complications or failures when setting up new devices utilizing Autopilot. As the feature may not be able to access the crucial data from the WIL database.
Therefore, Autopilot.dll WIL errors in Windows 11 can usher in recurring crashes and unanticipated system restarts. Further, these errors are often triggered by events logged in the Windows Event Viewer.
What is autopilot.dll wil error and what causes this error to occur?
Windows Autopilot is a feature in Windows 11 that authorizes associations to be effortlessly set up. And configure devices for their users requiring minimal manual involvement. Autopilot.dll is a Dynamic Link Library (DLL) file that is a crucial part of the Autopilot service in Windows 11.
Further, the “indexing WIL error,” likely refers to an issue where Autopilot.dll is encountering errors. While indexing Windows Information Library (WIL) data. The WIL is a database that contains information about Windows settings, policies, and configurations. Autopilot uses this information to automate the setup process for new devices.
Also Read- How To Enable/Disable Show Labels On Taskbar Pins In Windows 11
Possible causes of the autopilot.dll wil error
- The Microsoft Account Sign-in Assistant Service has been identified as a potential factor related to Autopilot.dll WIL errors. Disabling this service may resolve the issue.
- If the Windows Information Library (WIL) data that Autopilot.dll leans on for indexing is corrupted or missing, it can result in indexing WIL errors. This can happen due to issues with Windows updates, software conflicts, or other system-related factors.
- Conflicts between Autopilot.dll and other software or services operating on the Windows 11 system can disrupt the indexing procedure and trigger errors. This can ensue if some conflicting third-party applications or services intrude with Autopilot.dll’s functionality.
- If Autopilot.dll has become outdated or incompatible with the Windows 11 operating system, it likely encounters difficulties while indexing WIL data, ushering in errors.
- In some circumstances, hardware issues such as disk errors or other hardware failures can furthermore induce indexing WIL errors in Autopilot.dll, as it depends on the integrity of system components to suitably index WIL data.
- There could be additional system-related factors such as misconfigurations, protection settings, or system fluctuation that can result in indexing WIL errors in Autopilot.dll.
Now that we know all the probable causes of this error, we will look at some likely fixes to resolve the autopilot.dll wil error on your Windows 11.
Also Read- How To Enable Or Disable Open Search On Hover in Windows 11
How do I fix the autopilot.dll wil error in Windows 11?
1. disable the Sign-in Assistant service on Your Windows 11 System
The Microsoft Account Sign-in Assistant service is a utility that assists users to sign in to various Microsoft apps. Thus, delivering a seamless sign-in experience. Nonetheless, in the context of the error related to Autopilot.dll, it has been observed that the only active service at the time of the error is the Sign-in Assistant service. Disabling this service might be a potential solution to resolve the error. By disabling the Sign-in Assistant service, you are essentially preventing it from running in the background. This could potentially eliminate any conflicts or issues that may be causing the error related to Autopilot.dll.
You can disable the Sign-in Assistant service by adhering to the steps given below:
Step 1: First, you need to hit the Window + R key together to open the Run command prompt. Then in the prompt that appears, type or paste services.msc and press enter to run it, which will then open the Windows Services manager.
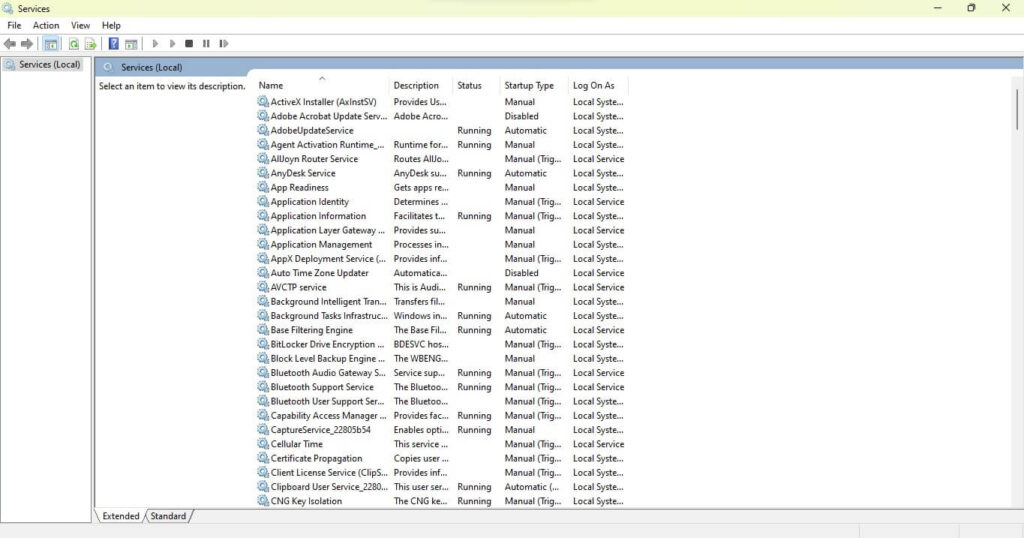
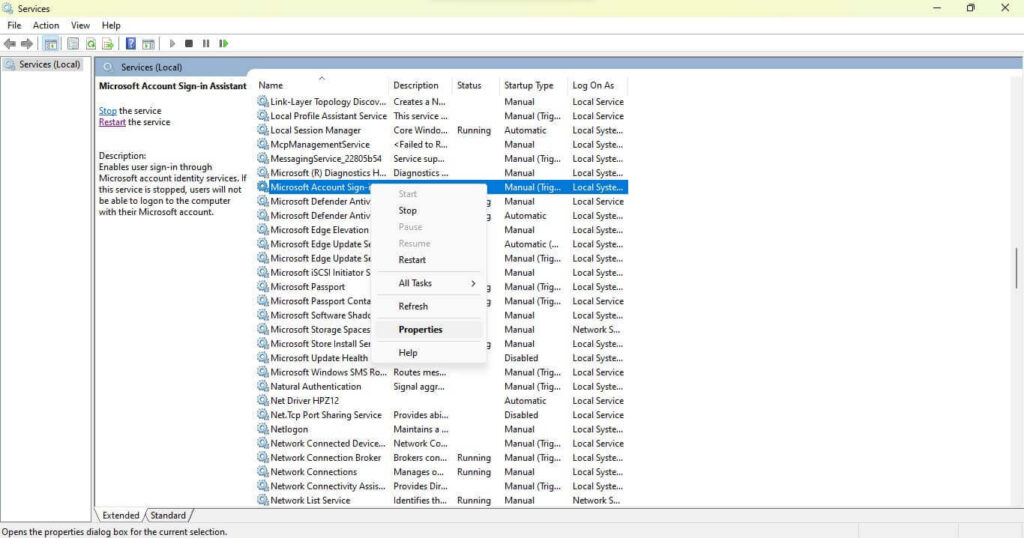
Step 2: Then in the Services window, scroll down and locate the Microsoft Account Sign-in Assistant service in the list of services and then right-click on the service and tap on Properties.
Step 3: After that, in the dialog box, under the General tab, tap on the Startup type drop-down menu, and simply select Disabled.
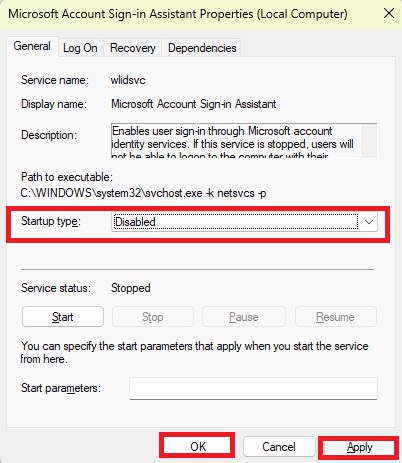
Step 4: Finally, you require to tap on OK and then click on Apply to save the changes. And then restart your PC to allow the modifications to take effect. After restarting, review if the issue with Autopilot.dll has been resolved.
2. Check for Pending Windows Updates
One conceivable solution to address the error is to assure that all Windows updates are installed. An outdated operating system can initiate various errors, such as the Autopilot.dll WIL error. To check for the latest Windows updates, you need to:
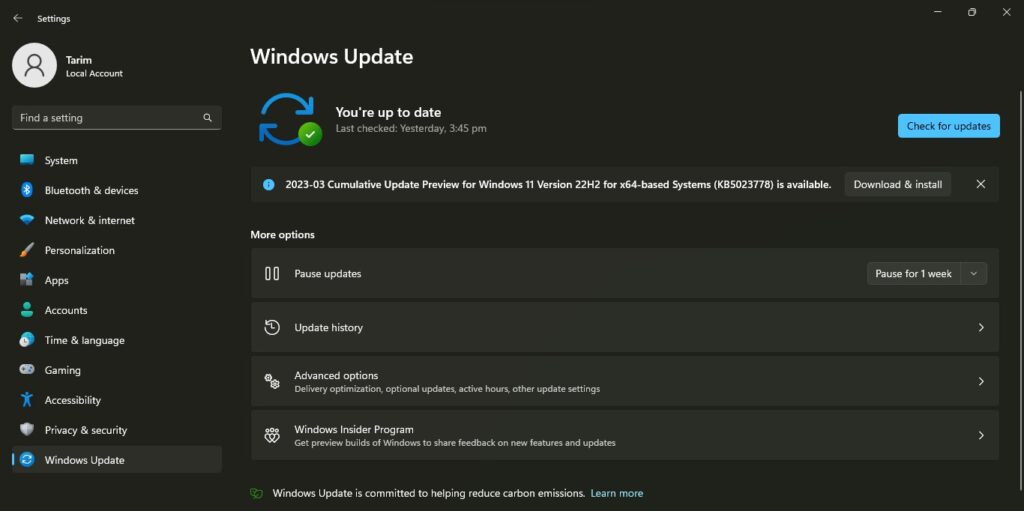
Begin by pressing the Window + I key together to open Windows Settings and then Click on the Windows Update tab. Further, all your pending Windows updates will display in that window.
Finally, install any pending updates and then check again to see if the issue has been resolved.
Also Read- How To Delete Windows.old Folder In Windows 11
3. Optimize your Windows System Image with DISM Commands
Running these DISM commands can detect and fix any problems with the system image. This can assist resolve errors like Autopilot.dll WIL errors. It assures that the system files are in an appropriate state, which can avert errors. As well as enhance the across-the-board soundness and performance of the Windows operating system.
You can fix the system image by following these steps:
Step 1: Start by opening a terminal by searching for cmd and then on the right pane you will see the Command Prompt. There you will notice the option of Run as administrator under the Command Prompt menu.
Step 2: Now, in the opened terminal, jot down or paste the following commands or codes one at a time, and hit Enter after each to run the scans:
DISM /Online /Cleanup-Image /CheckHealthDISM /Online /Cleanup-Image /ScanHealthDISM /Online /Cleanup-Image /RestoreHealth
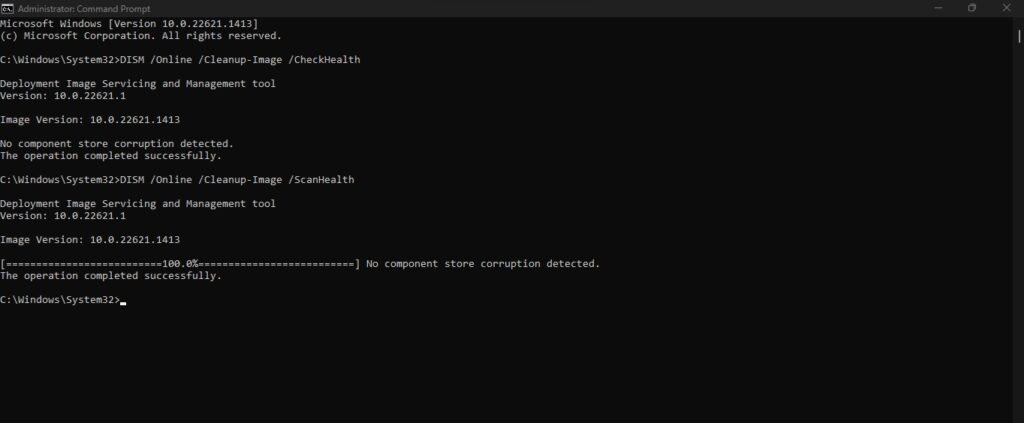
The Deployment Image Servicing and Management (DISM) tool will check all the components of your system. And fix any bad or corrupt sectors during the scanning process. Also, keep in mind that this scan can take a little while as the files can be a bit larger.
4. Disable XMP to Resolve compatibility issues
XMP is an element in some computer BIOS that authorizes for overclocking of memory modules, providing higher performance settings overextending standard specifications. However, utilizing XMP profiles may provoke compatibility issues, leading to errors like Autopilot.dll error.
Therefore, disabling XMP in the BIOS can resolve potential compatibility issues by reverting to default settings, ensuring stability and compatibility with a wider range of hardware and software configurations, and preventing errors linked to XMP profiles.
You can disable XMP in the BIOS by following the steps below:
- Initiate by restarting your computer and then during the restart process, you will see the manufacturer’s logo on the screen along with a key to access the BIOS settings. After that, you just need to press as well as hold that key till you notice the system boots into BIOS mode. Note that in some computers, you may need to press the Fn key along with the designated key to access the BIOS.
- After that, once you are on the BIOS page, look for the Overclocking settings, which may be located on the Advanced Settings page.
- Finally, search for the XMP also called the “eXtreme Memory Profile feature”, and disable it. Then, after disabling the XMP feature, save the changes and exit the BIOS.
What is the function or purpose of Microsoft Autopilot?
Windows Autopilot, a feature offered by Microsoft that facilitates the procedure of managing Windows devices, from their initial deployment to their eventual retirement. This functionality remains devised to benefit both IT administrators and end users correspondingly.
By utilizing cloud-based services, Windows Autopilot helps lessen the time and effort spent by IT personnel in deploying and managing Windows devices. Traditional techniques of device provisioning and management often require consequential manual intervention. Along with infrastructure setup, which can be time-consuming and complex. Windows Autopilot automates many of these tasks, authorizing IT administrators to quickly and efficiently deploy devices with minimal effort.


