


 Header Through Cloudflare")


When your computer has a bug, you might have had to completely reinstall the Windows 11 OS to fix it up. Whether or not the wireless network configurations also get deleted, along with other data, might be a question you’ve had. But, fortunately, it doesn’t go away. It will only show up again if you keep a copy of it on a specific file before you reinstall your computer. There is a need to take the backup and restore it again because you might not remember the passwords for the different SSIDs. You can’t keep all of your old profiles if you reinstall your computer. Your computer will have to make them all again when it does this.
Also read:How To Set Up Microsoft Family App On Windows 11
How do I connect to Wi-Fi on Windows 11 with the Taskbar?
You can use the taskbar to connect Windows 11 to Wi-Fi.
The network icon is on the left side of the taskbar. Click it to open the network. If you do this, the Quick Settings panel will be called out. You can see the wireless icon on this panel.
- Right next to the wireless icon, click the arrow button to the right of it.
- When you’re done, you can see the wireless connections that your device can pick up and connect to.
- Then, choose the wireless connection that you want to use to connect to it.
- You can see the “Connect” button for that wireless connection right there.
- There is a way to connect automatically. If you want your PC to automatically connect to this Wi-Fi network when you open it, you can choose it. Click on the Connect button.
- It’s time to type in the network security key (password).
- Press the next button.
Also Read: How To Remove Duplicate Files In Windows 11
How To Backup and Restore Wi-Fi Network Profiles
STEP 1: Run a command prompt as an administrator.
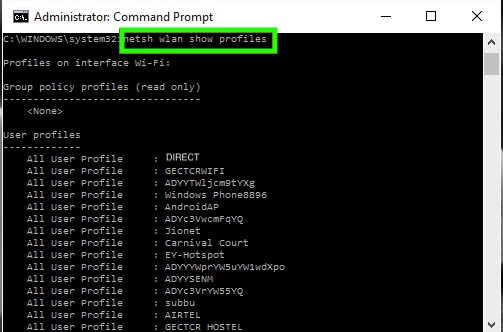
STEP 2 – We’ve always been inquisitive about the wireless networks to which we’ve linked our system, even from the start. To do this, type the command shown below into the Command prompt and hit Enter.
netsh wlan show profiles
They show you a list of all the SSIDs that your computer was connected to.
STEP 3: You need to save the network SSIDs and their passwords in a separate folder. Do this now.
To do this, type in the command and the interface will be made for it, so do that.
netsh wlan export profile key=clear folder=”C:\wnetwork”
To store the data, I have made a folder on the C drive called wnetwork. I’ll put the data there. You can change the path as you like.
Also, if you set “key=clear” in the command above, it saves the passwords for the keys that you set there as well. If you want them to be save, you don’t need to write “key=clear” in the command above as, or
netsh wlan export profile folder=”C:\wnetwork”
Also Read:Windows 11 Known Issues And Solutions
STEP 4: If you only want to back up one SSID, type the command below.
netsh wlan export profile “SSID name” key=clear folder=”C:\folder-name”
Suppose I need to save the information about the network DIRECT in the folder wnetwork, I should give the command as,
netsh wlan export profile “DIRECT” key=clear folder=”C:\wnetwork”
Hit the Enter key once you are done with this.You will get the message of successful interface creation.
STEP 5- is to move to the folder where you kept the backup files and look at the information there. XML files will be used to store the information
Also Read:Turn On Or Off Focus Assist In Windows 11
To Find Out How to Get the Wireless Network Information That You Saved.
STEP 1: Open up the Command Prompt in Admin mode.
STEP 2 – Now, type the command below to restore the information for all wireless network profiles.
Because we set user=current, this can only be seen by the current person because this is only for the current person.
netsh wlan add profile filename=”C:\wnetwork\profilename.xml” user=current
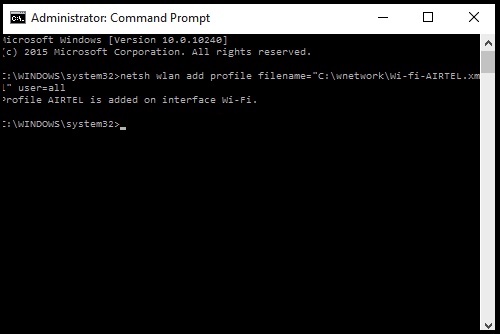
STEP 3 – Type in the command if you want the data to be exposed to everyone.
netsh wlan add profile filename=”C:\wnetwork\profilename.xml” user=all
Here my profile name is Wi-fi-Airtel.xml and it should be stored in the folder wnetwork in C drive.
STEP 4 – Go back to the folder and to your miracle, you see the files again, even after reinstallation of Windows. See the profile added into my wnetwork folder in the below given screenshot.
Also read:Set Up Parental Control On Windows 11- An Ultimate Guide!
The last words
That’s all. You can see that the netsh wlan command is very easy to use. It makes it very simple to manage your wireless networks. Hence, it has features that the GUI doesn’t have. So, It makes it easy to back up and restore wireless profiles in Windows 11.


