


 Header Through Cloudflare")


Windows 11 is one of the recent addition to the world of windows. There is no difference between the old windows 10 and the new windows 11 but a better version has some advanced features added to it. Windows 11 has been the new OS which has a lot of additional features which were demanded by the users by the past version. The new windows 11 has an addition to create the operation of the system which also includes of round edges to the icons and other features in the system.
Windows 11 is elaborating the list of visual changes for the users. The ongoing process of the upcoming windows 11 22H2 will help in squeezing even more visual changes and help in fixing bugs as well. One such addition of sticker on your desktop 11 can help you to spruce up your desktop.

Earlier desktop stickers were only available in the beta channel. You need to join Windows Insider Program. It is a free and easy-to-use tool that does not take more than 1 hour time to join insider the Program and install the latest updated application.
Moreover, such improvement or new introduction made by windows 11 is the Desktop stickers. This feature helps in the OS which helps in the addition of different kinds of stickers in the background of the desktop. This option comes unsegregated with the OS. You must enable the desktop sticker in windows 11 to use them on your system.
If you require some help in this, then you are at the right place. This article will help you with how you should enable the desktop sticker on Windows 11. Here you will see how you can add and use the desktop stickers.
Also Read: How To Enable Or Disable Desktop Stickers In Windows 11
Here are some steps on how you can enable desktop stickers in Windows 11:
- Select the search button next to the start icon on the taskbar. Search for Registry Editor and once you can see the Registry Editor press enter key to go in-depth.
- Select on the navigation bar which is present on top of the Registry Editor tool. Now paste the address which is given below and press the enter key. HKEY_LOCAL_MACHINE\SOFTWARE\Microsoft\PolicyManager\current\device
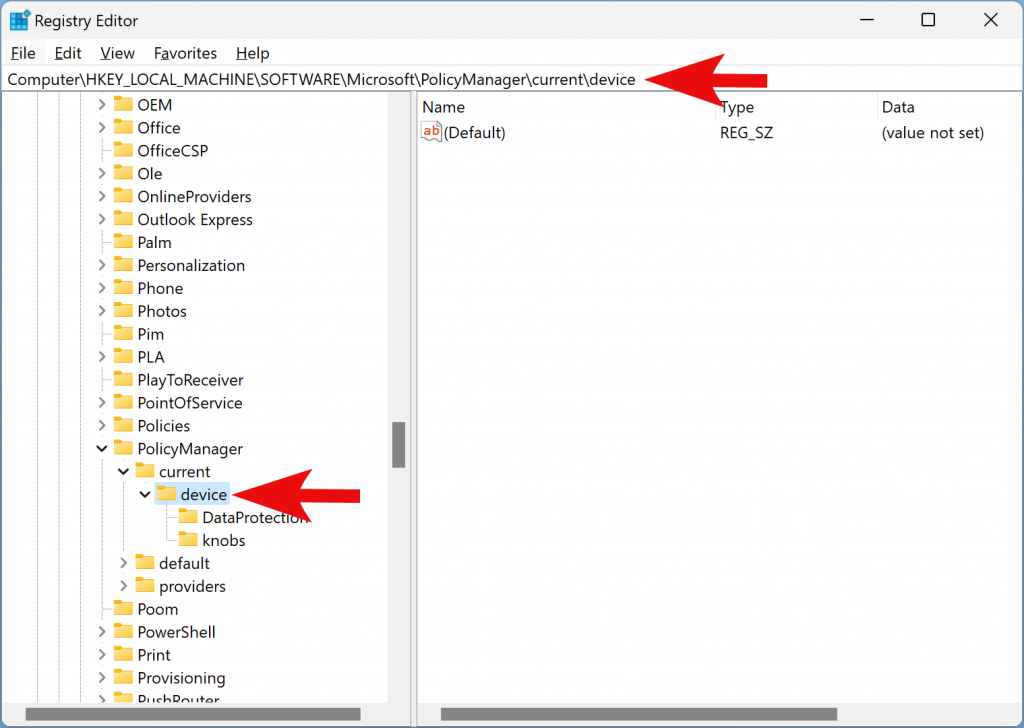
- Double or right click on the folder called DEVICE from the left side pane of the windows. Take the cursor to NEW and then select option KEY from the drop-down menu.
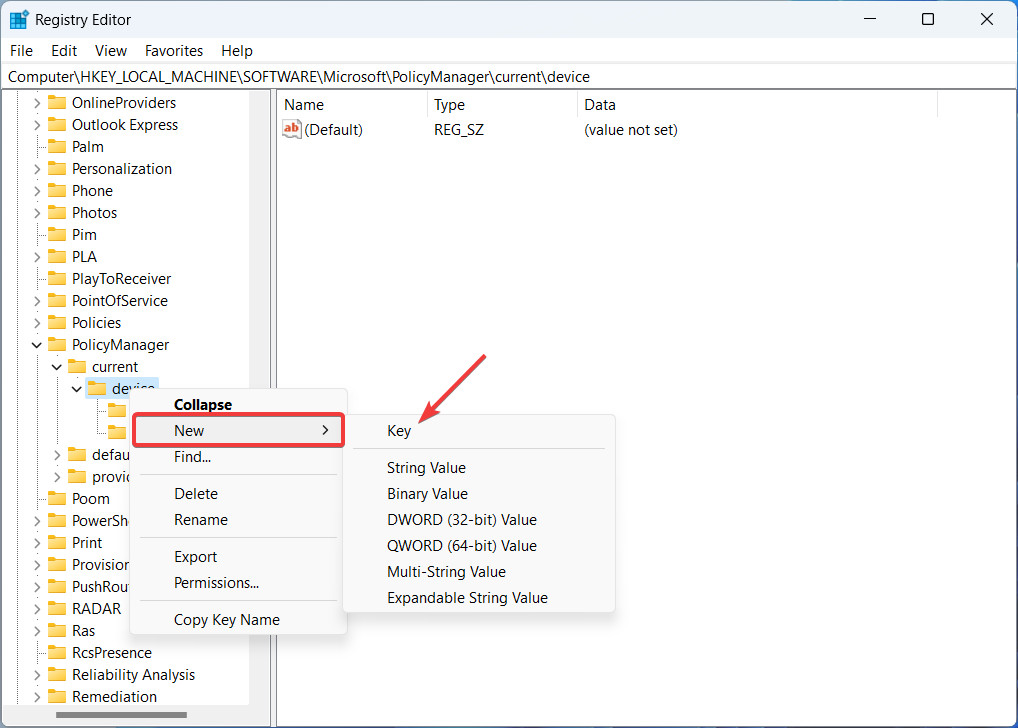
- Now you are supposed to rename the new key as STICKER and press enter( so that it is easy for you to find it)
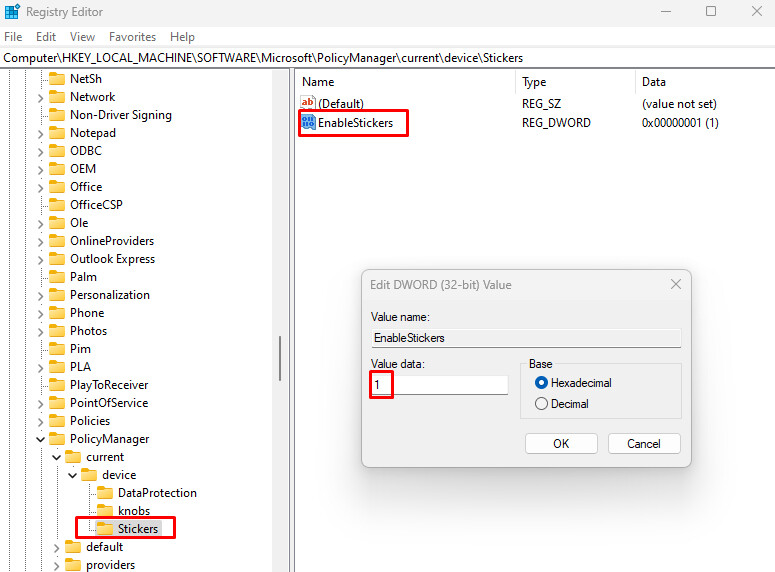
- Double-tap or right-click on the sticker which you renamed. Take the cursor to the empty section on the right. Right-click on the empty pane. Take the cursor on NEW and select DWORD (32-bit) Value.
- Further, rename the new value created as Enable Stickers and press ENTER
- Double press the ENABLE STICKERS file and you should edit the VALUE DATA for the same thing as 1. Now leave everything and press OK to accept the given command.
- However, now you can restart your Windows 11 device. You can find that along with the WALLPAPER section, you can see the option to set STICKERS.
How to Add/Remove Stickers in Windows 11 Desktop:
Since you have completed the process to enable the desktop sticker in Windows 11. It’s time you use the same features to customize your desktop. Now to do this, you need to follow the simple steps given below.
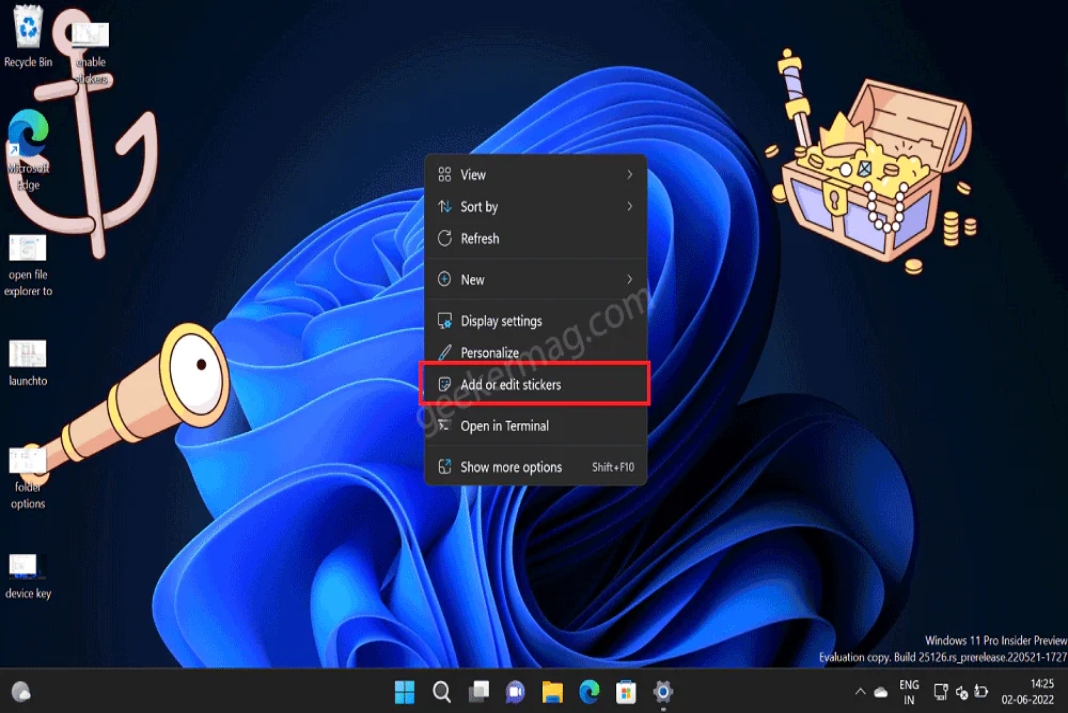
- Double click on the empty side of your WINDOWS 11 DESKTOP. Now from the drop-down menu, select the section called ADD OR EDIT STICKERS.
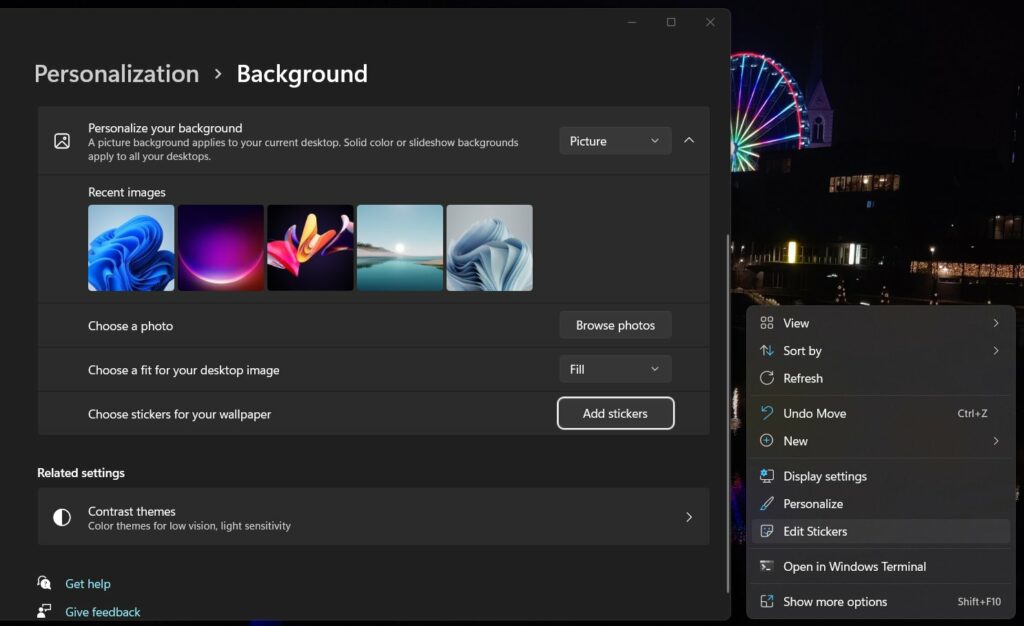
- Here, the sticker option window will be visible on the screen. Now you can SURF for INDIVIDUAL STICKERS you want according to your requirement. When you find the perfect sticker you want for your desktop, SELECT THE SAME.
- The sticker which you have selected will be visible on the top left section on the screen. You can click the same MOVE THE STICKER anywhere on your desktop.
- If you are willing to delete any sticker from your desktop. You can SELECT THE STICKER and then click on the Trash icon below the same.

- Therefore, now you can close the sticker pane by exiting the window.
Also Read: How To Add And Remove Favorites In File Explorer Home In Windows 11
You can access the Sticker option after you enable sticker on windows 11
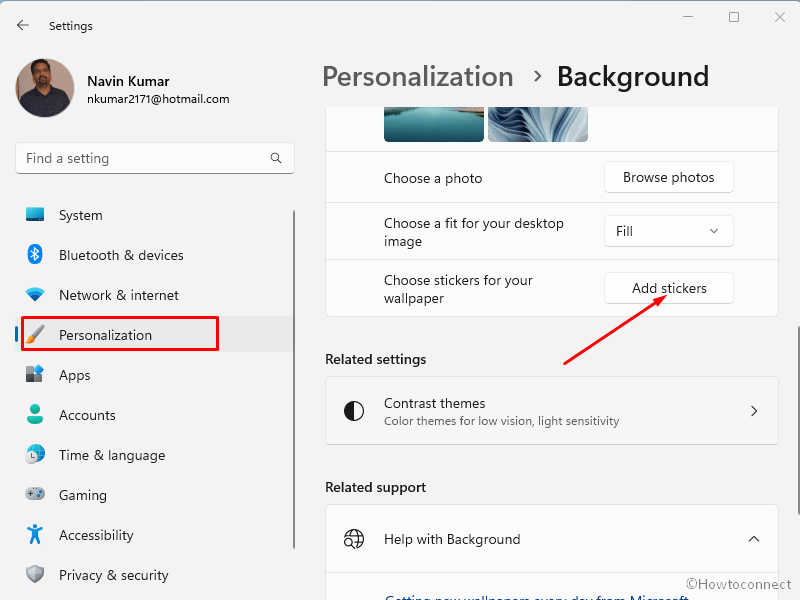
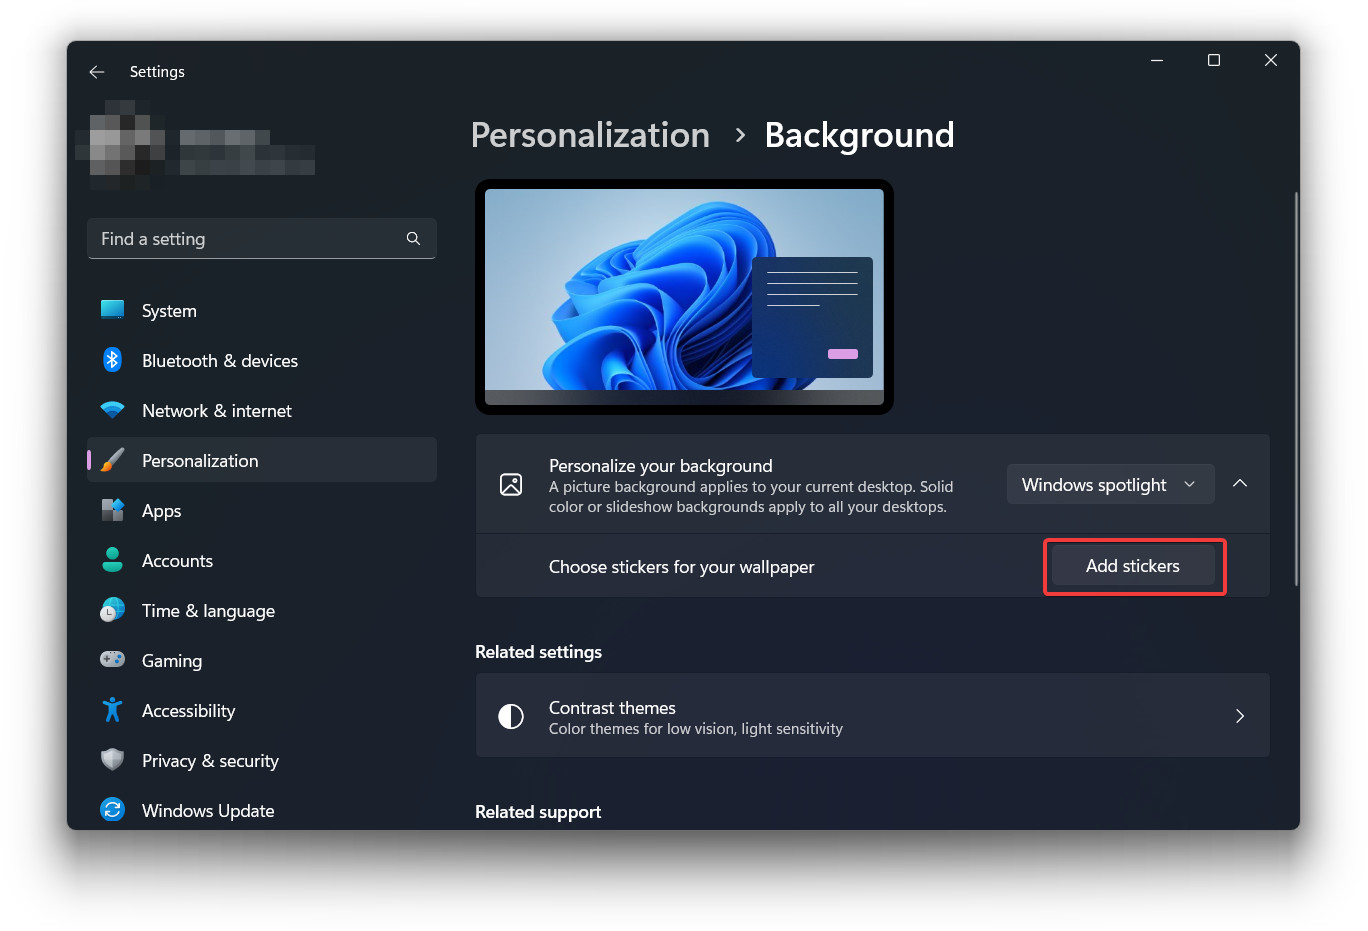
- Open setting from start on the taskbar
- Now personalize from the left section of the windows
- Click on the background to proceed
- Finally, click on the option named CHOOSE STICKERS FOR YOUR WALLPAPER.
- Now you are eligible to use the stickers option as explained in the above procedure.
Using desktop stickers on Windows 11
It’s important to know that desktop stickers are still an experimental process. However, this feature does not work as it is advertised. As a result, for instance, we got an issue in displaying them on the desktop screen. When you add stickers, the desktop doesn’t show desktop icons and taskbar when you’re picking up a sticker. Therefore, if your having any problems give a quick restart to your PC.
Also Read: How To Show Drive Letters Before Or After Drive Name In Windows 11


