


 Header Through Cloudflare")


![[Interview] The Future of Screen Experiences ②: From Watching to Understanding With Vision AI Companion](https://www.hawkdive.com/media/samsung-tvs-and-displays-vision-ai-companion-interview_thumb932-218x150.jpg "Exploring Vision AI Companion: Transforming Screen Experiences for Users")


The automatic Repair tool is an embedded repair tool for Windows which diagnoses the problem if Windows fails to boot successfully on your PC. However, the irony is that even the Automatic Repair tool may face issues sometimes. Automatic Repair tool may fail to diagnose the issue and present you with an error prompt saying ‘Automatic Repair couldn’t repair your PC’ and you may need to fix the Automatic Repair loop in Windows 11.
If you are struggling to make the Automatic Repair tool work on your Windows 11 PC, don’t worry!
In this article, we are showing you some effective ways to get out of the Automatic Repair loop in Windows 11.
Also Read: How To Check And Free Up Disk Space On Windows 11
Use Command Prompt to access the options of Boot Menu
It is possible to fix the Automatic boot errors in Windows, partition the boot sector using bootrec.exe. Let’s see how to make it work:
- Choose the Troubleshoot option and then open Advanced options.
- Now choose Command Prompt from among the different options.

- When the Command Prompt window opens, enter these commands:
bootrec.exe /rebuildbcd
bootrec.exe /fixmbr
bootrec.exe /fixboot - It is also advised to use chkdsk command with bootrec.exe when you are stuck in these situations. The chkdsk command diagnoses the metadata of the hard disk or errors if any. So try the following commands:
chkdsk /r c:
chkdsk /r d: - Now restart your PC and check if the problem is resolved.
Boot Windows 11 in Safe Mode to fix the Automatic Repair loop in Windows 11
The System File Checker can only detect and correct the corrupted file system using the Windows 11 recovery image. However, the SFC command will not be able to diagnose the problem if there are corrupted files in the replacement image itself. In this scenario, we have to use the Deployment Image Servicing and Management (DISM) to fix the install.wim image.
Let’s see the details of this method:
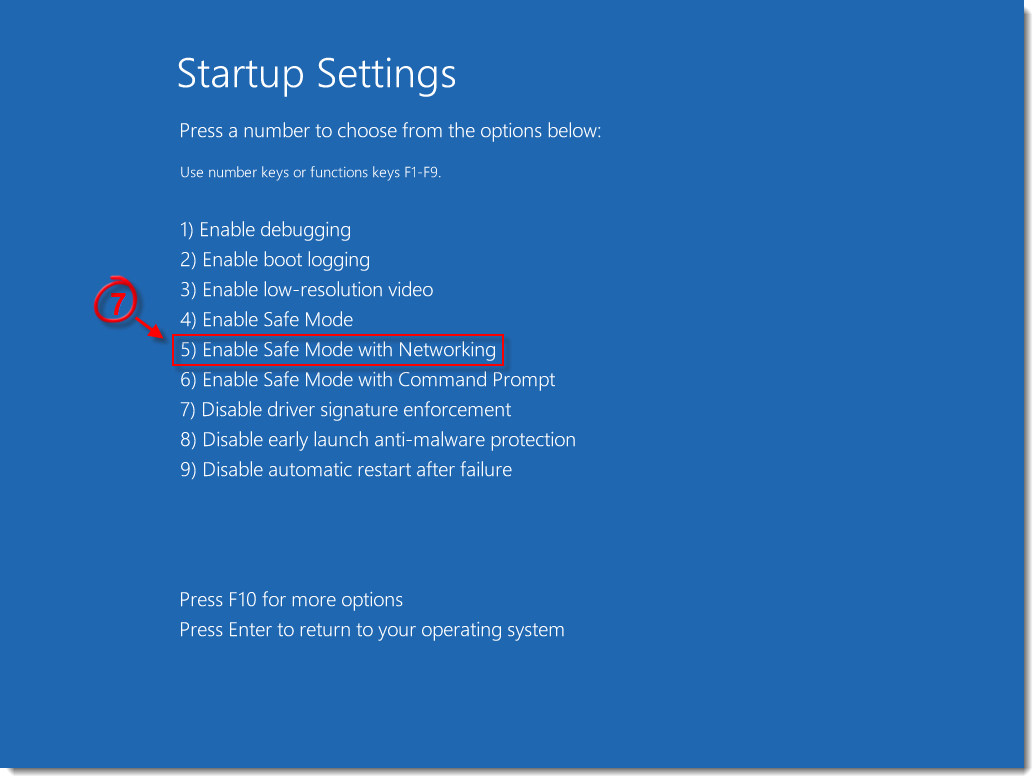
- Head to Troubleshoot > Advanced options > Startup Settings on your Windows 11 PC.
- Now choose to Restart your PC.
- When your PC restarts, choose the ‘Enable Safe Mode with Networking’ option from the list.
- Now your Windows 11 C will start in Safe Mode.
- In the Safe Mode, you may feel that there is a driver issue in the software you are using. In this case, visit the manufacturer’s website and install the updated driver.
- After this press, the Windows key and choose Command Prompt (Admin) from the start menu.
- Now enter the following command and press the enter key:
DISM /Online /Cleanup-Image /restorehealth - Now Windows 11 will begin restoring the health of your PC which will take some time.
- Once this cleanup is done, restart your Windows 11 PC and install the driver you’ve just downloaded.
Run the Windows Startup Repair to fix Automatic Repair loop Windows 11
Another effective method that can fix the problem is Windows startup repair of Windows 11. Let’s see how to make it work:
- Navigate to the Advanced option from the blue screen and press the enter key to choose it.
- After this press the Troubleshoot button and then choose advanced options
- Finally, choose the Startup Repair option and this will allow Windows 11 to diagnose the issue.
- Wait for some time until the diagnosing process is complete. Now restart the PC and try again.
System Restore your Windows 11
System Restore is another viable solution to fix the automatic repair loop in Windows 11. When you are unable to boot Windows 11 on your PC, it is advisable to boot your PC through the Windows installer DVD or USB drive. Follow the steps given below:
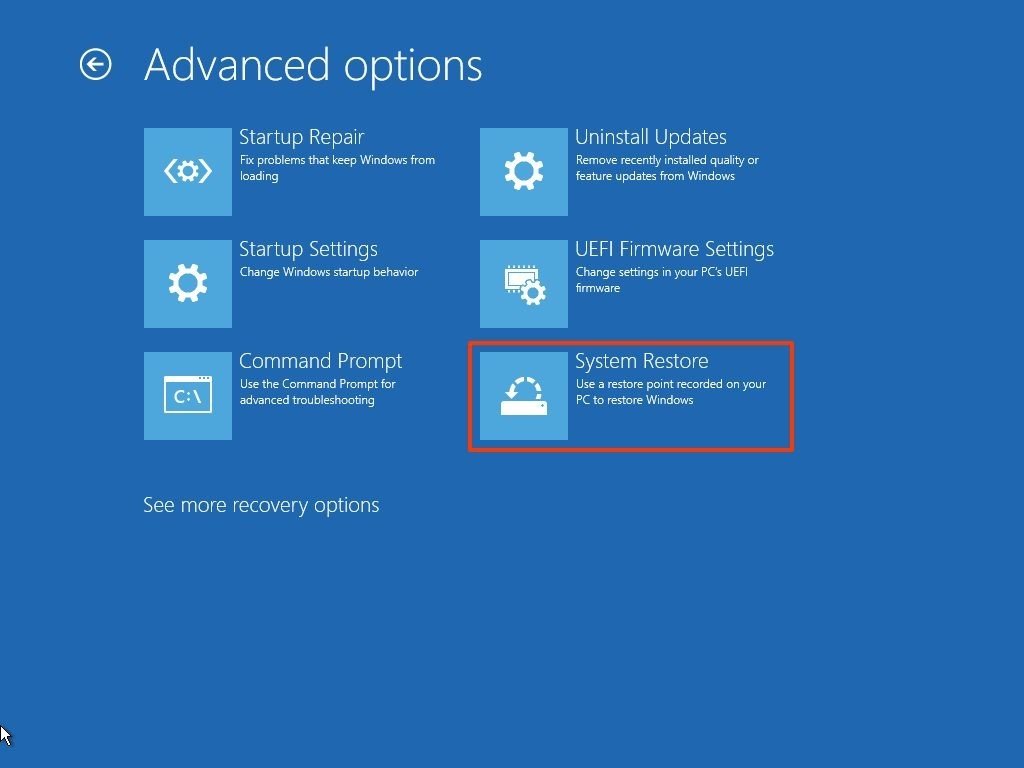
- On the blue screen, choose the ‘language and other preferences here.
- Now use the Install button and then press the Repair button from the left panel.
- Now choose the Windows Operating System to repair option.
- Pick the System Restore option from the menu.
- Now follow the on-screen instruction and begin the Windows installation process.
- Now restart your PC. Hopefully, this time you will not encounter any issue in starting the Windows.
Also Read: How To Optimize Windows 11 For Gaming
Conclusion
These are some of the viable methods to fix Windows 11 PC stuck in an automatic repair loop. You can try one or all of the above methods to fix this issue. If the problem still exists, you should go to a Windows Repair Outlet. Hope this article was of use to you, don’t forget to share it with others.


system restore not working