


 Header Through Cloudflare")


![[Interview] The Future of Screen Experiences ②: From Watching to Understanding With Vision AI Companion](https://www.hawkdive.com/media/samsung-tvs-and-displays-vision-ai-companion-interview_thumb932-218x150.jpg "Exploring Vision AI Companion: Transforming Screen Experiences for Users")


In the digital era, storage is the easiest thing to get yet it is never enough. The high quality and huge media files, videos, apps, and games occupy a large chunk of space on your hard drives that you’re always running out of space. Besides the necessary files, a huge amount of temporary files, caches, archives gather and eat up your hard drive’s space so it becomes necessary to free up disk space on Windows 11.
Further, if you’re running low on space, it would not be possible to store important files, download drives, updates, and more. You may even experience a lethargic performance of your PC after you upgrade to Windows 11.
Is your PC running out of disk space after you’ve switched to Windows 11? Do not worry, in this detailed guide, we have put down everything that can help you manage and free up disk space on your Windows 11 PC.
Also Read: How To Install Android Apps In Ubuntu 20.04?
Examine the space on your Windows 11 Hard Drive
First of all, let’s see how much space has been occupied and how much space is still available for use on Windows 11. This will also give you an idea of what is occupying the precious space on your Hard Disk drive so that you can free up the disk space before running out of space altogether.
Let’s see how to check the storage space on your Windows 11 PC:
Also Read: How To Install Windows 11 On An Android Phone?
Use File Explorer to Check the Disk Space
- Head to the Windows 11 Files Explorer on your PC.
- Now choose the ‘This PC’ option; this will bring up the ‘Device and drives’ menu of Windows 11 Files Explorer.
- In this section, you will see the total disk space and how much disk space is still free for your use.
- Now right-click on any drive and choose the Properties option.
- It will open up the Properties dialog box. Here you can see all the information above that particular drive such as total drive space, space already occupied and the total space still free for use.
Check the App Disk Usage using Windows 11 Settings
If you want to inspect the disk space occupied by any software or app, follow the steps below:
- Launch the Settings app on Windows 11 and open the Apps from the left pane.
- Now choose the ‘Installed Apps’ option and see the space occupied by them.
- It is also possible to sort the apps according to the space occupied, file name, and date modified.
How to create Disk Space on your Windows 11
Now that you know that you’re running out of space, it’s time to unclog your disk by deleting temporary files, folders, and data to speed up your Windows 11 PC. Let’s take a look at different ways that can help you create free space on your Windows 11 PC.
Also Read: How To Fix ‘This App Can’t Open’ Error In Windows 11
Free Up Hard Disk Space after Installing Windows 11
When you install the latest Windows 11, the process makes a recovery file which is the duplicate copy of the previous Windows you were using. This huge folder generally named ‘Windows.old’ occupied as much as 12-20 GB space of your C: drive. Besides this enormous folder, you will also find temporary files of the previous version when are no longer needed now. If you’re running low on space, you can get rid of these recovery files to create your disk space. Let’s see the detailed process of doing so:
- First of all, you need to use the Win+I shortcut key to access the Windows 11 Settings.
- Now choose the ‘System’ option in the left pane of Settings and then scroll down the right side of the window and click on Storage.
- Next, choose the ‘Cleanup recommendations’ option in the Storage Management tab.
- Now choose ‘Temporary files’ in the new window.
- Wait till the scan completes; this might take a while.
- After the scan is completed, tick the checkbox for the ‘Previous Windows the installation(s)’ folder under the temporary files option.
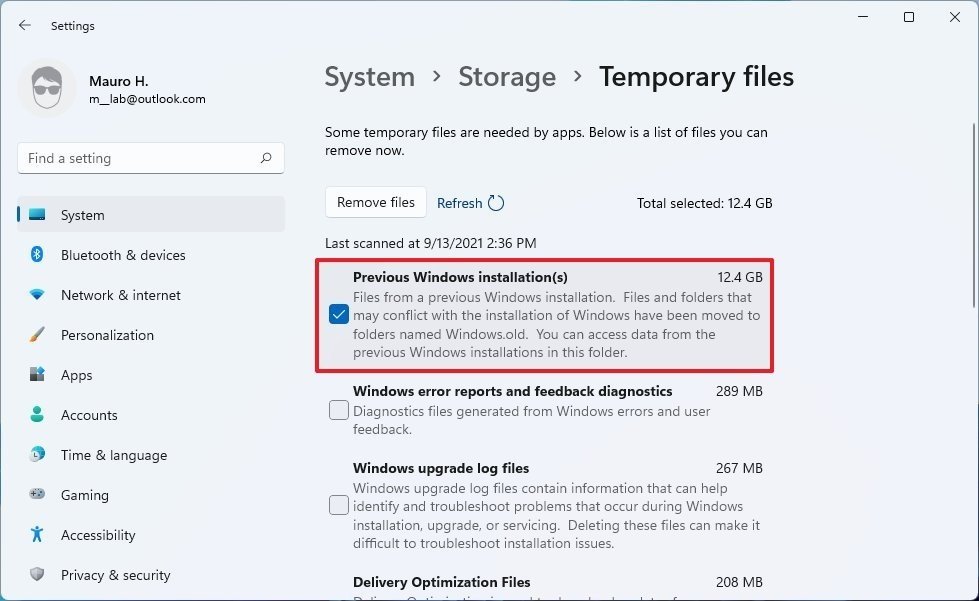
- Finally hit the ‘clean up’ button in the pop-up.
- Now will have for a few minutes as Windows 11 will clean up the files; after the cleanup will be completed, a huge amount of storage space will be cleared on your hard disk.
Cleanup recommendations to make space on Disk
Microsoft has given a new tool called ‘Cleanup Recommendations’ in your Windows 11 PC that can assist you in creating free space on your hard disk drive. Let’s see how to free up disk space on Windows 11 using cleanup recommendations:
- First of all, you need to open Windows 11 Settings App on Pc.
- Now choose the System option then Storage and finally you can access the ‘Cleanup recommendations’ feature in Settings App.
- Now you will go to the cleanup recommendation window on your Windows 11 PC.
- Here you will see four drop-down options, they are: Temporary filesLarge or unused files
Files synced to the cloudUnused apps - Now what you need to do is to tap each drop-down option and choose the recommended item for the menu to delete them.
- Option 1: Temporary Files In this drop-down, you will find the folders and folders of the previous version of Windows, Recycle bin, and the downloaded files.
There is another tab called ‘See advanced options. It displays all the temporary files on your disk; larger files on top. What you need to do is to tick the boxes near these files and then press the ‘Remove Files’ button.

- Option 2: Large or unused files
In this drop-down, you will find the heavy and unused files that are cluttering your PC for a long time. These files will be displayed according to the descending order of their size and you can tick the check box next to them and then hit the ‘Clean Up’ button. - Option 3: Files Synced to cloud Here all the files that have been synced to One Drive-Microsoft’s Cloud Service will be displayed. This means you can delete these files from your PC to create space on it.
- Option 4: Unused apps
All the apps you haven’t used for a long time will be listed here. Windows 11 will recommend these files to delete them and create some space. Here also you can tick the checkboxes next to the apps you want to delete and then hit the Clean Up bottom.
Also Read: How To Boot Windows 11 In Safe Mode
Delete Unused or Redundant User Accounts on your PC to create space
Whenever a new user account is created on your Windows 11 PC, the same name folder is also created. When we start using that user account the size of the folder grows huge. These user account folders all the files, folders, and settings specific to that user account. So if you have many user profiles on your PC and some of them are abandoned, then you can delete them to create space on your disk. Let’s see to free up disk space on Windows 11:
- First of all, you need to open the Settings App on your Windows 11 PC.
- Now choose the ‘System’ option from the left pane of the Settings window and then choose Storage from the right side of the window.
- This will allow you to access the Storage page of your PC. Open the ‘Other People’ folder present under Local Disk (C:).
- In this window, you will be able to take a look at the space occupied by the user accounts on your Windows 11 PC.
- If you want to reduce the space taken up by the user account, choose the ‘Manage other people’ option in this window.
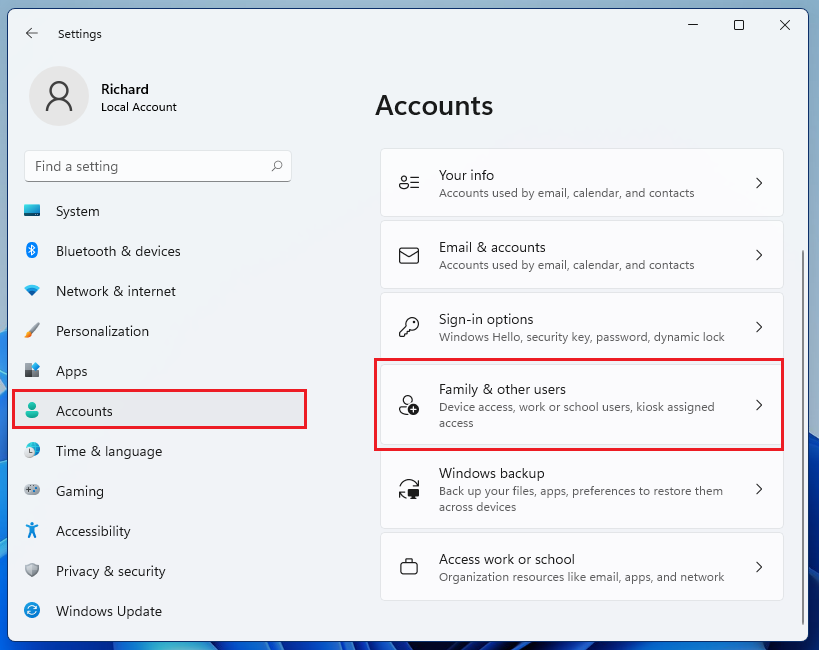
- Now you will directly reach the ‘Family & other users’ window. This window will display you the list of all the user accounts currently on your PC.
- Now tap the user account that you don’t have anymore and click the ‘Remove’ button.
- To do this, you can also go to the ‘Family & other users’ window directly by tapping the Accounts option in the left panel of Settings and then choosing the ‘Family & other users’ option from the right side of the window.
Turn on the Storage Sense option in Windows 11
Windows 11 offers another maintenance feature in Windows 11 that intelligently finds and deletes cached files, temporary files, and folders, and empties the recycle bin of your PC. This feature will automatically perform these actions without your intervention. Let’s see how you can enable and set up this feature on Windows 11:
- Head to the Settings App on your Windows 11. Now choose the ‘System’ option from the left panel and the Storage option from the right side.
- Next, go to the Storage management tab and enable the switch for the ‘Storage Sense’ feature.
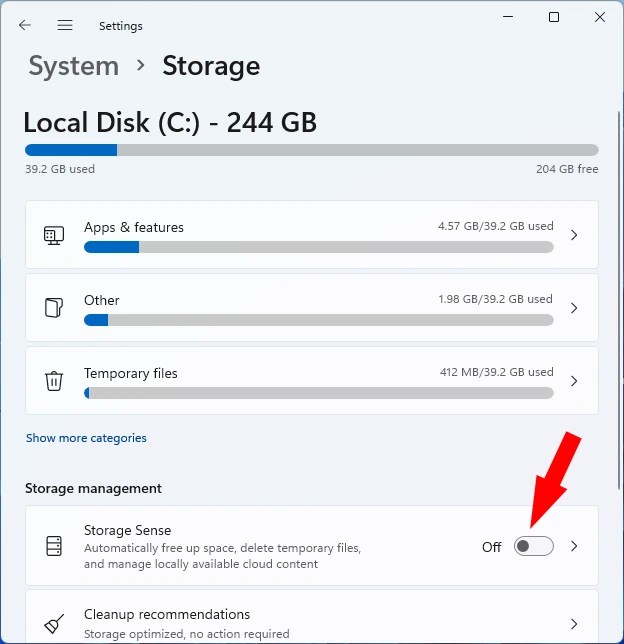
- Now you will have to configure this feature; click the right arrow near the ‘Storage Sense’ feature to find the several options under it.
- Check the check box for ‘Cleanup of temporary files so that Storage Sense can dispose of the temporary files whenever it gets to work on your Windows 11 PC.
- Now check the option ‘Automatic User content cleanup’ so that the storage sense can automatically get to work when the disk space is running low on your PC.
- Similarly, you can permit Storage Sense to delete the downloaded files if you’ve not accessed them for a set number of days. It is set to ‘Never’ by default but you can change it to ‘1’, ’14’, ’30’, or ’60 days’.
- Storage Sense also has an option to create space on your Windows 11 by getting rid of those unused files that are already synced to Microsoft’s OneDrive. But if you check the ‘Always keep on this device’ checkbox for this file, it will be deleted.
- After you apply all the settings, Storage Sense will automatically get to work according to the schedule that you’ve set.
Use Disk Cleanup tool on Windows 11
To create space on your disk you can also use the very efficient Window’s Disk Cleanup tool. This in-built tool has a good reputation for effectively cleaning cache, temporary files, and junk files to make space on your disk. Disk Cleanup is a very old maintenance tool of Microsoft and lets you remove temporary files. Let’s see how to use this tool on Windows 11 PC:
- First of all, you need to open the Windows 11 Start menu. Now type ‘Disk Cleanup’ in the search bar and choose the first suggestion you see in the search results. Note: You can also open the run command prompt by using the Windows+R shortcut key. Then type ‘cleanmgr’ and press the enter key.
- A disk cleanup dialog box will open on your Windows 11 PC. Here you will have to pick the drives that you want to scan for junk files. By default, the C: drive will be selected here. After making the choice, press the Ok button.
- If you want to scan some other drive choose the different drive from the drop-down menu and press the OK button.
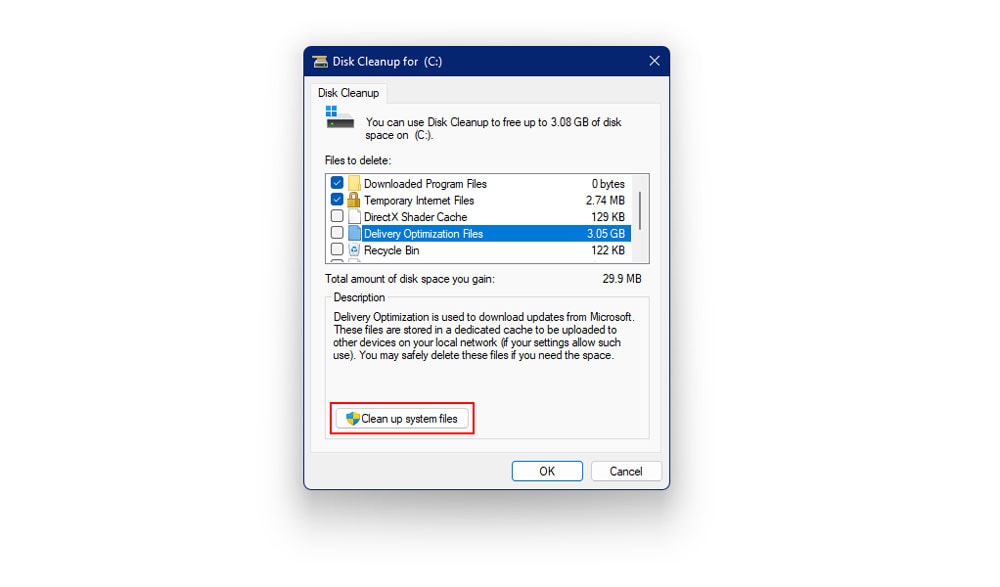
- All the junk files, temporary files, and caches occupying your drive’s space will be listed when the scan is completed. Generally, you will find Downloaded Program Files, Temporary Files, Recycle Bin folder among the already selected files by default.
- If you want to delete any other file, just check the box near that folder in the pop-up.
Finally, press the ‘OK button to allow the disk cleanup tool to dispose of these files. - Apart from these files, there are some more Previous Windows Files, System error memory dump files, and more huge junk files. To access these files in the disk cleanup tool, you will have to press the ‘Clean up system files button.
- Now choose the C drive in the Drive Drop Down and press the OK button.
- Now your system will begin scanning your disk drive to find these files.
- After the scan ends, select the files you want to delete.
- When you finish making the selection just press the Ok button.
- Finally, press the ‘Delete Files’ button on the confirmation pop-up window to delete these files forever.
Empty the Recycle Bin Folder
If you are not aware of what the Recycle Bin is for, let’s explain. When you remove any file or folder from your drive by hitting the delete key on your keyboard or by right-clicking that file and folder and choosing the Delete option from the context menu, it is not deleted forever; it is moved to the Recycle Bin. So all the deleted files and folders are present in the recycle bin and lay there forever until you manually empty the recycle bin.
The recycle bin folder occupies a large amount of your PC’s disk space without you knowing. So it’s a good idea to periodically empty the recycle bin folder so that it does not take up a lot of space. Let’s see how to clear the files and folders from the Recycle bin.
- Open the Desktop on your Windows 11 PC and look for the Recycle Bin folder.
- Right-click the icon and press the ‘Empty Recycle Bin’ option from the context menu.
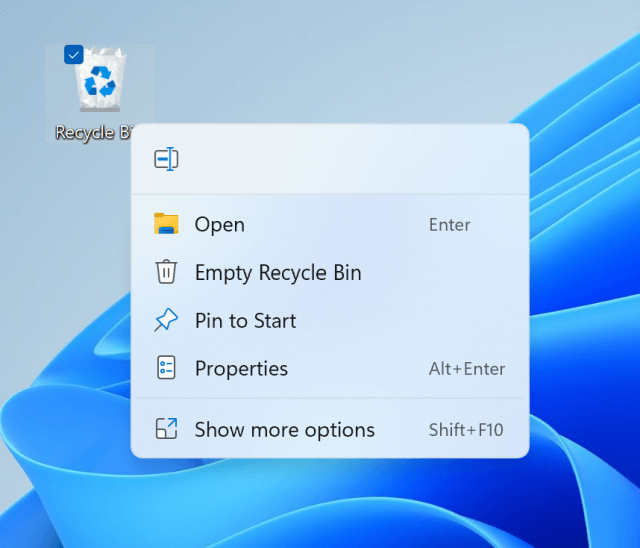
- A pop-up window will open that will ask you to confirm the action. Click the Yes button to get rid of these unwanted files from the recycle bin forever.
- You can also open the recycle bin folder and restore the files you want to keep.
- Then press the ‘Empty Recycle Bin’ button from the top of the file explorer menu the bar.
Delete System Restore Points in Windows 11
Whenever you bring up an important change in your Windows 11 PC such as installing a program or deleting one, downloading windows updates, or installing new drivers, your Windows creates restore points on your PC. Your PC can easily get back to the optimized state if anything goes wrong while applying these major changes if anything goes wrong.
As much as the System Restore Points are useful, they take up a hefty amount of your system’s space. If you are running low on space after upgrading to Windows 11, you can delete these System Restore Points to create more space. Alternatively, you can also disable this feature so that the restore points are not at all created on your Windows 11 PC. Let’s see how to erase the system restore points created on your PC:

- First of all, you open the Start Menu on your Windows 11 PC and type ‘System Restore’ in the Windows 11 Search bar. Now choose the ‘Create a restore point’ feature of the Control Panel from the Search Result.
- Another method is to simply use the Win+R shortcut to open the Run dialog box on your Windows 11 PC and type ‘sysdm.cpl’ in the search bar. Finally hit the Enter key.
- Now go to the ‘System Protection’ section in the System Properties dialog box. Now you need to select the Local Disk (C:) in the Protection Settings. After this, hit the ‘Configure’ button.
- Now press the Delete button present in the Disk Space usage section. This will erase all the stored restored points in that drive.
Conclusion
Here we reach the end of our detailed guide on how to check and free up the disk space on your Windows 11 PC. If you will follow all these methods, you will surely end up creating a significant amount of space on your disk drive. This will speed up your PC and you’ll see that it will work more smoothly than before. Have any questions? Let us know in the comments below.


