


 Header Through Cloudflare")


![[Interview] The Future of Screen Experiences ②: From Watching to Understanding With Vision AI Companion](https://www.hawkdive.com/media/samsung-tvs-and-displays-vision-ai-companion-interview_thumb932-218x150.jpg "Exploring Vision AI Companion: Transforming Screen Experiences for Users")


Go through this guide to find relevant solutions to fix the Wireless Display Install Failed Error in Windows 11.
Windows 11 is full of awesome features that help improve workflow and productivity. One such advanced feature is the Wireless Display. Wireless Display was first introduced in Windows 10 and is also a part of Windows 11 as an optional feature.
This feature comes in handy when you want to project the media files like videos, movies, and photos from your Windows 11 PC to some other compatible device.
Since this feature is present as an optional feature in Windows 11, you need to download it in the Windows 11 Settings. Although the downloading and installation of the Wireless Display feature is completely straightforward, some users are encountering the Wireless Display Install Failed Error on Windows 11 PC.
Also Read: Connect To Wireless Display with Miracast in Windows 11

In case you are one of those troubled users, you don’t need to worry much. In this guide, we are presenting different workarounds that can help you fix the Wireless Display Install Failed Error in Windows 11. So, without wasting much time, let’s dive right into it.
Miracast Technology
Before heading to try the fixes mentioned in this guide, you need to ensure that your PC is compatible with the Miracast technology. In case you are clueless about the technology, Miracast is what makes it possible to share the media files from one computer screen to some other. For the wireless display to mirror and project your PC, it should support the Miracast technology. Let’s find out if your PC supports Miracast or not.
- First of all, go to the Windows 11 Settings app using the Windows + I shortcut.
- Choose System from the left navigation bar and then Project to This PC from the left sidebar.
- Now see if Miracast is compatible or not. In case it is not compatible, you will not be able to use the Wireless Display feature.
Also Read: How To Change Taskbar Time To 12 Or 24 hour In Windows 11
Other reasons for the Wireless Display install failed error
Let’s take a look at some of the other methods because you can get the Wireless Display Install Failed error.
- Unable to connect to the internet.
- Metered Connection
- Unstable Internet
Keeping this in mind, let’s see how can you fix the Wireless Display Install Failed error:
Ensure you are using an internet connection
As you know that installing Wireless Display needs an internet connection. If you forget to connect your Windows 11 PC to the internet before installing a wireless display, do it right now.
Make sure that the internet connection is stable so that the download is not paused midway.
In case you facing connectivity issues, go through the article given below:
How To Fix ‘Can’t Connect to this Network’ error in Windows 11
Connect to a different Internet source
In case you are connected to an internet source that has poor connectivity issues, it will be another reason why the wireless display installation is failing. In such a scenario, you should also try switching to some other internet source with a good internet connection.
Disable metered connection
If the metered connection is turned on in the Windows 11 Settings, this can be a big reason why you are encountering the wireless display install failed error. As you know, the metered connection comes in handy to limit how much data is used by your Windows 11 computer.
Since the wireless display needs more bandwidth to install on your PC, you should disable the metered connection for the time being. Here is how you can do it:
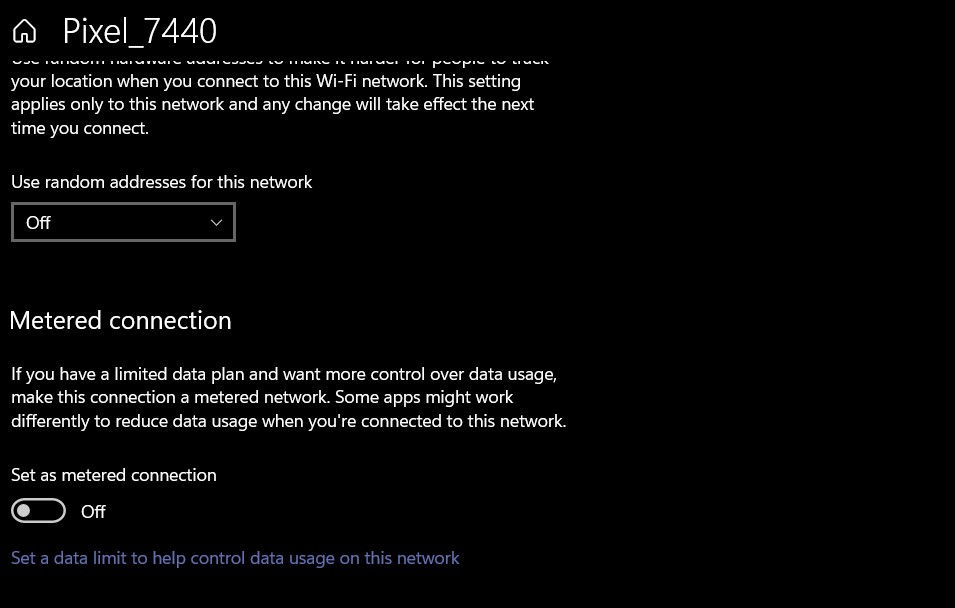
- First of all, use the Windows + I shortcut key to go to the Settings app.
- Next, click on the Network and Internet option to access the internet settings.
- Now go to the Properties window and keep scrolling until you see the metered connection section.
- Now turn off the toggle for metered connection option and close the Settings window.
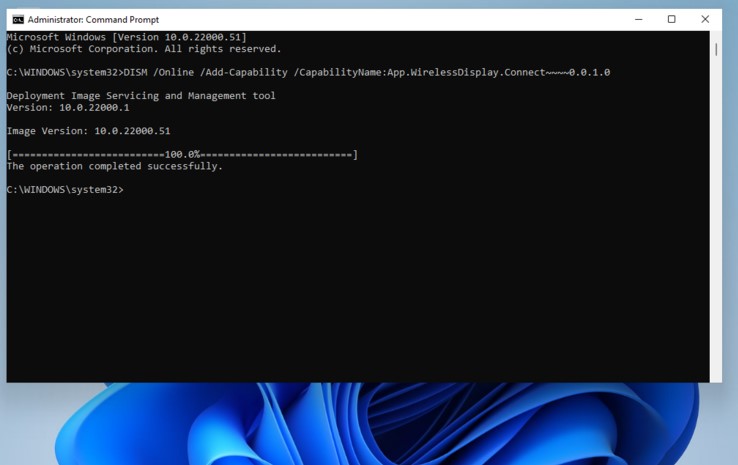
Install Wireless Display via Command Prompt
If the above method did not work, let’s try a workaround to install the Wireless Display. Here is how you can install wireless display using the Command Prompt:
- Open the taskbar and type cmd. Now right click on the first search result and choose the Run as Administrator option.
- In the Command Prompt type, the command below and hit the enter key
DISM /Online /Add-Capability /CapabilityName:App.WirelessDisplay.Connect~~~~0.0.1.0
- You will see the progress of the installation in the command prompt window.
Install Wireless Display via Powershell
Here is another way to install the wireless display, it involves using the Powershell. Follow the steps given here to install wireless display via the Powershell
- Go to the shortcut menu using the Windows+X combination and then choose the Windows Powershell (Admin) window.
- In the Powershell window, enter the following command and hit the enter key.
- DISM /Online /Add-Capability /CapabilityName:App.WirelessDisplay.Connect~~~~0.0.1.0
Conclusion
We hope you were able to successfully resolve the issue that occurred in installing the Wireless display in Windows 11. In case you did not succeed, try the workarounds given here to install a wireless display on your Windows 11 PC.
Also Read: 5 Tips To Fix No Battery Detected Error In Windows 11


