


 Header Through Cloudflare")


Read the text out loud feature can be really helpful for people with visual disabilities. Moreover, it can read a text for you while you are looking away from your screen. So, in this article, we will be discussing how to make Mac read text aloud for you in 2022.
Your Mac computer can read out text for you and help you in many ways. By reading out what’s on the screen, it can save your time. This can be possible through the Spoken content feature of the Mac computer. You will no longer need to dig into the text to understand it or check whether it sounds perfect. So, without any further digression, let us learn how to make Mac read text aloud.

Also Read: Mac Not Restarting After Upgrading To macOS Monterey? Try These fixes
How to make Mac read text aloud?
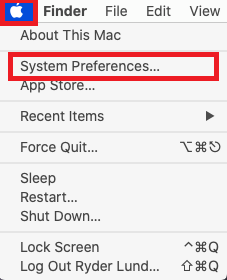
- Click the apple icon (top-left corner).
- Select System Preferences.
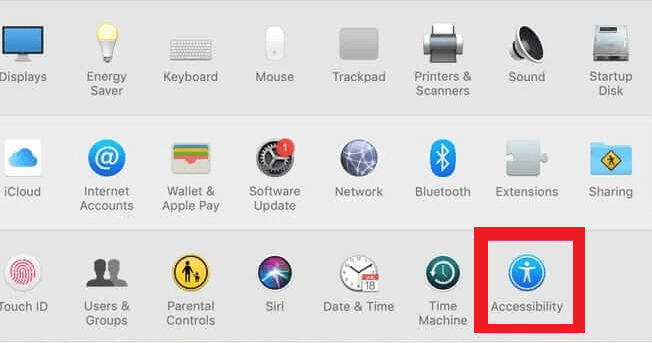
- Tap Accessibility.
- Choose Spoken Content(left-side).
- Select the options you want to be enabled.
Now, let us discuss the steps to make Mac read text aloud in detail:
- Click on the Apple icon on the top-left corner of your screen as shown below in the screenshot.
2. Then, Select System Preferences from the menu which appears as a result.
3. Now, choose Accessibility from a bunch of options available on the screens.
4. Further, click on Spoken Content from the group of options available on the left side as shown below in the screenshot.
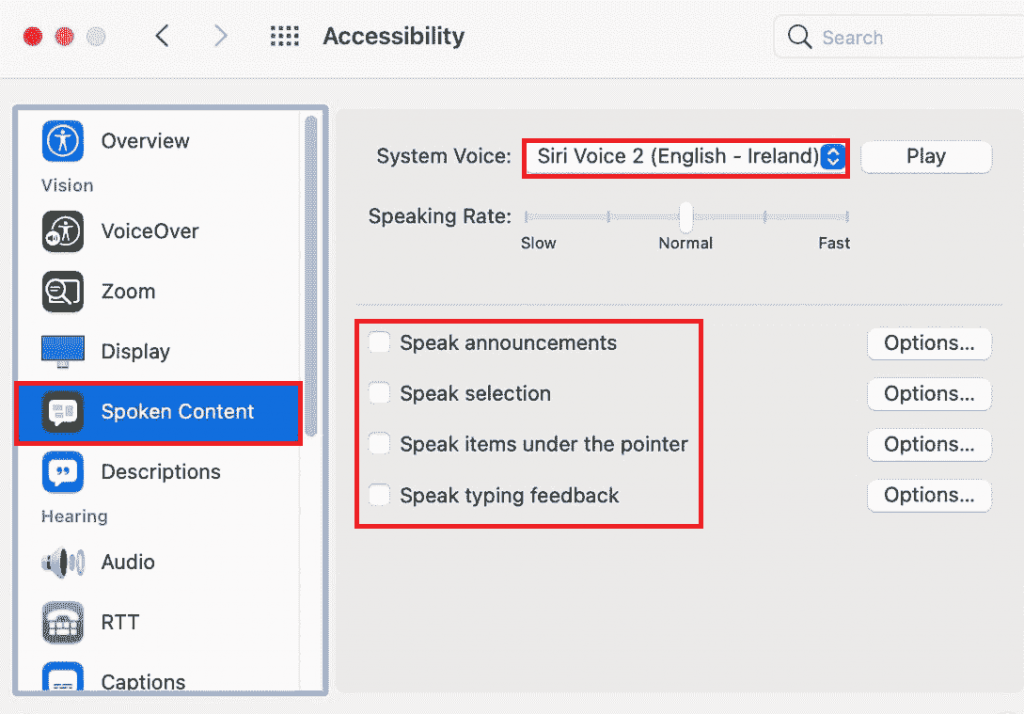
5. Now, you can choose the Spoken content options as per your preference.

6. System Voice: Select the voice assistant who you want to read the text for you. Just click on the dropdown next to System Voice. Here, I have selected Siri because I personally like her voice. So, choose according to your choice. Moreover, you can also download new voices and in different languages.
7. Speaking Rate: You can also decide and set the speaking rate as per your preference. You can choose slow, normal, or fast. For me, normal works the best.
Other options are to be enabled as per your preference. Their significance is discussed in the snippet below.
Also Read: How To Fix High CPU Usage After Upgrading To macOS Monterey?
Speak Announcements
If you enable this option, the voice assistant will read any new notifications, pop-ups, alerts, etc. for you. In short, it will speak announcements for you.
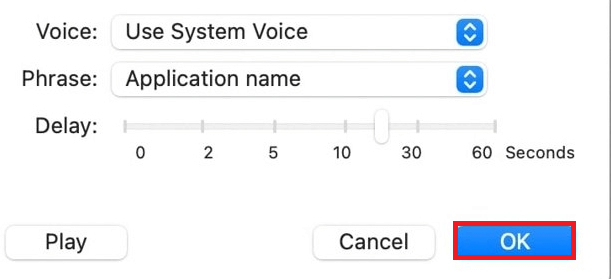
- Voice: The options button next to Speak announcements allows you to set the voice assistant for making announcements such as Siri.
- Delay: With the Delay option, you can set when do you want the system to speak announcement after the notification appears.
- Phrase: Using this option, you can set the phrase that you want to be said before the system speaks the announcement. It can be the application’s name or interruption phrases such as “Excuse me!”, “Alert”, etc.
- Play: The play button allows you to test the settings.
After everything is all set, you just need to click on OK.
Also Read: How To Find Mac Address On Windows 11 PC
Speak Selection
Another option is Speak Selection. This is the best option according to me. Speak Selection speaks aloud any text on the screen. All you need to do is to select the text and press a key combination.
- Click on the Options button next to Speak Selection.
- Now, choose the settings according to your preference.
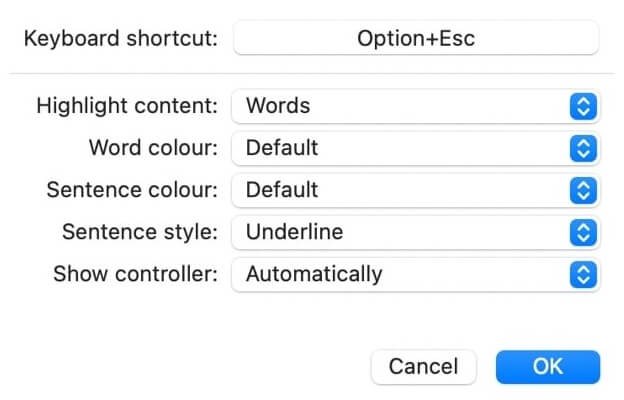
- Keyboard Shortcut: You can set the key combination according to your liking. By default, it is Option+ Esc.
- Highlight Content: macOS highlights the portion of the selected content that is being read out loud. You can choose it for words, sentences, words and sentences, or Off.
- Word color and Sentence color: Choose the color of the highlighted word or sentence being read.
- Sentence Style: You can choose the style of highlighted text: underlined or changed the background color.
- Show Controller: This option shows an extra controller window while the text is being read aloud. With this option, you can play, pause or stop the reading. Additionally, You can speed up or slow down the reading rate. You can also skip forward or backward.
After everything is all set, you just need to click on OK.
Also Read: Universal Control Not Working Between Mac And iPad? Try These fixes
Speak items under the pointer
This feature is extremely helpful for visually challenged people. It reads what’s exactly under the pointer. So that ‘special people ‘ know what they are pointing at using the mouse. Just click on the options button next to Speak items under the pointer to modify its settings.
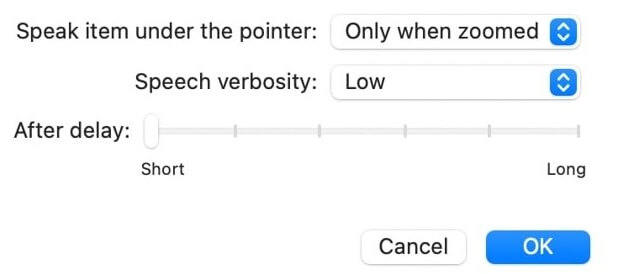
- Speak item under the pointer: You can use it to set when does it run- all the time or just when the text is Zoomed.
- Speech verbosity: You may choose between low, medium, or high speech verbosity. Additionally, you can set the delay (short or long) after which the system starts reading what’s under the cursor.
After everything’s done, you just need to click on OK.
Speech typing feedback
In simple words, this feature reads what the user is typing.

- Echo characters: It will type every character the user types inclusive of punctuations.
- Echo words: It also does the same thing. But, it reads the words user types. The system reads the words after you have pressed the space bar.
- Echo selection changes: Toggle the checkbox for echo selection changes if you want to hear previously written letters or words uttered as you you select them or move through them.
- Echo modifier keys: Toggle the checkbox for echo modifier keys if you want to hear the modifier keys as you Shift, Control, Atl, etc. stated as you press them to perform a keyboard shortcut.
After selecting the preferred settings, you just need to click on OK.
CONCLUSION
So, this is all about how to make Mac read text aloud 2022. We have mentioned steps to enable and use it on your Mac computer. If you face any problems while performing these steps, do let us know in the comment section. So, in this article, we tried to answer the following FAQs:
- How to make Mac read pdf?
- How to make Macbook Air read text?
- How to make Mac read highlighted text?
- How to make Mac read text on Word?
- How to make Mac read text?


