


 Header Through Cloudflare")


The most recent Mac operating system, macOS Ventura, has flaws and slowdowns much like previous versions.
If you’re here, you’ve found the proper site because you updated to macOS Ventura but are now dissatisfied with it and wish to roll back to Monterey, Big Sur, Catalina, or an older version. There is merit in downgrading from macOS Ventura to macOS Monterey. Problems with the next macOS Ventura include the inability to use external displays, the bad performance of your favorite game, and the incompatibility of some pieces of software. If you run into problems using macOS 13, you can easily roll back to macOS 12.
Here are three methods that guarantee your data will remain intact while you go from macOS Ventura to macOS Monterey. Pick the one that works best for you to reinstall the reliable macOS Monterey.
Save your Mac’s data.
First and foremost, make sure you have a recent backup of your Mac. Any information stored on your Mac will be deleted with a fresh installation of macOS. After reinstalling macOS, you may easily restore your backups to go back to where you were before you had to start from scratch.
The Process for Reverting from macOS Ventura to Monterey
#1. Update to macOS Monterey
1. In Safari, click on the link to download macOS Monterey. If you cannot obtain the installation file for macOS Monterey, you should use another computer already equipped with the operating system. If you want to see the app on the Mac App Store, click here.
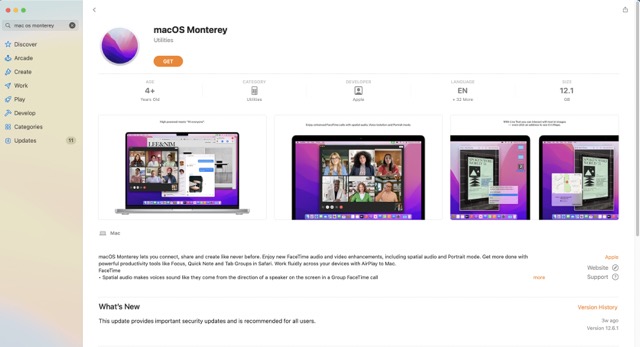
2. After a little while, a “Get” button-equipped macOS Monterey page will open in the App Store.
3. Hit the “Get” button, and downloading will begin immediately. Once the download is complete, open Finder, click Go in the menu bar, then choose Applications. Navigate Proceed with the installation of macOS Monterey using the.dmg file you have previously downloaded to your Mac. An illustration is provided as an example here.
Now that the installation file is prepared, you may make the disk bootable.
#2. Make a disk that can boot into macOS Monterey. Methods of using the Terminal command
1. Have your USB drive ready; if the drive format is different, connect it to your Mac and launch Disk Utility; next, choose the USB drive and click the Erase button. Type “USB” for the file name, “Mac OS Extended (Journaled)” for the format, and “GUID Partition Map” for the partition scheme. Just choose the Delete button. When the erasure is complete, proceed to the following step.

2. Open Terminal and enter the following command; if the name of your USB drive isn’t “USB,” you’ll need to adjust the command accordingly.
the command sudo /Applications/Install macOSMonterey.app/Contents/Resources/createinstallmedia —volume /Volumes/USB —nointeraction
3. Time this process according to how much data can be written to your USB device.
4. wait for a notification in the Terminal similar to “Install media now accessible at” before using your Bootable Drive.
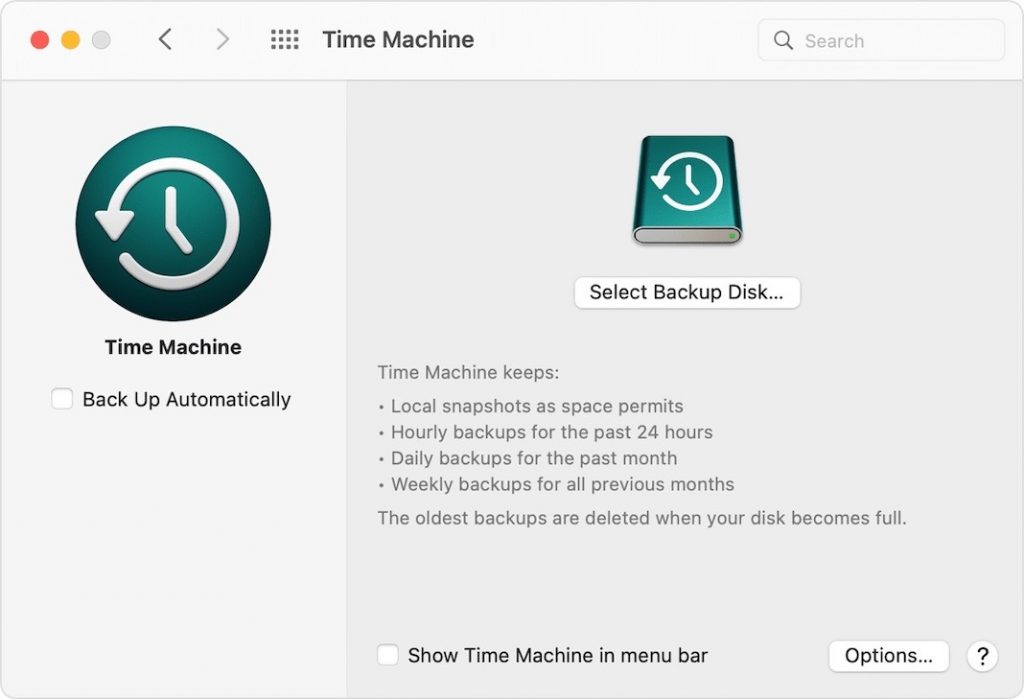
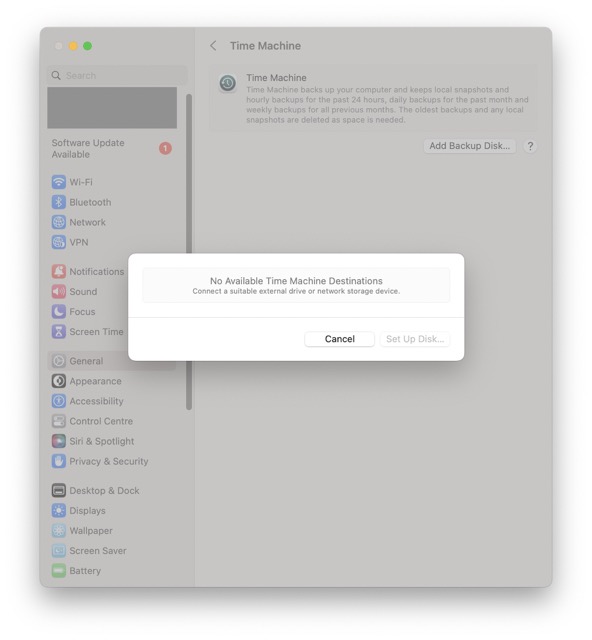
#3. Reverting from macOS Ventura to Monterey using Time Machine.
The only people who can utilize this method have a full backup before upgrading to macOS Monterey. You can easily restore everything with just a Time Machine backup.
1. Link your Mac to the Time Machine disk.
2. Have your Mac reload.
3. Power up your Apple Silicon Mac by pressing and holding the Power button for a few seconds. Finally, select Options > Continue.
4. To bring up the login screen on an Intel-based Mac, press and hold the Command + R keys.
5. Choose Continue after selecting Restore from Time Machine Backup.
6. Click Continue after choosing a Restore Source to use.
7. You can choose which backup you wish to use for the restoration in step 7.
8. Follow the on-screen instructions to finish the reinstallation and load your backup.
9. The practically flawless OS and virtually supportable apps that come with macOS 12 are just two of the many benefits of installing macOS Monterey on your Mac.
#4. How to Revert from Mac OS X Ventura to X Monterey Using Recovery Mode
If you’ve lost all of your backups for the version of macOS you were using before Monterey, you may always revert to that version by entering Recovery Mode.
Basic Mac troubleshooting and recovery tasks like disk verification, OS reinstallation, and startup security change are all easily accessible from within Recovery Mode. Using Recovery Mode, you may reinstall macOS Monterey by following the instructions shown below.
Here are the steps:
1. Turn off your Mac.
2. Follow a Power on using one of these key combinations
3. Type Command-R to reinstall the current version of macOS.
4. To reinstall the operating system that came with your Mac, or the most recent stable release of macOS, press Shift-Option-Command-R.
5. Option + Command + R to update to the most recent version of macOS that works with your computer.
6. Reinstall macOS by following the on-screen prompts.
#5.Using a Bootable Installer to Downgrade from macOS Ventura
What do you do if you haven’t been backing up your Mac using Time Machine and want to roll back to an older version of macOS? Don’t stress. Here, we’ll demonstrate how to create a bootable installer for a previous version of macOS. Compared to the first two approaches, this one is more laborious. The process has been broken down into four sections for easier comprehension.
- Get an external drive ready.
- Any external disk you use must have at least 14GB of space. The macOS installation process takes roughly 12GB, but you’ll still need space for your own files.
- You should check your disk for any other data that may have been stored there. Let’s set up the format. You can skip to the next section if the external drive has already been formatted.
1. Connect the hard disk to your Mac.
2. To use Spotlight to launch Disk Utility.
3. Choose your drive in the left-hand menu, and then select Erase in the main window’s toolbar.
4. Choose a format that is compatible with your Mac and then give the drive a name like “MyVolume” or something else.
5. Choose “Mac OS Extended” if your Mac runs HFS+ (Journaled).
6. Select APFS if your Mac supports it.
7. Open the Terminal program and type diskutil info / to see what file system your Mac is using.
8. Choose GUID Partition Map as the Scheme if it is an option.
9. Then, after selecting Erase, select Done.
Verdict
Logically, you’d want to roll back to an earlier version of macOS given how buggy the beta release of Ventura is.
If for whatever reason, you cannot do a downgrade from macOS Ventura, you will need to continue using the beta version of macOS and installing updates as they become available. You’ll be able to upgrade to the full release and leave the beta phase behind before the end of the year.
Has the macOS Ventura version been rolled back? What was your experience like? How about you? Did you utilize any of the techniques above, or did you come up with your own? Leave a comment telling us how you feel about our downgrading.


