Speed up or tune up a slow computer
Why does a computer run slow?
A computer may run slow because of Two reasons, Hardware or Software. Hardware which cause slow performance issue are RAM(Random Access Memory- Physical Memory Stick ), Processor, Bad or Malfunctioning Hard drive or any other Malfunctioning devices (like Malfunctioning Printer, Network Card, Keyboard or Mouse) connected. To resolve slow performance issue you have to either replace or upgrade them which I am gonna talk about later.
While Software issues are the major reasons to make your computer run slow. Software issues could be numerous which make your computer slow for example viruses in your computer, startup items, unwanted softwares, Low disk space , junk files , Malwares , spywares , adwares, Ransomware, browser addon softwares, Bad or outdated driver softwares, Outdated operating system files, Incompatible or outdated software in your computer, Leftover files and registry entries of uninstalled software. So I am gonna talk about all these reasons step by step and the tools used to fix them with description.
After doing all this troubleshooting I guarantee that your computer would definitely run at least 3 times Faster than before .
And this article is also gonna helpful for fellows who are working in a BPO for Tech support Position or who are going to appear for an interview for Tech Support Position.
So I start the troubleshooting with removing Junk and unnecessary files and software from computer to free the precious disk space.
Speed up or Tune up a Slow PC
Step 1. Remove Temporary Files to Tune up computer.
Temporary files, or foo files (.TMP), are files created to temporarily contain information while a new file is being made. It may be created by computer programs for a variety of purposes; principally when a program cannot allocate enough memory for its tasks, when the program is working on data bigger than the architecture’s address space.It is normally created when working on a program or installing a software.
Another Temporary file types are .chk files and file name starting with a tild (~) symbol.The CHK file type is primarily associated with ‘CHKDSK/SCANDISK Output’. File fragments cleaned from the disk. When you
run the DOS or Windows disk checking programs they can find errors and may write these out as file fragments in .CHK files.
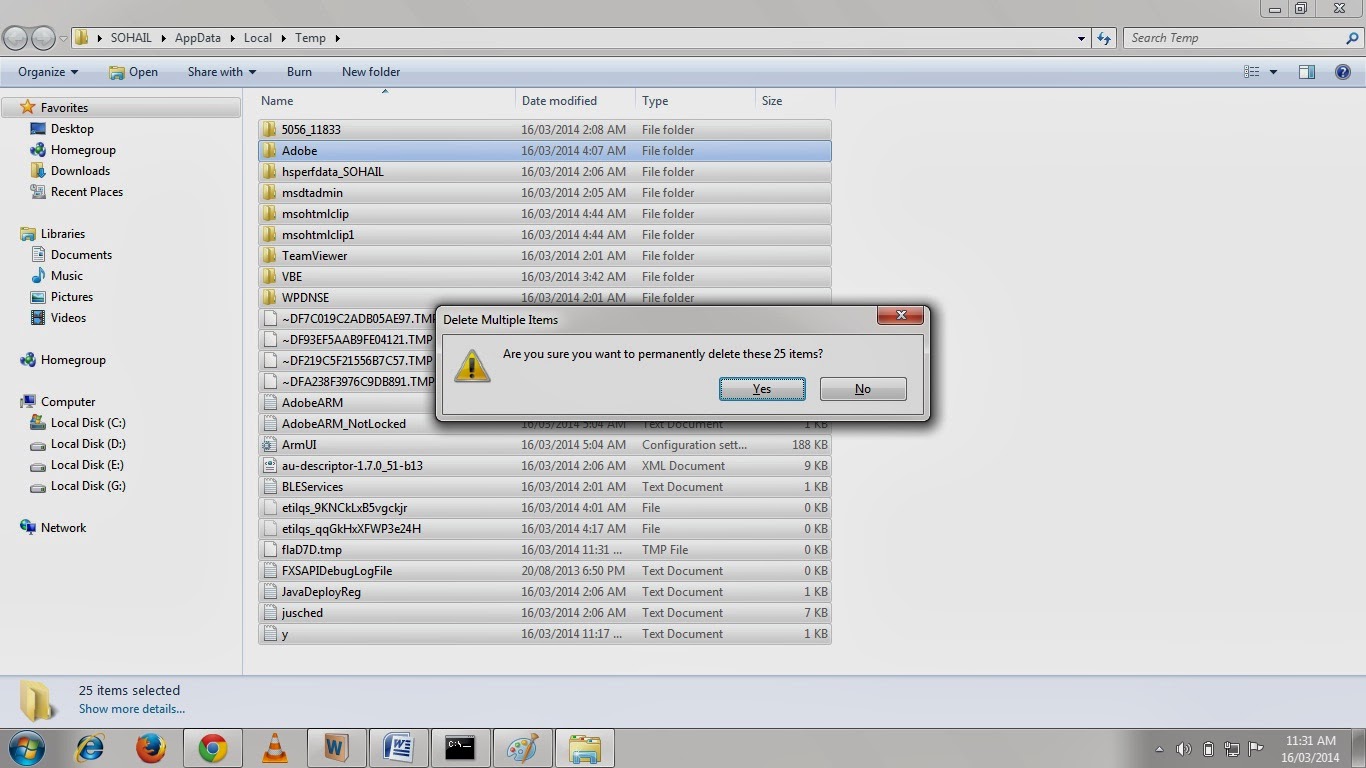
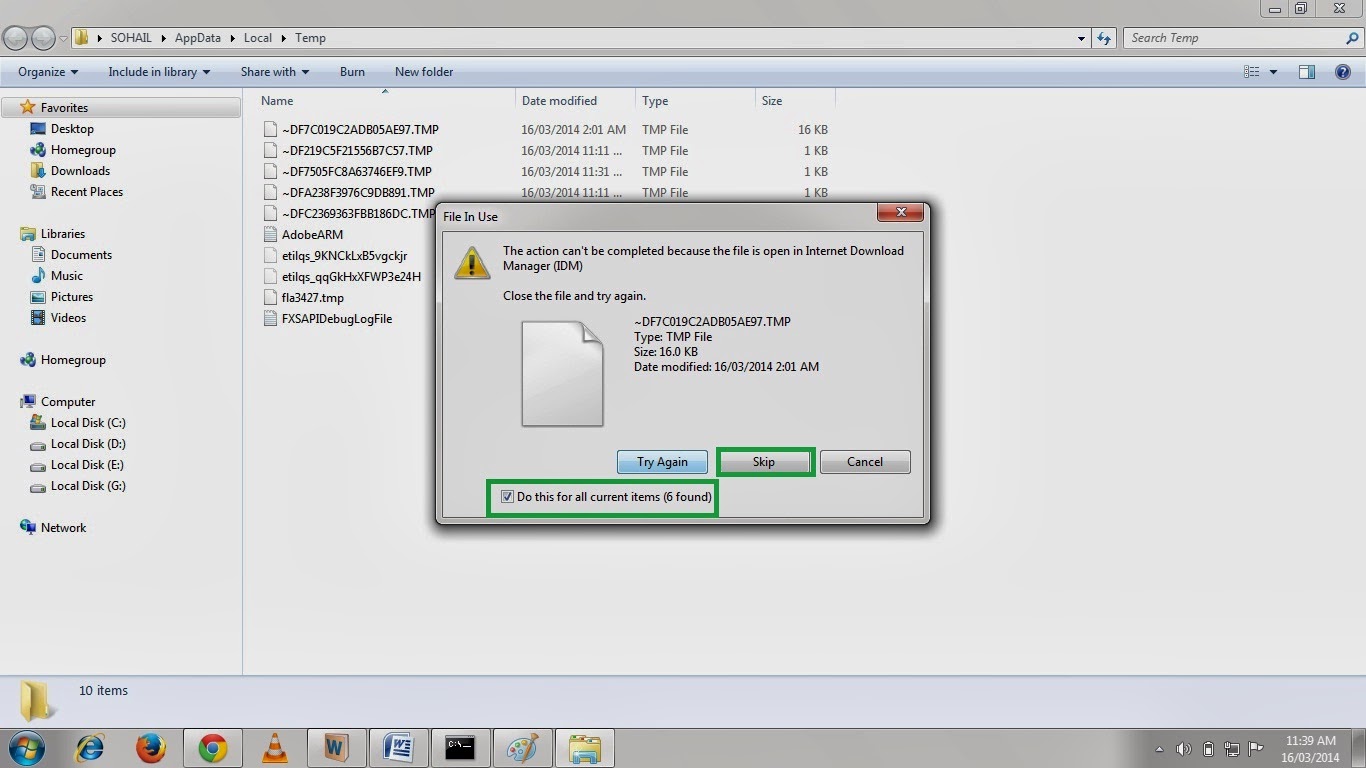
CHK is a file extension for a temporary file format used by WordPerfect for Windows. A CHK file can be created before and in between saves to safeguard data or to recover data after a program crash.The CHK file extension is also associated with file fragments saved by Windows Disk Defragmenter or ScanDisk. Temp files are typically deleted automatically when the program is closed normally, but if the program quits unexpectedly, the temp files are not deleted.So to delete Temp file first close all the open and running program even exit or stop the Antivirus running then press Windows Logo key+R to open Run dialog box as shown in the picture 6(a). Windows Logo key is Located at the bottom row of your keypad which could be second from left and looks like Windows Flag Logo. Now type %temp% and click okay , It’s gonna show all the temporary files so click any one of the files and press CTRL + A to highlight them all and then hit Delete button.Confirm yes you want to delete them all as in the picture 6(b) and they all are gone.Some of the files will not be deleted and will show a message that the action can’t be completed as the file is associated or open in a program as in the picture 6(c) so just check and do this for all current items. Then click Skip and close this window.

Step 2. Delete Prefetch.(NOT RECOMMENDED)
There is NO benefit aside from an absolutely laughable disk space gain of a couple kilobytes, and that is temporary. DO NOT delete the prefetch folder or it’s contents.
If you already have deleted it unknowingly you better need to build the layout.ini file to speed up the boot process. Yes, The “Layout.ini” file contains list of system programs and files accessed during boot. It, also, contains a list of the most commonly used programs. This allows Windows and Applications to start more quickly.
“Rundll32.exe Advapi32.dll, ProcessIdleTasks” >>> OK.
The processed result is stored in Layout.ini in the Prefetch directory, and is subsequently passed to the Disk Defragmenter, instructing it to re-order those files into sequential positions on the physical hard drive.
This will further improve performance by minimizing the distance that the hard drive’s heads have to be moved from one file to the next.
It is possible to trigger this re-ordering (by running “Defrag.exe %systemdrive% -b” from the command line) without running a full defragmentation. (click) the Start Button >>> Run >>> type-in the following command, “Defrag %systemdrive% -b” >>> OK, this will run the command as shown in the picture 6(C-1).
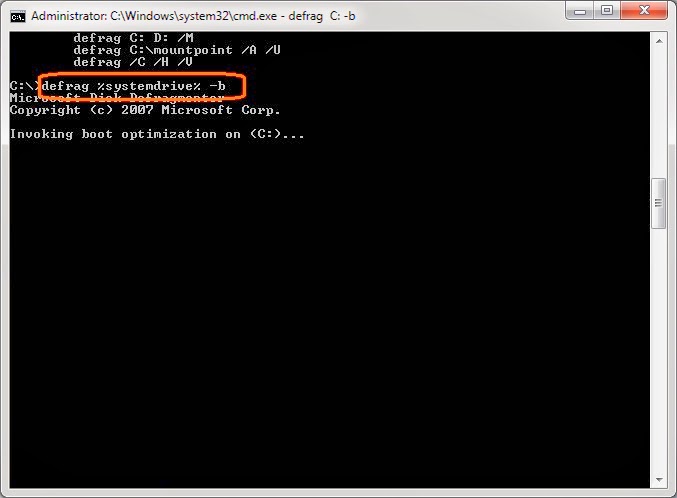
Note: Be aware that above process shown in the picture 6(C-1) may take several hours.
Step 3. Delete other temporary files using command prompt to speed up your PC.
Here I am referring to all the temp file which could not be deleted from %temp%.So we will be deleting all the .tmp, .temp, .chm, and files starting with tild(~) sign.And to do this you must start command prompt as an administrator.So go to Start search and type CMD look at the top search result it will be CMD,Right click CMD and choose Run As Administrator as shown in the picture 6(d). It will open the black command prompt window with prompt C:\Windows\system32> with a blinking cursor as shown in the picture 6(e).
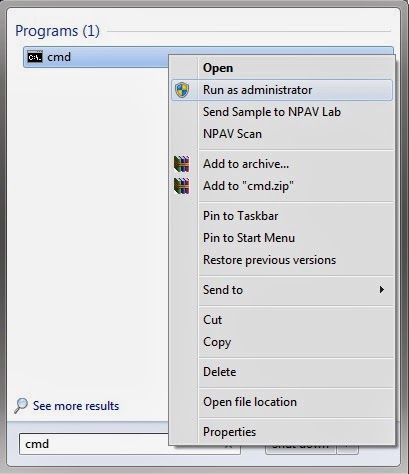
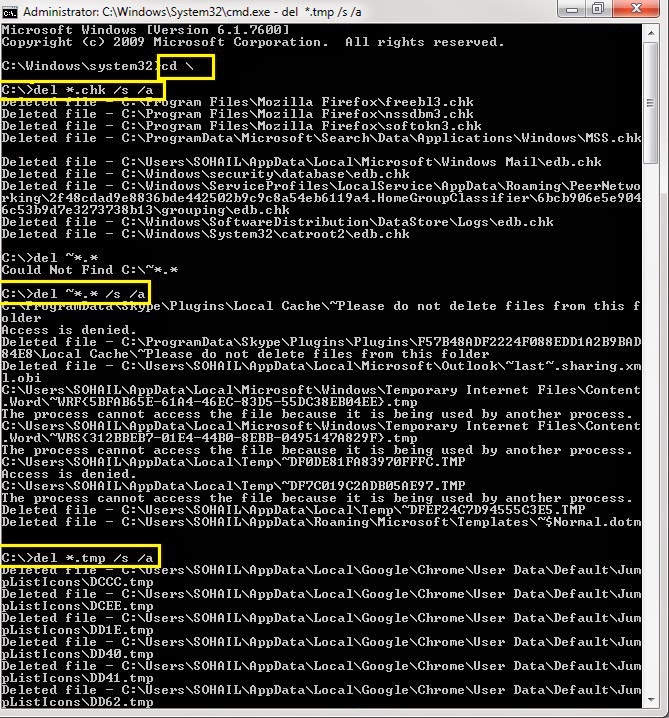
Now at the command prompt type “CD ” without quote and hit enter.It will then show you the prompt as C:\>_ now here you are gonna give four commands to be performed one by one.which are written below and also shown in the picture 6(f).
1. C:\> del *.temp /s /a

2. C:\> del *.chk /s /a

3. C:\> del *.tmp /s /a

4. C:\> del ~*.* /s /a

5. C:\> del /f /s /q %systemdrive%*.log

6. C:\> del /f /s /q %systemdrive%*.old

7. C:\>del /f /s /q %systemdrive%*._mp

8. C:\>del /f /s /q %userprofile%Local SettingsTemporary Internet Files*.*

9. C:\>del /f /q %userprofile%cookies*.*

10. C:\>del /f /s /q %systemdrive%recycled*.*

11. C:\>del /f /q %userprofile%recent*.*

12. C:\>del /f /s /q %userprofile%Local SettingsTemp*.*

13. C:\>del /f /s /q %systemdrive%*.gid
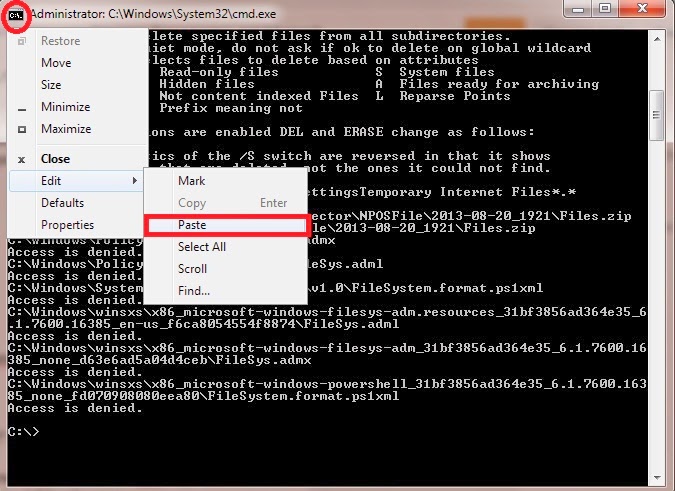
This is gonna delete all the junks and temporary files from your computer.You can simply copy this command and paste it at black command prompt. To.To do this click at the top left hand corner of this command prompt window where you see a tiny c:. logo and then go to Edit and select Paste as shown in the picture below.
Step 4. Delete Index.dat file to Tune up your PC.
Clearing the Internet Explorer history by clicking the Clear History button on the General tab in the Internet Options dialog box does not change the size of the Index.dat file. Also, setting the Days to keep pages in history value to 0 (zero) on the General tab does not change the size of the Index.dat file. So it also keeps entry for thole files which are not saved in your computer and was deleted long time ago.IE uses three different types of index.dat files which are Cache index.dat files, history index.dat files and cookies index.dat files.
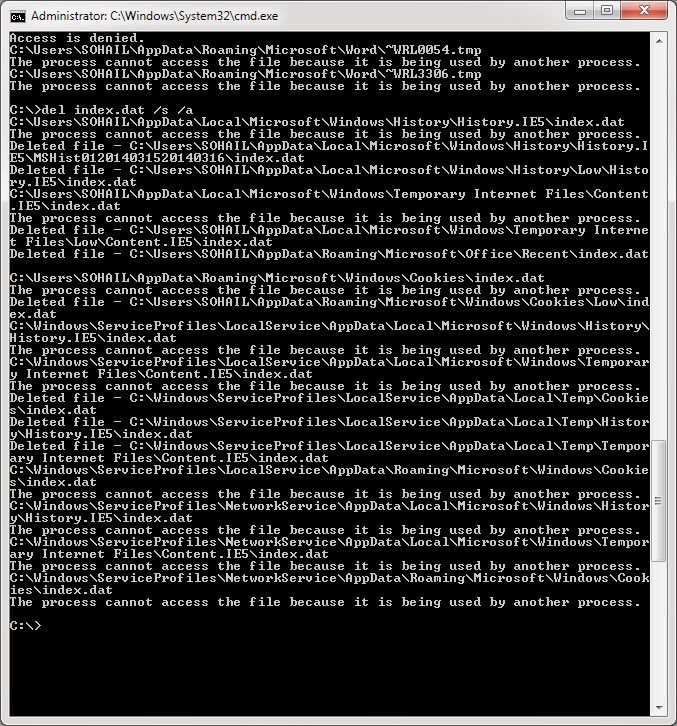
C:\Users\username\AppData\Roaming\Microsoft\Windows\Cookies/contents/history(In windows 7) and in C:\Documents and Settings\username\Local Settings\Temporary Internet Files\Content.IE5 or cookies.IE5/history.IE5 (in windows XP).To delete index.dat file make sure all of your browser is closed, Open Command prompt again as administrator and type command go to C:> prompt and here type command Del index.bat /s /a and hit enter as shown in the picture 6(g). Some of the index.dat file will not be deleted as its protected by logged in user. So you might need to login with a newly created user or login to safe mode with command prompt.
Step 5. Run Disk Cleanup (Cleanmgr) to tune up your PC.
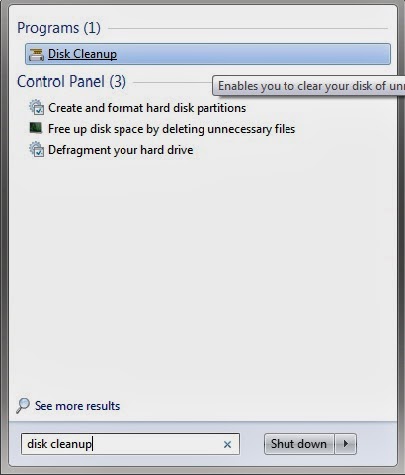
- Open Disk Cleanup by clicking the Start button . In the search box, type Disk Cleanup or Cleanmgr, and then, in the list of results, click Disk Cleanup.

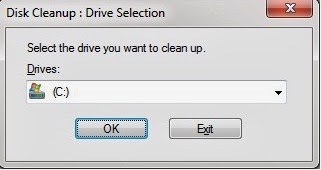
Pic- 6(h) Run Cleanmgr for Disk Cleanup - In the Drives list, click the hard disk drive that you want to clean up, So select c: drive and then click OK.

Pic 6(i) – Runing Disk Cleanup - In the Disk Cleanup dialog box, on the Disk Cleanup tab, select the check boxes for the file types that you want to delete, and then click OK.

Pic 6(J) – Runing Disk Cleanup - In the message that appears, click Delete files.
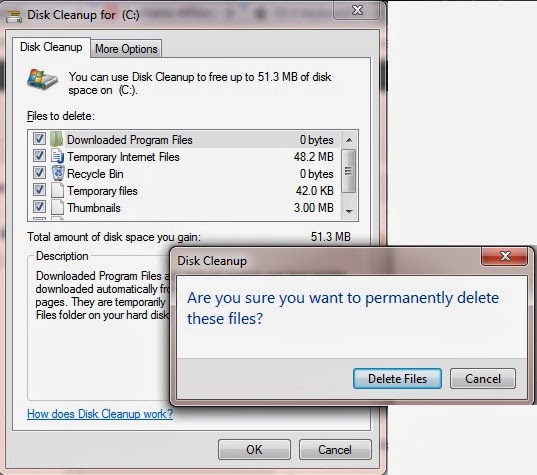
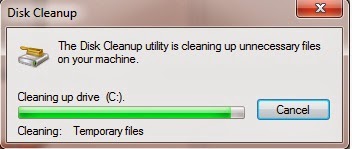
Click Delete Files and then it will start deleting the selected files as the below picture.
Step 6. Delete Old Shadow Copies to tune up your PC.
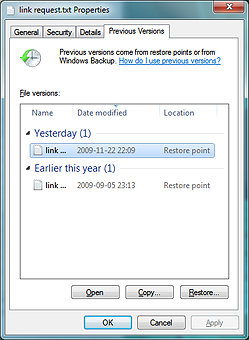
vssadmin delete shadows /all. It will then show you the number of shadow copies and ask – “Would you like to delete them?” the moment you press Y it would start deleting them. I have shown you the same in the below picture 6(n).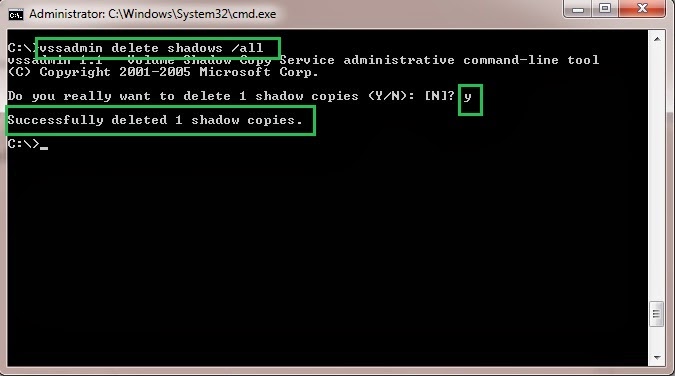
Steps 7. Adjust visual effects for best performance and increase virtual memory to Tune up your PC.

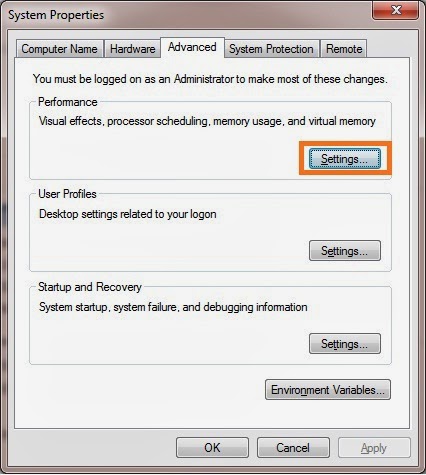
Click on the settings button it will open performance option as shown in the picture 6(Q) below. On the first Tab which is Visual Effects click Adjust for Best Performance and then only check the below 7 checked option as shown in the picture 6(Q).
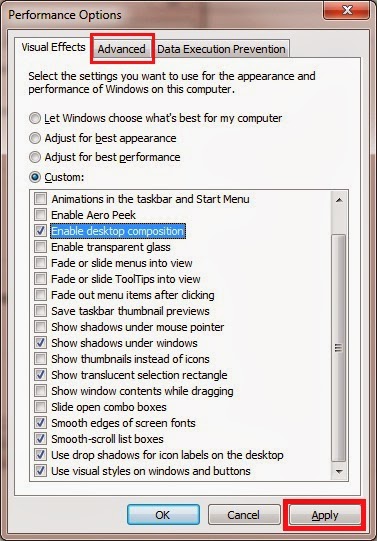
After selecting them click apply and then click on the Advanced Tab above.You then want to click on Change under virtual memory section as in the picture.
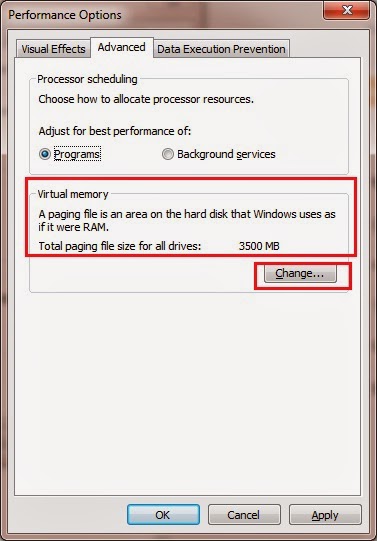
You will then get the option to change the virtual memory.Here you have to first uncheck the option “Automatically manage paging file Size for all drive” as shown in the below picture. And then click on C: drive to highlight it and then click on custom Size as highlighted in rectangle In the initial Size type the size 2 times of your RAM and in the Maximum Size, Type 2 Gigabytes ( 2000 MB) more than initial Size. Here I have 2 GB(2000 MB) of RAM(Memory Stick) so in the initial I have set 3500 MB(3.5 GB) and the Maximum is 5 GB(5000 MB) then click on set and then click OK. Then apply and its gonna show you the message that the changes you have made needs you to restart your computer to take changes in effect. Click OK and close all the window.
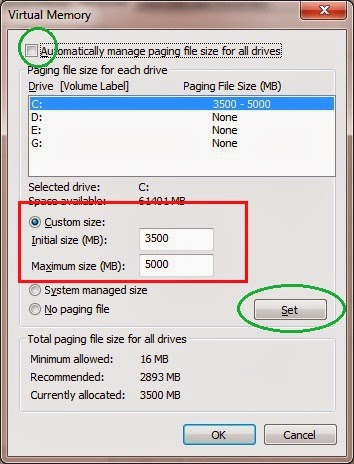
Here also setting Paging file (virtual memory) on drive other that C:\ is gonna optimize your computer even more because Paging file is Like a virtual memory where your operating system puts file of currently running program and data associated with them and swap it between Physical RAM and Hard drive. So C: drive is already queried every time your processor or computer needs any information which makes it busy and slow in accessing some information because it gets multiple request at the same time.So putting the paging file on a different drive makes C: drive intact and decreases the no of request from other hardware and the paging file process runs smoother. So If you have a different HDD connected to your computer try to set paging file on that one as well while doing tune up for slow PC, Any ways that’s optional and for advanced users.
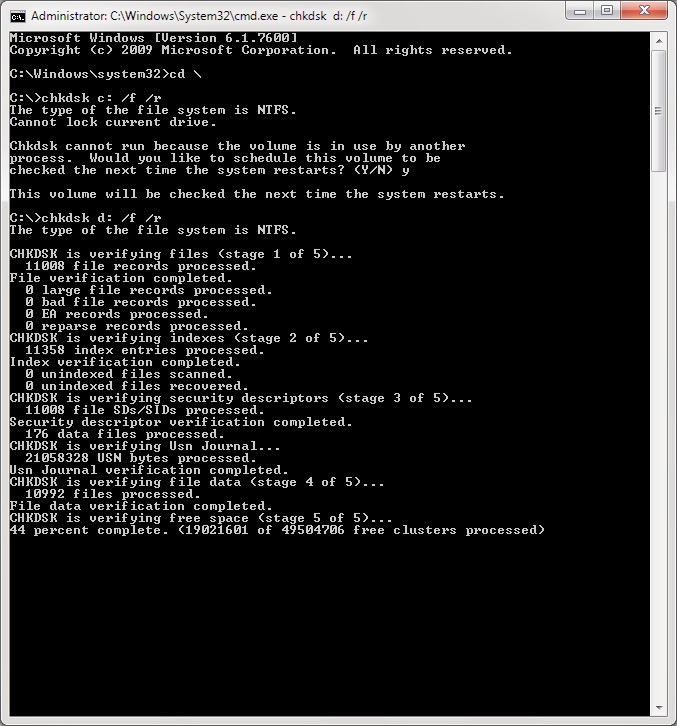
Steps 8. Check your Hard drive for Errors (Run CHKDSK) to Tune up your PC.
When a program crashes or you experience a power outage, your computer may create errors on its hard drive. Over time, the errors slow your computer. The Check Disk program will identify and clean any errors on your computer and help it keep running smoothly.
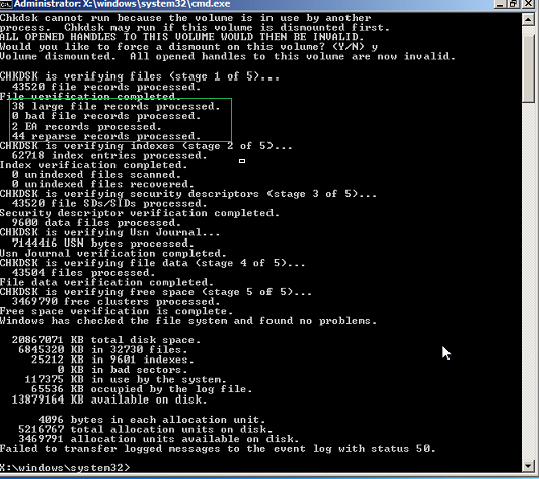
Chkdsk (Chkdsk.exe) is a command-line tool that checks volumes on your hard disk drive for problems.You must run this too while tuning up your Slow PC. The tool then tries to repair any problems that it finds and which results in faster access of information from hard drive. For example, Chkdsk can repair problems related to bad sectors, lost clusters, cross-linked files, and directory errors. To use Chkdsk, you must log on as an administrator or as a member of the Administrators group.
You can also run Chkdsk from My Computer or from Windows Explorer.
Steps 9. Run Disk Defragmentation(Defrag) to Tune up your Slow PC
When your computer writes data into a file on your hard drive, it’s not always able to place all of the data together. A section of a file might be written near the beginning of the disc, the rest of that file could be written near the end or can be written in a contiguous manner depending upon the availability of space on the disk.
If all the blocks (small pieces of data) are not arranged orderly in a contiguous manner it causes programs to run slowly, as the computer spends time retrieving the file fragments from all over the disk.
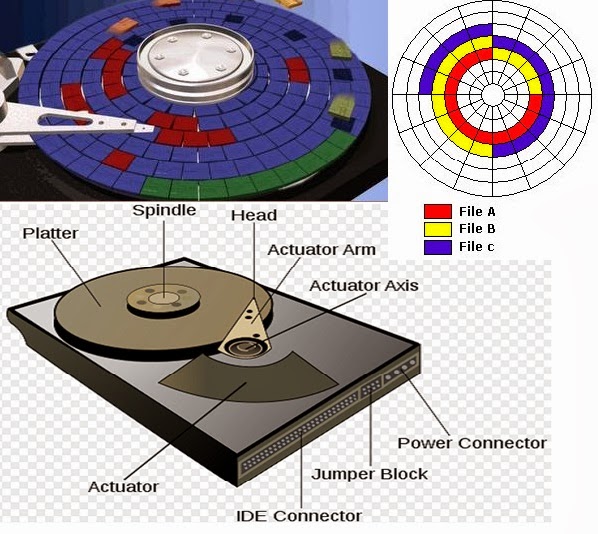
Defragmenting your disk volume arranges files (and free space) in an orderly manner, consolidating fragmented data on a volume (such as a hard disk or a storage device), reducing the time taken to read a file because it minimizes the distance that the hard drive’s heads have to travel from one data block to other in order to access a file.There are various tools available to defragment the disk volume, and one version is included with MS Windows. In this version of Windows, Disk Defragmenter runs on a schedule but sometimes due to some reason it does not run for a long time,So you should run it manually or change the schedule it uses.
So Defragmenting a disk minimizes head travel, which reduces the time it takes to read files from and write files to the disk.
Fragmentation happens to a volume over time as you save, change, or delete files. The changes that you save to a file are often stored in a different place on the volume than the original file. This doesn’t change where the file appears in Windows only where the bits of information that make up the file are stored on the actual volume. Over time, both the file and the volume itself become fragmented, and your computer slows down as it has to look in different places to open a single file.
To defragment your hard disk
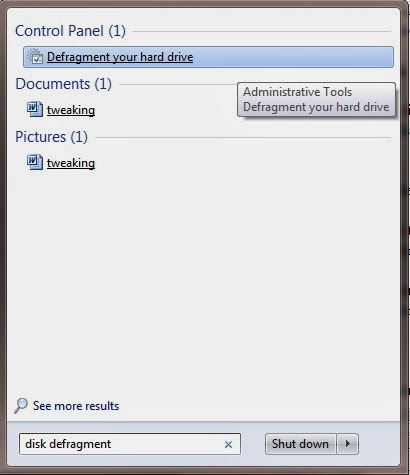
1. Open Disk Defragmenter by clicking the Start button. In the search box, type Disk Defragment, and then, in the list of results, click Disk Defragmenter. You will get Disk Defragmenter window like shown in the picture 6(w) below.
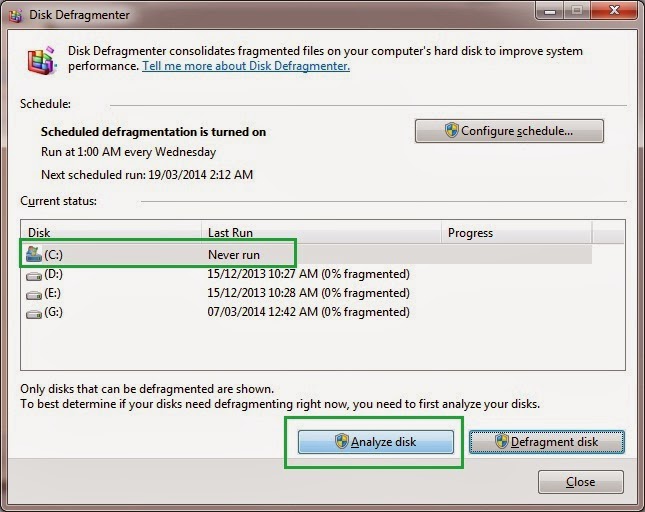


2. Under Current status, select the disk you want to defragment.
3. To determine if the disk needs to be defragmented or not, click Analyze disk as shown in the picture 6(x). If you’re prompted for an administrator password or confirmation, type the password and confirm.
Once Windows is finished analyzing the disk, you can check the percentage of fragmentation on the disk in the Last Run column as shown in the picture 6(z). If the number is above 10%, you should defragment the disk.
4. Click Defragment disk now to Tune up your slow PC. If you’re prompted for an administrator password or confirmation, type the password or provide confirmation.
Once it has finished Defragmenting, it will show you the status as shown in the picture 6(aa) below.
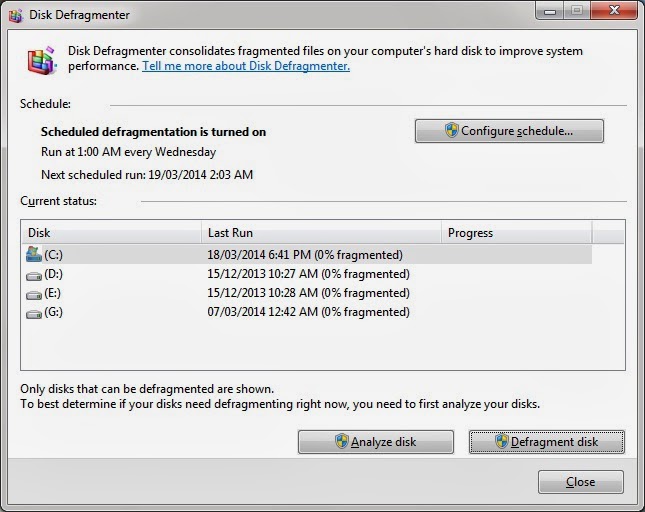
Disk Defragmenter might take from several minutes to a few hours to finish, depending on the size and degree of fragmentation of your hard disk. You can still use your computer during the Defragmentation process.
Notes: If the disk is already in exclusive use by another program or is formatted using a file system other than NTFS file system, FAT, or FAT32, it can’t be defragmented.
Network locations can’t be defragmented.
Step 10. Remove unnecessary items from start up to Tune up your PC.
Start up Items are the main cause of making computer run slower and slower as the computer’s age grows. These are the programs start automatically when Windows starts and uses the processor and computer resources while booting up and increases the boot time, few example of these programs are Yahoo Messenger, MSN Messenger,Google and yahoo updater services, third-party programs,Security software, printer software and driver updater.
Software manufacturers sometimes set their programs to start at the same time Windows starts so that the program will open right away when you tap or click the program icon. Many of these programs run in the background are not obviously running. And these programs are not really required to start at the same time Windows start.
We will use the following methods to find these programs and stop them from running at start up.
1. Go to Run and Type Msconfig and hit Enter.
2. This will open system configuration utility as shown in the Picture 6(ab) below.
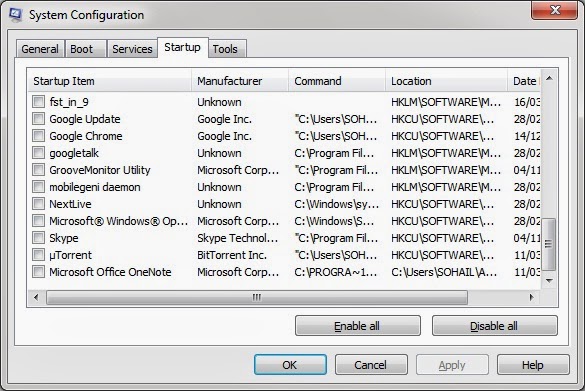
3. Click on the Startup tab on the top and go through the list of Startup programs here and keep unchecking the items you don’t really need all the time or don’t wanna run, Go down the list and see if there’s any item you are sure they are not going to be required, You can turn if off,. Then click Apply and then OK.
Restart your computer and see if everything continues to work(don’t worry, if something gone amiss, you can always come back and revert your settings).
Clean hidden Startup from registry (Registry Editor) to tune up your slow PC
Sometimes even after removing the start up items from System Configuration Utility(Msconfig), Some programs still pops up because they have a hidden entry in registry which is the central database of Windows Operating System. To remove such entries go to Run and Type Regedit and press ok.
1. You will See Registry Editor window as shown in the Picture 6(ac) below.
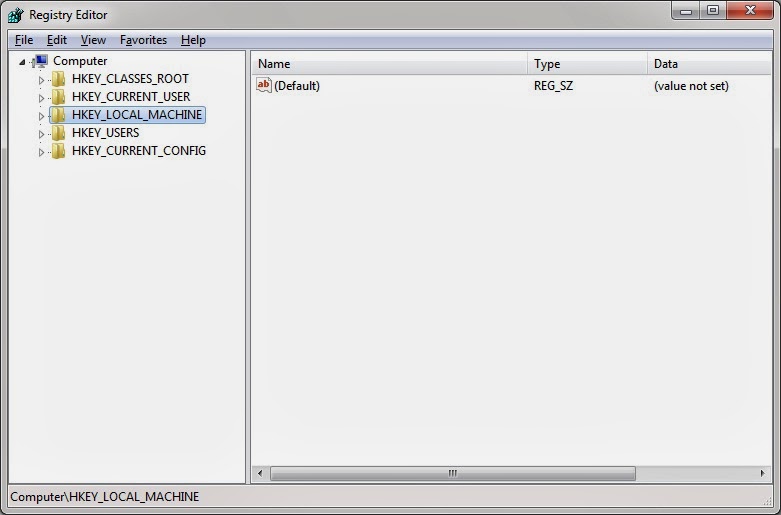
2. Find the key HKEY_CURRENT_USER\Software\Microsoft\Windows\CurrentVersion\Run as shown in picture 6(ad).
And then delete the value associated with the program you want to remove.
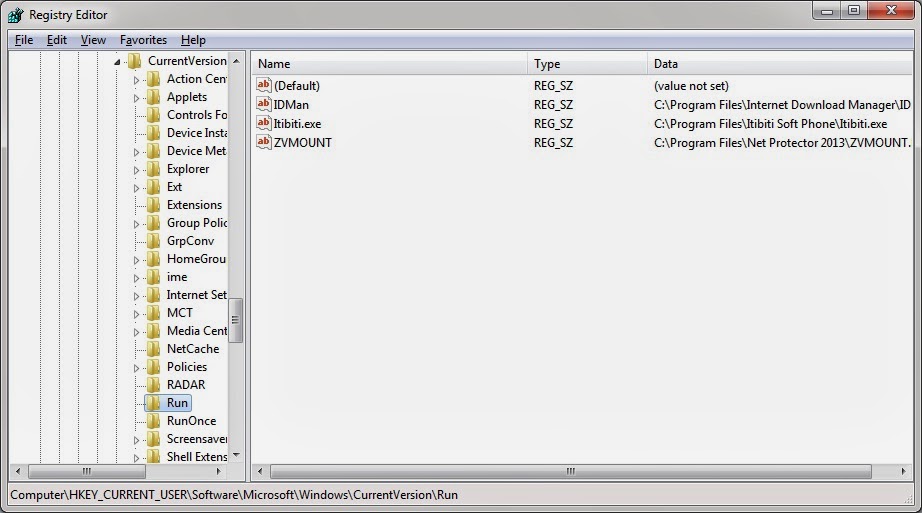
Here Startup items shown as in the picture above are not necessary so I want to delete that to Tune up my Slow PC.
This is the same registry key where you can also add an entry to automatically start programs whenever Windows launches.
to open a new startup application find the key [HKEY_CURRENT_USER\Software\Microsoft\Windows\CurrentVersion\Run].
For each program you want to start automatically create a new string value using a descriptive name, and set the value of the string to the program executable.
For example, to automatically start Notepad, add a new entry of “Notepad”=”c:\windows\notepad.exe”
So If you’re trying to remove a program and can not find it in the StartUp folder (usually C:\WINDOWS\Start Menu\Programs\StartUp), then it may be launching from one of the registry keys below. To remove it, delete the value associated with the program you want to remove.
[HKEY_LOCAL_MACHINE\Software\Microsoft\Windows\CurrentVersion\Run]

[HKEY_LOCAL_MACHINE\Software\Microsoft\Windows\CurrentVersion\RunOnce]

[HKEY_LOCAL_MACHINE\Software\Microsoft\Windows\CurrentVersion\RunServices]

[HKEY_LOCAL_MACHINE\Software\Microsoft\Windows\CurrentVersion\RunServices\Once]

[HKEY_LOCAL_MACHINE\Software\Microsoft\Windows NT\CurrentVersion\Winlogon\Userinit]

[HKEY_CURRENT_USER\Software\Microsoft\Windows\CurrentVersion\Run]

[HKEY_CURRENT_USER\Software\Microsoft\Windows\CurrentVersion\RunOnce]

[HKEY_CURRENT_USER\Software\Microsoft\Windows\CurrentVersion\RunServices]

[HKEY_CURRENT_USER\Software\Microsoft\Windows\CurrentVersion\RunServices\Once]

[HKEY_CURRENT_USER\Software\Microsoft\Windows NT\CurrentVersion\Windows]
It may also be loaded from the [Load] or [Run] sections of your WIN.INI file, found in the Windows directory.But you must remove unnecessary item’s entry from above highlighted two registry key.
Disable unnecessary services to speed up or tune up your Slow PC
Now once you have removed the unnecessary Startup items from system configuration utility and also from registry then click on the services tab on the top in system configuration utility and then check Hide all Microsoft Services as shown in the picture below.

And here uncheck all the not important services as shown above like Adobe Flash Player Update Service, Google Update service, Mozilla maintenance service, or any other service related to the software or program you are no longer using, then click Apply and then OK to Tune up the PC.
11. Use a PC optimization Software or a Tuneup Utilities.
You can also download and use CCleaner from downloads page. CCleaner is a free Tue Up software from Piriform which also works fine.
12. Do a little tweak in registry to Tune up your computer
Now the next step is to make a little changes in registry to make your computer super fast. So go to Run dialog box and type regedit to open registry editor and then make changes to the following registry key with the below mentioned key value to tune up your slow PC.
And I would recommend you to take the backup of the registry before you make any changes so that if you do any thing wrong or delete any of the keys by mistake you can always restore the registry back.To back up the registry key right-click on the Registry key you plan on changing, and click “Export“. The Registry Editor will prompt you to save a .reg file to your hard drive.
To undo Registry changes, just find your .reg file and double-click it. The .reg file will reset your Registry values to their existing values (but will not remove values that you’ve added).
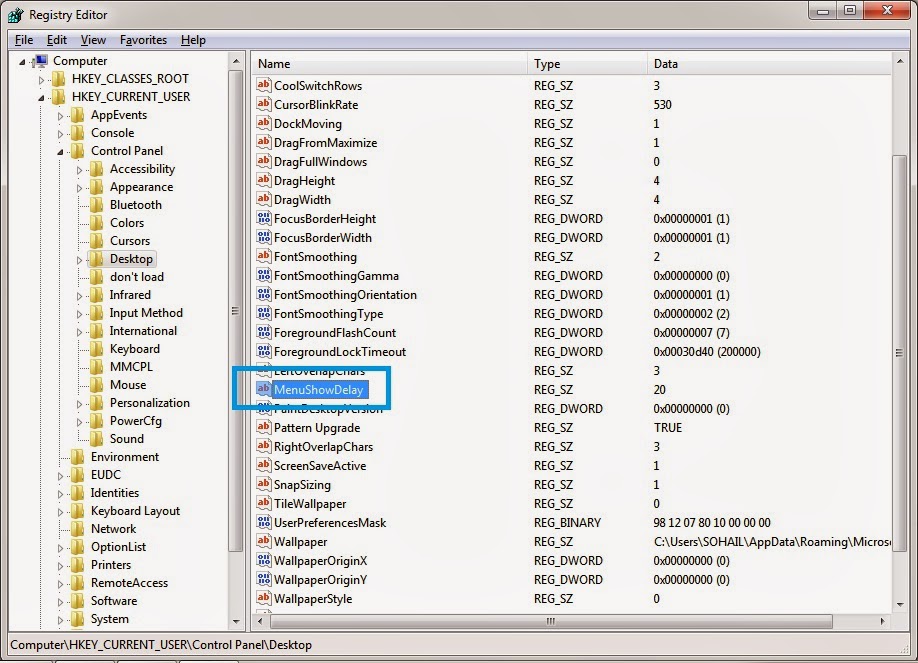
[HKEY_CURRENT_USER\Control Panel\Desktop]

"AutoEndTasks"="1"

"HungAppTimeout"="1000"

"MenuShowDelay"="8"

"WaitToKillAppTimeout"="2000"

"LowLevelHooksTimeout"="1000"
[HKEY_CURRENT_USER\Control Panel\Mouse]

"MouseHoverTime"="8"
[HKEY_CURRENT_USER\Software\Microsoft\Windows\CurrentVersion\Policies\Explorer]

"NoLowDiskSpaceChecks"=dword:00000001

"LinkResolveIgnoreLinkInfo"=dword:00000001

"NoResolveSearch"=dword:00000001

"NoResolveTrack"=dword:00000001

"NoInternetOpenWith"=dword:00000001
[HKEY_LOCAL_MACHINE\SYSTEM\CurrentControlSet\Control]

"WaitToKillServiceTimeout"="2000"
[HKEY_CURRENT_USER > Software > Microsoft > Windows > CurrentVersion > Explorer > Advanced]

"DesktopLivePreviewHoverTime"="set the value according to your need, see below for the description"

"ExtendedUIHoverTime"="200"

"ThumbnailLivePreviewHoverTime"="600"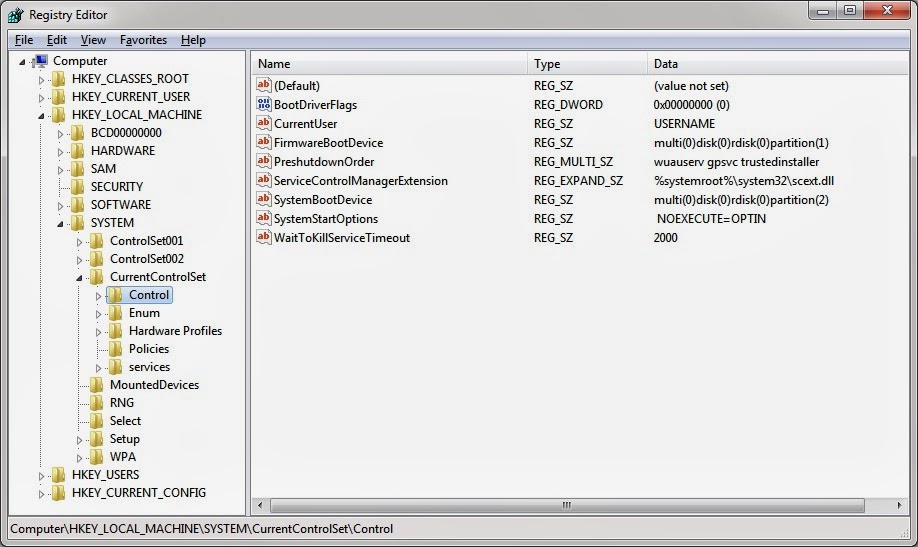
[HKEY_LOCAL_MACHINE\SYSTEM\CurrentControlSet\Control\Session Manager\Memory Management]

"DisablePagingExecutive"="1"
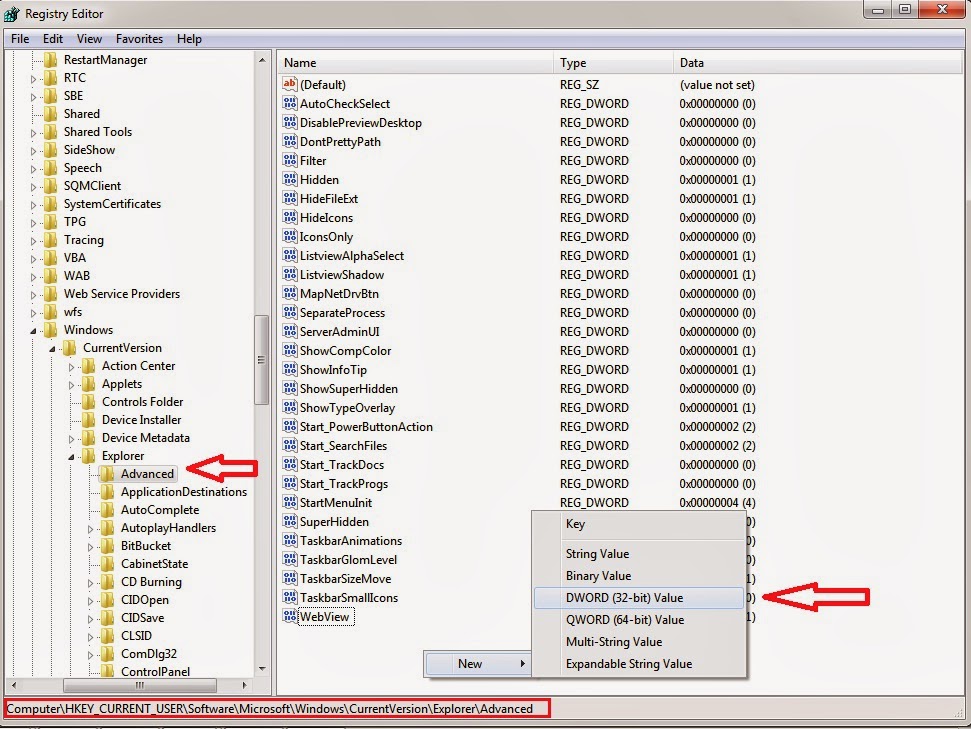
Now let me also explain what these registry keys mean and what they do. So below are the information on the keys that you have to change the value for, in order to tune up your slow PC. Here some of the key like NoInternetOpenWith might not be available in your PC so you can either create it with their associated value as mentioned above or you can just ignore them.
AutoEndTasks – Forces Windows to automatically end user services when the user logs off or shuts down the computer.
HungAppTimeout – Reduces system waiting time before killing user processes when the user clicks on “End Task” button in Task Manager.
MenuShowDelay – Decreases menus show delay time, it’ll make the menus show faster upon clicking.
WaitToKillAppTimeout – Reduces system waiting time before killing user processes when the user logs off or shuts down the computer.
LowLevelHooksTimeout – Reduces system waiting time before killing not responding services.
MouseHoverTime – Reduces popup delay time to show popup description faster when you move mouse cursor over an item.
NoLowDiskSpaceChecks – Disables the low disk space check so that you don’t get the annoying low disk space notification in system tray.
LinkResolveIgnoreLinkInfo – Prevents Windows from wasting time in searching for a program which no longer exists in your system when you try to open its shortcut.
NoResolveSearch – Prevents Windows from searching for the disk drive to resolve a shortcut.
NoResolveTrack – Prevents Windows from using NTFS file system’s tracking feature to resolve a shortcut.
NoInternetOpenWith – Disables “Search on Internet” prompt in “Open with” window so that you can directly see available programs list.
WaitToKillServiceTimeout – To tune up your PC reduces system waiting time before stopping services when the services are notified about shut down process.
DesktopLivePreviewHoverTime -This key value set the value for Aero Peek preview activation time.You may not find this key already in registry editor so you will have to create this DWORD (32 bit) key as shown in the Pic-(ah) above. Windows 7’s Aero Peek lets you see the desktop when you move your mouse cursor over to the “show desktop” button at the end of the taskbar at the bottom right hand corner. The standard delay time for the Aero Peek preview is 500 milliseconds, or half a second. You can set the value to higher (a longer delay time) if you’re activating it too often by accident, or to lower (a shorter delay time) if half a second is just too long.
Type in how many milliseconds (1000 milliseconds = 1 second) you want the delay time to be, and click/tap on OK.
NOTE: 500 milliseconds may be a good delay time to tune up your PC, but adjust the delay time to meet your needs though.
ExtendedUIHoverTime– When you roll over taskbar icons in Windows Vista and in Windows 7, little previews appear which is called Taskbar Preview. The standard delay time for these previews is 400 milliseconds, or just under half a second. If this is too slow (or too fast) for you, you can adjust the delay time as per your need to tune up your PC.
ThumbnailLivePreviewHoverTime – Whenever you move the mouse cursor to the taskbar over a running application icon, the thumbnail preview of the running application becomes visible. Also when you move cursor to the Live Preview Thumbnail (then all the running applications will become transparent and the application for which you have moved the cursor on will become active, to give you a clear display of the application. You will experience that windows is taking sometime to display the running application when you move the mouse cursor on its Live Preview Thumbnails.In order to Tune up your PC adjust this live preview delay time to the desired value for this key.
DisablePagingExecutive – Setting the value 1 for this key will move the windows Kernel (ntoskrnl.exe) to system memory. If the Windows Kernel is in system memory(RAM), it will run slightly faster than if it were on your hard drive. Setting this value to 1 is useful when debugging drivers, because all of the code and data is always memory resident. It also improves performance on machines with a lot of memory, because it prevents disk reads to get code or data and is the best tune up step.
To make the most of it I personally recommend you to use this tweak only when you have more than enough RAM for your workload otherwise on low memory systems this can force application code to be needlessly paged and reduce performance.
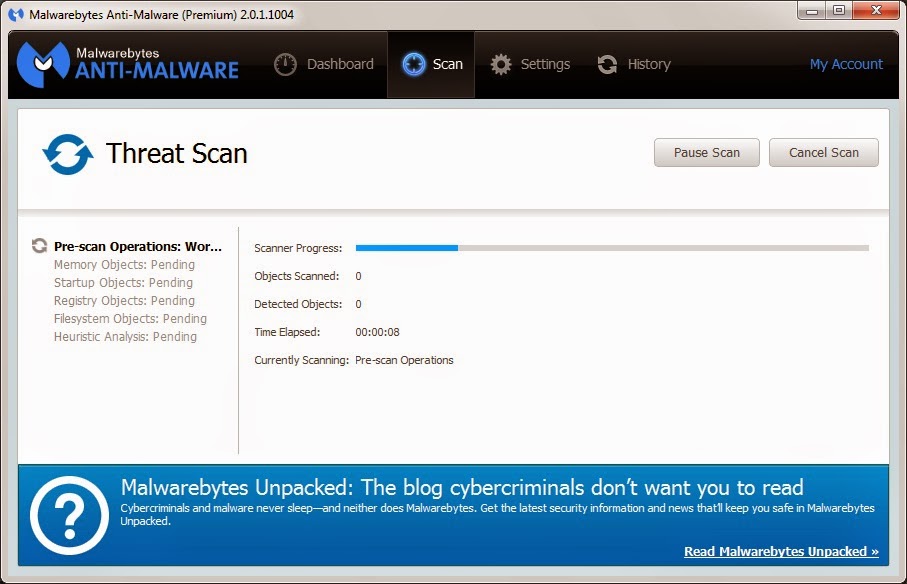
13. Scan the computer with Anti-Virus, Anti Malware, Anti-Spyware and Adware Blocker.
Now let me tell you that most of the time your computer and Internet both are slow because of Malware, Viruses and Spywares, they are the hidden software or codes which keep running in the background and use your computer’s precious resources (Like Disk spaces, Processor, Memory, and Internet Bandwidth). So in the process of optimizing your computer to Tune it up, you must run the scan with mentioned tools and clean your computer from viruses,Spywares and Malwares. And this is all what Geek Squad ‘s technician does and charge you $80.So Running scan with these Security software is a must, you should run the scan twice a month to keep your computer Tuned. There are multiple security software available in the market like Norton, McAfee, Bit Defender, KasperSky, Avast, AVG, Panda Internet Security etc. But I would recommend not to Invest money in Security software because I have seen the situation thousand times that even the computer which has a Paid Security software with active subscription goes infected with Viruses like FBI-Virus or National Security Agency Virus, Adware and Malware. I would just have a Free version of Antivirus ( AVG , Avast , Avira, Microsoft Security Essentials ) and will scan my computer with MalwareByte (Anti-malware software) and Super AntiSpyware which I would buy for lifetime @ $50. Avast is a good Antivirus among all free versions of Antiviruses. So install this onto your computer and keep it updated and run the scan. You can download all these tools from download section of my Blog.But Avast could not be good for some of the computers which have Low memory, it could rather slow your PC down so in that scenario the best option is to install Microsoft Security Essentials which is also free.
14. Remove Unnecessary or Unknown software from your PC
Some time we download programs from internet and try to install them and we don’t pay much attention during the Installation process when you are clicking on next and next you also check the unwanted complimentary software coming with them and they get installed in the system silently and keep using the system’s precious resources which also make your computer slow.
Some time you install programs for testing purpose or for one time use only and it is never used thereafter and you leave it running in your system that make the computer run slow. You should uninstall (Remove) these type of old and unwanted programs from windows computer in order to tune up to make it run faster . Because even though you are not using these programs but some services and system files of these programs load in Windows all the time. By completely uninstalling these unwanted programs on your computer help to improve system performance. Programs can be uninstalled from control panel. Go through the steps mentioned below to uninstall a program from your computer.
1. Click on Start button and then click on Control Panel in Start menu now under Control Panel window, first of all make sure you have changed the View By option to Small Icons at the top right hand side as shown in the picture.
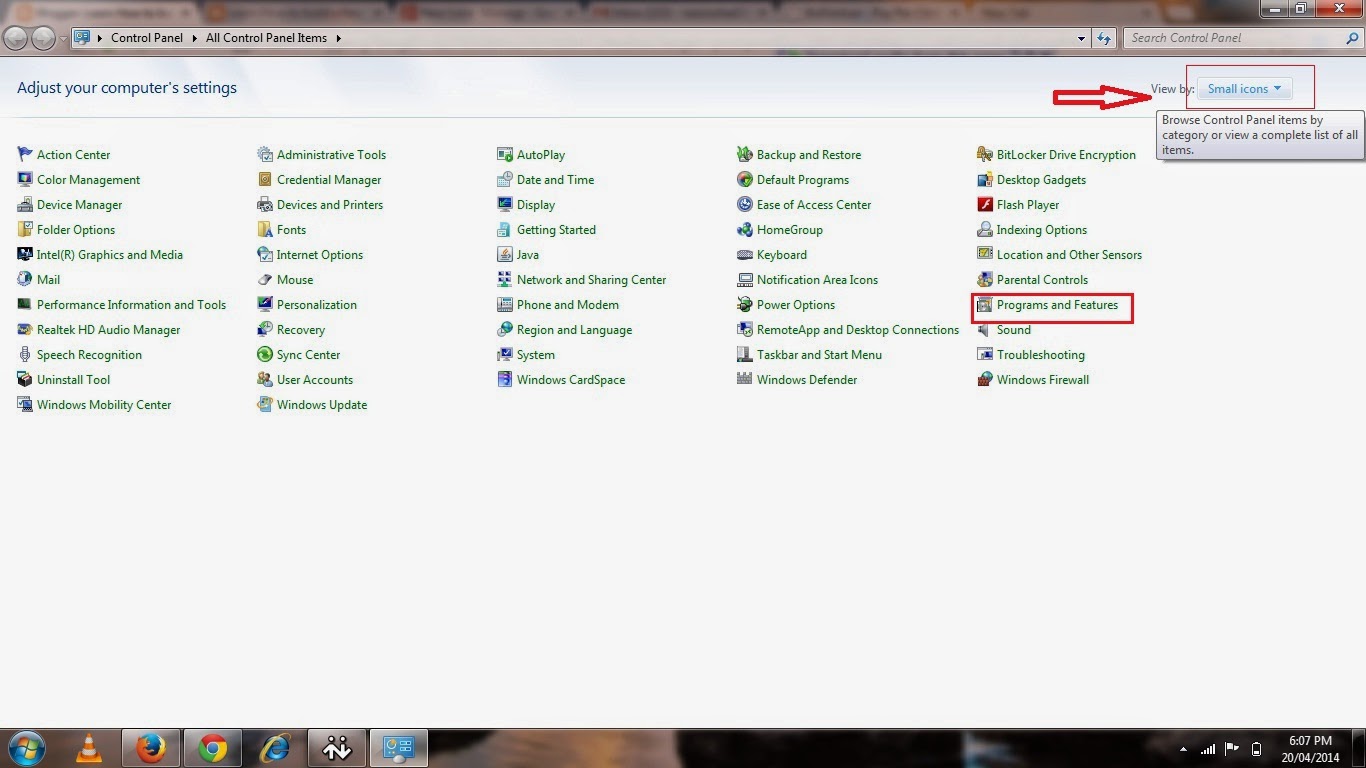
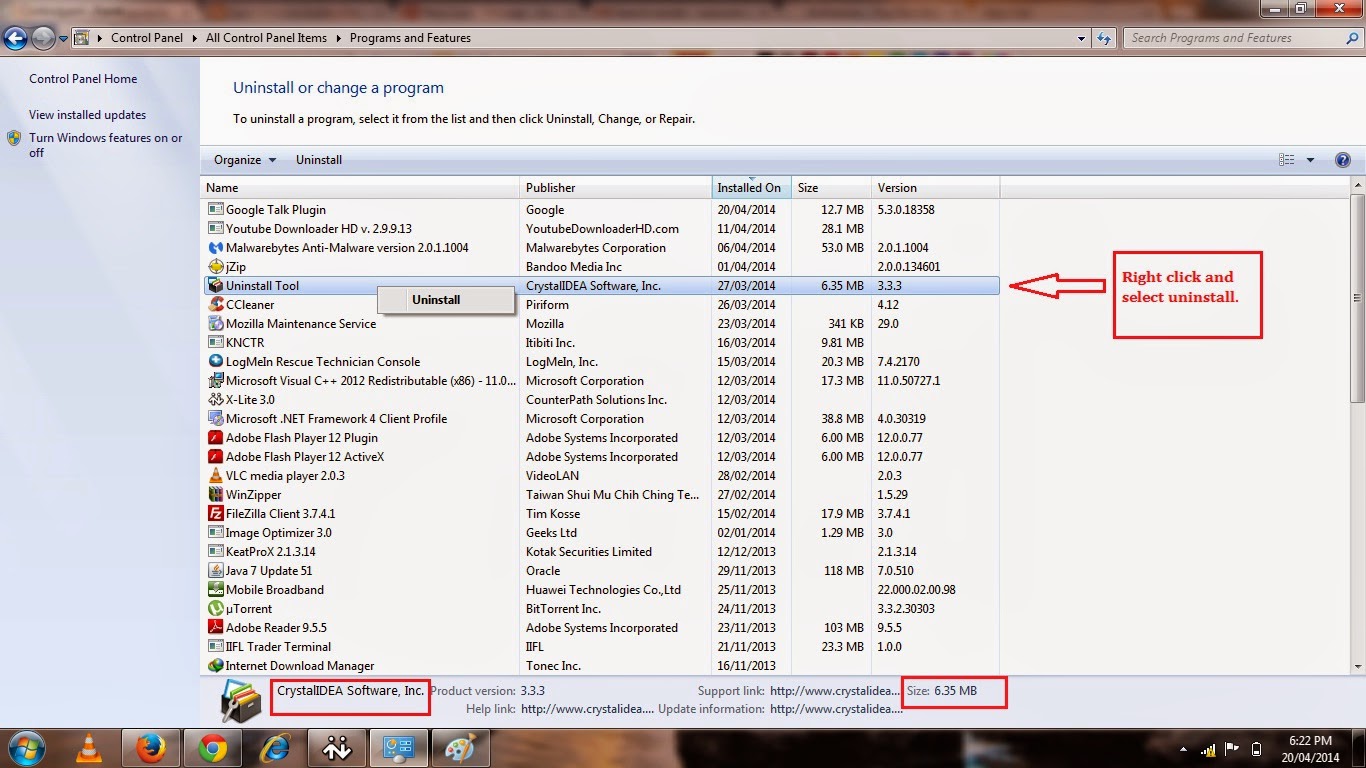
2. Click on Program and Features option in control panel and then its gonna open a list of all the Programs installed on your computer so look through the list and just uninstall the unnecessary software by right clicking and selecting uninstall to tune up the computer.Be careful here because if you unknowingly remove any windows application or driver software you computer might become unstable so you may loose that program so just remove the Junks and Malware or Toolbar.
That was all about tuning up a PC. I hope you liked it. There are hundreds of options and steps to tune up and cleanup a PC, but I have mentioned the most commonly used methods, which does not have much negative effect on other third party software and on operating system. If you have already tried all the above methods and your computer still runs slow, you may want to consider formatting the system partition and clean re installation of operating system.


![The Apex Legends Digital Issue Is Now Live! Apex Legends - Change Audio Language Without Changing Text [Guide]](https://www.hawkdive.com/media/5-Basic-Tips-To-Get-Better-On-Apex-Legends-1-218x150.jpg)


