


 Header Through Cloudflare")


By default, clipboard history can hole only one item at a time. However, if you turn on the Clipboard history option on your Windows 11 PC, your device’s clipboard can hold up to 24 items you have recently copied or cut. In this article, we will be discussing how you can turn on and use Clipboard history in Windows 11.
Turning on clipboard history proves to be super useful in the process of copying several texts at the same time. You can copy multiple snippets simultaneously according to your comfort. Ultimately, this feature is time-saving and beneficial.
Also Read: How To Change Taskbar Time To 12 Or 24 hour In Windows 11
So now, without any more time, let’s dive directly into the topic.
Points to be discussed:
- Use Clipboard history in Windows 11
- Turning on Clipboard history in windows 11
- Removing an item from the Clipboard history
- Pin items on the Clipboard
Use Clipboard history Windows 11
Using clipboard history to copy a particular item is beneficial when you have cut or copied multiple snippets or images. So, below is how to do it.
- First of all, Place the cursor where you want to paste the text/image.
- Now, Press Windows + V key combination.
- Clipboard history will appear on the screen.
- Scroll through the clipboard history.
- Select the item you want to copy.
- Click on the selected item.
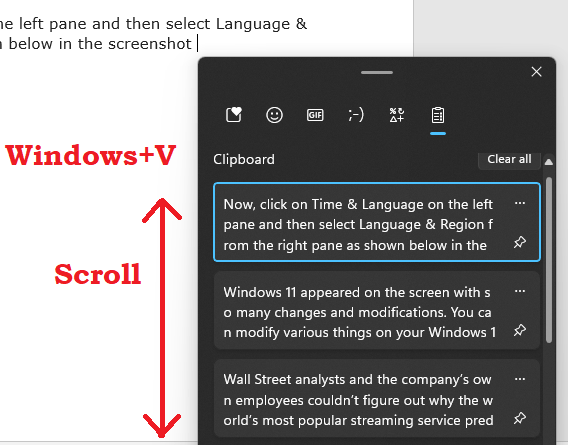
That’s it. This way you can paste multiple items from your Clipboard history. In short, you just have to press Windows+ V key combinations. The Clipboard history will display on your screen. Now, you can easily scroll through the items and select what you wish to paste. After selecting, just click on the item.
Also Read: 5 Tricks To Open Command Prompt In Windows 11
How to turn on Clipboard history in Windows 11
Before making use of the clipboard history on you, you must make sure that the Clipboard history option is turned on in your Windows 11 device. By turning on the Clipboard history, your clipboard can keep a record of the recent 25 items you have copied or cut. So, steps to turn or switch on the Clipboard history feature are mentioned below:
- Go to the System Settings on your Windows 11 PC.(Windows + I)
- Now, Click on System on the left-pane.
- Next, System options will display on the right-side.
- Scroll down.
- Click on Clipboard tile.
- Turn on the Toggle next to Clipboard history.
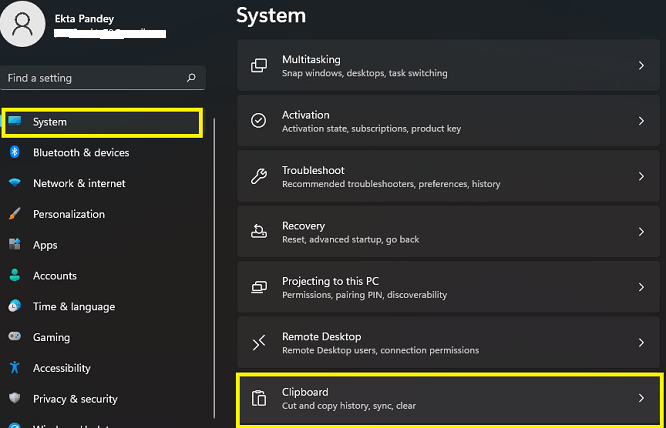

Note: In the first step, you can also access the System Settings by going to the Start menu. Just click on the Windows icon on the taskbar. Now click on the Settings icon.
How to remove an item from the Clipboard history?
Removing an item from the clipboard history is a piece of cake. Well, given that only 24 items can be held by the clipboard at a time, it is essential to keep on removing unnecessary items from the Clipboard history. Additionally, when you add the 25th item to the Clipboard history, the first item will automatically be deleted from the list.
However, you can manually get rid of the clipboard items you don’t need anymore. Below is how to do it.
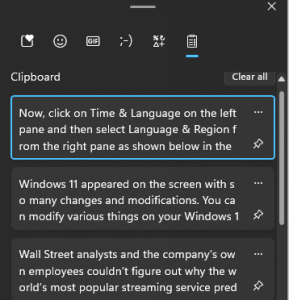
- Press Windows+ V key combination.
- The clipboard history window will immediately display on the screen.
- From the list of clipboard items, Select the item you want to get rid of.
- Click on the ellipses( three-dot) icon on the Right Side of the Selected item
- Now, tap the trash can icon to get rid of that item.
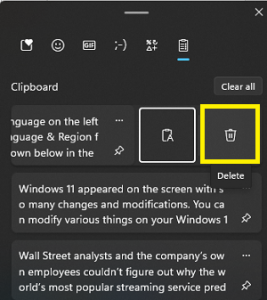
Hurray! you have successfully removed the unnecessary text/snippet from the clipboard history.
Also Read: How To Change Lock Screen Timeout In Windows 11
How to pin items on Clipboard?
Since the introduction of the Clipboard history feature in 2018 in windows, copying and pasting text/images has become easier. Having mentioned that you can add or remove items from the clipboard on your Windows 11 device, we will be discussing the Pin the item feature of the clipboard.
In your Windows 11 device, you can easily Pin items that you repeatedly need to paste. This feature saves your time as you don’t need to scroll through the clipboard history continuously to spot a copied snippet/image.
So, to pin an item in on the Clipboard history, just follow a few easy steps which are mentioned below:
- Press Windows + V keys at the same time.
- The clipboard history windows will display on the screen.
- Scroll through the items copied or cut on the clipboard.
- Now, Select the item/snippet/image you want to pin.
- Click on the pin icon next on the right side as shown below in the screenshot.
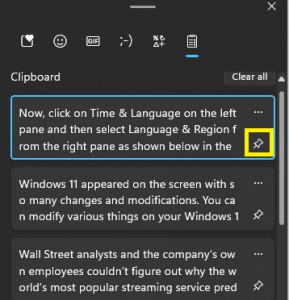
So, by following these steps you can effortlessly pin items on the clipboard history.
Also Read: 4 Best Methods To Get Transparent Taskbar In Windows 11
Conclusion
So, this is how you can effortlessly turn on and use Clipboard history on your Windows 11 PC. Additionally, the clipboard history feature allows you to pin items as well as get rid of unnecessary items from the list. Moreover, this is a great feature to utilize especially when you want to copy multiple snippets. Also, you get rid of the tedious task of copying again and again. Just Press Windows + V and get access to all the recently copied or cut items.


