


 Header Through Cloudflare")


In this article, we will explain the process of using Yoast SEO on your WordPress website.
If you are a newbie to blogging and WordPress is your preferred platform, you must know about Yoast SEO. Yoast SEO is a plugin specifically made to empower WordPress websites. This Plugin enables you to manage the SEO factors of your website, particularly the content. Thus it will help you improve the SEO standards of your website. Apart from this, Yoast SEO also analyses the readability of your content so that it ranks higher on the Search Engine Results Page.
Here we are explaining to optimize your WordPress website using Yoast SEO. That will help you build the most informative and professional website possible.
Also Read: What Is Linktree And How To Use It For SEO?
What Yoast SEO does?
Suppose you are thinking about starting a blog but you are ignorant about Search Engine Optimisation (SEO), will it mean optimizing your website to rank higher on search engines is a tough nut to crack? Well, that’s not true. Yoast SEO, a Plugin for your WordPress websites will help you optimize your website on popular search engines such as Google, Bing, and Yandex. YOAST SEO judges your content on several parameters and helps your blogs and content rank above your competitors.
SEO the acronym for Search Engine Optimization is the process of optimizing the On-Page factors of your website and its pages. Optimizing your website means modifying the web page’s content to meet the standards of the Search Engine’s algorithm. When your website’s content is at par with the guidelines laid down by Google, the Search Engine will automatically rank you higher on the search results.
Keep scrolling to know how you can leverage this powerful tool to get the best results possible from your WordPress blog and its content.
Also Read: How To Create Beautiful Box Shadows In HTML And CSS
The installation process of the Yoast SEO plugin
Before you begin using the Yoast SEO plugin on your WordPress website, you need to install it. The installation process of the Yoast SEO plugin is very simple. All you need to do is to stick to the steps given below and the plugin will be installed on your website in no time:
- To install the Yoast plugin on your WordPress website, you need to sign in to your website. For this enter your WordPress login credentials and press the Login button. When the login attempt will be successful, you will see your website’s dashboard.
- Next, you will see the dashboard menu of the left sidebar. Look for the Plugin option here and click it to access all the Plugins on your page.
- When you are on the Plugin page, you will see an ‘Add New’ button next to the ‘Plugins’ label.
- Click on the button and enter ‘Yoast SEO’ in the search bar given on the top right corner.
- You will instantly see the Yoast SEO plugin in the search result. Press the ‘Install Now’ button under the plugin.
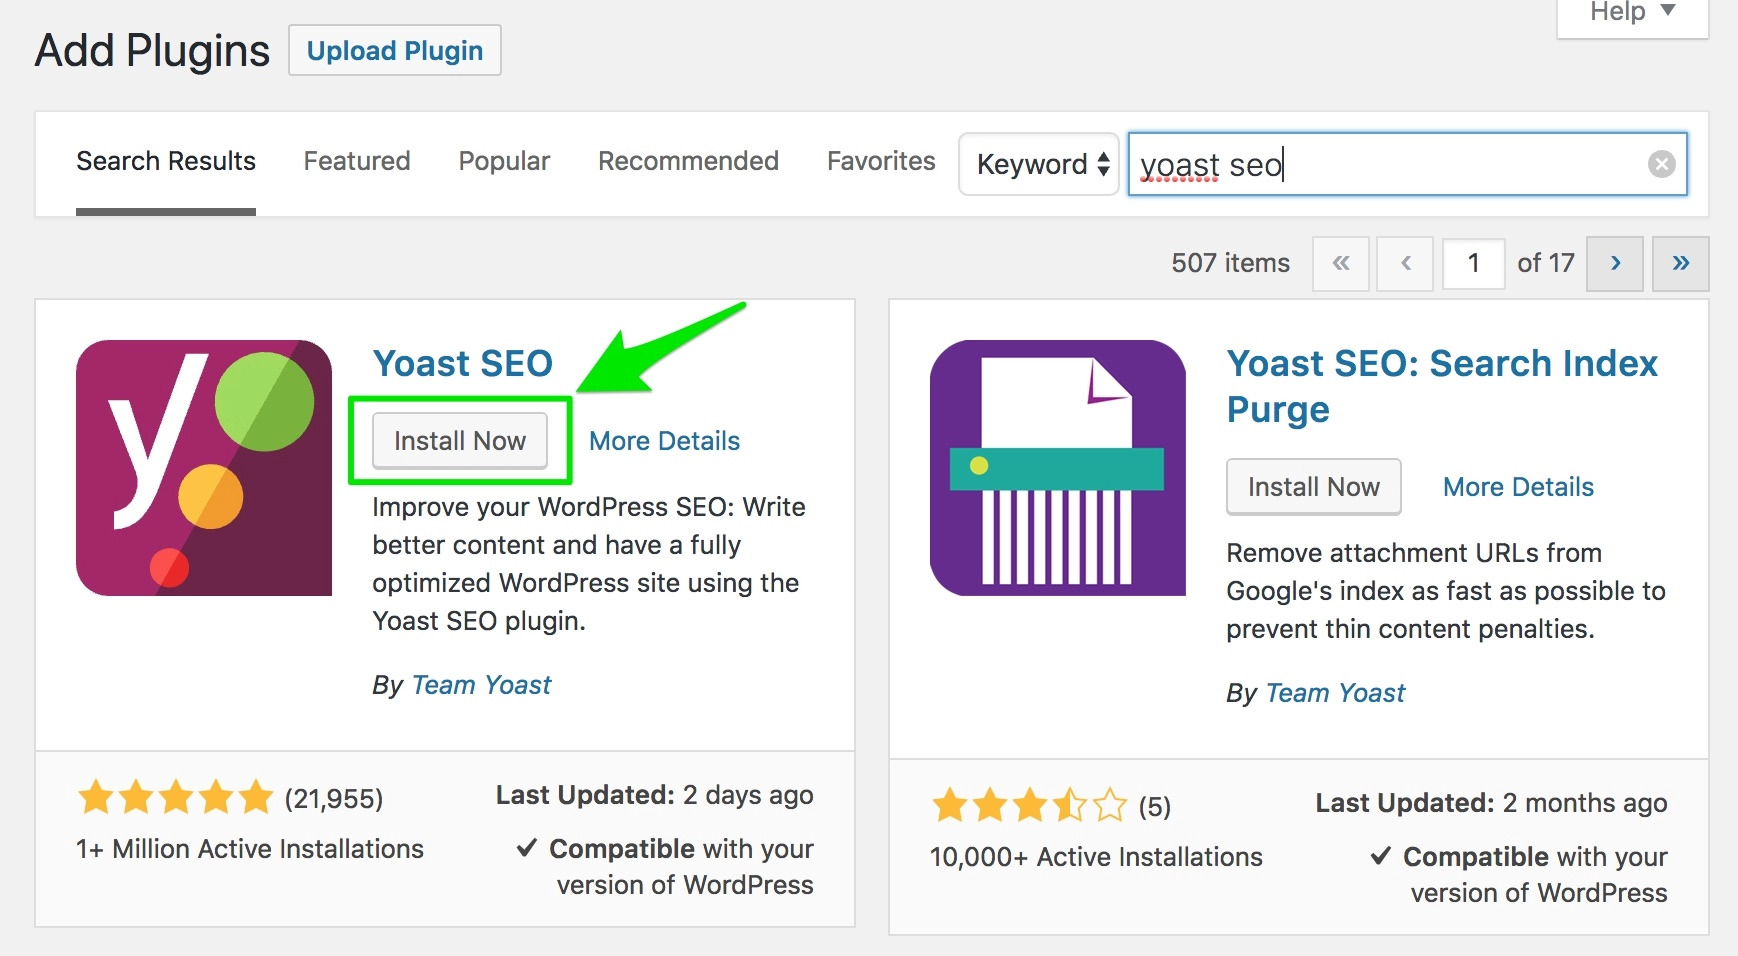
- When you’ll do it the Yoast SEO plugin installation process will start.
- After the plugin installation is successful, you will see an ‘Activate’ button which will appear in place of the ‘Install Now’ button.
- Just press the Activate button and you’ve good to go!
Also Read: How To Use Hashtags For Branding And Promotions
The Yoast SEO Configuration Wizard
Now that the installation is successful, go back to the WordPress website’s dashboard.
Next, click on the SEO tab and you will directly land in the Yoast SEO dashboard.
If you’re here for the first time, you will see a headline saying ‘First Time SEO Configuration’ along with a Configuration Wizard Link on it. You will have to click on this link to reach the first step of the Yoast SEO Configuration Wizard.
When you see the first screen of the ten-step wizard, click on the ‘Configure Yoast SEO’ button that you see. Now, let us walk you through all the steps of the Yoast SEO configuration process:
Step 1: Environment
In this step, you will see two options named Option A and B and you will have to pick one of them.
Go for Option A if your website is already live. However, if your website is still under development will have to choose option B.
Step 2: Site type
In the next step, you will have to choose a category that can categorize your website. We have chosen the ‘Blog’ category here.

Step 3: Organization or person
In the next step, you have to mention whether your WordPress website belongs to an individual or an organization.
If you choose the Organisation option here, you will have to give the following details in this step:
- Provide the name of your organization
- Upload your organization’s logo with the minimum dimensions being 112x112px. A square logo is recommended here.
- Mention all the social media handles of your website. If your website belongs to an organization, you will have to provide its social media profiles here.
There is no compulsion for you to enter all of the profiles here. This information will help Google generate your organization’s graphic card.
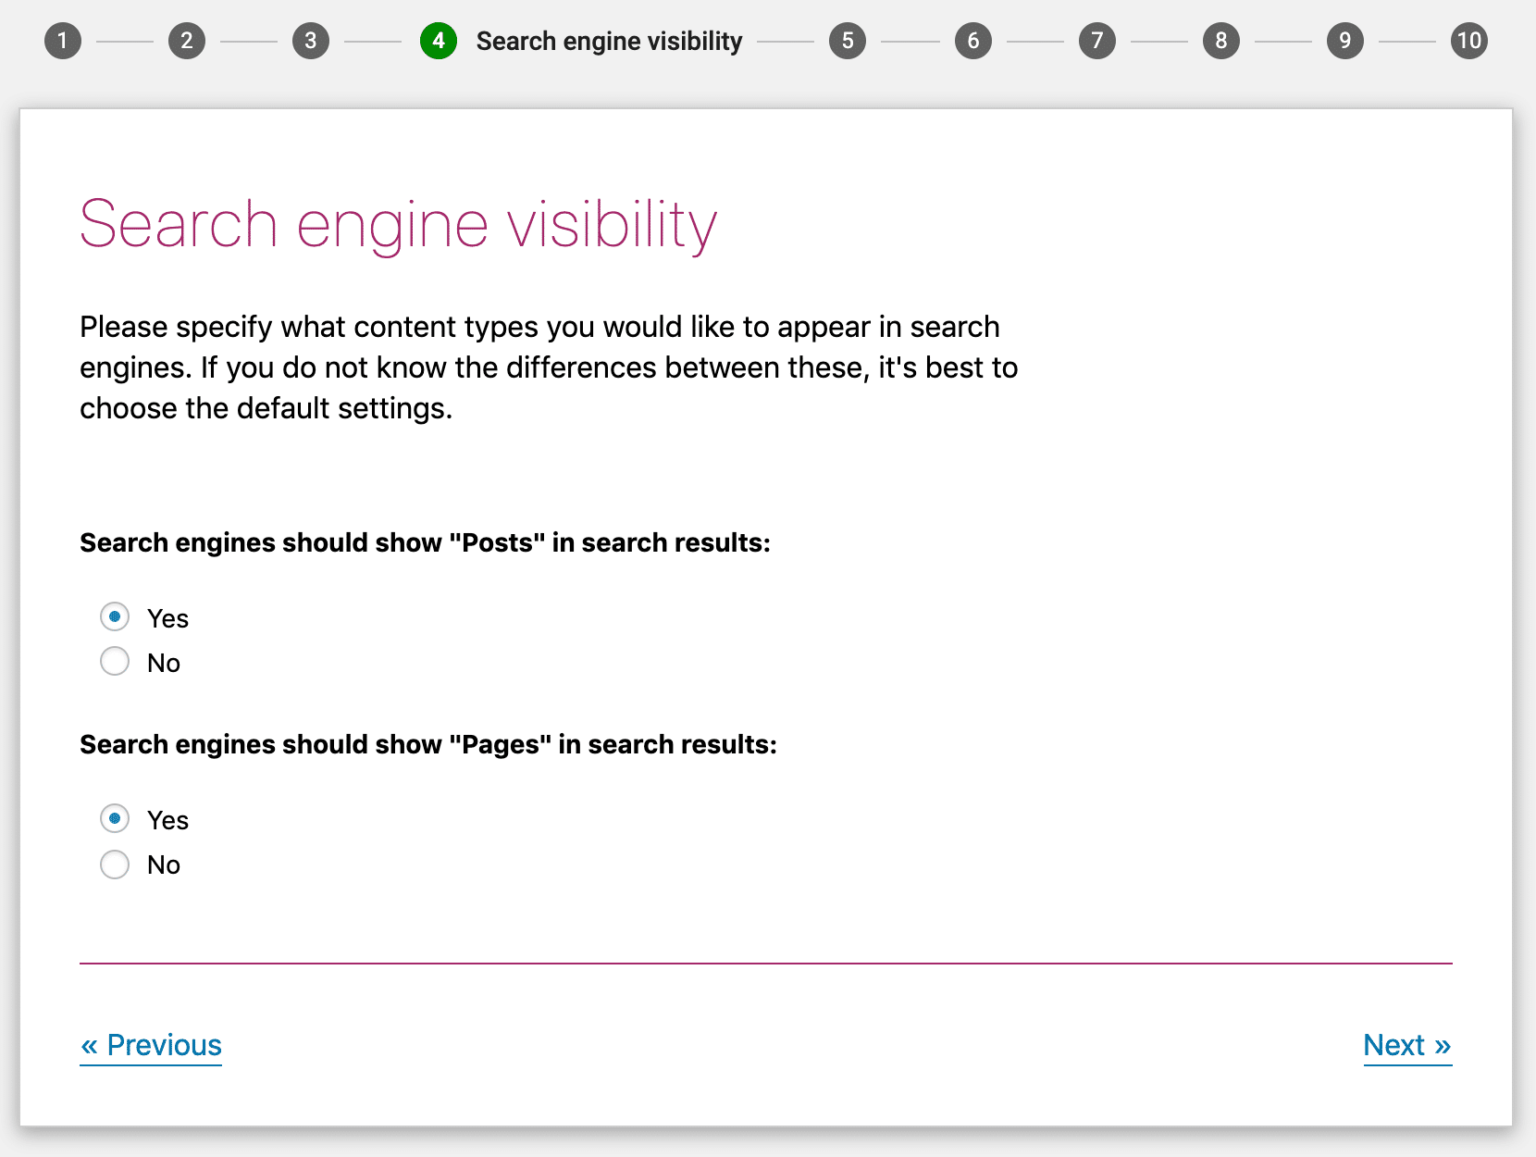
Step 4: Search Engine Visibility
In the Search engine visibility step you have to specify the type of content you want the search engines to index. If you are a novice and clueless about these settings here, it’s best to leave these options to the default settings.
Step 5: Multiple authors
Here, you have to specify whether you are the only author on your website or if there are others also. If you choose ‘No’ here Yoast SEO will automatically deactivate your author’s archives so that there is no issue of duplicate content in the future. Deactivating your author’s archives will show the search engines that it shouldn’t index this page.
If your blog will have many authors in the future, choose ‘Yes’ here.
Also Read: How To Use Hashtags For Branding And Promotions
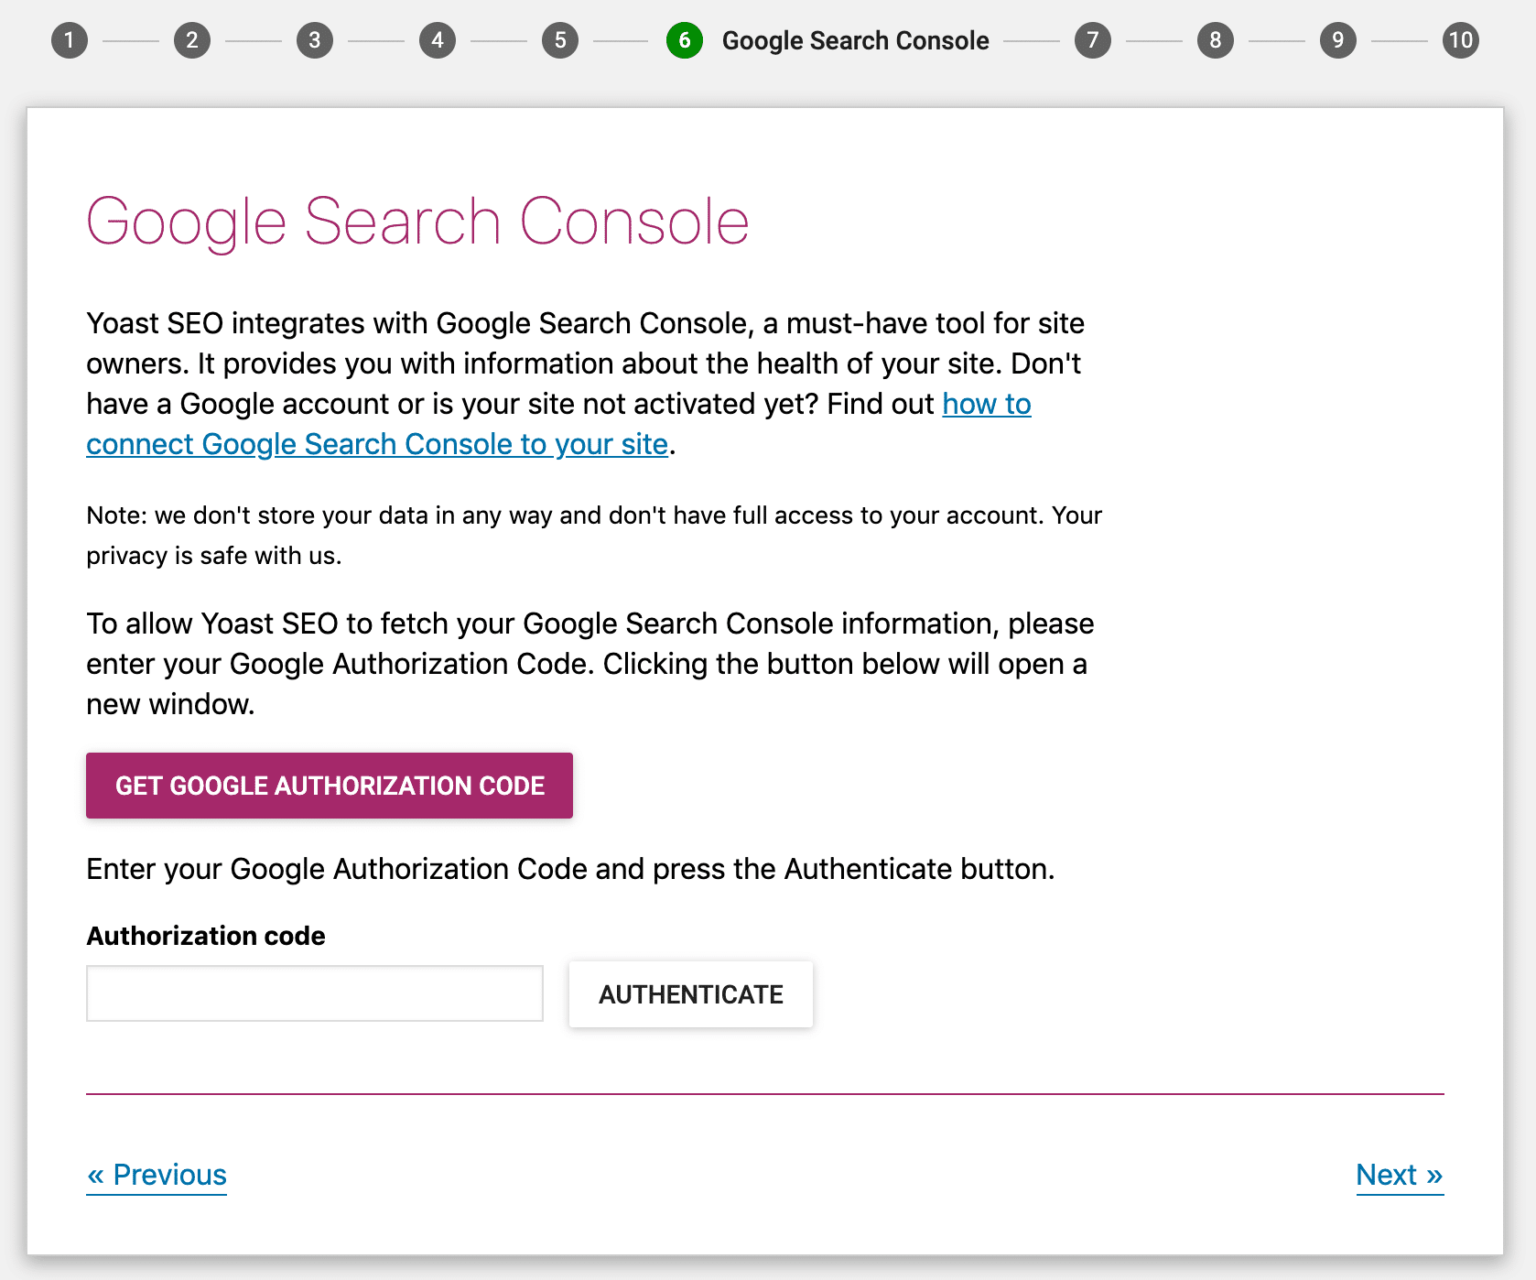
Step 6: Google Search Console
Since Yoast SEO syncs with your Google Search Console, it needs to import the information from the Search Console. If you have already signed up for the Search Console, you need to permit Yoast SEO to integrate and access the information from the Search Console. For this, click on the ‘Get Google Authorization Code’ button given here.
- When the authorization code is generated, you will have to enter the code in the text box given here.
- However, if you do not use Google Search Console at this moment, you click the Next button to skip this step.
Step 7: Title settings
The title of the blog post shows blog will appear on the Google search results and the tabs of any web browser.
By default, Yoast SEO will craft your blog title in this manner:
Post Name *Separator* Website Name
In this step, you will have to mention their details:
- Your website name
- The *Separator*
Now suppose if we choose this Separator “-”, the title of the blog post ‘How to Use Yoast SEO on WordPress’ will appear this way on the Search Engine Results Page.
How to Use Yoast SEO on WordPress – Hawkdive.com
Step 8, 9 and 10
That’s all that is important in the configuration wizard. In the next steps that will follow, Yoast SEO will ask you to do the following:
- Sign up for their newsletter
- Purchase the premium version of Yoast SEO, keyword research training, and plugin training
- In the last step, you will see the ‘Success’ notification. Finally, click the Close button.
Congratulations, you have successfully configured the Yoast SEO for your WordPress website.
Also Read: How To Create Beautiful Box Shadows In HTML And CSS
Getting Started with Yoast SEO Meta Box
The Yoast SEO Meta box is that component of the plugin that you will see when you will draft a new blog post. The Meta Box is the most important part and gives the following benefits to your WordPress website:
Analyze the content of your webpage to improve the SEO quality and content readability
Enables you to tweak the settings to set how your blog post will appear and function on the Search Engine Results Page and your social media profiles. Yoast SEO Meta Box is usually present under the Classic WordPress Editor. However, it may appear anywhere else depending on the position of other plugins and your website’s themes.
Moreover, if you use the WordPress Block Editor, this meta box will appear on its right side.
The meta box appears underneath the (its exact location depends on your other). If you’re using the new, you can find this on the right-hand sidebar as well.
Yoast SEO Meta Box is categorized into three sections which are as follows:
- Content Optimization Tab- This section is further divided into four parts, namely, Snippet Preview, Readability analysis, Focus keyphrase, and Cornerstone content
- Social Media Tab- In this tab, you will find a few settings related to your social media
- Advanced Tab- The advanced settings tab includes the advanced settings related to content optimization
Content Optimization Tab
The content optimization tab notifies you of how optimized and readable the page’s content is. The plugin keeps in mind the popular search engine guidelines. This tab is further divided into four sections:
- The first section of the tab is named Snippet preview. In this section, you can see the preview of how the blog post will appear on the search results. Below the live preview, you will also see an ‘Edit Snippet’ button. If you want to modify the SEO title and Meta Description of the blog post, you will have to press the ‘Edit Snippet’ button. As soon as you will edit this information, you will also see its live preview.
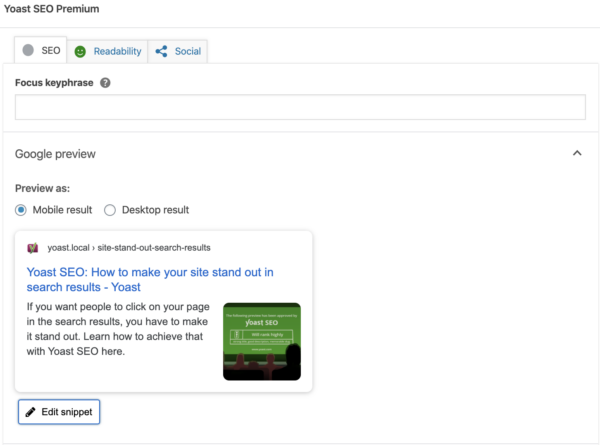
- Image Source: Yoast
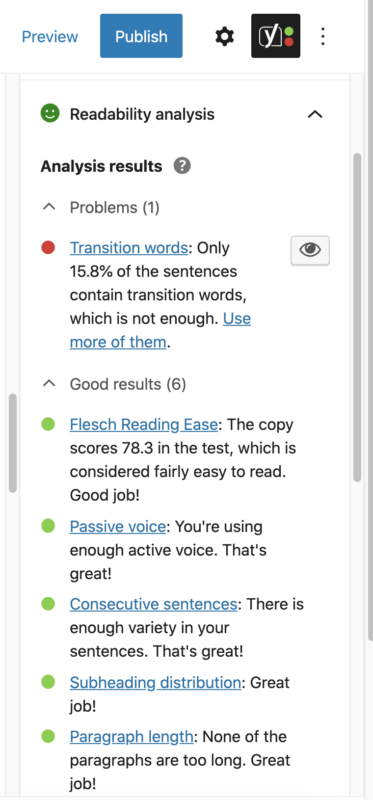
- Next comes the Readability analysis area. In this section, Yoast SEO judges your content and tries to see how well your page’s content can be understood by your site’s visitors. Based on the analysis, the Plugin will also suggest you some improvements to elevate the readability of your blog post.
Keep in mind that the suggested points are not perfect. So there is no need to score well on all the points here. However, they provide you with guidelines that help improve your website’s content. - The Focus Keyphrase area shows how well the content is optimized for the keyword on which you want to rank the content. You will have to enter the Focus keyword in the text box on the top of the tab. After this, the Yoast SEO Plugin will analyze the content and see its performance against that keyword.
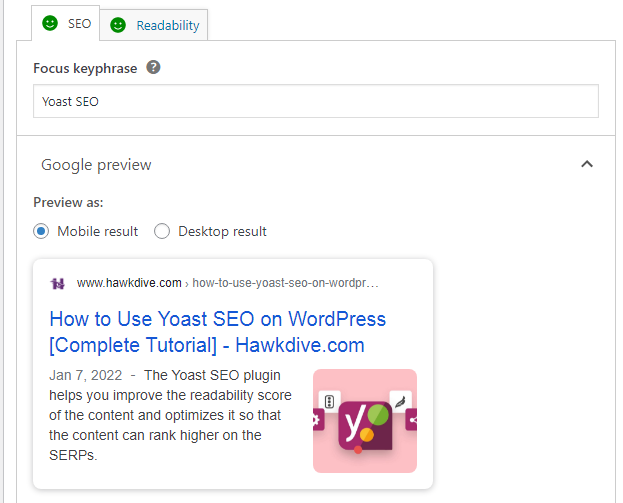
After this, it will show in what areas the content is doing well and what improvements are needed in your content. In case you have installed Premium Yoast SEO, you will also get an option to add related keywords below the main keyword.
Note: Yoast SEO score won’t rank or help rank you higher on the Search Engine; it only advises to improve your content on the key points.
- Lastly, we have the Cornerstone Content section. Here you can choose whether you want to allot this post as the cornerstone content or not. Cornerstone content is the most important and best works of your website. These are the pages that you want the search engine to rank higher on the results page. Cornerstone content is usually, long and informative posts that include all the aspects and details of the given subject.
Also Read: Best 5 Productivity Apps For Students In 2022
Social Media Tab
After the Content Optimization tab, the second tab is known as Social Tab. The Social Tab of Yoast SEO allows you to set how your blog post will appear when you will share it on different social media platforms. The free version of Yoast SEO allows you to configure the preview of blog posts only on two social media platforms- Facebook and Twitter.
Generally, social media platforms can intelligently pick up this information by themselves when you will share the URL. However, if you want to modify some information, you can do it yourself.
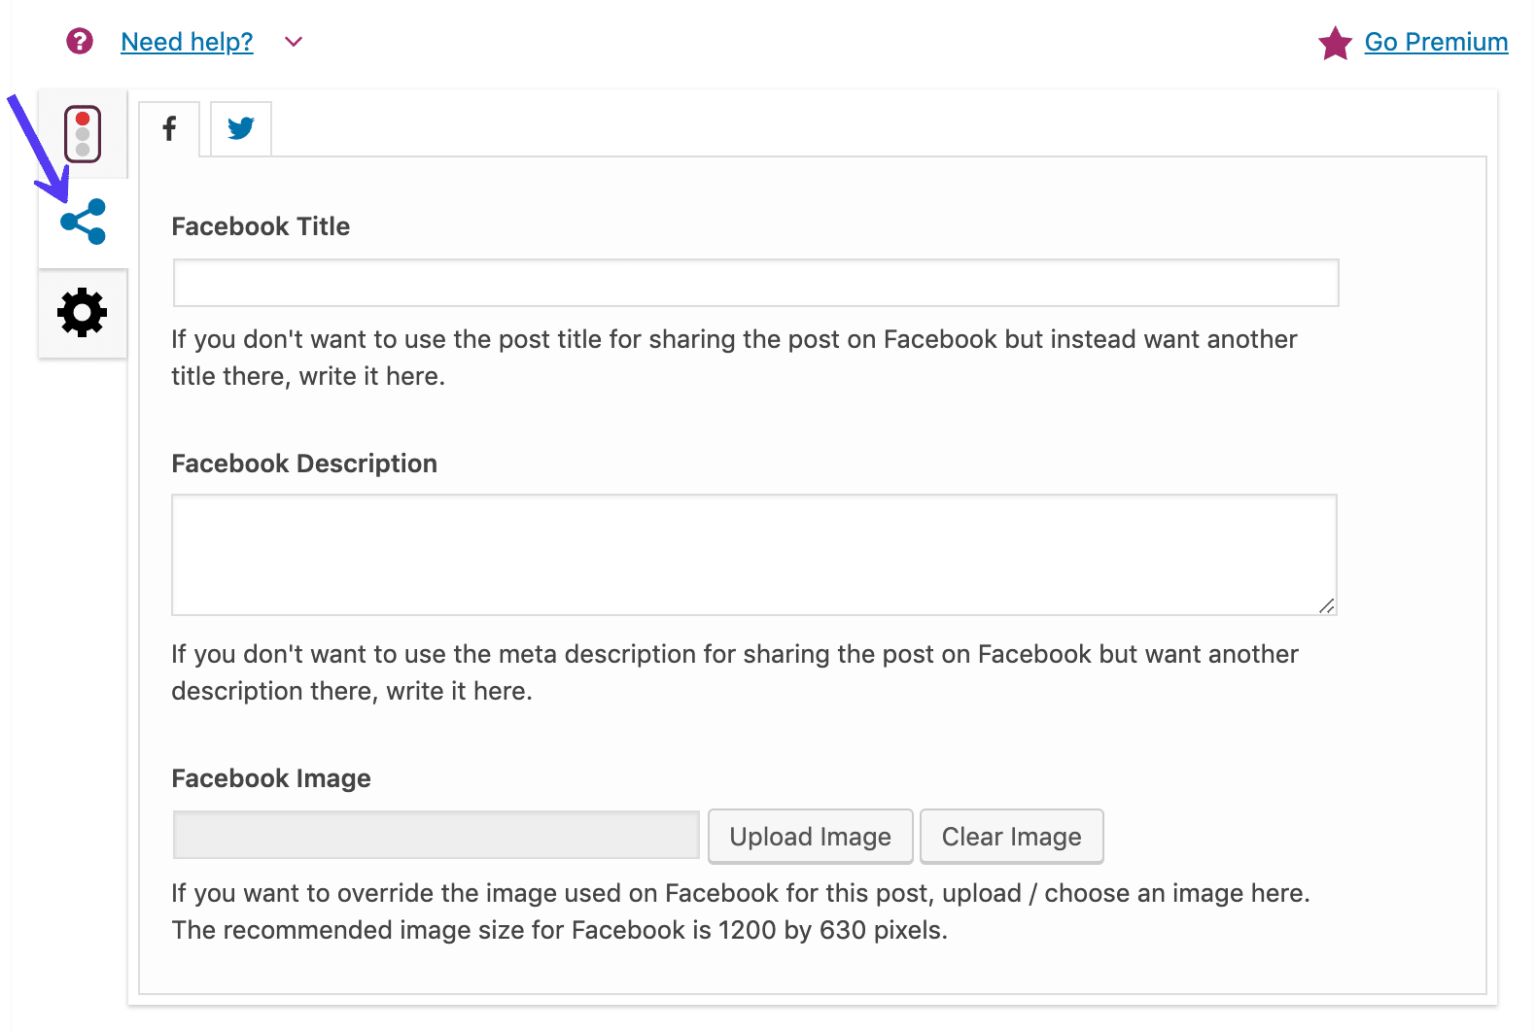
Luckily, you don’t have to manually enter all the details in the relevant text boxes for each blog post; Yoast SEO can do this automatically for you. These are the details that the plugin will automatically pick up for your content.
- SEO title
- Meta Description
- Featured Image
As mentioned above, you are free to modify any of the pre-filled information.
Advanced Tab
Advanced Tab is the last section of the Yoast SEO Meta Box. Generally, you have to change the settings in the ‘Advanced’ tab and leave all the options to the default. However, if you know what you are doing, here are the settings that you can tweak yourself:
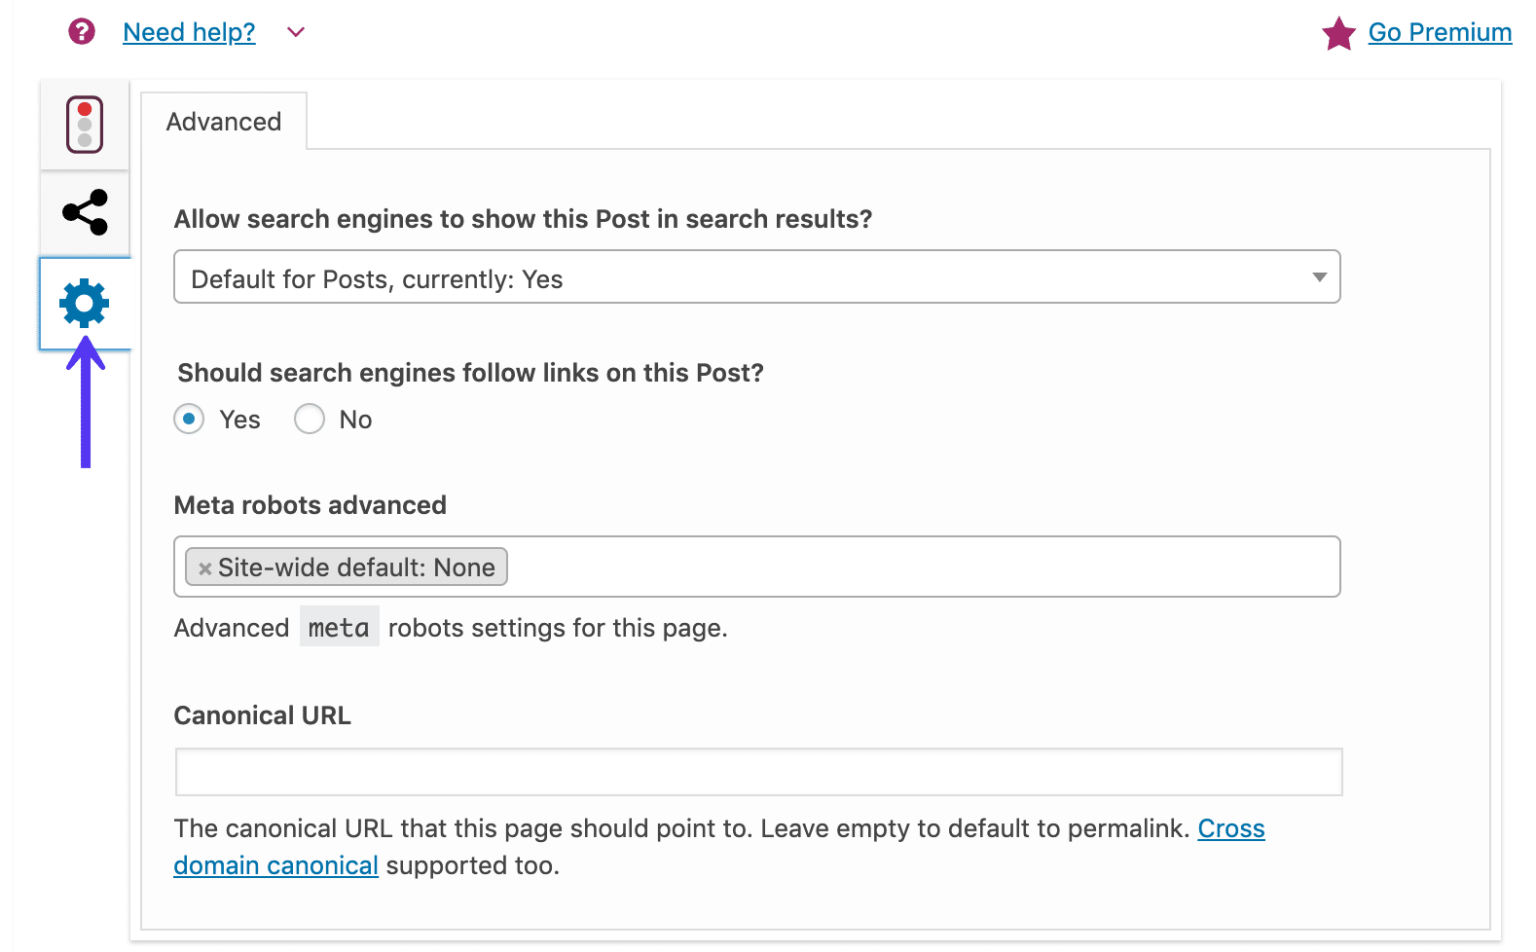
- Inform Google not to index this content or web page. Doing so will restrict this page from appearing in the Search Engine Results Page.
- Setup a canonical URL to prevent publishing duplicate content.
Conclusion
That is pretty much what you need to know about Yoast SEO if you are getting started on WordPress. Yoast SEO will surely help you improve your website’s readability and will optimize your website’s content. If you have any other questions regarding this powerful WordPress plugin, feel free to ask us in the comments below.


