


 Header Through Cloudflare")


Although Windows 11 was released not long ago, Windows 10 continues to lead to desktop OS popularity. Those who have transitioned from an earlier version of Windows to Windows 10 may find these hints and recommendations especially useful.
Windows 10 supports a wider variety of programmes than previous desktop operating systems and has more functionality overall. There are major updates to Windows 10 every few months.
After all these years, we’re continually learning new things about Windows 10 with our customers. There’s still a lot to find out about techniques and strategies.
Remember that Microsoft releases new versions of its software several times a year with improved features, so be sure that your PC runs the most recent version of Windows 10!
1. Multi-window scrolling with background scrolling

Any window, not just the one you’re now working in, can be scrolled in Windows 11. This is helpful if you have several windows open and want to look at them all at once. For instance, you may use it to open additional sub-menu options in new windows to avoid repeatedly going back and forth on the same page.
Try simultaneously starting up two different apps, such as a web browser, and a text editor or word processor. Adjust their placement on the screen so that you can read at least part of the text on both. You can scroll the second window by hovering the mouse or touching the touchpad while you are in the first window. You should still be able to scroll up and down the page when you aren’t using that window.
If it isn’t already, you may turn on the feature by toggling the option to “Scroll inactive windows when you hover over them” in the Settings menu under “Bluetooth & devices.” Then you can scroll a foreground window by placing your mouse over it and using the scroll wheel.
2. You can stay on task with the help of Focus Assist.

Someone always needs something from us whenever we try to get some work done. Notifications interrupt us at inopportune times, diverting our focus from the tasks.
With the help of Focus Assist, you won’t go off course. With the flip of a switch, you can stop all alerts, notifications, and other distractions from interfering with your concentration.
- Focus Assist can be accessed through the Settings > System > Focus Assist menu.
- You can set the no-interruption software to activate at specific moments, such as when you’re giving a presentation or sharing your screen, or you can use it manually to avoid potentially embarrassing notifications.
- Notifications can have varying levels of importance, which the user can adjust.
- There will always be people who need to get in touch with you, no matter how busy you are.
- Choose “Priority Only” from the Focus Assist menu. To the right of this choice is “Customize your priority list,” where you may set up a list of contacts and programmes for which you want to get urgent notifications.
- If you want to get things done, you’ll have to put everything else aside.
- If your mind wanders while using Focus Assist, no problem; when you turn it off, your action center will display a summary of what you missed.
- Don’t let anything detract from your concentration.
3. Timeline for Windows

Timeline allows you to resume reading easily or listening from a previous session. Simply accessing the functionality by clicking the Task View button in the taskbar or by hitting Windows Key + Tab will bring up a timeline of your past actions and incompatible applications. Even more helpful, Microsoft allows you to combine relevant programmes into “Activities” in Timeline, so opening that budget paper from a week ago, for example, will also bring up the presentations and websites you referenced. Even more so, this syncs across devices, making it potentially handy if you use multiple PCs, though Microsoft regrettably plans to discontinue Timeline’s cross-device syncing shortly.
However, there is one small snag: Although Microsoft provides tools for developers to bake in compatibility, only a select few apps now operate with Timeline. Everything from Microsoft Office to Adobe’s Creative Cloud to built-in Windows 10 programmes like News and Maps, and the Edge and Chrome web browsers (after you install a Microsoft extension). Settings > Privacy > Activity History is where you’ll find the option to turn off Timeline.
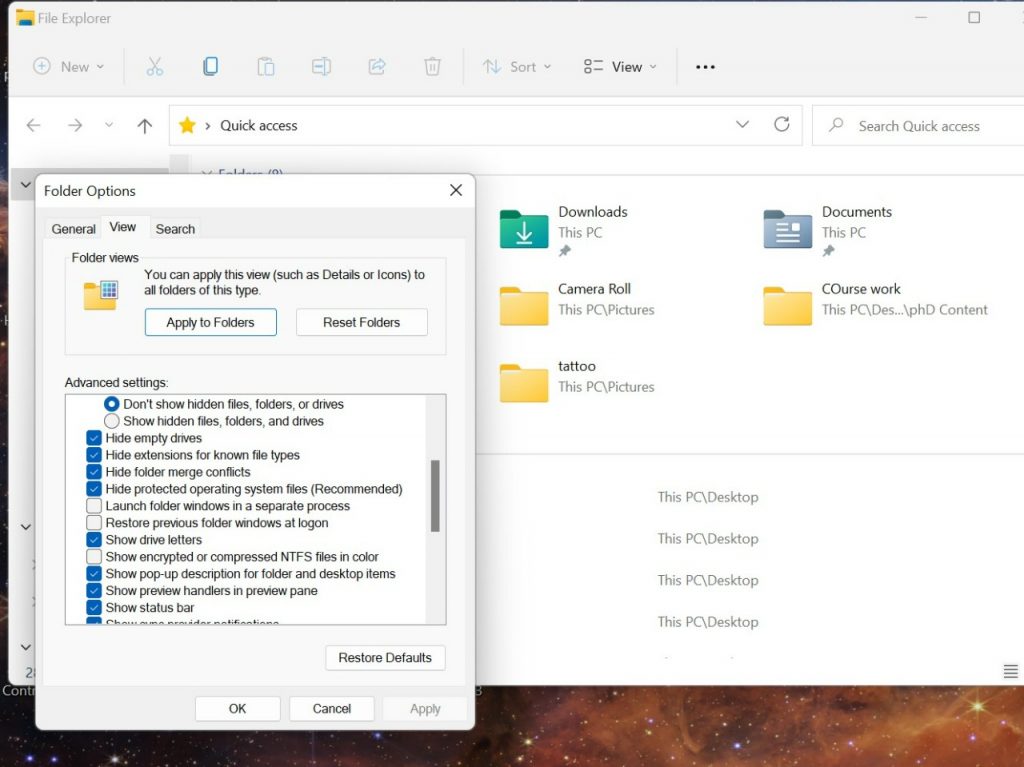
4. File Explorer should display filename extensions

Microsoft’s default behavior of hiding file extensions makes it difficult for users to locate specific file types like JPEGs and JPGs. Follow these steps to view file extensions in File Explorer:
- Press the “Search” button in the taskbar, then “File Explorer Options” (Other routes, like as a Start menu search, will also get you here, but this one is sufficient.)
- Afterward, select the View tab in the new window that has opened.
- Third, ensure the option to “Hide extensions for known file types” is not selected. Choose Apply and then OK. All of a file’s extensions should now be displayed in File Explorer.
- File Explorer’s Options panel provides additional customization options, such as the ability to reveal empty drives, hidden files and folders, and more.
5. Cloud-based clipboard
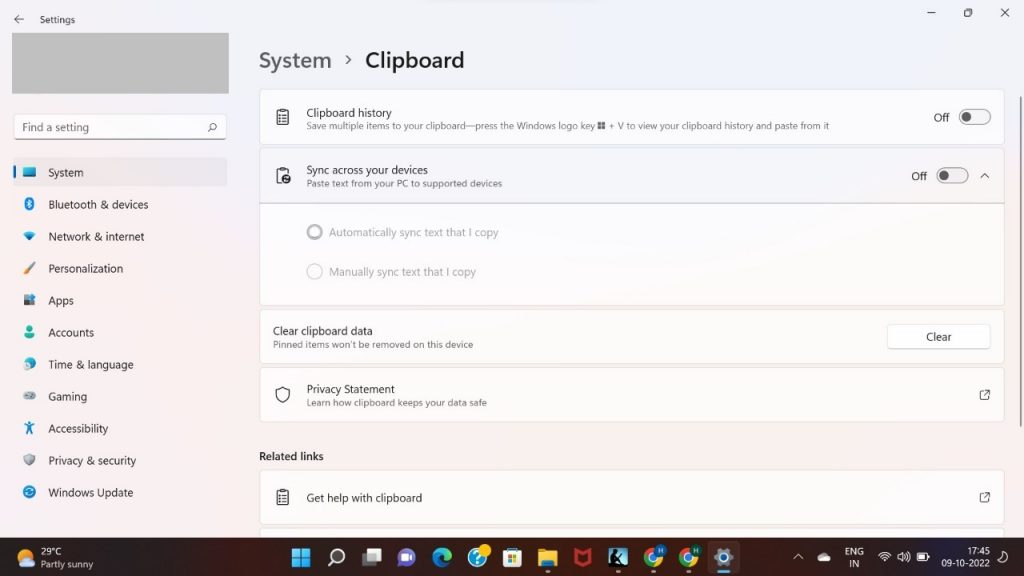
While Windows 10’s copy and paste has been erratic for years, the cloud clipboard introduced in the October 2018 Update is a welcome improvement that allows users to share their clipboard across many computers. To begin copying and pasting information between computers, go to the “Start” menu, select “Settings,” and then “System,” followed by “Clipboard.” Then, make sure “Sync between devices” is checked.
Within this menu, selecting “Clipboard history” will allow you to copy and save several items to the clipboard for later use. This is some cool swag.
6. Windows with Linux
With time and effort, Microsoft has expanded its Windows Subsystem for Linux (WSL) from its humble beginnings with the Bash shell into a feature that will impress even the most seasoned programmers. The new version, WSL2, has improved performance by running Linux in a virtual machine with its own kernel. The Linux root file system can be used to store data that can later be accessed in the Linux virtual hard disc by way of Windows File Explorer. However, to utilise it, you must enable the Linux compatibility option and obtain a Linux distribution from the Microsoft Store. Ubuntu, Debian, OpenSUSE, and even Kali are just some of the distributions you can choose from.
Microsoft is incorporating a graphical user interface for Linux programmes into WSL2; however for the time being, the feature is most effective when used in a command-line environment. It works splendidly with Microsoft’s fantastic Terminal text editor, depicted above, allowing for unified control over Linux, PowerShell, and other command line utilities.
7. Stop typing and commence dictation
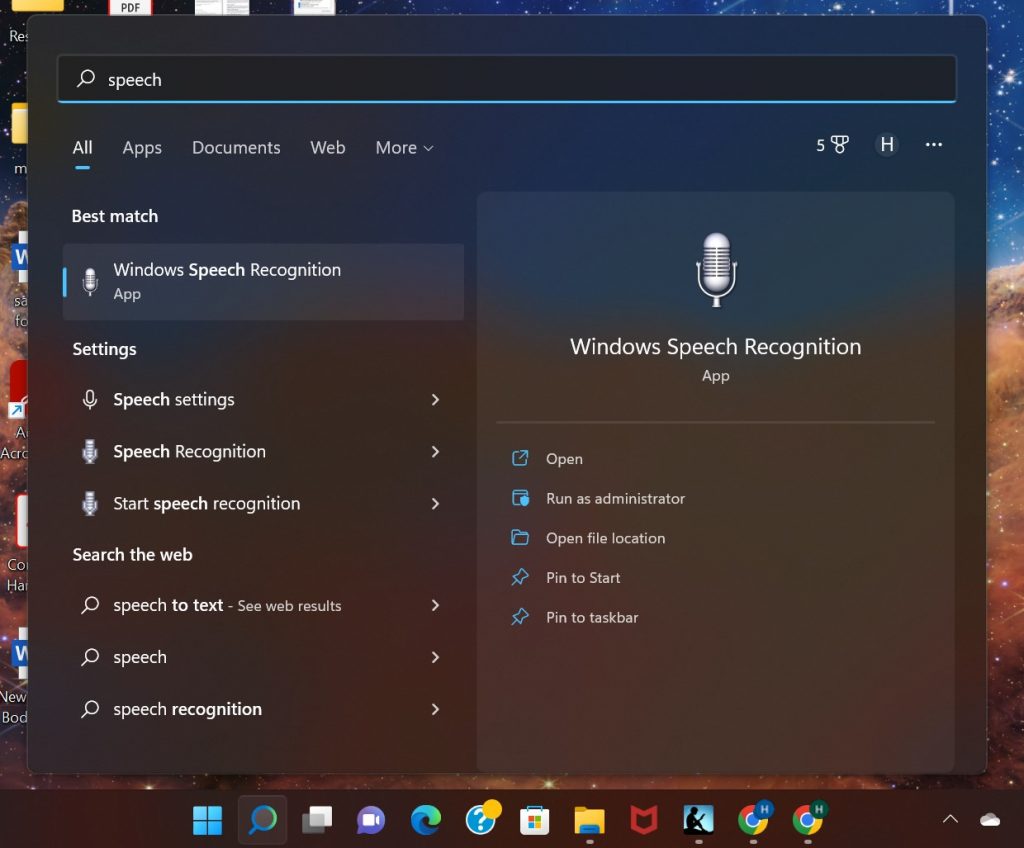
Rather than taking notes or writing something down, you can simply speak to your computer. Speaking to your computer is another option for controlling it and executing actions like launching applications, browsing menus, and activating buttons.
How to Get Started:
- Click the Start button, then type Speech into the search bar. Press Enter or the Speech Recognition Next button to continue with the Windows Speech Recognition setup.
- Determine whether you’ll use an external microphone, a microphone attached to your computer, or a headset. Proceed with the next step by clicking.
- Follow the on-screen instructions, do a quick audio test, and then make sure the switch is in the On position next to Allows you to dictate messages and perform other gadget functions by simply speaking.
- Put your mouse pointer in a text box, either in Windows 10 itself or in a third-party app like Microsoft Word. Press the Windows key plus the letter H to activate the computer’s microphone.
8. Make use of the night light and dark mode
When you work, is it late at night or early in the morning? You may have headaches and eye strain if your screen is overly bright.
- Settings > Personalization > Color is where you’ll find the option to make “dark” the system and app-wide default theme. This reduces the brightness of your screen, making it so that most of Windows’s apps and features display in black-and-white. You can experiment with it when in the day you use it to find what’s most beneficial.
- Night Light – With the prevalence of video conferencing tools like Zoom, you may have noticed that staring directly at your humongous screen results in an overexposed appearance. To activate “Night Light,” head to the menu and select Settings > System > Display. Night Light, a “blue light filter,” changes the display to warmer colors at night to help you sleep better and minimize eyestrain. However, if you turn it on during the day, you will appear MUCH better in all of your constant video conversations.
9. Protecting Your Windows Computer
It would be unwise of us not to cover the basics of Windows 10 security.
The following are only a few basic precautions you should take, but bear in mind that modern cyber security measures involve far more than just ensuring that your own computer has all the necessary settings enabled.
- If you want to know how to safeguard your company or home office, you should talk to an expert in the field of cyber security.
- Always use the most recent version of Windows. Windows is set up to install updates by default automatically. That implies you might get an update you didn’t ask for and have no control over. In most cases, you’ll want to install updates as soon as possible, especially if they contain critical security patches.
- If you haven’t done so already, set a password for your account. When installing Windows, many users don’t take the time to create a unique password to access the operating system. However, without a password, your computer is open to any hacker. To add a password, head to the settings menu, select Accounts > Sign-In Options, and click Add under Password.
Keep your anti-virus software updated and functioning. Although Windows 10 has some malware protection, we advise taking extra precautions. If you want to make sure you’re completely safe, you should talk to a professional in IT security.
- Keep your software up to date and remove unused programmes. The less exposed you are, the less likely someone will be able to hurt you. Reduce its size by removing unused programmes. It’s possible that this is preinstalled, unnecessary software that poses a security or privacy risk. Get rid of it if it’s not being used.
- Take the case of encryption. Someone can access sensitive information and possibly steal money if they gain unauthorized access to your computer while you are using it or if they gain access to your files remotely. Thought should be given to encrypting it. BitLocker includes Windows 10 Professional, Enterprise, and Education editions and encrypts fixed and removable storage devices. As before, it’s best to get help from a professional if you’re unsure how to implement such stringent protections.
- When you’re away from home, connect to your home network over a VPN. There have been concerns raised about the security of mobile Wi-Fi hotspots. Use a Virtual Private Network (VPN) that encrypts your data in transit if you need to perform anything sensitive online.
10. Sandbox in Windows
Windows Sandbox, introduce with the Windows 10 May 2019 Update, allows users to experiment with new programs and websites safely. Essentially, the function generates a second and isolates Windows instances within the primary one, where you can perform actions that should not be trusted. If everything goes wrong, you can merely delete the virtual computer and start over. Easy-peasy! If a file passes inspection, you can release it from quarantine and transfer it to the main Windows 10 installation. If you don’t mind taking a greater risk, the May 2020 Update includes support for networking and your PC’s GPU within Sandbox and the option to share a folder between Sandbox and your desktop.
11. Modify your screen’s refresh rate.

After several revisions and many years, the ability to change your monitor’s refresh rate is now available in Windows 10’s display settings with the October 2020 Update. Hallelujah. Before this update, adjusting your frame rate required digging into the obscure settings of the Device Manager or utilizing the Nvidia or AMD program, depending on your graphics card.
- The Windows 10 Settings app (System > Display > Advanced Display Settings) now allows you to change your display’s refresh rate. Most gamers will benefit from this advice, as it is directed at those looking to purchase displays with faster-than-average refresh rates. The higher, smoother refresh rates possible on such displays are often not used because high refresh rate monitors default to the more traditional 60Hz. It’s simple to verify and repair now.
- Even if you have a super-fast monitor but are concerned about battery life, the new feature under Display Settings makes it simple to increase the refresh rate for gaming but decrease it for regular desktop use. Most users will want to keep their refresh rate at its highest setting.
12. The Kaomoji and Emoji Keyboard
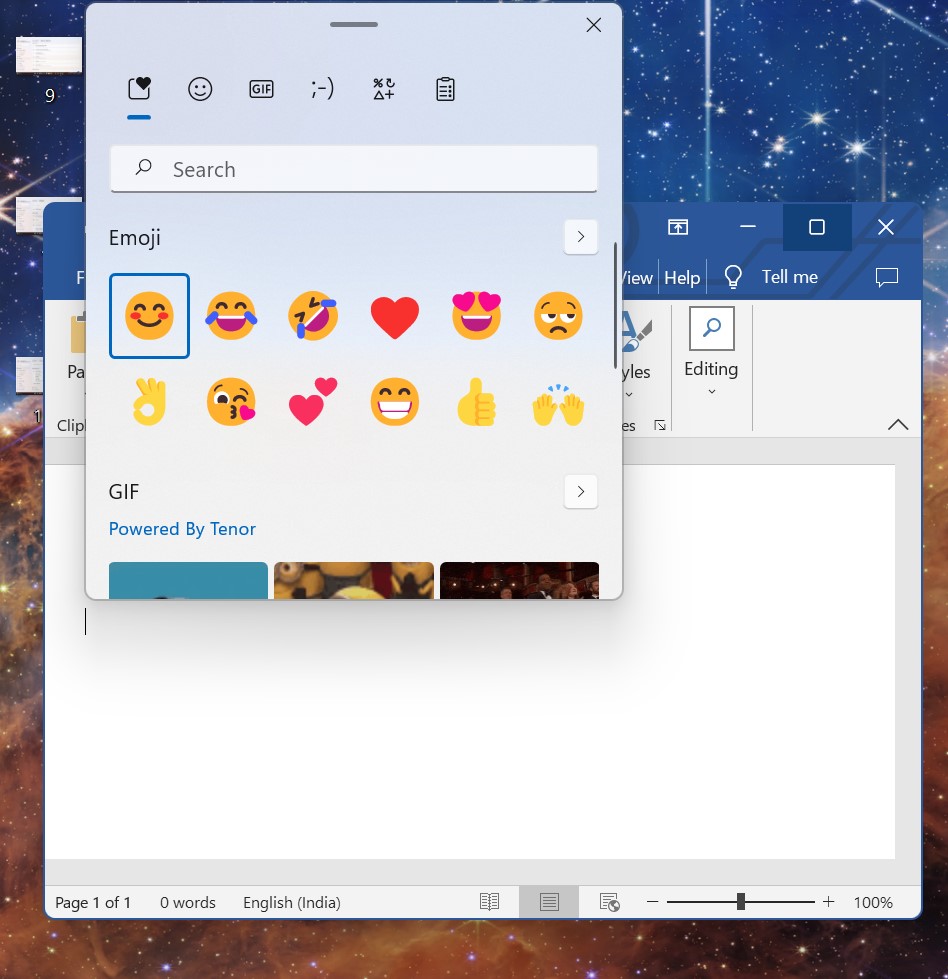
- Windows 10, in case you hadn’t heard, has a virtual emoji keyboard built right in, and it even beats out mobile OSes by supporting ASCII-made kaomoji! (⌐■ ■)
- To bring it up while typing, press the Windows key and the; on your keyboard simultaneously. With each significant upgrade to Windows 10, Microsoft has been expanding the available emoji and kaomoji.
13. To access the “hidden” Start menu
You probably know that in Windows 11 there is a second Start menu that can be accessed by pressing the Windows key or clicking the Windows icon in the bottom left corner of the screen. The Command Prompt, the System Settings, and the Task Manager can all be quickly accessed through this menu. You can use either the shortcut key combination (Windows key + X) or the context menu when you right-click the Windows icon (Start button).
14. Near Share
No more need for flash drives or messaging applications; with Near Share, you can easily share files and URLs with nearby computers without even being in the same room. Share in Microsoft Edge or File Explorer, and you’ll see the computers in your immediate area that support Nearby Sharing. When something is sent, the recipient is alerts with a pop-up window. This is similar to Apple’s Airdrop, however, it doesn’t work on mobile devices.
To begin using Near Share, you must first enable the Nearby Sharing option in Settings and ensure that Bluetooth and Wi-Fi are functional on your computer. Our tests showed transfer speeds to be quite poor, similar to those of Bluetooth, so you may need to use another method if you need to send very large files. According to Microsoft, the feature would utilise Wi-Fi or Bluetooth automatically, depending on which is more convenient and speedy.
15. Reposition the On/Start Button
You’ll immediately notice where the Start button is situated. Formerly situated in the bottom left of the display, it is now in the same horizontal alignment as the other icons on the taskbar. Don’t worry, though; you can easily undo the switch. Simply access Taskbar Settings by right-clicking the taskbar. Change the Taskbar’s alignment to the Left by selecting the appropriate option from the Taskbar behaviors menu. This will realign your taskbar such that the Start button is once again in the upper left corner.
16 Don’t use Alt+Tab with Edge
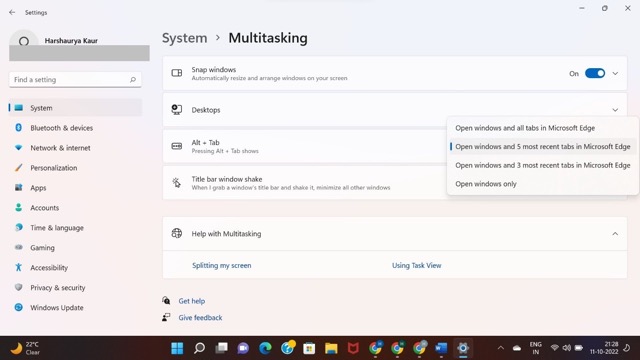
If you have multiple windows open, you probably utilise the keyboard shortcut Alt + Tab to quickly move between them. As of Windows 11, the Alt + Tab menu will also show open tabs in Microsoft’s Edge browser. By going to System > Multi-tasking in Settings and then selecting Open windows only from the drop-down menu next to Alt + Tab, you can prevent Edge tabs from being prioritized.
17. Hide the Recommended files
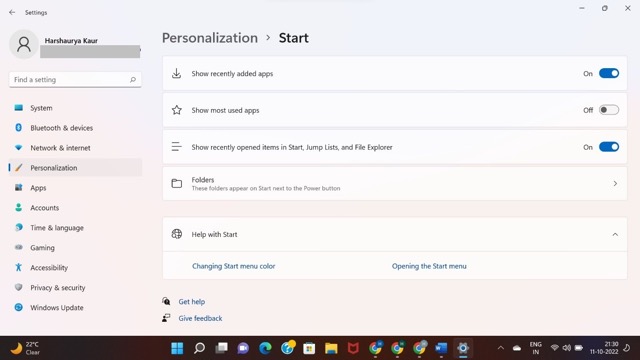
A significant element of Windows 11 is the Recommended section, which is driven by Microsoft 365. This part of the Start Menu displays your most frequently accessed or recently used files. However, many users find this to be annoying and choose to disable it, resulting in an empty Start button. Since this isn’t pleasing to the eye, we normally switch to displaying recently added apps instead. Learn the steps here.
- Start by pressing the Windows key plus the letter I,
- Then click on Personalize, and finally click on Start.
- Toggle the switches for Show recently added apps.
- Show recently opened items in Start, Jump Lists, and File Explorer, and Show all objects.
- Be aware that this setting is system-wide in Windows 11, thus disabling it will prevent you from receiving file suggestions in File Explorer.
18. Disable widgets and chat
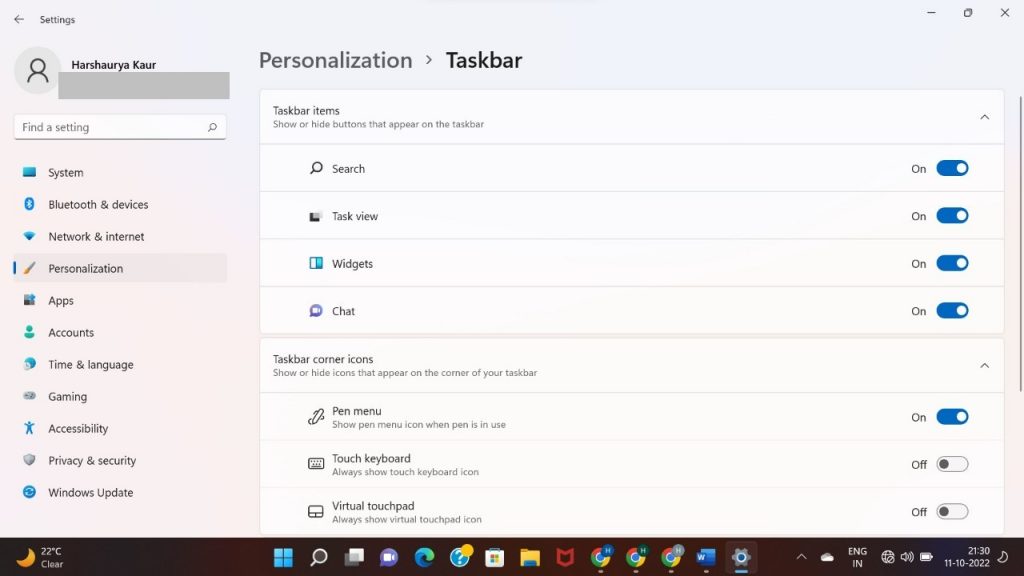
Two of Windows 11’s most notable new features are the Widgets and Chat functions. These allow you to stay in contact with the people and things that matter to you most. If you don’t find yourself using these options, you can disable them and free up some room on your Taskbar. Let me explain.
- To access Personalization, press the Windows Key + I combination.
- Select Taskbar, and then seek for an option to either conceal or reveal the taskbar’s buttons.
- Turning off Taskview, Widgets, and Chat is as simple as toggling a switch.
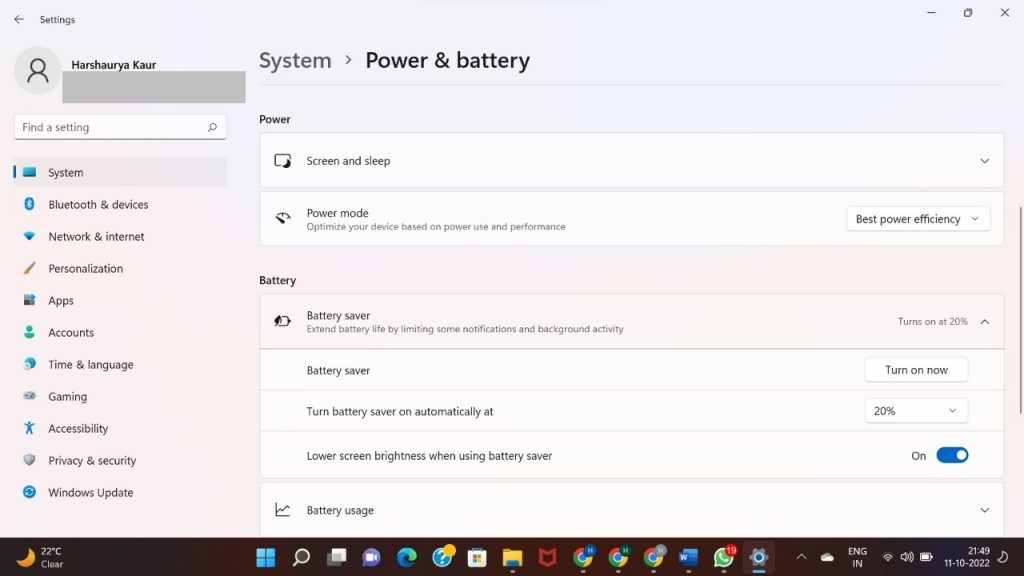
19. Adjust Sleep Times
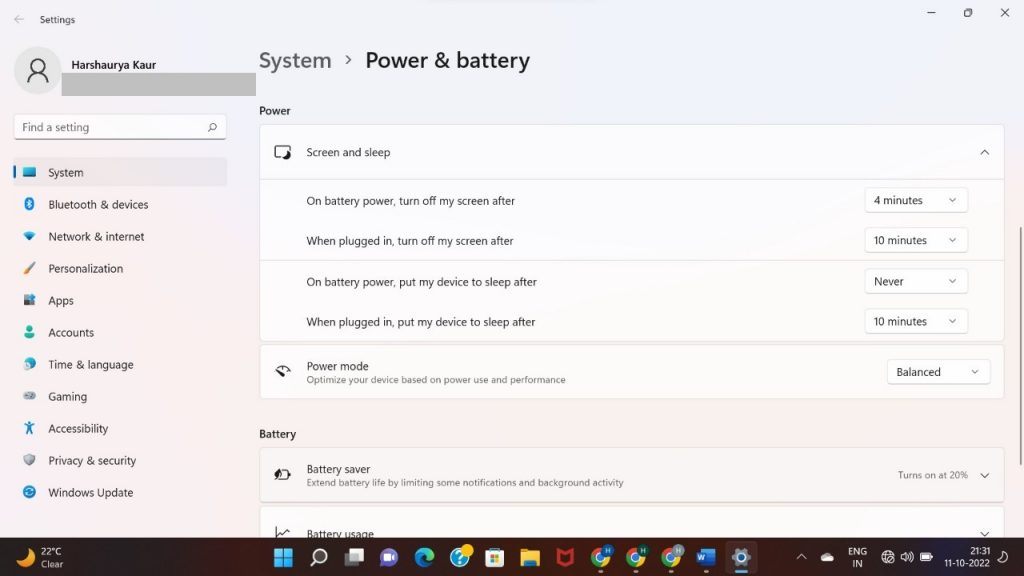
The battery life of a laptop is crucial, as is common knowledge. So, if you care about conserving battery life, you should modify your laptop’s sleep habits. You have control over the screen’s automatic shutdown and the system’s sleep settings. In order to make the necessary changes, just use these controls.
- If you want to change how your computer or mobile device sleeps, you can do so from the Start menu.
- To access the Power and Battery options, simply select the item from the search results and click on it.
- There are several options for customising your screen and sleep time within this menu.
- Whether your device is plugged in or running on batteries, you can set the idle timeout to the behaviour you choose.
20. Disable Sticky Keys
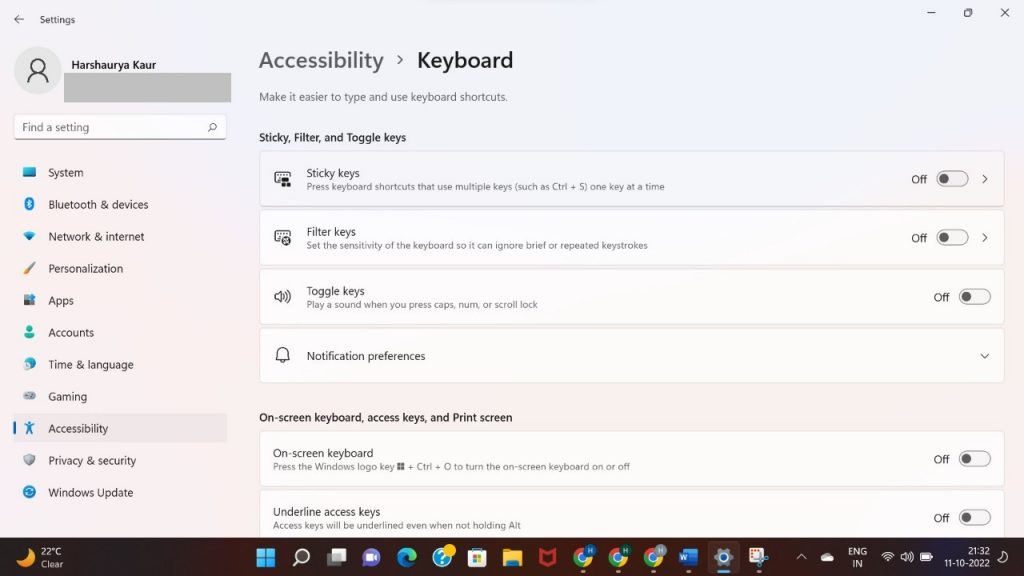
The Sticky Keys accessibility feature allows you to use a combination of keys by pressing them one at a time instead of simultaneously. While this is helpful for individuals who have problems with the keyboard, it can be annoying if you find yourself constantly using the Shift, Control, or ALT keys. As you keep pressing them, an increasingly irritating pop-up window opens. See below for instructions on disabling Sticky keys.
- Access the Settings programme by clicking the Start menu’s gear icon.
- You may access the app’s search bar by tapping the corresponding icon on the left side of the Settings screen. Select Sticky Keys from the list of alternatives that appears as you type.
- Accessibility information for Sticky Keys will load in a new tab or window.
- Turn off Sticky Keys via the keyboard shortcut by toggling the corresponding switch.
- When turned off, the Stick Keys warning will no longer appear after repeatedly pressing Shift, Control, or Alt.
21. Modify the Color Scheme of the Command Prompt

The Command Prompt’s default colour design is a simple black background with white lettering. However, improvements can be made to resemble the types of attempts a hacker makes in the movies to break into a computer system.
Check the steps below:
- To access the Command Prompt, click the Start button and enter its name into the search bar.
- Go ahead and launch it in administrative mode.
- A right-click on the program’s title bar will open its contextual options menu.
- Select Colors from the drop-down menu of Properties.
- In this section, you can customise the look of the pop-up window’s text and backdrop to match the overall theme of your screen.
- When satisfied with the chosen colour scheme, click the OK button.
- As soon as you make a modification, you’ll see it mirrored on the screen.
22. Convert Your Display Into A Wireless Monitor
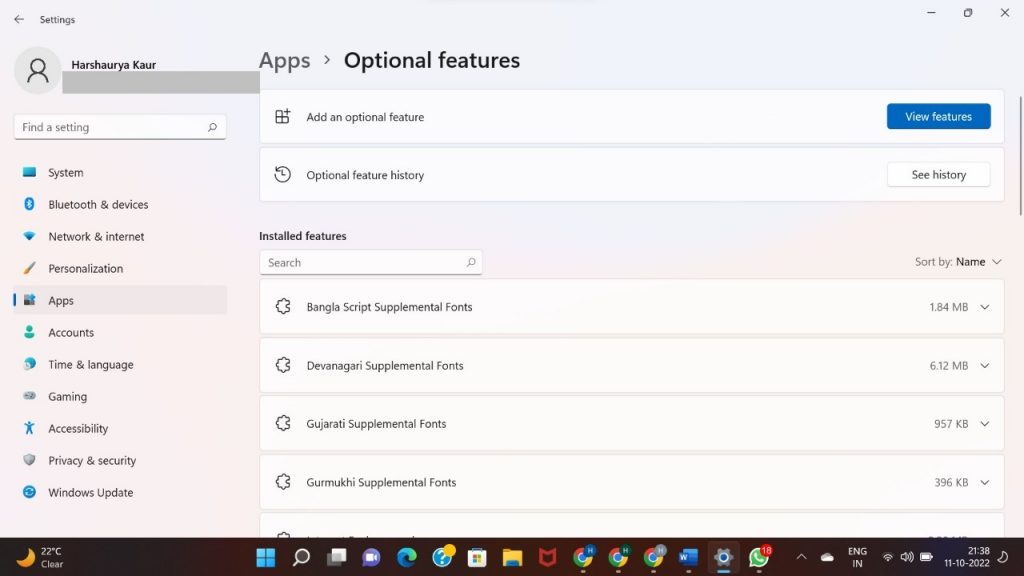
While Windows 11 comes preloaded with a lot of useful features, you can choose to add or remove some of them if you don’t find them useful. By default, you can’t utilise your computer’s display as a wireless monitor. If that is how you intend to utilise it, then follow these instructions.
- Initiate a hunt for “Optional Features” under the Settings app’s search box. When you see it listed in the recommendations, click on it.
- Now that you’ve opened the tab labelled “Optional Features,” you can examine each and every add-on that was downloaded and set up.
- Click the View Features button if there are none to see if there are any hidden ones.
- Simply installing Wireless Display requires you to search for it and tick a box.
- You will be asked to restart the computer after the installation finishes.
23. Turn Off/On Startup Programs
Have you ever wondered why Windows took so long to load on your computer, while so many other programmes launched instantly? Okay, you can stop Windows from starting any programmes that you don’t require right now. Here’s the procedure.
- Right-click the “Start” button that appears when you do this.
- Your computer should now show you a context menu.
- The Task Manager option will appear on the menu.
- To view a list of programmes that begin running when Windows boots, click the Startup tab.
- Right-click the apps you don’t want to run and choose “Disable” from the menu that appears.
- Any software that you’d like to run automatically on boot can be enabled in the same way.
24. Turn on Spell Checker and Keyboard Hints
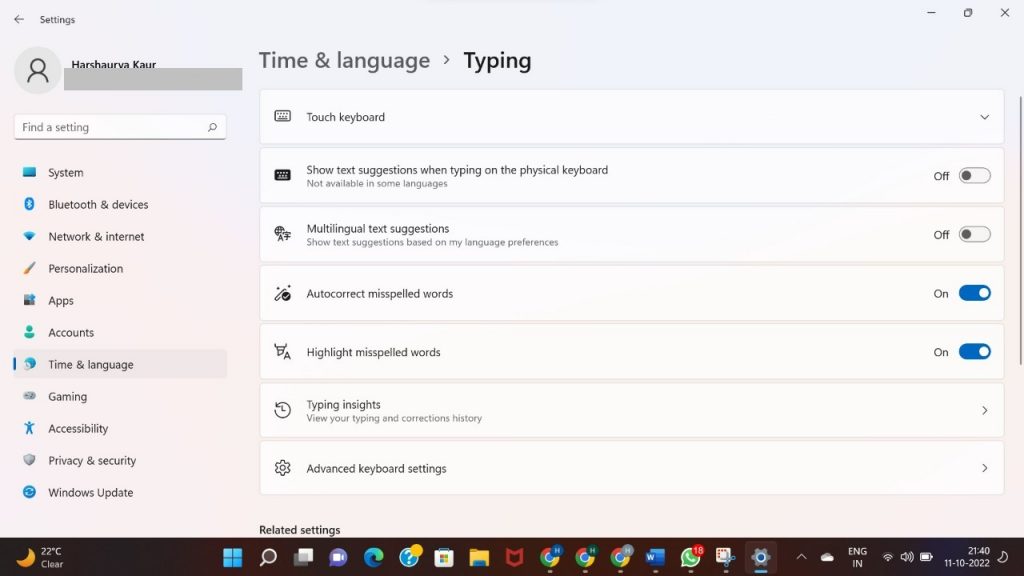
Auto-correction, spelling recommendations, and similar functions are available on Windows PCs, just like they are on mobile devices. You can utilise this function with either your own keyboard or the on-screen keyboard.
- The Time and Language options may be found on the left sidebar of the Settings app. Now select Typing on the menu bar on the right.
- Toggle switches can be set to “On” to activate features like “Highlight misspelt words,” “Autocorrect misspelt words,” and “Suggestions.”
- After some time of utilising this tool, you can look back at your progress in the Typing Insights section.
- Turn on Typing Insights to view a summary of how Windows’ auto correct and suggestions have aided you in writing.
25. Authorize and Modify real-time subtitles
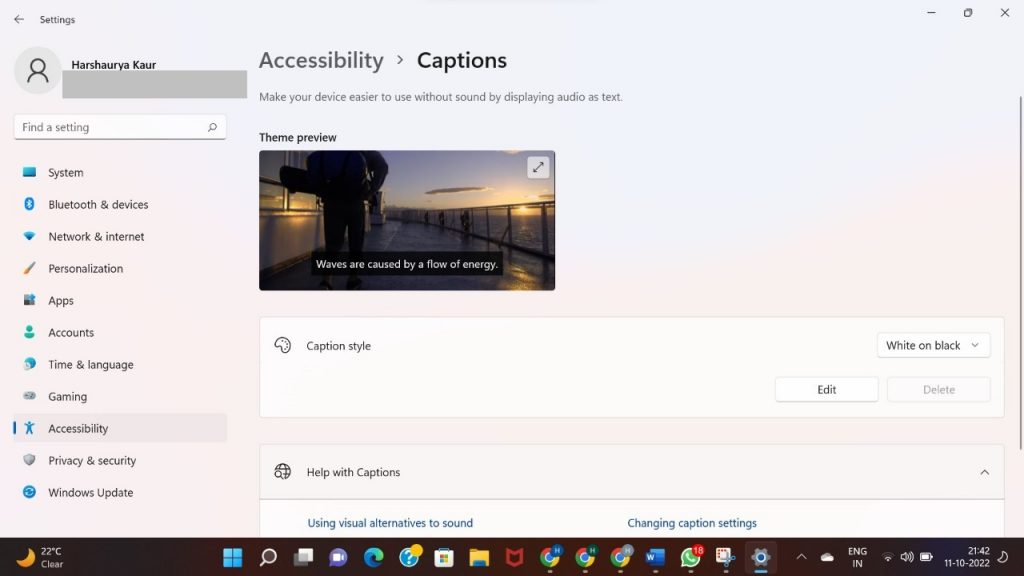
Windows previously included functionality for reading Closed Captions embedded in video files. Live Captions are a new feature included in Windows 11. This implies that videos can now have subtitles added in real time. Considering how many people rely heavily on closed captions and subtitles, you’ll likely agree that this is an essential feature. We’ll go over how to switch them on and make a few adjustments.
- To enable captions, use the Settings app and navigate to the Accessibility submenu.
- To enable Live Captions, click the On button.
- It will also require certain package downloads. To begin, select the Save option.
- The Caption style can be changed by selecting one of the readily available alternatives.
- Currently, Live Captioning only functions on devices where the language is set to US English.
26. Modify Privacy Preferences
Everyone is wary of having their online movements tracked by businesses looking to cash in on valuable user data in today’s always-on, always-connected environment. That’s true, and the same holds true for Windows 11’s privacy features. However, some parameters need to be adjusted immediately.
- Open the Settings menu to access your device’s privacy and general settings. In the new window, choose the General tab.
- The Advertising ID, Display Suggestions, Show Locally Relevant Content, and App Usage Tracking choices may all be found here.
- Simply turn all the switches to the “Off” position.
27. File Manager Extensions
The File Manager provides a convenient location to access all of your local and networked files. The file extensions will be shown in Details View by default when using the File Manager. In any case, you can easily enable it if you wish to view the file type alongside the file name.
- You can access the system’s file management interface by pressing the Windows key plus the letter E.
- You should now select the horizontal three-dot menu in the Menu bar.
- When you right-click a folder, the Options item in the context menu will take you to the Folder Options dialogue.
- Navigate to Hide Extensions for Known File Types by clicking the View tab and scrolling down a little.
- Remove the checkmark from the box, then click the Apply and OK buttons.
- Afterwards, the name of the file will include the extension.
28. Enable File/Folder Checkboxes
It is a great Windows 11 tip. The standard method for selecting multiple files or a folder is to hold down the Control key while clicking the mouse in a single direction (left in this case). Use checkboxes instead of clicking through directories and files to make your selections. Follow these steps to activate the checkbox options.
- To access the File Manager’s other features, press the menu button’s three dots.
- The Folder Properties window can be accessed via the Options menu.
- Go to the View menu and scroll down until you see the Use Checkboxes to select items option.
- Use the Apply and OK buttons to activate the checkboxes on your files and folders.
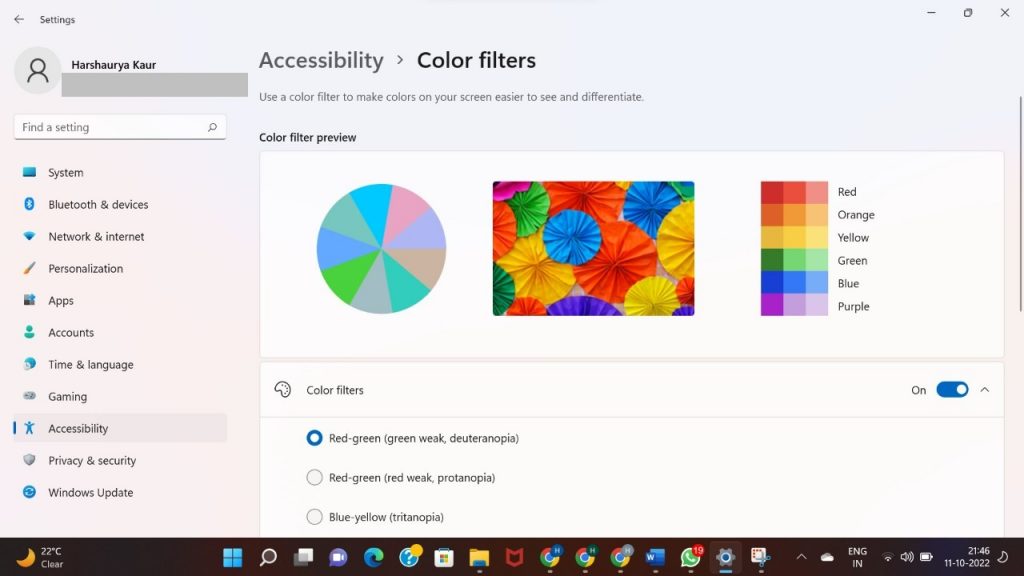
29. Change the Color Scheme.
This is a fantastic addition for folks who are colour blind, have vision impairments, or have trouble distinguishing between colours. When this filter is used, people easily distinguish between hues. That’s a terrific function, so tell your friends with vision problems about it. To activate Color Filters on Windows 11, follow these steps.
- Simply open the Settings menu and tap “Accessibility” to access the feature.
- Go ahead and select Color Filters from the Videos menu.
- To improve your colour perception, turn on Color Filters and select the filter that works best for you.
30. Use the Numeric Keypad to Manage the Mouse

Outside of touchscreen devices, the mouse is an indispensable input tool. What would you do if, for some reason, neither the touchpad nor the external mouse would function? This may cause you some discomfort. If inspiration fails to strike, you may always use the Numeric keypad to guide your mouse. It’s weird, for sure, but there are times when it comes in handy. Here are the steps you need to do to make the Numpad act as a mouse.
- Go to the Settings menu and select the Ease of Access tab.
- Then, select Make the Mouse Easier to Use from the Ease of Access Center.
- You’ll need to scroll down a little to access the option to utilise the keyboard to manage your mouse.
- After checking the box, you can move the mouse with the Numpad.
31. Make use of Power Modes
You may adjust your PC’s power consumption and performance in Windows 11’s Power Modes to suit your needs. The battery saving, balanced mode, and performance options are all up for grabs.
- Power and Battery can be accessed from the Settings menu.
- The Power Mode menu item should now be visible.
- Choose the appropriate option.
32. Get Rid of Your Cache!

You should remove the cache files when you need more storage space or when you realise that your programme still isn’t functioning properly after the most recent update. In Windows, clearing the cache can be done in these ways.
- Simply hit the Windows and R keys simultaneously to bring up the Run dialogue.
- After typing Prefetch, Temp, or %temp%, you can now use the enter key.
- The folder containing your system’s cache and temporary files will open.
- Delete everything inside it by selecting it all and pressing the delete key.
- Make two more copies using the other suggested folder names.
33. Put Windows Updates on Hold
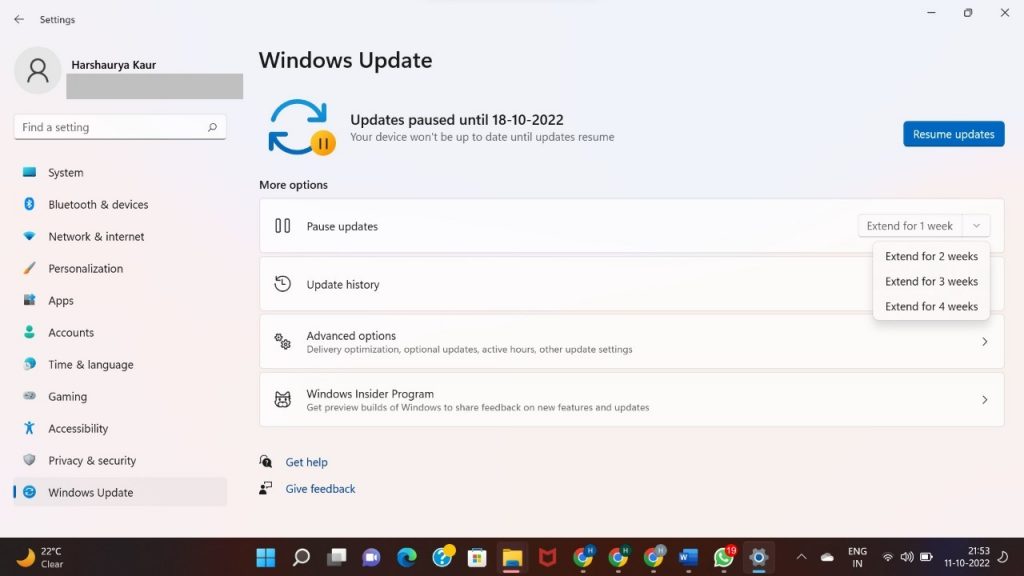
While most Windows Updates are beneficial because they address known issues and include new features, there are times when an update is the cause of more problems than it fixes. If you learn that a new update is causing problems, you should probably not install it. You can delay the updates for up to a week if you want to play it safe. Let me explain.
- To access Windows Update, launch the Settings menu.
- You should now be able to halt further updates by clicking the corresponding button.
- You can take a week off by clicking the Pause button.
- The updates will resume in seven days. You can hold update downloads for another week by selecting “Pause Updates.”
34. Set up camera protection
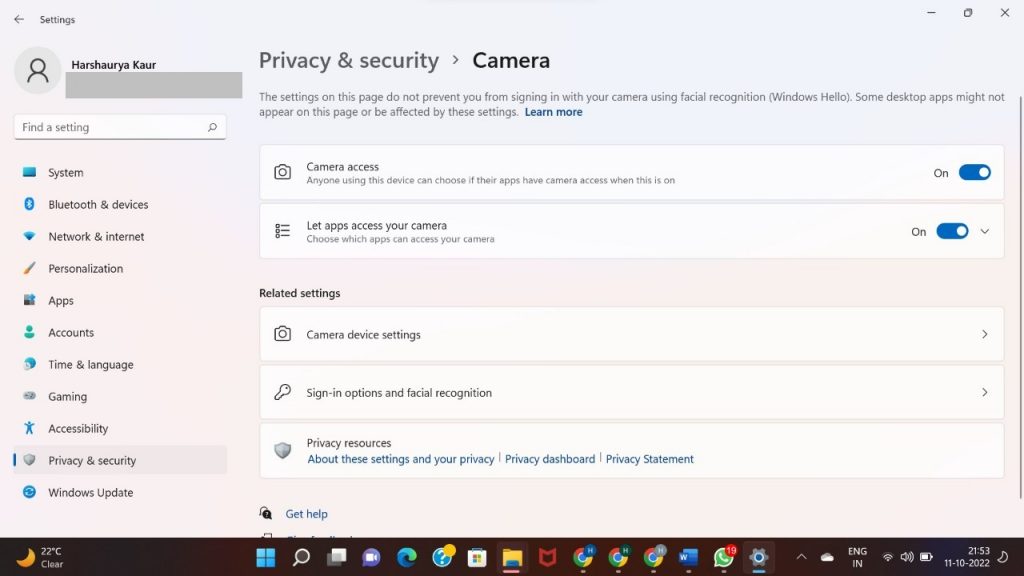
Safety sliders that obscure the camera lens are now standard on many gadgets, notably laptops. This helps prevent hackers from accessing your camera for spying purposes. However, if your smartphone doesn’t have a removable camera, you should enable these settings. OK, here’s yet more Windows hints we can check into.
- Select Privacy and Security in the Settings menu. To enable the camera, go to Settings > App Permissions.
- You’ll have the option to turn the camera on or off at any time.
- If the switch is turned on, you’ll be able to decide which apps are allowed access to your camera and which aren’t.
- Checking the recent activity can also reveal whether or not an app has used your camera lately.
35. Restore the original right-click options
In Windows 11, the right-click menu has been revamped to be more user-friendly, with shortcuts for frequently used tasks like copying, pasting, and renaming files placed front and centre. However, advanced users may wish to think about a new shortcut to access the classic right-click menu that is now buried in Show more options. Select an item as usual for the traditional right-click menu and then press Shift+F10 on your keyboard.
36. Make the touch keyboard seem different.
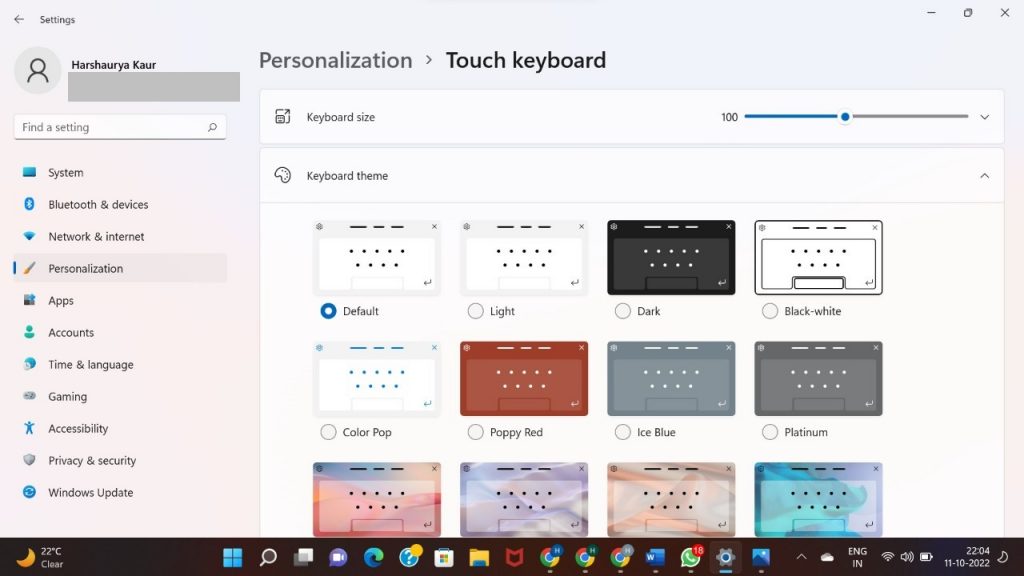
The Surface Pro 8 will benefit greatly from the enhancements made to Windows 11 that make the operating system more touch-friendly. Among these modifications is a newfound control over the touch keyboard’s layout. You’re not restricted to the system-issued white or black keyboard; instead, you can alter its appearance and layout to suit your needs.
- Select the Touch Keyboard setting by pressing the Windows Key + I combination on your keyboard, then clicking Personalization.
- Alternative layouts and keypads are available for selection.
- In addition to the sixteen predefined themes, you can make your own, modify the key sizes, and much more.
37. Pointer Position
Finding the current mouse pointer position is the next Windows 11 hidden feature to be revealed. Sometimes it’s just not possible to make out the location of the mouse pointer if you’re using the default one. Particularly if you’re using a white application or a large screen background. It’s inefficient to jiggle the mouse about until you find the cursor aimlessly. However, there is a method available for determining the present position of the mouse cursor.
- It’s as simple as opening the Settings menu and looking for Mouse in the top right corner.
- To modify your mouse’s settings, select the appropriate link.
- Choose the Pointer Options tab in the Mouse Properties.
- If you scroll to the very bottom, you’ll see a button labelled When I press CTRL, the cursor will move to the position I specify.
- Choose the box, then hold down the CTRL key. The location of the cursor is clearly visible.
38. Turn off Windows Updates and Stop Downloads
This Windows update thing has become a nuisance for everyone. Everything from introducing new problems to installing updates in the middle of your task. You can stop users from automatically downloading upgrades by designating your network as metered. While connected to a metered network, your computer will not receive system updates or app updates from the Microsoft Store. To make your internet connection a metered one, please follow these instructions.
- Make use of the Taskbar’s contextual menu by clicking on its quick-access icon.
- If your device is already connected to a WiFi network, you can proceed by clicking on the WiFi icon’s right side.
- The currently connected network and a list of others will be shown.
- Select “Properties” from the right-click menu when you click on the linked network.
- The Network Properties dialogue box will open.
- To enable metered connections, just flip the switch.
39. Set the mode to “Developer”
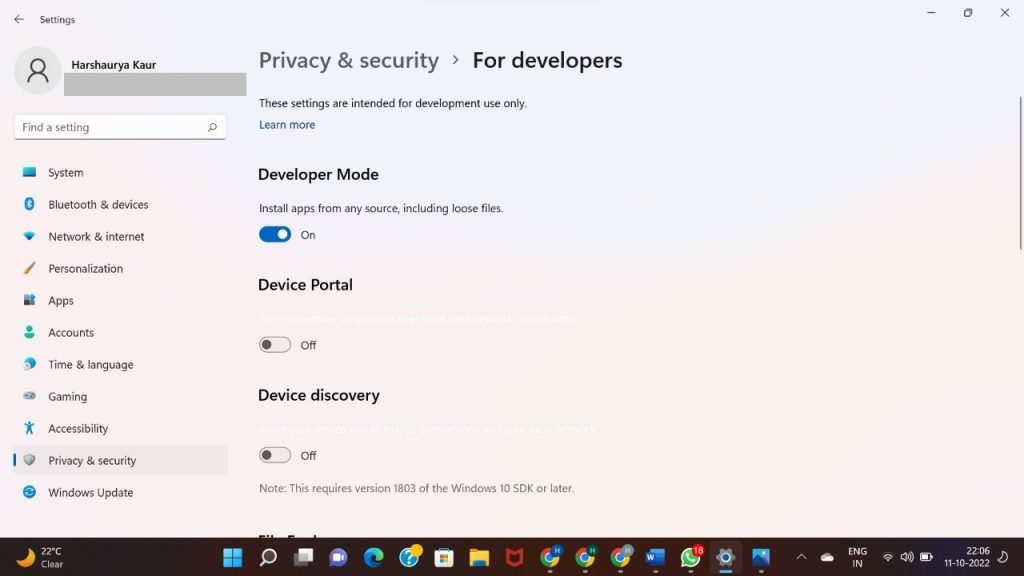
Online software and Microsoft Store apps are both accessible to you on your Windows PC. So, what would happen if you tried downloading an app from somewhere other than the official app store? Microsoft, thankfully, has you covered. To do this, you need to switch on the developer mode, which will let unofficial apps be installed.
- To access the Privacy and Security menu, launch the Settings app.
- To access the developer tools, go to the Security menu at the top and select For Developers.
- Toggle the switch for Developer Mode to “ON.” A prompt will appear, asking if you want to activate it. Check the box that says “Yes.”
- The same screen also lets you select Console Host or Windows Terminal as your default terminal app.
40. Restore the Start menu’s folder system

The inability to pin folders to the Start Menu is another major issue for many users who switched to Windows 11 from Windows 10. However, there is a built-in option in Windows 11 that allows folders to be displayed next to the power button on the Start Menu, however this option is limited to system folders.
- If you want to see the system folders on the Start Menu, you may press the Windows Key + I and select the Settings option.
- Then, click Start, followed by Folders. Once you’ve done that, you may toggle the visibility of the system folders you care about accessing from the Start menu.
Options include:
- The Control Panel.
- The File Explorer.
- The Documents folder.
- The Downloads folder.
- The Media folder.
- The Network folder.
- The Personal Documents folder.
41. Change Windows Update Preferences
For the updates to not start installing in the middle of your current task, you’ll need to tweak a few more settings. If you change these settings, you won’t have to worry as much about updates popping up in the middle of your work.
- Open Windows Update by launching the Settings utility.
- Pick the “Advanced” menu item now.
- Verify that the Get me up to date toggle has been set to the off position.
- The Active Hours time is the second setting that has to be modified.
- The times of operation are displayed automatically. To make alterations, select “Manual” from the drop-down menu.
- If you tell Windows when you’re busy, it won’t update while you’re working.
42. Methods for Taking Screenshots.
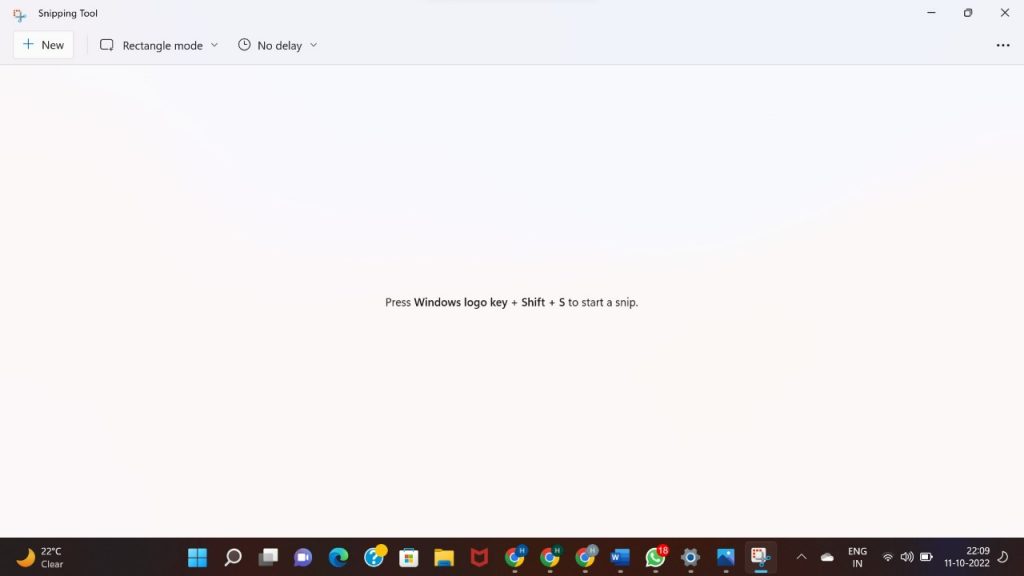
The new Windows 11 operating system makes it a breeze to capture screenshots. Taking screenshots can be done in a variety of different ways. Whether you choose to use the tried-and-true PrintScreen button or the Function/Windows key combination, you can do so. Snipping Tool is a helpful feature introduced in Windows 11. This new feature will replace Windows 10’s previous Snip and Stitch option. The Snipping Tool is available via the Start menu.
43. Make your sound better
Windows 11 enhances audio quality while using either speakers or headphones. To adjust the volume, right-click the taskbar icon. Select the arrow to the right of your active audio device to enable the enhancement of your audio, then scroll down to the Enhance audio toggle and flip it to the On position.
44. Brand-new shortcut keys!
In Windows 11, you’ll find a brand-new set of shortcut keys, just like in Windows 10. They can be used to help you get through your day more quickly. Widgets, the chat app, speed dials, the notification hub, the layouts you create with Snap, and more all fall under this category.
45. Shaking Title Bar Windows

Title bar window shake is another neat feature introduced in Windows 11. To close all other windows except the one you’re currently working in, you can activate this feature and give your device a shake.
Allow window title bars to shake:
- Open Multitasking by navigating to Settings > System > Multitasking.
- Next, turn on Title bar window shake by toggling its switch.
- To try it out, open many windows, press and hold the title bar of one of them, and shake the device gently to reduce the size of all but one of them.
- You have to give it a light shake to replace the minimised windows.
46. Declutter Storage
Storage Sense is an excellent utility for clearing out the Recycle Bin of forgotten files, outdated software, cache, and other junk you’ve accumulated over time. Even better, you can have it routinely clean your closet.
- Locate Storage Sense in the Settings menu.
- When you first launch Storage Sense, you’ll find a toggle that allows you to turn the feature on.
- In addition, you can select the Downloads folder for deletion manually or automatically by clicking the button. The file is removed from the recycle bin when the timer goes off.
47. Convenient Access to Preferences
Windows + I is one of the most helpful keyboard keys in Windows 11, and it’s worth learning if you find yourself adjusting settings often. The Settings menu can be accessed with this shortcut.
48. Set privacy options
Everyone is wary of having their online movements tracked by businesses looking to cash in on valuable user data in today’s always-on, always-connected environment. That’s true, and the same holds true for Windows 11’s privacy features. However, some parameters need to be adjusted immediately.
- Open the Settings menu to access your device’s privacy and general settings. In the new window, choose the General tab.
- The Advertising ID, Display Suggestions, Show Locally Relevant Content, and App Usage Tracking choices may all be found here.
- Simply turn all the switches to the “Off” position.
49. Enable File and Folder Checkboxes
It is a great Windows 11 tip. The standard method for selecting multiple files or a folder is to hold down the Control key while clicking the mouse in a single direction (left in this case). Use checkboxes instead of clicking through directories and files to make your selections. Follow these steps to activate the checkbox options.
- To access the File Manager’s other features, press the menu button’s three dots.
- The Folder Properties window can be accessed via the Options menu.
- Go to the View menu and scroll down until you see the Use Checkboxes to select items option.
- Use the Apply and OK buttons to activate the checkboxes on your files and folders.
50. Turn off visual effects
If you don’t like Windows’ built-in visual effects and animations, there is a way to disable them. You’ll find that your OS’s menus and other elements respond more quickly once you disable these animations, as the delay caused by them is no longer there. To stop these transitions from playing, do as follows.
- Launch the device’s settings menu and navigate to the Accessibility option.
- Select the Visual Effects menu item now.
- You have the option of turning off both the Transparency and Animation Effects.
- After disabling both options, you’ll see that your computer’s windows and menus load much more quickly.
Closing Remarks
This concludes our list of essential Windows hints and hacks. No doubt, following these hints and tricks will enhance your time spent in Windows. Comment below if you have any more suggestions for useful Windows hints and hacks.


