


 Header Through Cloudflare")


Run Hyper-V Virtual Machines
While running virtual machines with Hyper-V is straightforward, selecting a specific VM to start automatically at startup is not as straightforward. In both corporate and personal computer contexts, having a VM launch independently and/or in sequence with other hosts might be crucial.
By default, when the host computer shuts down, Hyper-V keeps track of which VMs were running at the time of shutdown and attempts to restart them immediately upon restarting the host computer.
Hyper-V Automatic Start Action
If you’re editing a virtual machine’s settings, navigate to Automatic Start Action. This enables you to configure the behaviour of a virtual machine when its host boots up. There are three possibilities:
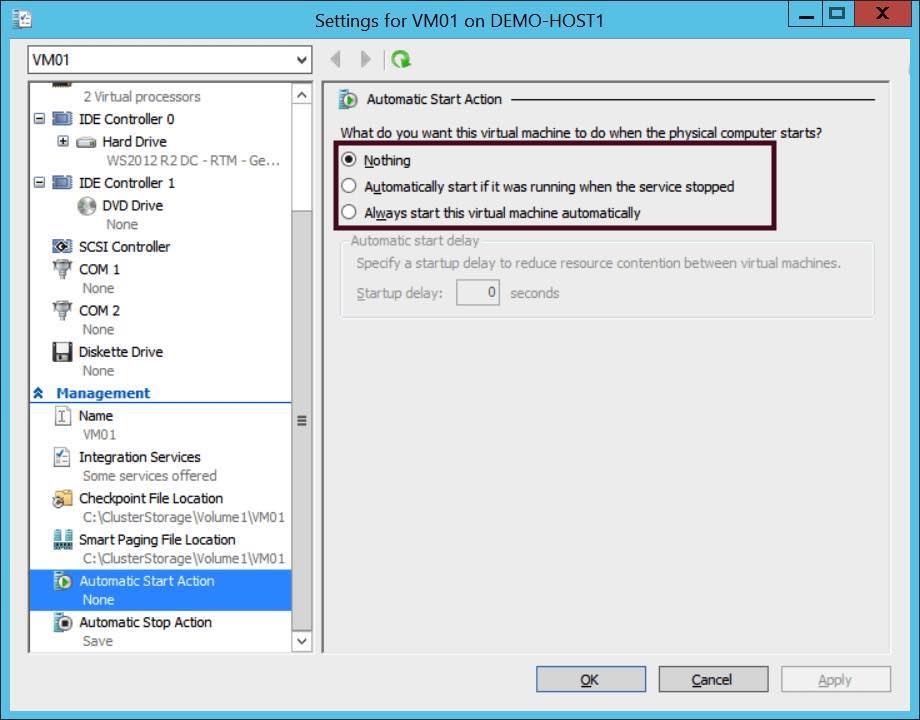
- Nothing: After the host boots up, the virtual machine will remain offline.
- Automatically Start If It Was Running When The Service Stopped: This is a valuable feature in a test lab. When the host shuts down, you may have a mixture of virtual machines that are either running or halted. If this option is chosen and the virtual machine was running when the host was shutdown, Hyper-V will immediately restart the virtual machine.
- Always Start This Virtual Machine Automatically: This is the default setting for production virtual machines. You wish to reduce downtime by starting the virtual machine when Hyper-V starts. Nota bene, there is a sub-option to delay the commencement of this process by X seconds. This enables you to manage resource contention (mostly storage bandwidth) and to schedule the startup of virtual machines (for example, start the domain controller, then SQL, application server, and then web server).
Also read:How To Change Microsoft Edge Kiosk Settings In Windows 11
Getting to know the Startup Delay option
To Run Hyper-V Virtual Machines, The Startup Delay feature is very beneficial in virtual environments comprised of numerous virtual machines and/or host machines. The two most frequently cited reasons for utilising the startup delay are as follows:
1. Starting System Components in Right Sequence
Starting VMs and controllers in proper sequence requires proper scheduling, which you may alter via the startup delay option. Although the aforementioned “always start this virtual machine” feature will handle the launch, if the startup delays amongst VMs/controllers are not varied, they will all launch at the same time. Naturally, if the Root domain controller is not launched prior to the Child domain controller, the latter will fail to function.
2. System Resource Conservation During Starting
Another reason a less sophisticated user would use the startup delay is to prevent Hyper-V Manager and virtual machines from using RAM and processing power during the initial startup phase. This enables other startup programmes to run more quickly, as they will have access to additional system resources. For instance, you may wish to ensure that your anti-malware and media apps are operating prior to starting the VM. Delaying the VM’s startup until all other programmes are on load often requires a 30-60 second delay period, but you may determine an exact value by timing how long it takes for all of your other programmes to start at startup.
Also Read:Can’t Download Files In Microsoft Edge? Try These Fixes
Hyper-V automatically stops itself.
If you merely turn off the power to a host or it crashes, the virtual machines will simply cease to operate as if you had also turned off the power to them. As a result, you should always attempt to gracefully terminate your hosts to Run Hyper-V Virtual Machines.
By modifying the Automatic Stop Action choices in the properties of each virtual machine, you may arrange your virtual machines to respond to this action. Three choices are listed below that Hyper-V will execute on a per-virtual-machine basis prior to shutting down the host:
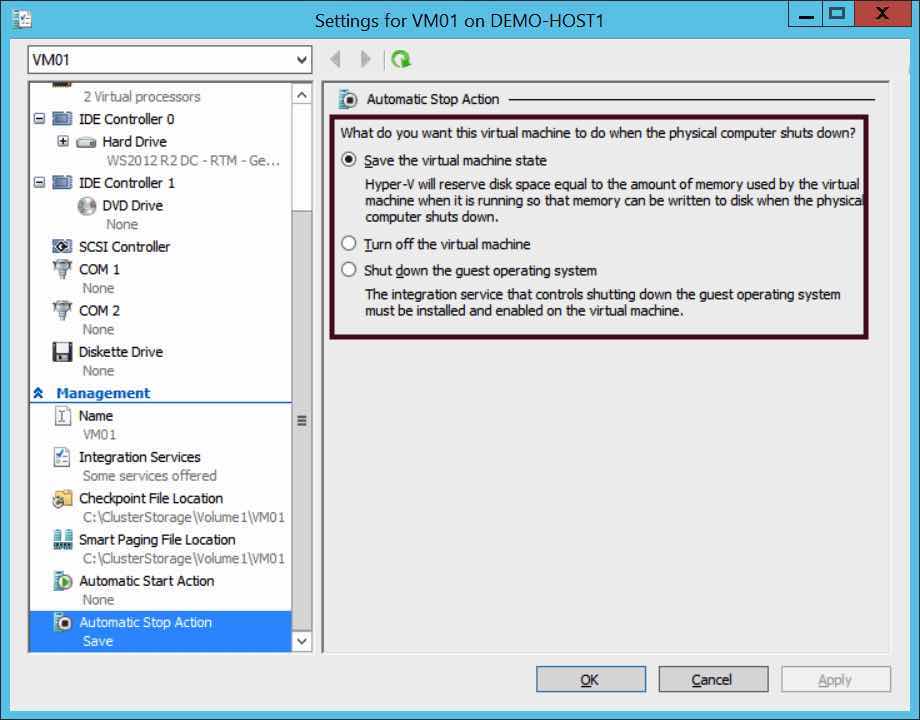
1. Save The Virtual Machine State:
This option enables you to minimize virtual machine downtime. The virtual machine is frozen in time, with the memory and processor stack being written out to a file stored alongside the virtual machine. After the writing operation is complete, the virtual machine terminates. When the virtual machine boots, it reads in that file and immediately begins executing, “magically” continuing as if nothing had happened. The guest OS doesn’t require to boot, services are not required to initialize, and caches do not require to repopulate; everything within the virtual machine continues as it was before the virtual machine was on halt.
2. Turn Off The Virtual Machine:
Selecting this option terminates the virtual machine. There is no state information record. If/when the virtual machine is restarted, the guest OS will behave as if it had lost power. You’ll utilize this option on chosen virtual machines. If you’re not concerned with the virtual machine’s state and require a faster host shutdown.
3. Shut Down the Guest Operating System :
When the virtual machine’s guest OS is shut down gracefully, the host OS is also shut down. There is no state preservation. The disadvantage is that when the host restarts, the guest OS and its services will need some time to start. If you choose this option, you should consider delaying and ordering the startup of virtual machines.
There is a caveat to the choice to save the state of a virtual machine. If you have virtual machines with a combined memory of 250 GB. Hyper-V will need to write up to (about) 250 GB of RAM to disc to save their states. You must budget for an additional 250 GB of disc space above and beyond the regular storage requirements of virtual machines. Additionally, you should be aware that Hyper-V creates a.BIN file for each virtual machine to ensure that this space is available. As a result, the 250 GB is spent even while the virtual computer is running.
Conclusion
We learned about the various options available with “Automatic Start Actions” and “Automatic Stop Actions” for each virtual machine running on Hyper-V in this post. We showed how these options facilitate the execution of various IT scenarios within a virtual environment. Additionally, we learn about the logic used by Hyper-V Virtual Machine Management Service (VMMS.exe). To initialize and start virtual machines configured with the “Automatic Start Actions” option.


